How to do Decorative Soldering Dots
Here’s a brand new way of creating decorative soldering dots. It’s neat, its foolproof and it’s quick. You can’t argue with that. It was suggested and demonstrated by Georgia Hamilton. A big hands together for Georgia.
Gather all the tools together and start creating your own decorative soldering dots:
Get Started
Create the decorative soldering dots patterns
Get Dot Soldering!
Once you’ve got the hang of this technique you can move on to the more difficult ‘drippy soldering’ method. It’s beautiful and really adds something different to your work. You can read about this decorative soldering technique here.
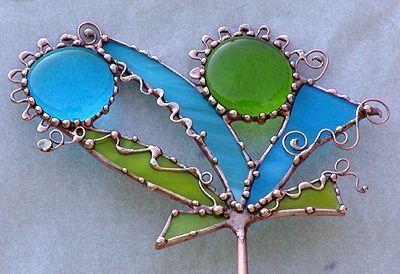
Balancing Act by Dianne McGhee
 |
 |
How do you achieve the tiny soldered “dots” on some of the copper foiled glass jewelry i’ve seen? i use a weller 100 with a 1/8″ tip for my pieces. is there a special tiny tip for that? or should i be able to achieve that using that tip?
Milly’s reply:
Thanks for your question Cheryl.
The tiny solder balls that you’re referring to are the result of a technique called ‘decorative soldering’.
Before I talk about the technique, your 100W, small tipped iron is perfect, especially if you want to do delicate jewellery. If you wanted to do do some larger decorative soldering you might find you need a slightly larger tip, but if you’re sticking to jewellery, you’re in luck 🙂
It’s the solder that you might need to buy. If you’re using 60/40 tin/lead, you might be better off buying some 63/37. This special solder sets up quickly which is great news for decorative soldering and TRYING to achieve lumps!
I explain in my video about the solder and iron tips. It shows you how to transform the edges of your sun catchers with ‘drips’ (see image above). It looks fabulous and really adds a layer of artistry to your work!!!
More information about the decorative soldering video here
Decorative soldering
– First make sure your tip is nice and clean. Re-tin it if it’s very dirty, or simply wipe it on a damp sponge to get rid of any surface dirt
– Flux the seams
– Solder all the seams first with 60/40 solder. It’s easier to do decorative soldering on top of already soldered seams. This doesn’t have to be beaded seams, they can just be tinned (covered with a flat layer of solder) if you prefer – like the image above
– Now simply melt a small ball of 63/37 solder over one of the seams until it forms a little ball. Touch the seam so that the ball sticks to the solder seam
– Continue along, making the balls as close or far apart as you like. If you want bigger dots, you just hold the solder on the iron tip for longer.
That’s all there is to it! Once you’ve got the hang of this, you’ll find lots of other ways of decorating your jewellery with solder.
It’s a great way to spice up soldering and add excitement to your work. Good luck, and come back with some photos!
Comments for Decorative Soldering Dots
Decorative Soldering Dots – NancyP
Thank you so much for the information both in the article and the comments. I’ve wanted to do this for so long but didn’t know what solder to use. You have made me really happy.
You’re welcome Nancy, good luck with the decorative soldering, Milly
Decorative soldering – Cheryl
I have always heard that for safety reasons, a lead free solder works best for jewellery.
Should the leaded jewellery be that close to the skin?
Hi Cheryl, yes, I’d use lead free solder for anything that is in contact with skin.
How to do the balls with lead-free solder – Kate
I am using a lead-free solder (97% tin and 3% copper) as I make jewellery. I am struggling to make the balls though – I am using a small cone-shaped tip. It is clean and even when I turn the heat up the solder doesn’t want to make a ball! I simply can’t get it to the stage where a drop would form. Any advice? Thanks.
Hi Kate, I can’t help you with this as I’ve not used lead-free solder for decorative soldering.
Anyone else out there?
wire gauge
What gauge wire did you use for all the curly q’s? I love this piece!
Milly’s reply:
I could lie and say I made this, but I didn’t! It’s called Balancing Act and it’s by Dianne McGhee.
Whenever I’ve used wire to decorate my panels, I’ve used between 14 and 20, with 20 being the thinnest. 16 is the one I like using best and the one I’ve found to be most useful.
Don’t forget to tin and straighten it first.
Feel free to share this tutorial with Facebook and Pinterest – the more decorative soldering dots in the world, the better 🙂
If you have any more ideas about decorative soldering, add your comments at the bottom of the page; we’d all love to hear them. Thanks.
Go here for another decorative soldering technique
Hi. Im new at this and have a question for you. Do you have to use patina after soldering an item. Im making Christmas decorations and would like to keep them silver.
Oooh great, your first stained glass Xmas decorations! No, you don’t have to use patina. You can polish and leave it silver. I think the silver is very festive so might be a good choice for you here.
Welcome to stained glass!
Great tips…Do keep them coming… Thanks…Tony…from Florida
You’re most welcome Tony from Florida, thanks 🙂
Thankyou so much for sharing, looks an amazing technique, I must try this, Ive learned so much from all Your hints and tips, I know practice makes perfect but I’m far from that yet but gaining more confidence all the time through practicing
That’s great to hear Hazel. As you say, keep at it and you’ll make steady progress. Thanks for your kind words, I’m glad my newsletter and website help.
Why did I never think of this – – it’s fantastic!! I need to get out of the box more often.
I love seeing what other people have “discovered”.
PS I have an assortment of tiny black beads that I superglue on to any little birds I do if they need eyes. Last action before completion.
Erin
Get decorating Erin! I hope you get on with the technique and it adds a ‘little something’ to your glass work.
Hi Milly
I just want to let you know that we purchased the decorative soldering video, which was very reasonably priced $3.99 US converted to AU was only $5.99.
we can only say that we are amazed and grateful to have this informative lesson on decorative soldering. you are our hero. we love getting your emails and look forward to them in the inbox. we can’t wait to share the knowledge with our colleagues at out lead lighting group each Thursday.
thank you, thank you and thank you
Cheryl and Trevor Fielding
Toowoomba Qld Australia
Aw, that made my day when I woke up to your message Cheryl. Thanks so much. I love thinking about all these people making stained glass all over the world… makes me happy 🙂
Hi, what is the tape its 3m but which type ?
It’s blue painting tape.
Thanks for your question Paul.
The tape idea is, without a doubt, one of the best tips I have ever seen! Thank you for sharing it.
Kudos to Georgia for sharing it with me. I’ll let her know that she’s the best 🙂
Outstanding tips and I thank you very much‼️
All thanks to Georgia for the tape one 🙂 I appreciate you taking the time to comment.
Milly, after quite a few years of doing stained glass projects for family and everyone else who’s asked me, I’ve now declared the next project to be one just for me! The decorative soldering examples you’ve given here are just the awesome and a way to practice them on my ‘own’ panel! I’m excited to try this. Thank you so much, Sandi
Hoorah to projects just for ourselves! I hope it adds that special touch that a panel for oneself deserves.
Thanks for sharing this, Milly.
I would like to put “blobs” of solder on my glass. Have you ever punched out a dot of foil and stuck it on the glass and then dripped solder onto the foil? Do you think the solder dot will stay in place during cleaning, patina and waxing?
If it works, it will make a nice tiny bird’s eye with materials I already own.
Guess what I will be doing this afternoon?!
A dot on its own is very vulnerable and will likely come off in the cleaning process. If you add glue into the equation it will work. Just solder the dot and put a dab of glue on the back.
How did the tape dots go? I’m assuming that’s what you did yesterday afternoon 🙂