How To Etch Instructions
What is Glass Etching?
Glass etching with acid is a process by which a resist is applied to glass before it is dipped into hydrofluoric acid.
Once in the acid, the coloured surface that is not covered with resist is etched away, lightening or changing its’ colour. The surface underneath the resist remains shiny and untouched.
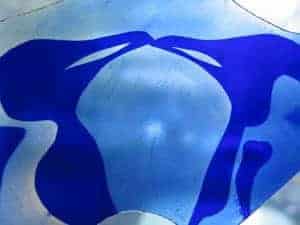
In the photo below, the glass started off all dark blue. A resist – in this instance contact paper – was cut out in the shape of penguins and stuck on before immersing the glass in acid.

!!!Health and Safety -This is an extremely dangerous technique so safety is extremely important. Never, ever attempt this away from a properly equipped studio with a specialised ventilation cabinet. Go here for the health and safety hazards associated with this etching process.!!!
What etching supplies do you need?
- Glass (flashed or streaky if colour differentiation wanted)
- Adhesive vinyl paper
- Resist (wax, fablon or bitumen)
- Craft knife
- Hydrofluoric acid – diluted 3:1
- Dibbler or feather
- Apron
- Latex and rubber gloves
You can also buy etching kits that use paste and contain many of the materials you need already included. The best value etching kit is definitely the Armour Deluxe Glass Etching Kit (affiliate link from Amazon.)
This is not the same process but can be done at home safely.
Identifying flashed (coloured) side
When using seedy glass, the bubbles will be coloured on the flashed side and clear on the white side.
If there are no bubbles you can cut a small triangle off the edge of the sheet glass and visually identify which side the layer of colour (flash) is on.
Mark the flashed side to prevent etching on the wrong side.
Masking up
– Put adhesive vinyl on the back of the glass to protect the reverse side from the acid.
– Cut a piece of vinyl slightly larger than the glass, take the backing off and place the glass on top of it.
– Squeeze out any bubbles and finally cut around the edges with a craft knife.
Stopping out – resists
Resists are put on the glass and left to dry before immersing in diluted hydrofluoric acid.
Put resist on where you want colour to remain.
Choose the resist/s to suit the effect you want to create. Here’s a list of the types of effects you can achieve with the different resists.
– Fablon or Adhesive Vinyl – creates very sharp shapes. Very precise and linear.
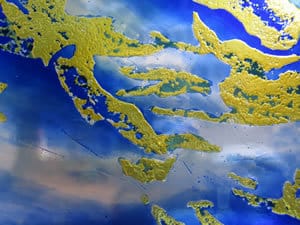
– Bitumen – creates very painterly effects. Can be sponged, stippled or painted on. Can be scratched into just before drying.
Can be used as a silkscreen resist and for ‘marbling’. This is done by floating the bitumen on water and, before it hardens, placing the glass on top of the random pattern.
– Wax – creates softer, freer lines. Wax allows the acid to creep under edges during etching, giving a softer etch than bitumen.
Can be scratched into.
Wax dries on contact with the glass, so you need to work quickly to avoid blobby messes!
To give yourself more time, you can warm the artglass slightly on a lightbox before applying the wax.
Best wax mixture = one-third beeswax, one-third tallow and one-third paraffin wax.
This mix allows smoother application of wax and melts at a low temperature.
– Melt the wax in a thermostatically controlled container, making sure that the brushes are also warmed up.
– Beware! – wax can float off in cold weather and if it has not been applied when sufficiently hot.
Mopping
The etching process by which shaded edges are achieved. This is even more dangerous as the acid is stronger.
– Make a ‘dibbler’ by wrapping some cotton wool in a piece of nappy lining and tie to the end of a bamboo stick.
– Dip the dibbler into very strong acid, and stroke the area that requires shading repeatedly, until the flash is removed to your liking.
Etching And Abrading
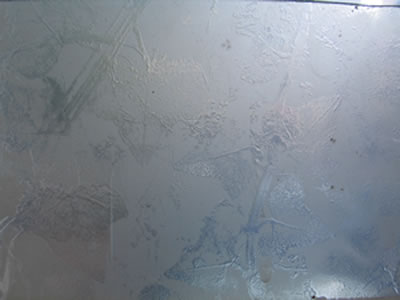
This process produces a contrast of clear and opaque glass. It is useful for textural interest and for providing levels of obscurity to float glass.
You can use any resist, with the proviso that the etching is quite deep, otherwise the process of abrading will flatten out the whole surface of the glass and rub out your textural effects.
– Once you have etched the glass, clean off the resist.
– Using a smaller piece of float glass, water and an abrasive powder, rub evenly across the surface of the etched glass.
– The choice of abrading powder determines the quality of the abraded surface– the coarser it is the coarser the abrade will be.
– Carborundum powder, bauxlite abrading powder or silicon carbide can be used.
Acid Paste
This technique produces subtle opaque areas and is best used on clear or lightly coloured glass.
– Wear latex gloves and apply the paste with anything that gives you the texture you desire.
– Leave undisturbed for 20 minutes and wash the paste off under running water.
– Dry thoroughly.
– Acid paste can also be used for screen-printing.
Go here for a detailed tutorial on the much safer Etching Paste