Create Your Own Stained Glass Designs
Free stained glass design tutorials to get you started on making your own designs from scratch. Can’t draw? No problem. There are lots of ways around it! These free stained glass design tips will get you started in a way that avoids fear.
Designing Cuttable Glass Shapes
Stained glass designing is made trickier for us glassers because of the types of shape we can and can’t cut. This has to be thought about during the process of designing stained glass. And what about those tiny pieces that you want for detail but can’t think HOW to incorporate into your design in a practical way?
If you’re always yearning to add more details to your stained glass work my Plating Magic (layering) course shows you lots of different ways you can do this. It includes creating shadows with foil and painting details on.
This 3 minute video below shows you a trick way of keeping all those tiny pieces…without having to cut them all out. Watch it and be amazed.
Donna added a note to this which is worth thinking about – “when I put the overlay on the backside, it was not in the exact same place as the front. Ironically, when held to the light it appeared that a shadow of the deck chair legs was cast on the sand”
Create a Stained Glass Pattern from a Photo
If you do fancy learning how to make stained glass designs, I’ve put together 5 simple steps that might help you.
1. Stained Glass Design Inspiration
- Photos are always good for inspiration, and can get you past that empty blank page you’re faced with at the beginning of a project.
- Find one that interests you. It can either be one you’ve taken, or one that you’ve found. I’ve chosen one I took of a cactus in Lanzarote.
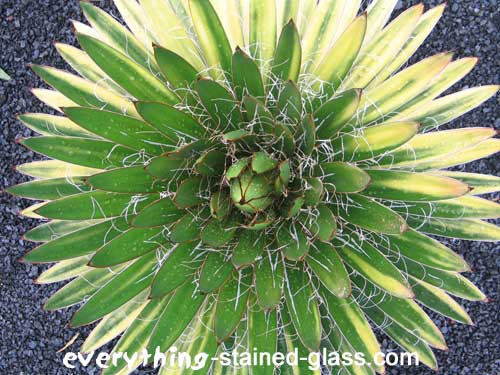
- Think about why you chose your photo? What do you like about it? Is it the colour, the shapes, does it make you laugh? Whatever it is you like about your image is what you’re trying to capture in your design.
- In the photo above, I liked the contrast of the strong, spiky leaves with the wispy twirly bits at the end. I think it will loosen it up and create a free stained glass design. I also like the light and dark greens, and the energy that brings.
2. Selecting Part Of The Image
It’s sometimes easier to choose a section of a photo, rather than the whole thing.
If you tried to pick out all the shapes in this one, there would be hundreds of complicated pieces. It would be too difficult to make, even for someone with lots of experience in stained glass.
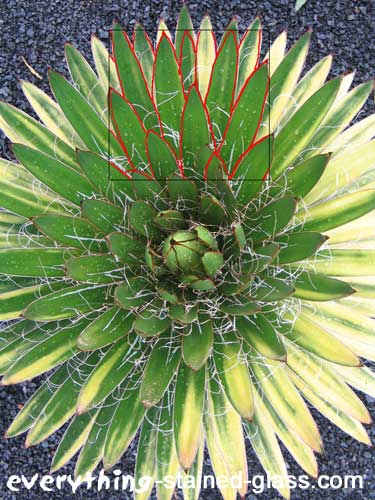
- Try isolating a section yourself. Either cut out a square or rectangle in a piece of paper and move it over your image until you find a section you like, or do it on a computer.
- Turn your photo upside down and around if you want. This sometimes helps you see something different. It can help you make a free stained glass design that has movement.
3. Making Simple and Free Stained Glass Design Shapes
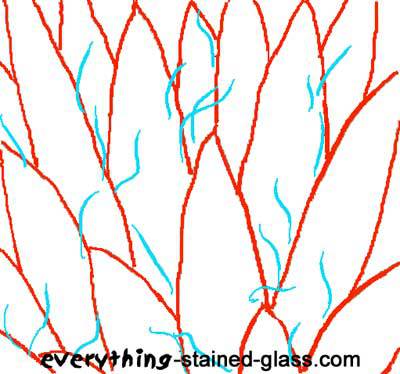
- Now pick out some simple shapes. I’ve done it on my computer in the photo below. You could do it by putting tracing paper over your image and tracing some of the shapes that you like.
- The lead or solder lines are your ‘drawing’. They are a very strong part of your design. It’s best to think about the pattern they make carefully at this stage. I’m trying to get mine nice and spiky here.
- You can see I’ve also picked out the wispy bits that I liked about the photo at the beginning. They give a bit of ‘life’ to the design.
4. Colour And Texture In Stained Glass Design
Once you’re happy with the shapes, you can start thinking about colour and texture. I always colour in my designs so that I don’t make mistakes later and waste the beautiful art glass.
- Make a few photocopies or scan your outline stained glass design. Now work out what colours you want and where to get the balance right at this stage.
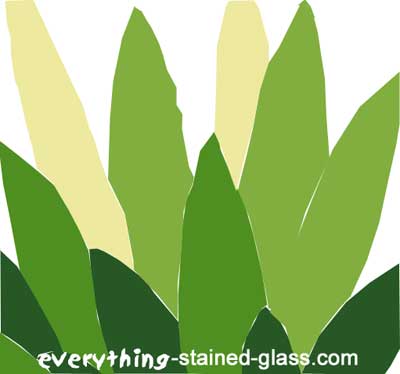
- If you leave some areas clear, it really makes the stained glass design stand out. It makes the colours ‘zing’.
- In thestained glass design above I’ve tried to create some depth with the dark and light shades.
5. Adding The Stained Glass Design ‘Lead Lines’
This is the point that it all comes together.
- Add the lead lines in, along with any details that you want to add – in this case my ‘wispy’ copper wire. To get this effect, simply solder pieces of bent copper wire to your solder lines after soldering.
- Now you can really get a sense of what your finished panel will look like.

- Make sure you’re really happy with your design. You don’t want to waste time and money making it in glass if it’s not right at this stage.
How To Make Stained Glass Designs – Troubleshooting
Some things to watch out for:
- that the shapes are ones that can be cut out in glass.
- anything that tapers off into a thin point. These are difficult to cut, so widen the ends a bit.
- shapes that don’t join up with other shapes. You can’t have shapes that stop in the middle of the glass, there must be a lead line to the edge, or to another shape.
- lots of points joining in the same place. They will end up creating a big blob of solder. Try putting a circle where they meet instead.
- concave curves. They’re the most difficult shapes to cut as the glass wants to break on the inside of the curve, so don’t make them too deep. Try to avoid them altogether for your first piece.
- if you’re designing for a window, you need to be working to scale at this point. You don’t want to design something long and thin for a short and fat window. See Measuring to learn about taking accurate measurements. Make sure you scale the Sight Size down to fit your sketchbook.
Understanding Perspective
My students don’t ask me about perspective. They ask FAR more practical questions like: ‘how do I make some items look closer than others?’ or ‘how big should the cow be?
This 2 minute Video Critique is taken from my Design Magic class.
It shows me explaining how to tweak design student Janet Hartley’s work so that each element is the correct size in relation to the others. Perspective, in other words 🙂
I’m not the star of the show by the way – the cows and the barn eclipse me!

Free Stained Glass Designs
I’ve had a look on the web and have come up with a few of the best sites that offer free stained glass patterns.
1. Spectrum Glass have a lot of designs for hanging panels and sun catchers on this site. There’s geese and horses to geometric and abstract patterns.
It’s easy to browse through them using the arrows at the top right of the page. They do recommend Spectrum Glass, but of course you can use any type of artglass.
This website is the best one for total beginners, but there are patterns that are for intermediate level.
2. Chantal’s Stained Glass. This is a lovely pattern site. Lots of sun catchers, panels, lampshades, boxes and just about everything else! Highly recommended.
There’s something here for all levels of skill, from beginners to advanced.
3. Free Stained Glass Patterns. This site has some amazing designs. You can get an idea of what each of them will look like in glass as they are all in color. Scroll down for the pdf to print off. This site is suitable for intermediate to advanced.
Once you have found a pattern you’re happy with, you’re ready for the next stage, Cutting Templates.
My tutorials for making a copper foil project with your new design are here.
The instructions for making leaded stained glass to realise your design in glass are here.
The Chantal Stained Glass site seems to be gone or not maintained any more.
I also have a question about cutting curves — why do you have to approach the inner curve with a lot of small bites, but (presumably) do not with the outer curve? Thanks!
Because the inner curve ‘bites’ into the glass sheet and makes it vulnerable to cracking. So it’s best to approach it with small mouthfuls 🙂
I noticed that too re-Chantal’s site April. What a shame it was a great site.
Thank you! I believe Chantal’s site was saved via the Wayback Machine, so if you go to web.archive.org , you can then paste in the address and it works. Or perhaps replace the address given with this one (I don’t know if it’s the best — just the one I grabbed)
https://web.archive.org/20210211065403/http://chantalstainedglass.50megs.com/
Oh great, that’s good to know. Thanks again April 🙂
I really enjoy your emails and all the helpful information.
I am having trouble with my solder and wondered if you could help. When putting down solder on copper foil I get a black ash on the solder and it makes kind of a mess of the solder. It is never nice and smooth. I thought it was the solder so I purchased a different brand and it is still the same. Could it be the flux. Does it expire? I’ve had it for many years.
Flux does get dirty so you should always decant and use from a smaller container and not from the main pot.
You can also try cleaning the solder with flux as you go. Plus regular cleaning of the iron tip and the solder lines themselves as you go can help.
Lots of ‘cleaning’ in there, I hope it hasn’t put you off Angie 🙁
I have a question regarding an address sign piece I’m making. It shouldn’t be that hard for me, but I’m stumped. I’m only making this piece with our street number… I’m trying to figure where to make the cut lines for the background. I would like to keep it as open as possible. Would you kindly give me a hint or two on where to place the cut lines without making it look too busy?? I sincerely thank you!
Hi Colleen, if you look up pdqpatterns.com they have some ideas for you – search for stained glass numbers. I can’t help here as I don’t know what number and there’s no uploading of images, I hope that helps.
Milly, your stained glass videos and email messages keep me motivated and inspired every day. I’m intimidated by cutting glass, and you’ve helped me work through the challenges of cutting. I will post one of the designs when I finish it… thanks to you, so far away, yet right beside me.
That’s such a lovely comment Elin, thanks so much 🙂 For anyone else wanting to improve their cutting, my tutorials are here: https://everythingstainedglass.com/how-to-cut-stained-glass
Hi Milly
I thought it was time I acknowledged the great service you are giving to aspiring leadlight artists. You are obviously a caring and generous person and I feel sure you are appreciated by many
Good stuff
Iain Govan Adelaide South Australia
Oh that’s very kind of you Iain, thank you 🙂
Thank you for that video on the deck chairs. The over line are a great idea
You’re most welcome Priscilla, thanks for commenting and I’m glad you found the it helpful.
Milly, wanted to share something I made without having to make a ton of tiny pieces.
I was commissioned to make a large glass of a cabin in the woods. One that they go to every year. However, the foundation was made of stones. I was able to take a sheet of copper foil and cut out a stone pattern on my silhouette cutting machine. It worked beautifully!
That sounds an intriguing idea Holly, with the foil sheet being the dark area rather than lead or solder lines… (if I’m understanding you correctly 🙂 )
Well done. I think that’s really excellent and a huge help for the timorous. Good luck with it.
Thanks mum 🙂 sweet of you to watch it and comment.
If you have a glass saw, is it still frowned on to have a rounded “point” without lead lines coming off of it?
The primary question is one or strength. If you constantly ask: ‘is this a strong shape?’ then you’ll be okay! Cutting lots of intricate shapes may look great but if they snap within a minute it defeats the object. That horrible word compromise pops up again!
Thanks for your good question Linda.
i would love to see a finished product, of the above picture. i can’t picture how you got those wispy lines on the glass.
Very good point Lisa! If you imagine cutting 2 1/2″ lengths of wire – say 16-18 gauge – and just soldering one end to the lead or solder seam where you fancy… the other end is flying free so it’s best up and away from fluffy jumpers brushing past!!!
I hope that helps and it’s on my list to find and upload a photo.
I struggle with a “marvelous” photo from my vacation on the mountains and I would have loved to have the tutorial during those days, trying to capture everything and transferring to glass. Great tutorial, keep it coming
Thanks Carlos. It’s never too late… get photographing and translating into glass 😉