When you copper foil stained glass lots of questions come up that you weren’t taught how to deal with. Queries such as these:
- What size foil do I need?
- How do I store stained glass foil?
- Where do I start foiling on a piece?
Scroll down to find a whole list of answers to help improve your stained glass copper foiling.
Stained Glass Copper Foil Width
Knowing which size copper foil to use for the variety of glass pieces is important. There are structural and aesthetic choices to be made.
If you aim for the copper foil overlap on the glass to be between 1/32” and 1/16” you’ll be spot on.
3/16” – 1/4” foil works well for most standard copper foil stained glass pieces.
If you have a wider overlap you may find that the width of the solder is too wide when you start assembling the piece together.
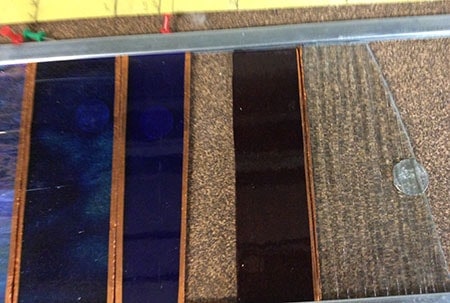
At some point, you may want to emphasise an area in your design. You can vary the line thickness to make it more interesting or to highlight an area. Say for example you had a panel with an owl in a tree. You can use wider foil around the owl to create a thicker line and bring attention to it.
Just keep in mind that you don’t want to weigh a panel down with too much solder in one concentrated area as it can compromise the sturdiness of the panel.
Copper Foiling Thick Glass
Has this happened to you? You’re working on a stained glass project and suddenly realise you have a very thick piece of glass. You need wider copper foil but don’t want to waste time going shopping. Argh!
All is not lost.
Simply wrap overlapping foil around the edge of the glass until the edges are properly covered. Then solder as normal. Here’s a 2 minute video showing you how:
If you’re struggling with any foiling techniques there are lots of things you can do to get better.
If you don’t have easy access to a class my Stained Glass Made Perfect course has helped many people improve the strength and neatness of their copper foiling. Not forgetting all the other techniques too!
The online course is self-paced so you can learn these foiling techniques even if you can’t get to a physical class. You can find out more about it here Stained Glass Made Perfect.
Storing Copper Foil
Stained glass copper foil can start to deteriorate if left out in the elements. You can lengthen the life of your foil by:
- using a ziplock bag or similar to keep it airtight
- buying a paint can from Home Depot (unused) and store your copper foil in it. The rolls fit perfectly and when the lid is secured in place, it helps maintain the foil.
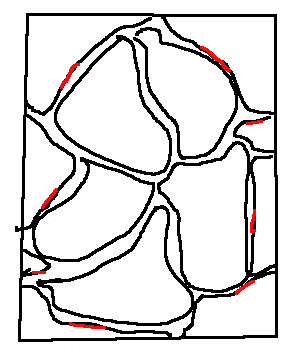
Where To Start Foiling
When you copper foil stained glass it’s best to start foiling away from the outside edge as this makes for stronger adhesion.
This is because the foil isn’t joined on the outside edge where is is more likely to come loose.
The red lines on the numbered edge pieces are an example of where to start the foiling.
Copper Foiling Textured Glass
Do you know how to copper foil stained glass that is heavily textured?
If you’ve tried this you’ll know that the foil breaks as you try to go from high to low. Even with shallow textured glass (ripples) the foil sometimes breaks as it goes across the ripples instead of nicely contouring to it.
There are a couple of solutions:
- For heavily textured pieces you can trim the foil with sharp scissors before you crimp and burnish.
- Use a cork for crimping textured glass as it is softer and provides pressure while reducing tearing.
- A rubber eraser on the end of a pencil. It cleans the foil too! This works for croc glass as well as other highly textured glass.
- Tilt the glass through the grinder at an angle of 30-45 degrees, flip it and do the same to the other side. This is especially good for something like croc glass where the “bubbles” sit high.
- Better still, you can use a rippled glass grinder bit (paid link) to remove the heavy texture on the glass before foiling. This really helps with foil adhesion. Before you buy a rippled bit make sure it will fit your grinder.
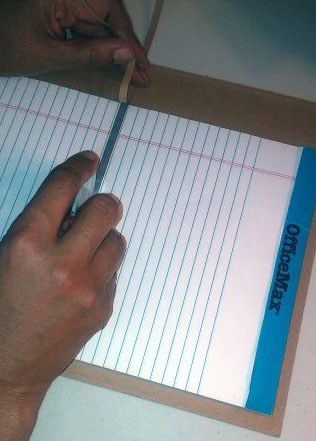
Centring Foil
When you copper foil stained glass by hand it can be hard to centre the foil. A simple trick was sent by one of my students to help with this. Use lined paper as a guide!
Do You Grind Before Foiling?
This is an interesting question and one I get asked A LOT. My answer might save you HOURS of time grinding and cleaning.
When you copper foil stained glass you do not have to have a rough surface for the foil to stick to. Foil actually sticks better to a cleanly broken edge than to a ground edge.
You do not need to grind every piece of glass.
It’s okay to only grind to fit.
I grind to fit glass pieces to a pattern or when assembling to fit glass into lead came.
I’m delighted when a cut is accurate enough first time. It leaves a lovely clean unadulterated surface for the foil to stick to perfectly.
Try This
If you don’t believe me stick a bit of foil on top of a clean sheet of glass and try getting it off.
It sticks, doesn’t it?! Hopefully that will prove to you that foil sticks to shiny glass. Your shiny cut edges are fine without grinding.
Just be careful of your fingers. You can just deaden the sharp edges off with a wet scythe stone to avoid cutting yourself and to prevent sharp edges cutting the foil.
Ground edges need to be thoroughly cleaned before foiling.
Copper Foil Coming Off Edges
Sometimes when you copper foil stained glass the foil comes away from the edge. This is a common problem which often happens when finishing or soldering.
Soldering
- If you solder too slowly or go over the solder repeatedly the foil glue melts and becomes unstuck. It’s worth remembering that the glue is there to hold the foil in place until it’s soldered. It doesn’t serve to keep it on once it’s been heated.
- Try increasing the width of the outside foil a tiny bit too. That will give the solder more stability.
- If you tin the edges rather than creating a beaded edge.
“Tinning” means covering them with a thin coating of solder. “Beading” is a rounded edge of solder that ‘clings’ to the edge of the stained glass and is much stronger.
I have a video on how to do a beaded edge on this page.
Finishing
Be gentle when cleaning and polishing. If you’re too rough the stained glass copper foil can come off.
There are more answers about copper foil not sticking here.

Milly,
As always I commend you on your teachings. You explain everything in a manner that I can follow along and you explain for us who are coming back to stained glass after a leave lets say. This newsletter alone has taught me several tips and tricks to foliling ( which is my most trouble area). I have a question that may be silly, but like the saying goes, no question is silly. Can you leave a project just foiled without soldering and if so what type of finish shine tips. Thank you again for your excellent teaching.
Joey – Brandon Florida
Yes you can leave projects prior to soldering but it’s best to wrap them so the foiled pieces aren’t exposed to air otherwise they oxidise and it’s hard to solder them.
My page on finishing is here: https://everythingstainedglass.com/stained-glass-tutorial
I hope that helps.
Thanks Joey, it’s good to hear my work is helpful and kind of you to take the time to say so.
I have (finally) finished a very large, intricate piece for my window. It measures 6′ tall by 2′ wide. I framed it with 3/4″ zinc frame and planned to permanently install it into the window frame using silicone caulk for strength and stability. Although I took multiple measurements of height and width along the spans of my window, my stained glass does not fit into the window frame because I failed to realize that the window frame is not plumb, or square. The window is ~ 1/4″ out of square. I dread the thought of having to remove the frame and reconstruct the edge pieces to fit the window. Is there any way to alter the zinc frame to accommodate the crooked window frame?
Ah. We’ve all done it so don’t feel bad. If the frame is a wide Flat H zinc you might be able to somehow bend it over without breaking the edge glass. If not, you will have to remove the frame and rework the piece to fit.
I frame in 1/2″ lead came for this reason; you can shave the flanges to fit if they’re a bit tight. (Probably not helpful for you to hear right now 🙁 ) Good luck.
What is croc glass? That’s not a term I am familiar with here in the US of A.
Croco glass is a textured type of sheet glass that resembles different sized round bubbles. It’s not manufactured anymore. I hope that helps.
Milly, I was sitting in church today paying more attention to the windows than the priest, and I have to ask: how does one paint faces onto stained glass? I see facial features, and shading in the folds of the robes and I assume they’re etched and blackened somehow. I’ve looked on the internet and can’t find a demonstration. Can you steer me anywhere?
Ha! Love your honesty 🙂
They’re painted with a special pigment and fired on to the glass in a kiln. I have a whole section of painting tutorials here: https://everythingstainedglass.com/painting-on-glass
Numbers 3 and 4 are about line work and shading respectively. I hope you take painting up, it adds so much to stained glass… and keeps congregations happy 😉
Wow, I was about to send this very question concerning painting features and shadows and all into my stained glass projects. I have a book around here somewhere that calls this technique Grisialle I think but cant locate the book. I suspected there might be a more modern an simpler (sp.) way and will check your link out as soon as I send my comments/questions above.
Thanks Milly
Jimmie Tipton
Do you have any tips on working with different thicknesses of glass within the same project? For example, should it all be flush on one side (back), or set in the middle (using card stock, etc.) of the thickest piece? I’m combining very thin mouth-blown glass with other thicknesses and am curious on what your approach might be!
My approach isn’t the same as a lot of peoples on this Lisa. I love and invite the irregularity on the front side as it makes the panel lively and adds its own movement to the piece.
I understand those who want it all flat on the front, too. It’s an aesthetic choice.
If you want it flat on the front you can turn your pattern over and solder the (uneven) back side first.
Good question and I hope that helps, thanks.
Do most beginners find a hand crimper helpful to smooth edges. Great idea of using paper lines
I haven’t had many comments about the hand crimper Lisa. I didn’t have much luck with it personally so don’t recommend it. I found it fiddly and it added more time to my process. Others may find it the most useful thing though, so if you can, try one out and see if it suits you.
All very helpful. ( I have just signed on)
Good to know John, I hope you find the newsletters helpful.
As to whether or not to grind every piece, I have learned, painfully, to err on the side of grinding. My reasoning is simple: I’ve found that often, when cutting glass, there will be a nearly invisible, incredibly thin “lip” sticking up from the edge of the glass. I’ve had occasions where I’ve NOT noticed these, taped the edge without grinding, and then, when running my finger over the tape to attach it initially…..BANDAID!!! Then I have to clean the blood off the edge of the glass, too!
So, I always run every piece through the grinder, even if only very lightly, to make sure the edges are as clean as they first appear.
I totally agree Mitch, thanks for the reminder. I always ‘deaden’ the glass edges, usually with another piece of glass held at a 45 degree angle and firmly stroked along each edge, top and bottom. A light grind will do the same job.
Me too. Grind all edges
Hello from Minnesota, Milly.
I am barely a beginner at stained glass but I have all sorts of projects I can’t wait to try.
One art project involves a cast iron bench.
I want to fill some of the open pattern on the bench with glass but I am concerned that soldering foil to cast iron would be a waste of time. This bench will be outside all year in extreme weather. Or, should I just stick to clear outdoor calk to anchor the glass?
What a lovely idea Sheila. You can use exterior caulking. If I were you I’d experiment with one piece, leaving it out in the ‘extremes’ and see how it goes. That’ll give you time to practise all the other techniques while you’re waiting to see 🙂
Should I tin all the pieces before I assemble a window 3’× 3′.
Or do I just solder on the edges as I assemble.
Thank you for any advice.
You don’t have to tin first Toni. I suggest it for beginners to give them more experience with soldering and getting to know how the heat and solder work together. Once you’ve got the hang of this you can just solder the beaded seams.
Very interesting and helpful.When soldering two pieces of glass at right angles, is it better that they be side to side on the edge or each piece flat on top of each other ( Hope you understand what I mean One way uses a lot more solder than the other
Thanks
It’s better that they form a ‘V’ and you fill that edge with solder Stanley. More solder used but a much better join.
Good question, thanks for asking.
I did a very large piece that required soldering 2 pieces of glass at a right angle to each other. I added a straight piece of copper wire and soldered it into the “V” for added stability and strength. It worked very well. I will do this in all of my future right angle pieces.
I am trying to buy a hand crimper and burnisher but nowhere seems to have them in stock. Any ideas please?
Hi Donna, not sure which country you’re in so hard to suggest. Tempsford SG have a Kwik crimper available in the UK.
Hope that helps.
My favorite burnisher is a wooden dowel that I put into a pencil sharpener to create a point. You can make it whatever size feels comfortable to your hand. “Re-sharpen” it whenever it becomes misshapen from all the use. It’s very inexpensive, and easy!
That sounds a lovely idea Sara, thanks 🙂
How critical is it to foil all the edges of a piece of glass? I have a case where I want to use hobby lead came to have a very low profile clean finished edge but even when using thin copper foil, the came doesn’t cover the foil in all cases. Is my piece too compromised if I don’t foil the edge that is meant to be tucked into lead came?
The good news is… you don’t have to foil the edges if you’re using hobby came Jeannine. The came is used for small decorative pieces and takes the place of foil on the edges.
I find it helpful to quickly buzz a piece of stained glass with a grinder, about 1 in (~2.5 cm) per second just to knock off sharp edges left behind after a break. Without that, it is easy to end up with a nasty sliced finger while trying to position the tape. Live and learn.
So true Stephen. Or you can quickly dull the edges with a carborundum stone if you don’t have a stained glass grinder.
Thanks for your comment.
when I add a head (domed glass cab) on say an angel the jointure tends to be bendable and the foil unhinges. These are handing ornament. HELP
It’s causing what is called a ‘hinge’ point Martha. If you can go around the edge of the whole thing with wire, soldering it into the edge seam, it will help but it’s best to design things without hinge points as they’re always weak.
Can you layer a stained glass piece and how would you solder it? I’m doing an iris and, as I rough cut the pieces I was laying them on the pattern. When I was finished, I found that the pieces looked really good stacked together, making a 3-D effect! But how would you get it to stay like that?? Possible or not?? and how would you finish the whole edge of the piece?
Oh Peggy I’m smack in the middle of making an online class that teaches just this thing… it’ll be ready at the beginning of next year. I’m including a ‘Glass Choices’ module that concentrates on just some of those infinite effects you’re talking about, and how to manipulate them to add so much to your work. It’s so exciting as you’ve accidentally discovered! Sign up to my newsletter here if you want to know when it’s ready.
Until then, the technique is called ‘plating’ and there are a few things about it to be found on the Internet but not much.
Hi Molly,
Thanks for the great tips. I started a project but for hung up on the foiling. The piece has some small circles, 3/4″-1″. The foil always breaks because it can’t stretch when pressed down onto the surface. Should I cut matching pie shaped pieces of foil to match the gap? Or can I cut thin strips to lay over the gaps? Or is there another solution? Thanks very much, mark
Foil often splits into curves. The second option is better – cut a short bit of foil and stick it over the split front to back, then trim with a craft knife. I hope that helps Mark.
I heard that slightly heating the tape will make the tape more flexible and less likely to break tight curves. A small space heater near the tape usually does the trick
Yes, good point Stephen. And of course, the narrower the foil, the less likely it is to split as well. Not sure if I mentioned that above!
Do you recommend use of a foiling machine? If so, can you recommend a type to look for? Thank you.
Good question Linda. Over the years I have tried them and people do say you need time to get used to them but I never have! The Table Top Foiler is the one that keeps floating to the surface when recommendations are mentioned. As I say, this isn’t from my own experience. Don’t let me put you off, lots of people love them. I hope that helps a bit.
How does lined paper help with foiling? How do you use the paper?
It gives you a visual guide to help you place the foil. ‘Roll’ the glass along the paper, in between the lines and it will help guide you.
Thank you for the tips on copper foiling. I am just going to begin a new piece and I am not very experienced….I will begin now with more confidence.
Judith
That’s very good for me to know Judith; confidence is half the battle!
I took a stained glass class 20 years ago and was told to always tin all foiled edges before assembling my project. Nothing I have read yesterday or today says to do that… What is the procedure now?
You don’t have to do this Jill. It’s helpful for early beginners as a way of learning about the flow of solder.
Tinning the edges does help create a soldered beaded edge as it helps the solder to flow around the sides – see my video on this page – but for the rest it’s not necessary.