Grinding small pieces of art glass accurately – without losing your fingers!
Click the links below to go to the section:
Stained Glass Grinder Cookie
Grinders Mate and Other Grinding Tools
Make A Grinder Jig For Bevelled Edges
Additional Grinding Tips
Cheap & Cheerful Finger Protection
Sometimes you have to be able to accurately grind small pieces of stained glass to get a good fit or for detailed designs. The small pieces put your fingers in the way of the grinder bit and can be difficult to manage, especially if your fingers are less than nimble.
I asked how others manage the tricky problem of grinding stained glass by hand and had some interesting ideas shared. Let me know if any of these are helpful or if you have a different trick up your sleeve that you would like to add in Comments below.
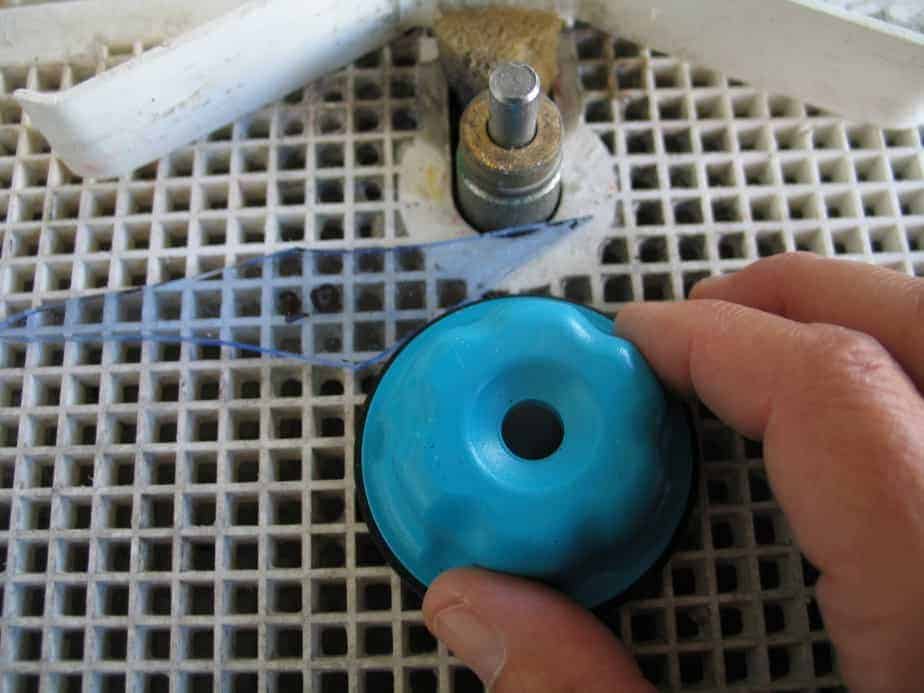
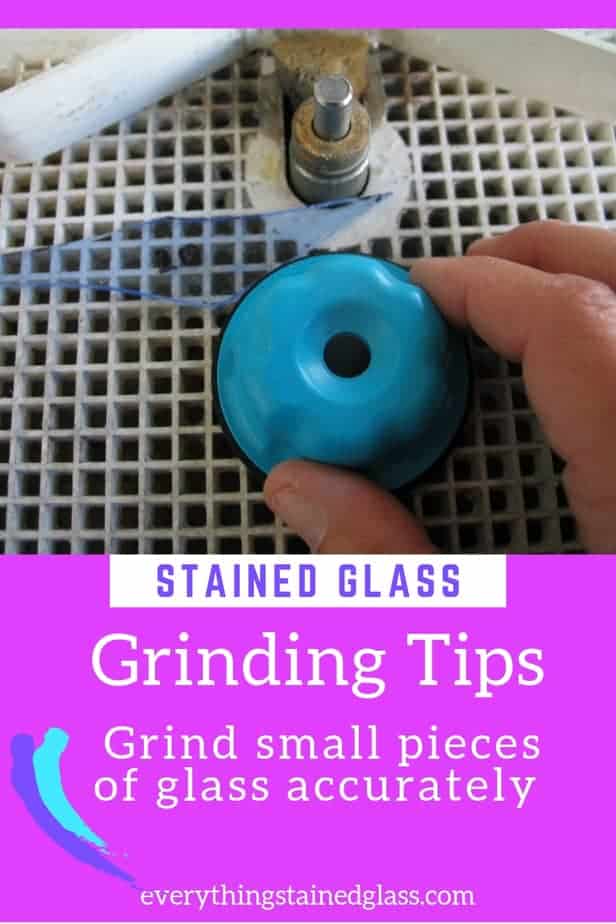
1. Stained Glass Grinder Cookie
Milly’s recommendation:
This is the tool I use for grinding small pieces of stained glass painlessly and accurately. It looks a bit like an unsuccessful flying saucer but is actually does a fine job holding small bits of glass in place when grinding.
I was a bit sceptical first, thinking that my fingers do the job fine, thanks. But I’ve been trying them out for a few years and now think they’re great.
Because you have more control over the grinding process there’s less breakage. For the same reason they seem to help preserve the grinder bit.
The Grinder Cookie is comfortable to hold, you don’t need to grip anything tightly so it’s good if you struggle with dexterity.
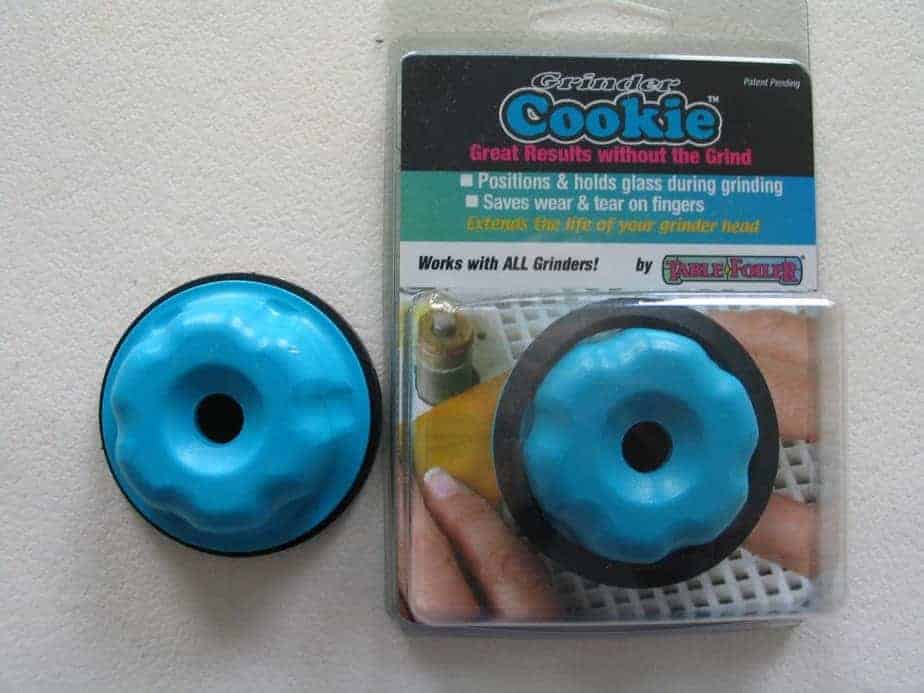
It is also good for grinding shapes that taper off into thin tips. I bought a few for my classes and tried using two together, which meant I didn’t have to hold the glass at all. The glass grinder cookie also stops you wiping the pen lines off with your fingers, which is a big plus.
Best of all, it saves your nails and fingertips and lessens the cramp you sometimes get when grinding tiny pieces of glass.
All in all, I stand corrected. This is a very useful addition to a stained glass kit and comes recommended.
Stained Glass Cookie Grinder (*paid link)
The following suggestions have been kindly shared by members of my Stained Glass Hub community and readers – a big thanks to all!
Tips on art glass cookie grinder alternatives from readers:
This is a great idea for a cheap, effective DIY version:
- I use the Stained Glass Grinder Cookie you show but found for even smaller glass pieces I made a pusher from a paint stirrer. I put a nickel sized ‘U’ in it and it works well.

2. Grinders Mate & Other Stained Glass Grinding Tools
You might find the following tips and discussions about different stained glass grinding tongs useful:
- I was recently loaned a Nick’s Grinders Mate to test out. I have to say that I LOVE it. If you haven’t tried one yet, I highly recommend it. The jaws grip exceptionally well and hold even the tiniest piece quite securely. I have read that others don’t like that the piece is elevated off the grinding surface and that this comes into contact with the bit at a raised point. This isn’t a drawback for me.
- I have the Grinders Mate and it works fine but teensy tiny pieces get lost in it.
- I have Grinders Mate, but I found that the soft rubber doesn’t wear well really tiny pieces “get lost.”

Comment from Milly: You can get replacement heads for these glass grinder tongs so the wear and tear described above isn’t the end of the tongs, just a bit annoying!
Grinders Mate Replacement Heads (*paid link)
- My art glass grinding tongs are the yellow Morton ones(*paid link), you have to clamp the glass piece down with your hand the whole time. I would recommend the Grinder’s Mate though because it stays locked – no hand grip required.
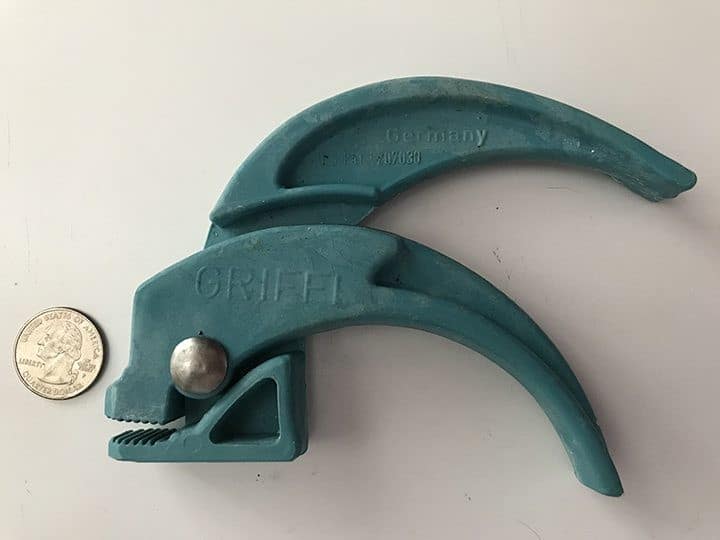
- While I was working on a fanlight, I stumbled across Griffin Glass Gripper (German made) grinding tongs that are marketed by Glastar. Like the Morton, you do have to hold them together to grip the glass, but so far, I’ve found them superior for holding super small pieces well. They seem to be a heavier plastic, and there is no soft rubber to wear and compromise the grip. The downside is price — they’re a significantly more expensive than Grinder’s Mate or Morton.
Just so’s you know, if you click and buy through the link within 24 hrs I get a small % from Amazon, (not you!). Thanks in advance but no worries if you have a local store – I’d always support them first 🙂
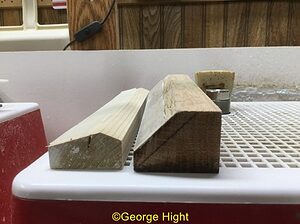
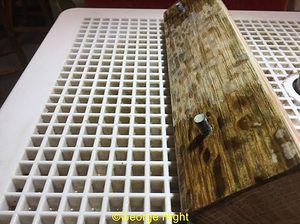
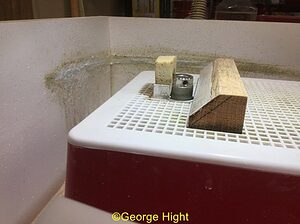
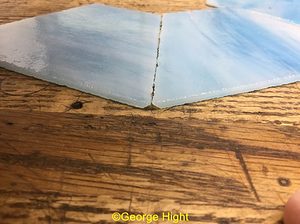
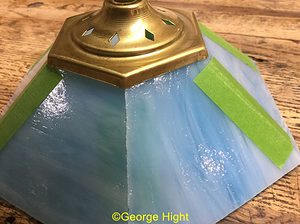
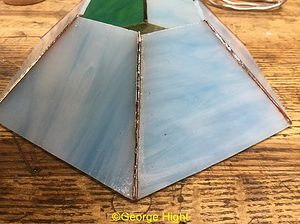
3. How To Make A Grinder Jig For Bevelled Edges
This jig will enable you to angle the edges of your glass and create a mitred joint. These bevelled mitred joints can be used in a variety of 3-D projects, for example lamps and boxes.
These mitred joints reduce the amount of solder used as there is no gap to fill.
- Use oak for the jig as it withstands getting wet from the grinder.
- Cut an angle on one side of the oak. The angle will depend on your project. 45 degrees is perfect for a right angled box. You will need a lesser angle for a multi-sided lampshade. The photo shows 2 different angles.
- Insert 2 pins in the bottom of the oak. These slot into the grinder grid and keep the jig in place. The placing of these pins is important as the jig has to be held close to the grinder bit. Use heavy gauge copper wire. You can see the distance needed in the photos.
- Lastly, stick a strip of ‘Slick Strips’ tape along the top of the bevelled side to help the glass slide freely. You can purchase this from a woodworking supply store.
Thanks SO much to George Hight for sharing this gem with us. It is a great help for all the lamp and box makers out there 🙂

If you don’t want to have so much control over the size of your angles you can get a ready-made lamp grinder bit like this one from Amazon (paid link).
4. Additional Grinding Tips
Here are some clever ideas from Stained Glass Hub member Denise Whittle, with a nifty storyboard to help you understand:
- I use a +/- 1 or 2 inch strip scrap piece so I have something to hold on to. Grind that scrap for safety.
- Grind around 3 sides, then score and break the 4th side and grind It. That way you only have to hold on to a tiny piece for one side.
- I also have a Cookie Grinder that keeps it up against the bit but still if it is too tiny, it will disappear into the bottom of the grinder.
- Another thing I do is to hold it up against the 1/4 or 1/8 bit directly either with my fingers or use the grinder tongs. You have to hold yourself steady because you don’t have a work surface to support your little piece.
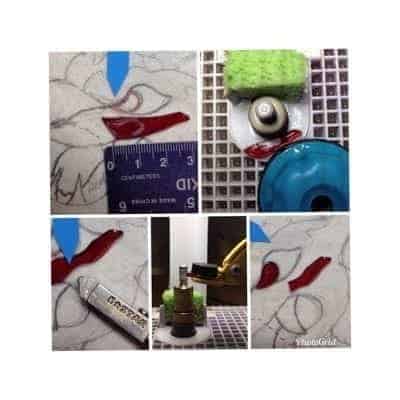
Image Denise Whittle
Here’s an ingenious cork idea, although I’m wondering how safe it is to insert a small piece of glass in a cork so be careful if you try this.
- I make a slit in a wine cork… slot the tiny piece of glass into it and hold cork while grinding :-). I will have to have people save for me as I also use them for burnishing foil on heavily textured glass too.
5. Cheap & Cheerful Finger Protection
- I got fed up with ground fingertips – the solution? Rubber thimbles! Easily found in stationery stores. For your thumb, get larger ones suitable for quilting, made from plastic. Here’s some on Amazon (*paid link)
- Alternatively, use adhesive tape – tape it over and back over the top of your fingers, then around the circumference of your finger/thumb to hold it on.
- I have been doing stained glass since 2002. I buy the rubber finger protectors that you would use for flicking through papers etc. for grinding. I buy them in different sizes. I always have them on each thumb and either my index or middle finger (this way it allows either index or middle finger, depending on which you have the finger protection on, to be clear to pick up the pieces. This works better than tape as they are very easy to take on and off.
- Idea from Ron – “I avoid grinding fingers (as much as I can) by using 2 erasers per attached pics. They grip the glass nicely”
So there you have some suggestions to help you grind small pieces of stained glass more easily and accurately, without putting your precious fingers at risk! Let me know below how you get on if you try any of these suggestions or if you have any others. Thanks in advance.
Hi Millie.
My wife and I teach stained glass in rural communities, and have taught over 1500 people the art over the past 10 years. We still love it! In grinding and cutting small pieces, we use our grinder mate with the ring saw and it works great. We love all the hints we see from your followers, and look forward to your posts. Keep up the great work!
Thanks Len, that’s kind of you. ‘My’ students and followers are the best 🙂
Hello from the Canadian 🇨🇦 Prairies! Not unlike the rubber fingers, I’ve used the silicone finger protectors meant for use with hot glue guns I also use a 1/2” square dowel 6” in length to keep my regular pieces grinding flat against the grinder bit. I’m very excited about trying the two rubber or silicone erasers for smaller pieces. Love your newsletter and readers comments. Such a beautiful supportive community.
Thank you for adding your useful tip Diana-Lynn. Very useful.
And yes, what a lovely community we have all built together; it feels like an oasis in the desert sometimes 🙂
I use a special grinder bit when I make a lamp shade.
Good point Donna, and much quicker LOL! Thanks for that.
This tip is more for those people who like to do things themselves. It also gives the opportunity to refine angles to a particular project.
What special grinder bit is that?
It’s called a lamp grinder bit Laura – you can see one here: https://amzn.to/3Bc2kfB (paid link – I get a small % if you buy within 24hrs). I’ll add it to the main article too.
Hi Milly: great timing – I am about to start some tiny grinding – I purchased the items mentioned in your article – now to try them. The hand made one sounds great also. Thank you for your continued supply of good news. Irene Canada
I hope they work for you Irene 🙂 Those little pieces can be a pain otherwise.
A2 LITER COKE BOTLE AND A RUBBER FROM LUBSTER PLIER HOLDER
MAKE THE JOB
WHERE CAN WE POST IMAGE OR PICTURE
Hello Jacques, that sounds interesting! Can you send me an email via the Contact form and I’ll get back to you regarding the image. Thanks 🙂
Hi Milly, the newsletters and comments from the other group members are a satisfaction for me. I am also a beginner and I appreciate any advice, any information. I like it when I see how enthusiastically you share in the group and how much dedication you respond to each of us.
Thank you all for your help.
Yes, isn’t everyone brilliant, sharing all their knowledge so generously? It really does help everyone. It’s a pleasure for me to add my bit too. Thanks for your kind words 🙂
I USE ACE ATHLETIC TAPE TO WRAP MY FINGERS WITH. IT STAYS ON EVEN WHEN WET AND COMES IN DIFFERENT COLORS. I EVEN HAVE USED BEFORE THE SINK STOPPER THAT GOES ON THE GARBAGE DISPOSAL SIDE LIKE A COOKIE, BEFORE COOKIES WERE MADE. “OLD SCHOOL” HAHA 🙂 I WOULD HAVE POSTED A PHOTO, BUT, THERE IS NO WHERE TO POST ONE HERE!
Great ideas Vickie thanks so much for adding your extra tips. Ingenious idea with the sink stopper – you should’ve patented it and sold it 🙂
Perfect timing for these tips. Will be grinding a lot of little pieces this week. Thank you!!
You’re most welcome Diane. You know I’m a mind-reader, yes? LOL!
I use a medium size medicine bottle cap and wrap a wide rubber band around it. Works just as well as a store bought cookie. I tried to include a picture but can’t seem to copy it on here. If someone can tell me how to post a picture here please tell me. Thanks!
What a brilliant idea Bud. I have heard of many ideas but not that. I’ve emailed you – could you email me the photo please? I’d love to put it on the page for others to see. Thank you 🙂
Very clever idea! I’m going to try it soon… I have a piece that is about 1 cm triangle…. Thanks for sharing this!
Hi Milly
Thanks again for sharing all the info from your friends & students. Just wanted to add to the ideas of grinding small pieces of glass I use the cookie also as suggested. I find that it works ok but on the smaller pieces not so well. I’ve come up with using an expired credit card, cutting a small curve into it on the narrow end (to match the size of the glass that is being ground. I’ve made several different sizes depending on what size I’m grinding. Also I use the credit card as a scraper to remove the dried glass “powder” from the grinder bed. Works like a charm!
Wow Dottie, now I thought I’d heard of a lot of things but never an old credit card! That’s amazing, thanks for sharing. We’re all going to be retiring our cards now LOL.
Thanks for the tip to use an old credit card to get residue out of grinder. I’m pretty new at stained glass and had not yet come up with an efficient way to do that. The old credit card sounds perfect.
Thanks for all the info for new glass cutters. I am learning a lot.
You’re most welcome Howard, thanks for writing.
I use rubber thimbles too. I buy them from eBay in packs of 10 and they are pretty inexpensive. They last quite a while before they wear through but they totally save you altering your fingerprints! I used plasters and tape previously but they don’t last long when they get wet.
Thanks for sharing your experiences Rachel; it helps others save their fingertips 🙂
Hi Milly, I enjoy your newsletters and comments from other glassers. I am a beginner, and tips and tricks are much appreciated. Thanks to contributors and for your comments.
That’s kind of you to say Linda. I’m with you on thanking all those who share their tips too – I can’t possibly know EVERYTHING 🙂
Hi Milly when my fingers get sore I use Alligator Skin tape great stuff and not affected by water so good for grinding. Its £4.99 from Kernowcraft.
Top tip Paul, thanks so much for adding it 🙂
Hi Milly! I appreciate your newsletter.
I am making mosaic windows for the first time. Can you tell me if a 3mm glass base is adequate to glue the art glass onto? The art glass is also 3mm. I am using Weldbond glue.
In order to prevent an obstruction of light, I am attempting to cut larger shapes, rather than the tiny squares my previous mosaics are made of. This way less grout is used resulting in more light.
Any suggestions are greatly appreciated!
3mm would be okay for up to 20 x 20cm square but anything larger I would recommend 6mm. If you’re going really big, use toughened glass. I hope that helps and good luck.
Glad you like my Everything Stained Glass newsletter Adriana, thanks 🙂
Great suggestions, and right on time! I’m grinding a teeny tiny piece tomorrow. Think I’ll try the cork idea.
Great to hear Joyce! Let us know which ones worked best for you 🙂
would a champagne cork be better? with the extra head on it I think it might be easier to hold onto, but maybe flatten 1 side??? haven’t tried, just thought of it while reading other ideas. did just purchase the morton grips but haven’t used them yet.
Oh that’s a good thought Susie, we’ll have to both try it and report back…
Hi guys,
I actually have never ground glass yet, but there’s a thing called a ring clamp which I use for making jewelry. It is ideal for holding small bits of metal while filing. I am betting it would work alright.
It uses a wedge to close the opposite end and has leather which acts as a cushion inside the jaws. It is also reversible with one side being rounded and one side being totally flat.
. Maybe I will mess around with it and let y’all know.
Thanks,
Long time Lurker
Janine
I love it when different crafts cross-pollinate, Janine. I’ve looked ring clamps up and am assuming it’s the wooden ones…? I can see how that works. Be sure to report back here so that we all know whether to rush out and buy one!
Thanks for coming out of your Lurking Shell to share that with us 🙂
Just like everything that is posted on Milly’s page, this information is so valuable. I can see using everyone of thses grinding tips whenever the specific need arises, all are great. Denise, you story boards are always wonderful.
I’m drinking all of this in and hopefully saving it in my old memory bank for future use.
Thanks so much!!!!
Gail, you’re so sweet! I’m a great believer in pooling knowledge and sharing it. I read something once about how you choose to travel in the world; go alone and travel fast or go together and travel far. ‘Together’ sounds so much more rewarding and ‘far’ so much better for our craft.
I’ve seen a lot of things in all the time I’ve been making stained glass but there’s no way I would’ve thought of and tried everything that people share with me. So thanks to everyone from me, too, you’re helping me go far 🙂
Wow, several great tips, on grinding small pieces.
I think I’ll try them all, and see which works best for me.
Thanks Milly
It would be great if you could report back when you’ve given them a go and tell us which was best for you Lilo, thanks.
My husband made a “pusher” out of a piece of wood. It is shaped so the front is smaller than the back . I now have two of them and it works really well for small pieces
It’s hard to visualise this Sue but good to know that the ‘pusher’ idea works for you, too. Cheap, too – always good. Perhaps you could email an image to me and I’ll add it to the page? Thanks in advance, Milly
Fabulous information, thank you.
I use the cork method for very small pieces and find it effective. Have the cookie but tend to use a lid from a vitamin bottle with a wide rubber band on it.
ooh, another idea Mitzi – the lid sounds a really good and cheap alternative to the Cookie Grinder. I’ll have to try that out, thanks for the suggestion, ingenious.
Good to know the cork isn’t dangerous!
Thank you Millie, another set of wonderful and much appreciated tips!
Debbie
Hey Debbie, nice to hear from you. Glad you found the tips helpful – there’s a new one above with a lid and rubber bands now 🙂
Hi, Millie:
I enjoy getting your tips and suggestions and find I can always learn something new. The problem I have found with all the grinder tools is that there is a loss of control and some block sight of the work piece over using my fingers. I have used several different grinding tools (and made several) and have gone back to using my fingers, and working on the grinder slower and more carefully. I have trimmed fingernails, but never a finger!
Keep up the good work!
Paul S from Michigan, USA
Ha, this made me laugh Paul. I know what you mean about slight loss of control. If your fingers are still able, that’s great. And time saved cutting nails can be used for stained glass 🙂
Hi Milly/readers
My hubby makes my “pushers” from the light wood we buy from Home Depot. The last time we were there, I asked for some “free” paint stirrers, as another reader just said; am going to ask him to make me some more from them. I find these work better & easier to handle than the “cookie or the tongs.” Just my opinion.
The paint stirrers are certainly a good option and winning a lot of votes!
I’m always up for opinions, Sandra, thanks for sharing yours 🙂
Would like the cutting curves issue
Hello Betty, am I right in thinking you’d like the free Cutting Curves eBook? You can sign up for my newsletter and get the eBook here.
Or if you’d like to look at my cutting course to see it’s of interest to you it’s here.
I love the rubber thimbles, they really protect my fingers, I have better control of the glass
That’s really good to know Betty, thanks for sharing your experience, it helps others decide what works 🙂