
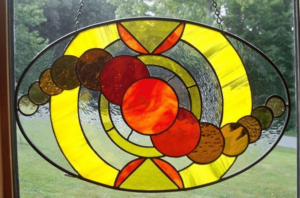
How to Lead an Oval Stained Glass Panel
 Question:
Can you tell me how to go about setting up an Oval piece? Do I need to make a stained glass jig for this?
I’m also using my came bender for the first time. Anything I should know before attempting to use it? Liz
Milly’s reply:
Good for you, giving an oval panel a go, they’re quite tricky but I’m sure you’ll be up to it. Let’s take each part of your question in turn.
Click the links below to go to the section:
Making the Oval Stained Glass Jig
Jigs for Irregular Foiled Panels
Making The Oval Stained Glass Jig
For setting up you’ll need a piece of hardboard (3-4mm thick) approximately 8cm larger than your panel all the way around.
Important: These instructions are for lead. If you’re foiling an oval just do Step 1 below. Don’t cut the plywood in half, as you can foil into a complete oval.
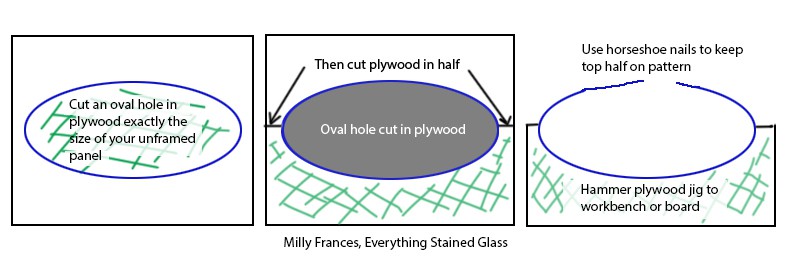
- With a jigsaw, cut a hole out of the centre of the hardboard or plywood. It has to be the exact same size as your unframed panel
- Then cut the hardboard/plywood in half. ou can’t lead further than half a an oval (or a circle) without the glass getting ‘trapped’
- Tape your pattern down and accurately hammer the hard/plywood to your bench or a more robust board
- Use horseshoe nails protected with offcuts of lead to keep the top half of the oval on pattern as you progress
Using A Came Bender With Zinc
There’s a learning curve (groan) with the bender but they’re very useful tools if you make lots of circular or oval panels. Copper, zinc or brass make a very neat and pleasing frame for them.
This is a great video on using the Cascade Came Bender for a circle. For an oval, measure the diameter of the half circles at the ends and then aim for that. Leave enough zinc to straighten out for both the long sides.
Sadly, there is no easy formula for ovals.
- Try using a marker so you know when to stop bending.
- Guesstimate the length by roughly marking around the panel with the straight zinc. Mark where the tight and more gentle curves are.
- You may need to unbend it along the way to get it to fit
Top Came Bending Tricks
- You lose about 1 1/2” at the at either end of the came so don’t forget to take that into account when you measure
- Going slowly is the trick. Try multiple passes with 1/8 – 1/4 turns to coax the straight came into curved. You want to avoid kinks
- Start with looser tension and increase after a few passes
- Make sure the came is in the correct thread. There are 3 levels for different type came.
- WD40 wiped on the came can help with the bend
- Warming the zinc can help
- Keep checking the diameter so that it corresponds to your pattern size
- Brass is the hardest metal so will take more passes and smaller increments to bend
Jigs For Irregular Foiled Panels
What do you do when you have a project with MANY pieces that doesn’t require a frame?
Reader Bill Tait has come up with an ingenious solution…
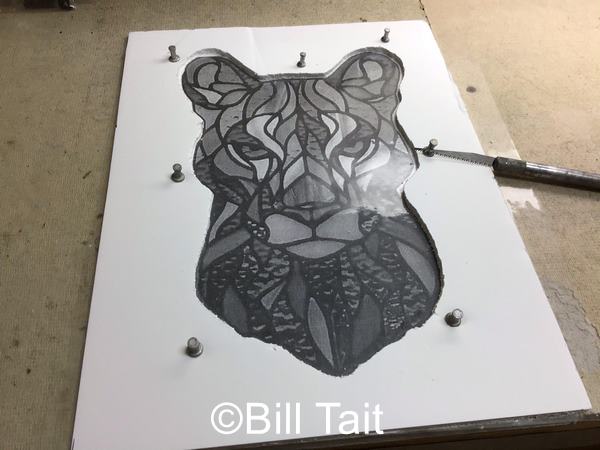
… he traces the pattern of the piece onto a piece of foam board and cuts it out with his little Xacto saw. With a few minutes work he has created a perfect stained glass jig to hold all the pieces in place.
SO much easier than all those pieces slipping out all over the show. Thanks Bill, you’re a star. Beautiful stained glass work, too.
Thank you for Sharing this can help me and a lot of other people. I love reading the e-mails you send out. thanks so much
Aw, you’re more than welcome Kathy. You’re pretty helpful yourself in the Hub (Milly’s student FB Group) yourself you know 🙂
Milly, I loved the video on how to use a came bender!!
Your tips for cutting zinc frame were very helpful too.
I think the order I solder my zinc to my glass is different than yours. After my 4 lengths of zinc framing are cut to size I go ahead and solder the corners together on my finished glass. Then I go around and tack solder all the solder seams to the zinc. This has always worked for me. I guess there’s more than one way to get the job done.
As always your tips are very valuable!
Yes, absolutely always different ways to do things Gail. Thanks so much for posting yours – it gives readers a choice as to which they prefer. My perfect scenario!