Make this butterfly stained glass garden stake and add a flash of colour to your garden. It can stay outside in all but the most extreme weather – in which case bring it inside temporarily.
I would recommend using a slightly wider foil for the edges to give the solder more of a base to ‘grip’ the glass edge.
Be prepared to give them an annual brush up and re-patina if necessary.
Click here to go to the Indoor Plant Pot Stake
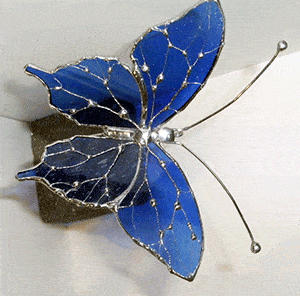
Stained Glass Butterfly Garden Stake
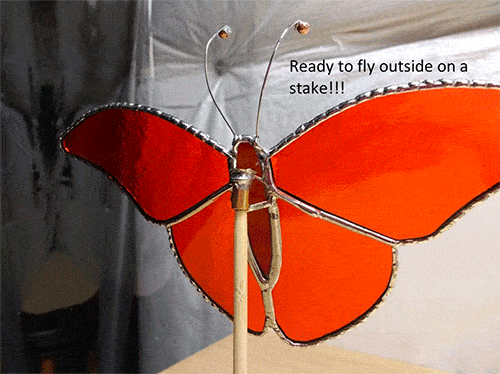
Gail Koebke made this lovely butterfly stained glass garden stake and has kindly written this tutorial for you.
Don’t forget to share it with your fellow glassers will you?
Materials Needed
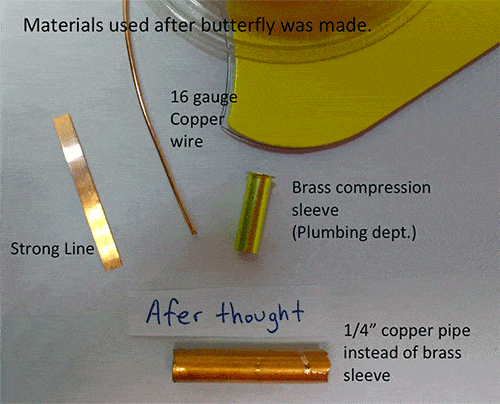
Gail found the brass sleeve at a smaller local hardware store for 49 cents! She found it in a little bin of loose parts.
If you’ve never used Strong Line before it’s a thin coppered steel strip used to strengthen your stained glass panels invisibly.
It’s just the perfect size to fit in between copper foiled pieces. It can also be used for lead came projects. You can see what Strong Line looks like here (paid link).
Strong Line is very similar to Re-Strip, except it’s made from steel that’s been plated with copper so you can solder directly to it. Have a look at Re-Strip here (paid link).
The big difference is that StrongLine is stiffer, so it’s a bit more difficult to get it to go around turns between pieces of glass.
Stained Glass Garden Stake – Get Started
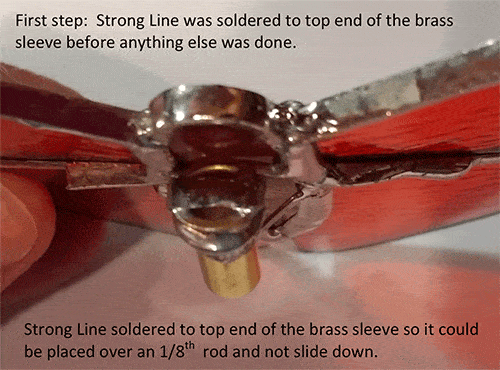
- Solder Strong Line to the top of the brass sleeve first.
- This prevents it from sliding down the rod and keeps it at the top.
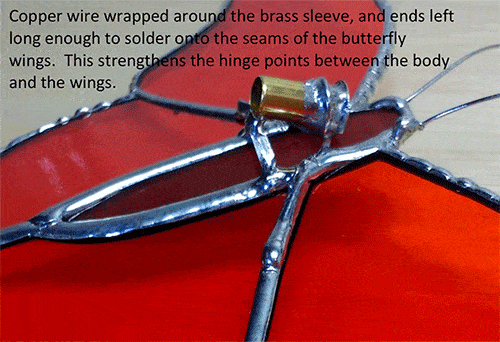
- Wrap the copper wire around the brass sleeve
- Leave the ends long enough to solder along the seams of the butterfly wings
- This gives more strength to the fixing
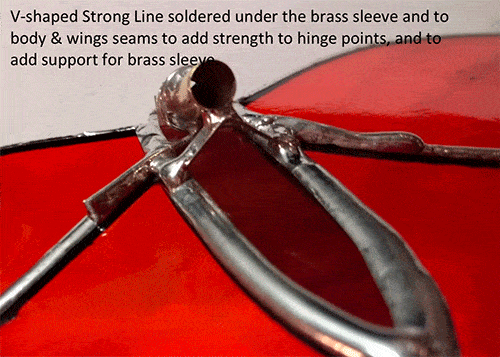
- Solder Strong Line in a V-shape under the brass sleeve
- Connect the Strong Line to both the body and the wings to increase strength and provide support
- The Strong Line is essential to hold the brass tube in place
If you like, your stained glass garden stake can be set at an angle. To do this, solder the sleeve at an angle as Gail has done. This is pleasing to the eye although it does make soldering the mount on a bit more difficult.
Assembling The Stained Glass Garden Stake
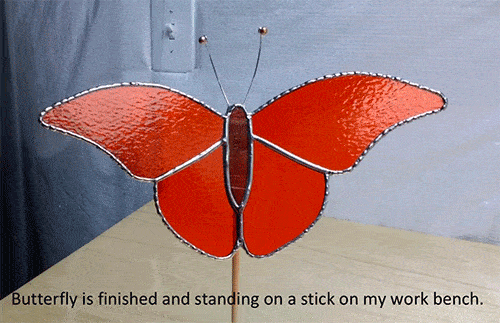
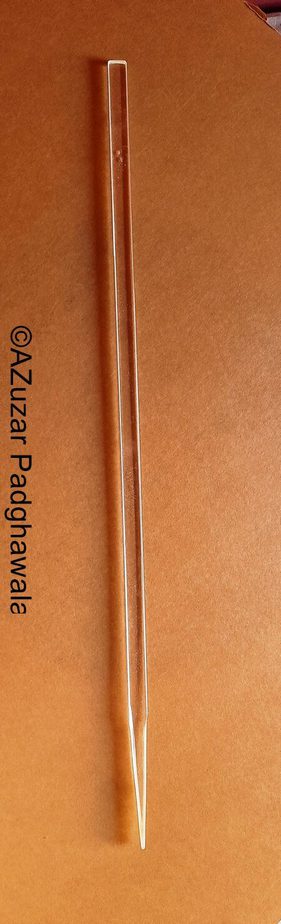
Your butterfly is now ready to be put on a 1/8” rod. It is NOT designed to be a tight fit. This is so the wind will spin it around.
Plant your stake in the garden and watch your butterfly spin and fly!
Make An Indoor Plant Pot Stake
Will you just look at this!
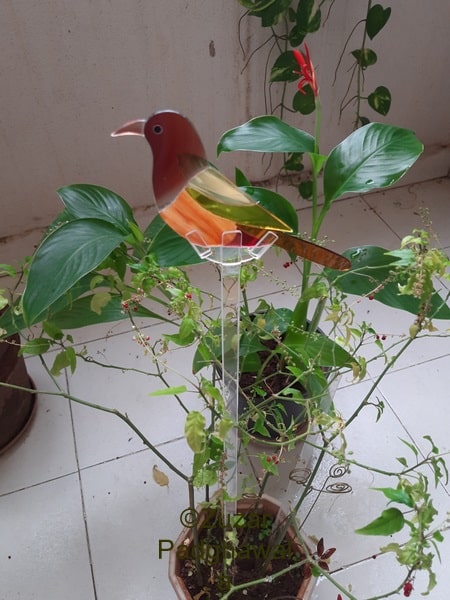
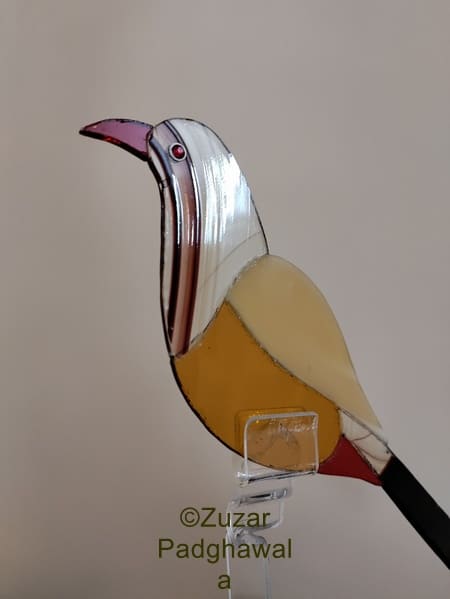
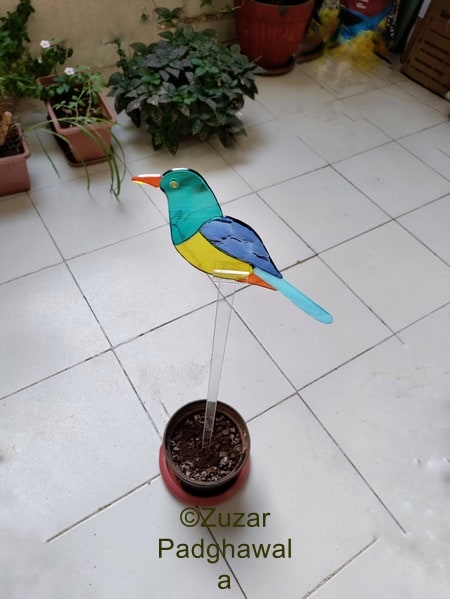
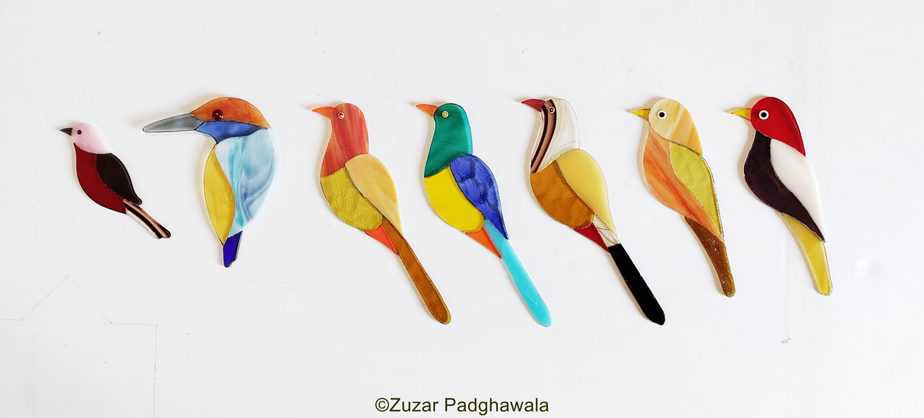
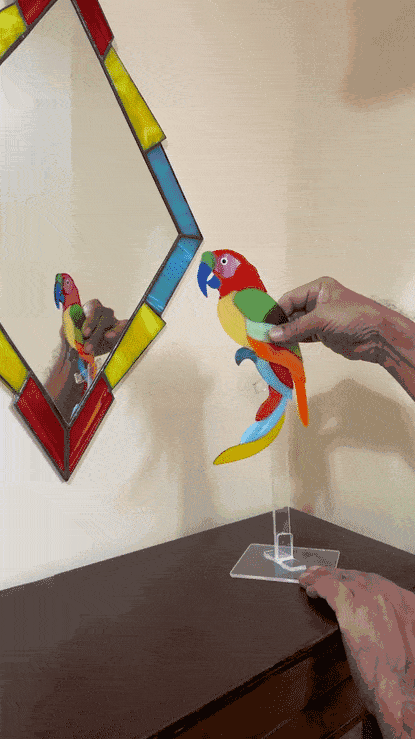
Reader Zuzar Padghawala uses acrylic and glass together to create colourful flocks of birds. He has made these gorgeous indoor plant pot stakes and has kindly offered to share them with you.
All you need to do is:
MAKING THE BIRD:
- Choose a stained glass bird design
- Cut some lovely colourful glass for your bird. You can be as wild as you like!
- Grind all the pieces carefully. The pieces should match each other perfectly with no gap
- Apply UV adhesive on the edges & stick together using a UV light or the sun
- Place it on silicon paper while it sticks
- For the eyes you can either use glass (see the Kingfisher, above), crystal or buy pre-made eyes to stick on
MAKING THE STAKE & FIXINGS:
You need a small sheet of 6mm clear acrylic, a heat source (blow gun or small portable camping stove), heat resistant gloves, safety glasses and a saw (band or hack).
Here’s Zuzar’s sketch of his workings out:
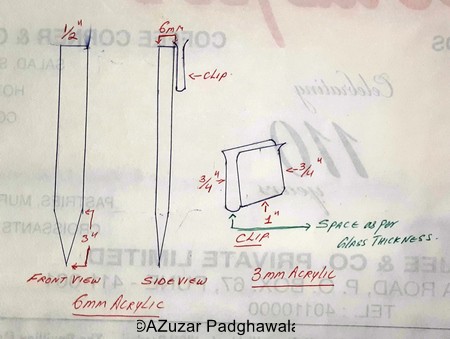
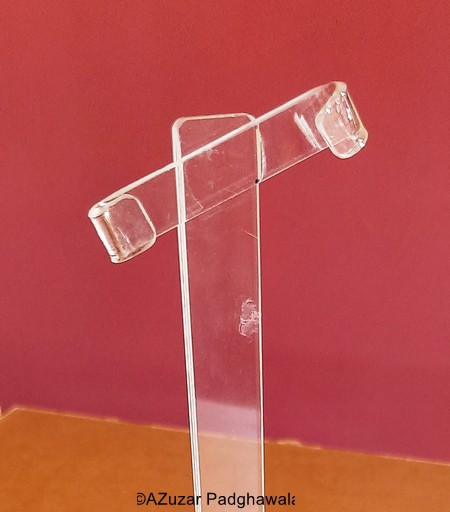
STAKE
The length and width is your decision and will depend on the size of the bird, pot and plant. Zuzar’s is 1/2″ wide x 24″ long (see image above).
Taper the stake 3″ up from the bottom to make it easier to insert in to the earth.
FIXINGS
There are 2 types of fixings; the Clip and the Loop.
They both use moulded (bent) acrylic. To mould the fixings you need to heat the acrylic as per this video:
The Loop – For Vertical Fixing
This option is for a vertical fixing of the bird. It is simpler & easier to make than the Clip.
- Cut a strip of acrylic the required length and width to fit your bird.
- Bend both ends over, leaving enough width space to slot your bird in (see image above).
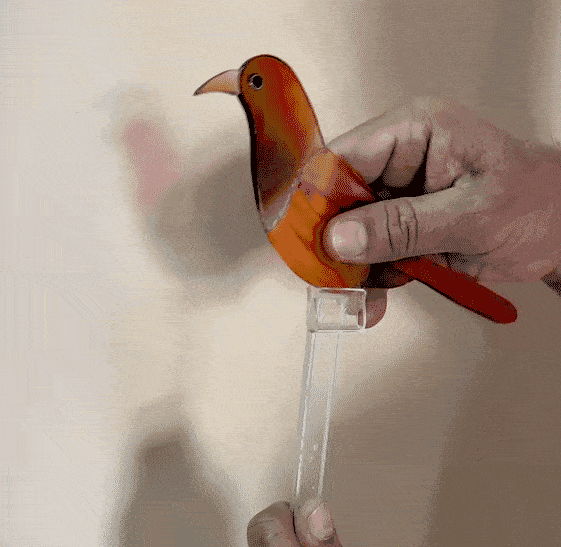
- When cooled and glued to stake, carefully insert your bird (see video below).
The Clip – For Sideways Fixing
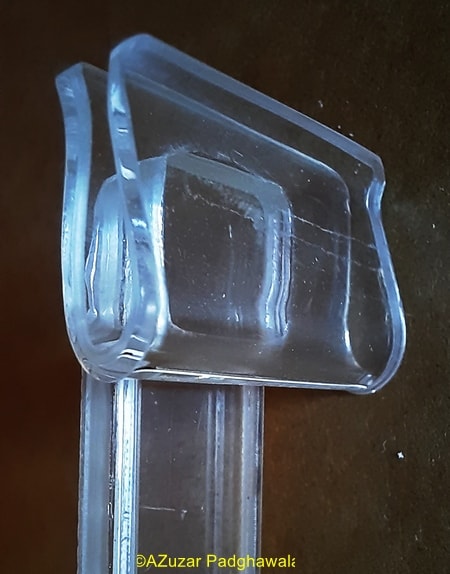
The finished front and back of Zuzar’s clip are each approx 1″ down x 3/4″ across. The strip of acrylic you cut will have to take into account the length of the bend.
The space in between the clip must be at least the depth of the glass, so that the bird can be inserted (see image above).
When cooled and glued to stake, carefully insert your bird (see video below).
Thanks Zuzar 🙂
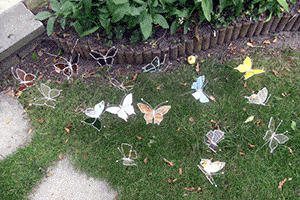
Another Butterfly Garden Stake Idea
Michel de Smedt kindly sent these butterflies from his garden. The copper wire for the body is wrapped around a stainless steel spring so these butterflies wobble in the wind when passing by. Lovely, thanks Michel!
Don’t forget to share this page if you think others will love this idea too. Thanks.
Want to make a stained glass Christmas Tree for your table? Find instructions on this page.
Hi
Was there a pattern for the butterfly shown by Gail?
I assume the size can vary but the picture of the red butterfly was stunning.
No pattern Roger but you can use the idea to make one of your own. Glad you like it, I’ll tell Gail 🙂
Good Morning , Milly (At least it is morning as I contact you). Beautiful day, lots of sunshine, green grass, with lots of yard work, now that we believe Spring , has decided to come. Lots of overland flooding, so hope we have enough rain for now. I thankfully live in the city so count my Blessing that I am “high and dry”.
What lovely creation of the birds. Such creative people. Have been lack’s in my glass wok, so had better get back to it and try a few new things.
Congratulations to Zuzar. Excellent workmanship!
Glad you enjoyed Zuzar’s birds Kathrine. They’re stunning 🙂
So generous and kind! Thanks to all for sharing your beautiful and ingenious creativity!
I know, everyone is so kind and willing to share 🙂
Thanks Milly. Always look forward to my Sunday morning inspiration 🤗. Also thanks to Gail, Zuzar and Michel for sharing their techniques. Definitely a studio day here in Alberta. Probably 2” of fresh snow and still coming down.
Thanks Lynn. Have a look at the revised instructions above; a misunderstanding on my part 🙂
Where can we purchase the lucite stakes?
You make them Marie. Have a look at the revised instructions above; a misunderstanding on my part 🙂
Where can you purchase the acrylic u clips?
You make them Karen. Have a look at the revised instructions above; a misunderstanding on my part 🙂
Thanks for sharing. I love them all and as soon as I get the chance I will be making some if not all. Thanks again Milly love the Sunday E-mails
Thanks Kathy, you might want to check the revised instructions – a misunderstanding on my part 🙂
Many thanks for your examples of butterflies… I’m doing some butterflies yet and it’s so nice to try a new kind.
Great to know Anja, thanks. I hope you’ll be producing a whole flock for your garden 🙂
These are wonderful. I’m going to have to try all of them. I so love all the great tips and ideas from every one especially you Milly. Thanks Stay safe and healthy. Cheers, Nancy
Aw, that’s nice Nancy. You’d best get making now 🙂
Just a quick tip to save money and an extra step in the process. A reclaimed 22 shell casing substitutes perfectly for the compression sleeve and doesn’t cost anything.
An ingenious addition to the tutorial, thanks Karen 🙂
Fabulous idea; my husband has lots of them. My next project for sure. Milly — can you explain the butterfly body by Michel, “The copper wire for the body is wrapped around a stainless steel spindle.”? I like that one too. Thanks.
Good question Cathy, ‘stainless steel springs’ is what is meant – I’ll change it to make it clearer.
Have a very safe & happy new year. Keep up with all the great advice! Thank you! Enjoy hearing from you! Blessings!
Dottie
Thanks Dottie, that’s kind 🙂