Stained glass soldering boards require two things:
- to be sturdy enough to hold your stained glass in place
- to have a degree of heat resistance
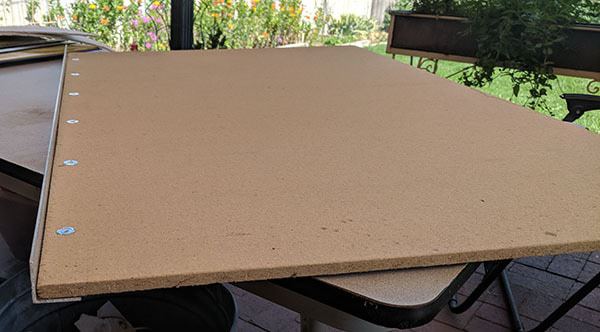
Homasote makes perfect stained glass soldering boards. Made from pressed fibreboard, Homasote is safe to use for soldering and good for assembling. You can even cut glass on it.
Funnily enough, for a product that’s similar in make up to papier-mâché, Homasote board is heat proof. It’s made from recycled paper compressed under a high heat and pressure. Glue holds the whole lot together.
Homasote is a brand name for the product known as “cellulose based fibre wall board”. As you’ve probably guessed, Homasote board was initially used for the building trade and has been high-jacked by stained glass! Amazon.com sell them here (paid link)
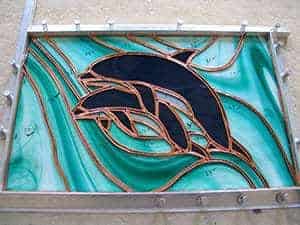
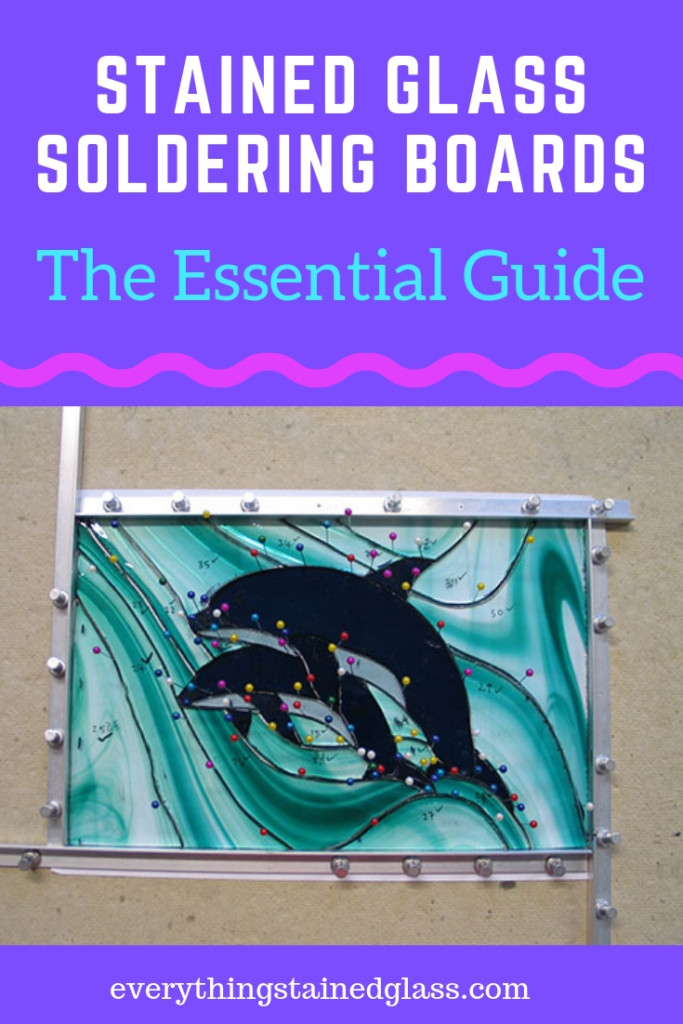
Stained Glass Assembly with Homasote Board
Copper Foil Method
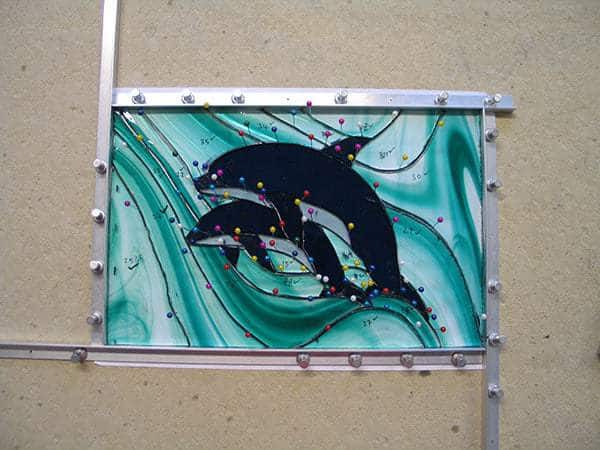
The surface of the Homasote board isn’t rock solid. This means you can easily tap nails or push pins into it to hold your stained glass securely in place before soldering.
Because of this, Homasote board is particularly good for copper foiled projects.
Pins easily hold a freeform sun catcher in place prior to soldering. Just place them at regular intervals around the edge of your work before tack soldering.
For square or rectangular panels you can use Homasote board along with Layout Blocks to hold the panel in place. Tap nails along the overlapping layout blocks to create a perfectly square panel. This overlapping configuration is shown in the image above.
TIP: Adjustable Homasote Board
Take a look at the adjustable board above sent in by reader Carole Jackmason.
It has a permanent baton attached to the left hand side of the board. When you’re ready to assemble your stained glass panel just nail in a layout block at right angles to the baton and you’re ready to start.
Your stained glass panel can be as big or small as you like with less fuss.
Lead Came Method
You can use Homasote board for the lead came method but I wouldn’t recommend it.
This is because the surface of the board isn’t hard enough to withstand the pushing and pulling needed to assemble a lead came panel.
The nails or pins will dislodge during assembly. Annoying!
I’d recommend chip board for the lead came method. It’s harder and more robust. Bang the nails in hard with the top end of the lead knife or a hammer and they’ll remain in place during assembly.
Alternative Stained Glass Soldering Boards
Drywall
Sometimes known by wallboard or brand name Sheetrock – drywall is a heat resistant board used in the building trade. Made from gypsum powder pressed between two thick pieces of paper, it is very lightweight which is a plus!
It’s not quite as adaptable as Homasote board because you can’t cut glass on it and in my experience it doesn’t take pins well and can chip and dust.
Rigid Foam Insulation Board
Alternatively you can use rigid foam board covered with butcher paper. Like Homasote, the surface isn’t solid so you can easily push pins or nails into it to hold your stained glass in position.
It won’t last for too long but you can easily replace it. A very lightweight solution for smaller projects. This would be a good alternative if you can’t find homasote.
TIP:
To make drywall and rigid foam stained glass soldering boards last longer, cover the whole piece with wide masking tape all over, including the edges.
The board will last for years if you take the time to do this.
More Ideas For Stained Glass Soldering Boards
You don’t need to nail your stained glass to the board to hold it in place. For smaller projects you can use masking tape to secure the pieces before tack soldering.
I use left over scraps of a granite kitchen top for these smaller projects that don’t need a jig.
Dwayne Brandly teaches stained glass and has kindly shared this tip with us. He makes work boards for his students to make their class projects on.
He glues cork on one side of the board.
This is good for cutting on and doing the tack solder or completing one side of the project.
He glues smooth laminate on the other side.
This side is great for burnishing the foil. The smoothness of the surface means that students can slide the piece around without worrying the foil will catch on the cork and rip off as they move it around.
See how to make your own Layout Bars in this post here
Click her to see how to get your panel square and fitting
Find out about other stained glass tools and materials
I am using the same piece of, I guess you would call it foam board that I have had since my first class in 2002. The only way to describe it is, the ceiling panel like the dentist office uses. You know, laying there looking up, the white board with dots you try and count and hope this finishes quickly. One side is painted white, I use the back which is unfinished grey. I call it self healing because you can push metal pins in over and over etc. At times I may scorch the paper and solder splashes. Great for holding the piece while tacking. It can handle all and you can cut it to any size you need. Thanks for reading. Joey – Brandon Florida
Thanks for your useful tip Joey, we appreciate your time. Your board sounds like a good friend (apart from sticking pins in LOL)
Yesterday, I went to my local Home Depot in Florida to buy Homasote. Their online store said they carried 2×4 pieces for $15. It is 1/4″ MDF. Too hard to push a pin into and too thin to support most projects. It is NOTHING like the 12×12 pieces that I purchased from my stained glass supplier.
No, mdf (medium density fibreboard) is too hard for pins. It’s even too hard for nails so can’t be used for stained glass. Good observation Kathy, thanks. You’ve saved everyone else the bother of trying it.
I’ve used the same 24×24″, 1/2 inch homasote board I purchased when I began my stained glass adventure. That was in 1990. So it has had many, many years of service and for about 10 years I created pieces for sale as well as for myself. It is still in great condition although stained. I’ve always use the small metal pins that I purchased at a stained glass store to tack my piece to the board. I have always used newsprint sheets (not newspaper) to draw my pattern on and tack that to the board to lay out my glass and to do my soldering. Even when I’ve been making a three-d piece I put down a paper sheet to do the soldering on instead of just using the naked homasote board.
Wow, that’s got to be a record Lois. I’m sure you’re careful so that the paper doesn’t get burnt with the solder or iron 🙂
I’m surprised that my board has lasted this long too! I’ve never had a problem with my paper burning even though hot solder drops onto it at times. I’ve always used a holder for my iron that has a heavy metal bottom and a metal spiral in which you rest the iron between using it. I never put it anywhere else except in my hand. Perhaps the newsprint doesn’t catch fire as readily as some other kind of paper could. I’ve actually never thought about it because I’ve always used this method and never had a problem. These materials and methods were what I learned from my instructor at the beginning. She thoroughly promoted safety above all else.
I also never allow children or pets in the room when I’m working on a glass project.
Hi Milly,
Thanks as always for sharing all your helpful tips, they are so valuable to a beginner like me.
However, after purchasing a homasote board recently and using it several times I keep ending up with the same problem; dust/fibres from the board end up mixed into my solder which gives the solder some very undesirable properties – it clumps together and doesn’t flow properly, it doesn’t bead properly (due to the clumping) and there are fibres visible in it. I’ve recently had to desolder and refoil a piece because I was so unhappy with the fibres/finish of the solder. To be fair, it was a good lesson to have gone through, but I don’t want to repeat it too often!
Looking at photos of other boards available online they look very similar, like they would be a little dusty/with loose fibres. Do you think I have ended up with a ‘bad’ homasote board, or is there something I’m doing wrong? It feels like the solder is picking up fibres due to its proximity to the board, which increases as I keep working, and I’m not too sure how I can avoid this.
If you have any tips or suggestions I would gladly hear them,
Cheers!
Katie
I’m wondering if the pins you’re using are relatively thick Katie? I hadn’t noticed this happening but I use thin pins. If you use the same area over and over the boards do have a shelf life but it doesn’t sound like you’ve had it that long.
Anyone else have any ideas?
i use push pins and they work great on homasit board but some pins are not sharp enough to push into the board so i scrap those since i get them at the dollar tree push pins are cheap
Thanks for the clarification Ann. The cheap ones sometimes do break.
If the homosote board is held together with “glue” (which appears to be urea-formaldehyde or phenol-formaldehyde or other synthetic resin), and if this glue is heatproof, then can you get more of the same type of glue and paint it onto the surface to stick down all the extra fibres?
(While looking this up, I learned that homosote is also used as a base for model trains! Desirable for its sound-damping qualities)
What an interesting idea Rod. I’ve never thought of doing that so can’t answer your question but would be very interested if you gave it a try. Come back and let us know how you get on if so 🙂
Thank you for the tip! I am extremely new to this. I bought two large, framed bulletin board from Hobby Lobby. I use push pins to hold it in place and put one of the boards over the top to flip the design to do the back work. I don’t know if that was the right thing to do, but it has worked well for me.
Yes that’s good practice Angela, to use another board to support your very weak half soldered panel when turning. Thanks for sharing 🙂
Some of us in the USA may have a problem locating HOMASOTE board. All I could find was a “substitute” which is prevalent at “Big Box Stores, especially Home Depot. HOMASOTE seems to be manufactured in the US but not readily available in my part of the Mid West. That is, unless you want a whole 4X8 foot sheet at over $50.00. HERE IS THE SAME THING AS HOMASOTE!!!!!!——-
It is called MDF and that is what most of the lumber yard people call it when you ask for HOMASOTE.
MDF is Medium Density Fiberboard and it has all the characteristics that Millie points out about the HOMASOTE.
I was able to find what appears to be literally the same thing at HOME DEPOT 2X4 foot piece $15.00.
I made a frame for it because it has a tendency to “bow” or “warp”. The frame is just pieces of 1X3 dimensional lumber screwed to the underside of the board, with a strip in the center of the 4 foot length for added stability. This frame doesn’t have to be fancy, mine has 2-3 inch gaps between the boards. Just enough to keep the warp out of the board and to keep it from sagging in the middle. Works great and you can also elevate the far end so give a nice gentle slope, aiding your work without allowing solder to run on you.
This is a very useful addition to the page Mike, thanks. We have MDF in the UK and it’s a bit harder than Homasote but I do use it all the time for leaded projects, or 1/2″ chipboard.
I find Homasote really good for small foiled projects or sun catchers that can be done with smaller, less robust pins (rather than the nails I use for jigs in leaded or larger pieces).
Thanks so much for adding your great tip 🙂
Regarding work surfaces, I, too, was taught using sheetrock, and have continued to use it for a few years while always keeping my eyes open for an alternative. One important consideration: you should use 5/8” sheetrock if you’re using push pins. 1/2” is thin enough that the tips of your pins can poke through and mar any surface beneath the drywall. Both Home Depot and Lowe’s in my area sell precut 2’ x 2’ pieces of both thicknesses. They’re only a few dollars each, are easily carried in the smallest car, and can be carried by one person.
The other thing I was taught originally, but had to learn the importance of on my own, is to place something between your glass and the sheetrock whenever using flux or patina. Flux, especially, will soak into the sheetrock and then contaminate future artwork. The best thing I’ve found is the brown paper that my glass often arrives in. I save every scrap and use it between the glass and the drywall.
Great tips and lots of useful detail Mitch, thanks SO much for adding them to the site 🙂
I have also stolen from the building industry. I use dry wall to cut and solder on. The paper on the drywall won’t catch on fire. It may singe, but won’t burn. I get my pieces from local building supply stores, and ask for damaged pieces. This way they are very inexpensive, and can be sized to my needs. Just tape the edges to avoid the “mess” of powdered plaster.
Great ‘steal’ Cheryl! Thanks for sharing your tip with us all 🙂
Thank you Milly for all the useful tips they are very helpful. I enjoy reading them all. I just wished I had more time to indulge in Stained glass but do it when I can.
You’re most welcome Margaret. Maybe in the future you’ll be able to set some regular time aside? You don’t need that much, even an hour a week would move you on to start with 🙂
Hi Milly, I’ve read your articles several times over the past few months but didn’t read the comments until today. I worked with stained glass for several years, then grandkids came & GG helped with child care and I got away from stained glass. Unfortunately stained glass & little tikes don’t work well together. Fast forward…With COVID and schools shutting down, my husband and I worked with the grandsons in different areas of supervised crafting and woodworking. Luckily, they got to return to school in the fall. My plan for Spring Break is to let them try a couple of simple stained glass projects. What I use to work on is ceiling tile. Where I work, they change out the dropped ceiling tile from time to time. Over they years I have asked for a few and they give them to me. Great for recycling and excellent for working with all areas stained glass, cutting, foiling, soldering, using pins or nails. Even if I had to buy replacements for the 2′ x 4′ tiles, they are relatively cheap.
Great suggestion Sue, thanks, very useful for smaller projects.
What lovely grandparents you sound, lucky children 🙂
Sue, Milly: I too use the 2×4 ceiling tile. I worked in the construction industry for many years and there was always some damaged tile that would have ended in the dumpster.
Milly, I enjoy this idea sharing format you have. As I read through the various comments, I wonder why I didn’t think of that or think it’s nice to see someone else using a technique that works for me. Thanks again
Mel
That’s so good to know Mel, thanks for letting me know.
The tips everyone are sharing are building up into something really useful for everyone. Thanks for adding yours 🙂
What is chip board?
I’ve nicked this from laveronline.co.uk as it’s a much better explanation than I could come up with! “sometimes referred to as Particle Board or Low Density Fibreboard – is made by mixing small wood particles with epoxy resin, which are pressed together under intense heat and pressure to produce a rigid board, typically with a smooth surface.”
Good question, I hope that helps.
Here are some more suggestions from my VERY helpful readers – thanks to them all!
William:
I use a big sanded (ran it through a planer to make it perfectly flat) pine board 12″ wide and as long as you want. if you get the grade they call “clear “, there are no knots to make it uneven and it will hold tacks for both foil and came without slipping but tacks push into pine easily. And if you need a bigger (wider than 12”) panel, they glue together edge to edge really well. they are pretty heat resistant at least at the temps stained glass uses and if you get a little char, it sands away easily.
Sharon: I use drywall. I have a 4×4 workspace on one table covered with drywall. I tape around the edges with the foil type HVAC tape. Very sticky and will never come off. I do solder and cut glass on the drywall. No problems cutting glass. Just have to make sure there is nothing under the glass except clean drywall. I have a bench brush. Important to brush away small slivers of glass or tiny balls of solder. I piece of drywall will last for years..like a decade. It is also easy to set up blocking angles with the drywall. I use push pins..thumbtacks with colored plastic on the end for easy handling available almost everywhere office products are sold. I can also use straight pins with colored balls on the end for small projects or for having a uniform separation between solder lines within the piece.
My point is…that drywall works very well for soldering and cutting glass. I use old foam computer mouse pads for foiling. The foam is dense and not think. It is probably harder to find these foam mats now since everything is touch and mouse is built into laptops nowadays. But if you can get your hands on these old mouse pads…they are great for burnishing the foil. I have taped the back side of several together to make a larger area for some of the bigger pieces I need to foil. I use a wallpaper roller, the old wooden type if you can find one, to burnish. I also use an eraser to burnish heavily textured glass. It also cleans the foil. Here in the US , when we were kids , we would use an eraser to make our copper pennies all shiny and new looking ! I also use foam board to encase my finished pieces if I am transporting them to another location.
Karen: You can use cement board; that stuff used to create a solid surface for tile.
But my personal favorite is silicone pads used for cooking. It is heat resistant and easy to clean. It is non-slip so the parts don’t skitter around. Try it.
Floyd: I got a 2×4 ceiling tile from Home Depot for around $18. Made two 1×1 and one 2×3 working surfaces.
I have been using sheet rock as a cutting and assembly surface for years. Bought a 4 x 8 sheet and cut it up into several smaller, e.g 4 x 4 and smaller to accommodate different sized projects. It easily allows use of stick pins to stabilize pieces. Best of all it cost around 6 dollars to buy a full sheet. I would consider other surfaces if there is a significant advantage?
Brilliantly helpful comment, thanks John. My only concern would be regarding lead came construction as you need a robust board for all the nailing, pushing and pulling. I use 1/2″ chipboard for that.
I use a 1inch thick rigid foam insulation, wrapped with painters tape then covered over with tin foil. The foil will last for 2-3 projects before I have to replace it. I do my soldering on here. But I will try a piece of fiber board.
Tin foil – that’s a top tip Diane, thank you. I hope you get on well with the fibre board.
I recently was making a small piece in copper foil, mostly of nuggets, bevel pieces, and an agate slice. It was very irregular, and I couldn’t figure at first how to hold it all in place to tack solder it. At last I found an old chalk board with a shiny surface, and used tiny bits of blue photo tack under nearly every nugget to hold it together. The board held up well for my purpose, standing up to the heat of the solder but not bonding to it. And the photo tack stuck well enough that it took some pull to get the piece loose when it was tack soldered, despite the tiny bits of the sticky stuff that I used. Not expensive either, and I used very little of the package of it.
Oh that’s a brilliant tip, thanks SO much Lisa. I’m sure it’ll be appreciated by others too 🙂
I use ceiling tiles. They are inexpensive and last a fair amount of time. They will hold pins or nails. I cut them in a few sizes and cover the edges with duct tape.
Thanks for your tip Nora, that’s very helpful.
Milly, these are wonderful tips!! You always share the best information with the world.
Thanks so much!!!
I share a lot of your tips too Gail so the thanks goes both ways 🙂
I can’t find Homasite board for sale in the UK. Shame – it sounds very useful!
Hi Moira, you’re right, I got mine from the US. I think Tempsford Stained Glass sell it here: https://tempsfordstainedglass.co.uk/search/?q=morton. I emailed them to check that it IS in fact the same product and they said it was a “soft fibre board” which sounds just like it! It’s worth giving it a try I think.
A tip about painting your homosote board…..don’t! Especially not enamel. Solder will melt into it. I initially though it would be cleaner and smother. Not. Ed
Ew, thanks for the heads up Ed, very useful!
Thanks again for more wonderful helpful tips!… I am once again in Central America and not trying stained glass..hope to finish some projects when I return to Florida! Really appreciate all your useful information Milly…all best wishes to you and your students!
Thanks Maricia. Get back to stained glass soon!