
Applique Tutorial
The stained glass applique method is straightforward, subtle, and much less laborious than copperfoil or leaded work. Here’s how to:
- Save money with advice on the best glue to use for applique
- Create applique stained glass windows with leftover cullet
- Save time by following expert applique grouting tips

Stained Glass Instructions for Applique
1- Layout
– The layout design is placed beneath a cut-to-size sheet of ordinary window (float) glass.
– I’ve always done it ‘air’ side up, but it might make no difference.
-The shaped stained glass pieces are glued to this float backing glass.
2 – Gluing the glass
After much research and experimentation, we settled on Weldbond (a Canadian all-purpose glue) as the best bonding agent. It ‘s non-toxic, spreads quickly and easily with the finger.
The only drawback is that Weldbond is white and optically rather dense when applied and takes quite a long while to cure to clarity if applied too thickly.
– It’s best to allow the glued pieces to cure for a couple of weeks before grouting the seams, to allow for more-rapid escape of volatiles from the glue.
– Apply a thin film of Weldbond to the back side of the stained glass pieces, a bit more for uneven glass.
Step 3 – Grouting the applique
– The seams in the applique are filled with non-sanded tile grout with polymer.
– Grout comes in various colors, but all are opaque and appear black in a back-lit panel in a window or light-box.
– In reflected light, the seams will appear grayish; mixing in some carbon-black with the dry grout before moistening and application will give the seams a darker, less-reflective appearance with indoor illumination.
– Over-moistening the dry grout will cause some unpredictable and unsightly bleeding of dark liquid behind the stained glass pieces.
This occurs by capillary action, or simply running into open spaces behind uneven glass.
It’s unpredictable; the moral is NOT to overmoisten the grout!
– To avoid this you should merely sprinkle water into a small tub of the dry applique grout and stir until balls of moist grout are formed.
– Pick out these balls of grout and rub gently into the seams with a finger.
– When you run out of grout balls, sprinkle a little more water to produce more.
4 – Cleaning the applique panel

Inevitably, much grout is smeared on the stained glass surfaces.
– After grouting the entire panel, allow to stand for five minutes or so.
– Wipe the stained glass surfaces gently with moist (not saturated!) paper towels to remove most of the grout residue.
– Let it stand overnight and remove the remaining films of grout from the stained glass surfaces with fine wire wool (steel wool).
– This may occasion some plucking from the seams, requiring tiny patches of fresh grout here and there.
Advantages of the stained glass applique method:
- Subtlety. With no foil/lead overlap, very tiny and narrow stained glass pieces and extremely narrow seams are feasible with applique work. The distressing darkness of a heavily soldered stained glasswork is obviated.
- Expedience and “greenness”. Applique uses no metals, no fluxes, no soldering, no patination, no flux-removers or cleaners!
- Strength. The double-thickness applique panels are much stronger than copperfoil or leaded stained glassart.
- Ease of repair. If a stained glass piece should pop off in handling the applique panel, just glue it back on and patch-up with a bit of grout!

Disadvantages of the stained glass applique method:
- With cathedral or streaky artglass, the uncured glue will be a distraction for some time, and even after curing to clarity in strong back-lighting mild light-refraction shadows will be visible along the edges of the contracted glue.
- Artglass with very uneven reverse side will be weakly glued because the contact surfaces are decreased.
- Artglass with intricate surface texture (Kokomo Vertigo, for example) will trap grout in the minute grooves, and much will be impossible to remove.
- This is not always bad news; in some panels, this produces an enhancement of shadowy areas.
- Chipped glass edges (from grinding) are not obscured; grout will fill tiny scallops and crevices and much cannot be removed. This makes the grouted seams a bit ragged-looking under close scrutiny.
- Using a fine-grit grinder head will minimize chipping but add considerably to grinding time: choose your poison.
- The finished stained glass applique panel is unframed and has somewhat uneven edges.
- The panels can be custom-framed for hanging, but they are of course heavier than copperfoil or leaded panels, being of double thickness.
- We insert precisely sized stained glass applique panels inside the ordinary pane in our bathroom window and find that the uneven edges are not a distraction.
- More-fastidious people may wish to frame the applique in, with a bit of frontal overlap. ¼” (6mm) or so is plenty.
- Viewed from the reverse side the late-curing white glue will be quite visible for an indefinite time.
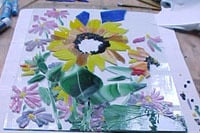
Kindly written and shared by stained glass applique expert Nasrene MacDonald. All the photographs are of her work.
Helpful Resources
The Technique of Decorative Stained Glass (paid link) by Paul San Casciani. Includes a chapter on stained glass applique.