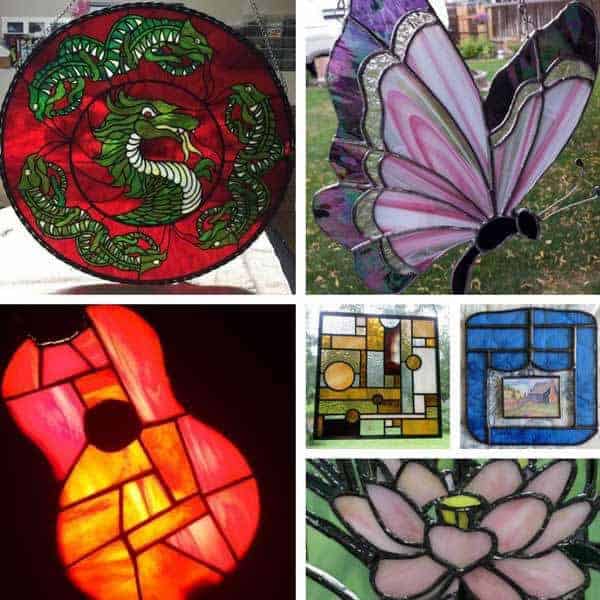
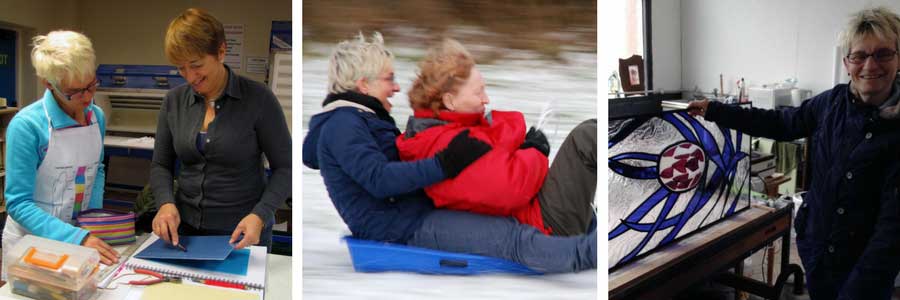
Giving you the skills to create beautiful things
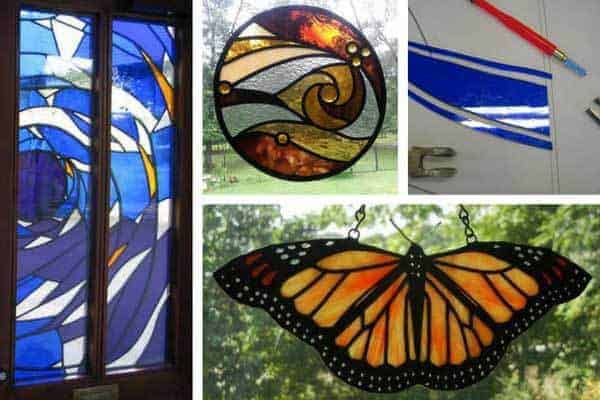
Hello and welcome to Everything Stained Glass. I’m happy you’re here and want to help you get the biggest buzz from your stained glass journey.
From Beginners to Advanced, I have something new to teach you.
ARE YOU A PAYING STUDENT? THEN CLICK HERE FOR LOG IN HELP
In the 16 years EverythingStainedGlass.com has been around I’ve added a LOT of information to the site. It can seem overwhelming.
To get you started, I’ve created 3 sections covering the most common questions I’m asked at each level:
1. Help for Beginners and Refreshers
2. Help for Improvers
3. Help for Advanced
And as I know you LOVE tools, I’ve devoted a section solely to them:
Search Button
Don’t forget, you can always use the Search Button (top right on each page) to find your answer/s.
That buzz when you lift your stained glass from the bench and hold it up to the light is truly the finest moment. My job is to help you reach that moment with confidence and satisfaction.
I’m not interested in the ‘right’ way, I’m interested in the way that suits you best.
Let’s dive in…
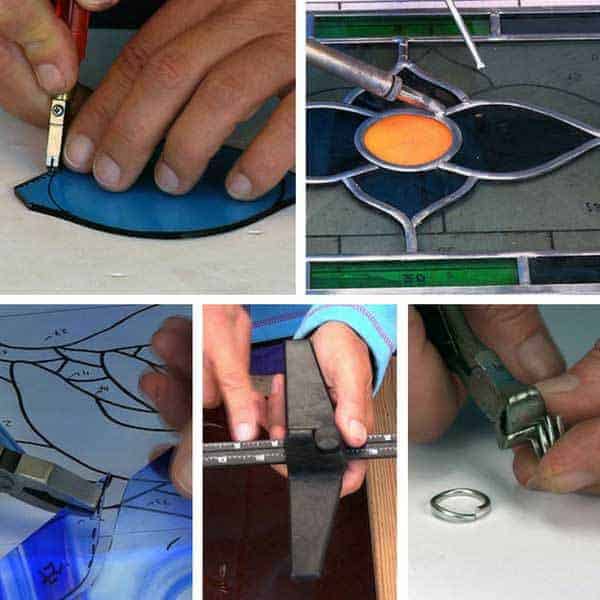
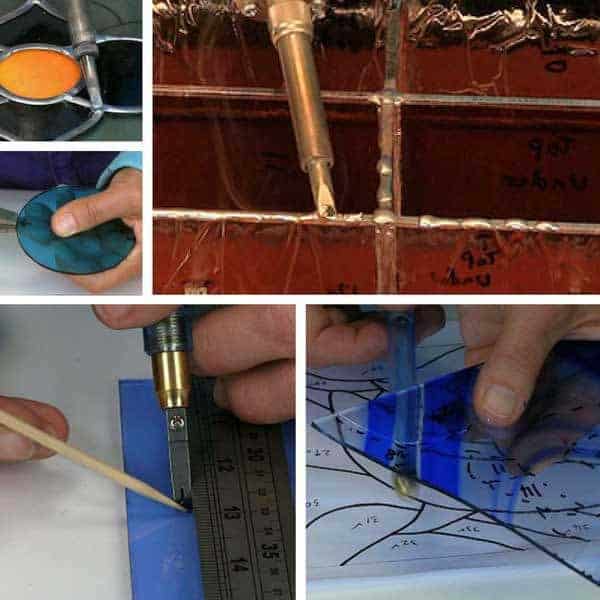
Everyone has different stumbling blocks at this stage. Cutting and soldering are the biggies, with patina and foil close behind.
- – Lumpy solder seams?
Stained Glass Soldering specifically takes you through the process.
- – Problems with iron temperatures, filling gaps or soldering hooks?
Visit these Soldering Help Pages
- – Struggling with cutting (e.g. cuttable shapes, cutting circles or panels that grow)?
- – Mouldy patina, eek. Hot foot it here:
Perfect Your Patina to prevent a mouldy, unsightly finish.
- – Pesky foil not sticking?
Here’s your answer Copperfoil Not Sticking
To make 100% sure you’re not missing any vital information at this crucial Beginner/Refresher stage take my Stained Glass Made Perfect course.
This course, together with my shorter Conquering Curves class will give you a solid ‘know it all’ start to your stained glass journey.
The top sticking points here are making larger work, bendy panels and repairs.
- – Ugh, wrong size pattern.
Go here Resizing Patterns to resize it.
- – Unstable panels? Learn how to reinforce here
- – Repair needed? There’s a workaround for you here:
- – Questions about lead? Everything is here for you:
This is also the time to expand into new techniques. My Leaded Stained Glass Artistry course is a natural progression at this stage to give you additional confidence and creative choices.
3. Help for Advanced
Those with skill in all areas can still improve and push forwards. There are new decorative and ‘arty’ techniques to explore and a more business approach.
- – Fancy adding tiny details? Overlay is your answer:
- – Vintage plates, decorative solder and textured glass are other possibles:
- – Underpricing your work? Go here for pricing help:
My Stained Glass Plating Magic course hits the ‘advanced’ spot perfectly. It unites the practical with the artistic in a way that will push you into completely new areas.
4. Tools and Materials
Beginners are always the most anxious about tools, so this list of essentials is for you:
- Glass Grinder (optional, but makes life much easier)
- Soldering Iron
- 2 Piece stained glass 10″ x 10″ – hobby cuts
- Glass Cutter
- Running Pliers
- Breaker/Grozer Pliers
- 60/40 Solder
- Copper Foil
- Safety Flux and Brush
- Soldering Iron Stand
- Fid and Burnisher
- Safety Glasses
- – My personal recommendations for these and a range of other (sometimes surprising) tools are here:
- – An explanation of what the tools actually DO is here:
- – If it’s a soldering iron recommendation you’re after, this is THE one:
Which Soldering Iron Should You Choose?
- – Saws and board hunting? Go here:
Stained Glass Saws and here Stained Glass Soldering Boards
- – Lastly, here are the lead came tools for you Lead Heads:
Introducing Myself
If you’re wondering ’who IS Milly Frances and what’s her story?’ you might want to check out my About Page.
The crucial bits to know are that I play 5-aside football badly, have a Masters degree in Glass and a Post Graduate Teaching Certificate.
My 3 passions in a nutshell – football, glass and teaching 🙂
Hello,
I’m about to start a large (approximately 30 inch by 30 inch) stained glass panel. I usually use copper foil and lead solder. I’m not sure what to use to reinforce this panel so it doesn’t warp. The panel will have a lot of hinge joints and be comprised of shapes within a large overall grid.
Thank you for your help!
I broke down several old glass panels and recycled the solder. I melted it down into managable pieces and have tried using it for new glass projects. the recycled solder clumps up on the iron tip and does not want to melt and flow evenly. Thought it was my old iron not getting hot enough so I bought a new 100w Weller. Same issue. I can make a clean solder line but it just doesn’t flow like a new roll of 60/40. thought this would be a good cost saver since the recycle project netted me about 30 pounds of solder
thanks for any thoughts
That’s an interesting experiment Dave, thanks for sharing. I can’t honestly say I’ve ever recycled solder in this way so can’t comment but I suspect you’re right; that new is better. I would be worried about the fumes in dismantling and recycling solder in this way.
I’m looking for recommendations for a new grinder. I’ve been using a Glastar Diamond Star grinder for about 12 years now and the motor sounds like it’s going. According to Delphi Glass: “The most revolutionary glass grinder in the art glass world is here”. They’re referring to “The Grinder”. It’s pricey, but quality tops cost for me. Comments? Recommendations?
Mahalo, Debbie
I have this page about the Grinder. As I say in my review, I’m relying on trusted people as I don’t have one myself… there are some comments underneath from users too. https://everythingstainedglass.com/stained-glass-grinder I hope that helps you choose.
Nice to hear from you Deb 🙂
Hi Milly,
I’m looking for bevelled half diamond shapes, any idea where I might buy them in the UK?
Many thanks in advance,
Mandy
Pearson’s Glass sell bevelled triangles Mandy, if that’s what you mean. Good luck in your search.
Hi Milly,
I have been working on a large project for about 2 years. My solder is coming out with black residue. I’ve tried using steel wool to clean the foil. How can I get this to stop happening? What can I clean the whole piece with as it is 1/2 way finished.
Thank you, Kelly
KwikClean works well Kelly.
If you clean as you go with the soldering the build up is less.
Hello Milly
I have a Diamond Tec DL 300 XL glass cutting band saw and after many years the drive belt snapped .the machine has bee great for cutting very difficult if not impossible cuts. There seems nowhere in England that I can get a replacement belt ,the only place that I can get one is Dimond Tec in the USA ,they only cost $15 but the want to charge over $60 to send the belt .I have asked them to put one in an airmail envelope but the will not do that .Bearing in mind that everything I have been making for years for friends neighbours and even strangers I have met that have taken an interest in what I make I am at the moment making a sun catcher full of flowers of a bed ridden neighbour and it hac come to a halt until I replace the belt Sorry to ask you this do you know any supplier in England that would be able to get one maybe two for me. A month ago I finished another sun catcher for a friend who had just moved into a new house this one also had flowers in it and I put there house number in the middle of the flowers .I expect you get the same pleasure as I do when you give a present to people and there look on there faces Makes it all worth while ,that glass took me over 3 weeks to make. Best wishes Pete Day
It’s expensive importing from the US Pete. You haven’t got any US friends who can send it to you as a gift? That’s the best way. I’m afraid I don’t know any suppliers selling these. Have you thought of FB Groups for secondhand stained glass ‘stuff’. It’s just the sort of thing people get rid of. Good luck and yes – a lovely moment with your friend – that’s why we make stained glass isn’t it 🙂
Sodium silicate (water glass). According to the SGAA manual is a painting medium! (one part sodium silicate to seven parts water) It seems to be an important technique in a glass painter’s repertoire, but they don’t specify what kind of projects demand the technique. Any hints? Thank you in advance.
Well you’ve set me off on a train of enquiry Leo, as I didn’t know… found this which helped me understand:
Liquid sodium silicate reacts under acidic conditions to form a hard glassy gel. This property makes it useful as a bonding agent in cemented products such as concrete and abrasive wheels. It is also an excellent adhesive for glass or porcelain. A traditional use for dissolved water glass is as a preservative for eggs.
I hope that helps.
Hello,
super new to stained glass, just getting supplies and trying to find answers to all my questions,
the one i’m finding the most contreversal is pertaining to how dangerous the lead is when making stained glass pieces, i have seen a lot of back and forth, some say gloves ,mask, fan when soldering etc. others say its just the fumes when soldering and just to use a fan, you seem to have been doing this long enough to know the answer, i love your site!! im so excited about all the knowledge i am finding here! Thank you!!
What a lovely place to be Liz, welcome to stained glass 🙂
The open window and desk fan are not as good as a fume extractor but as long as you’re sensible you’ll be fine. If you’re pregnant you need to back off though. I have a safety page here which gives more information: https://everythingstainedglass.com/stained-glass-workshop-safety-tips
Thank you so much!! can you tell me how climate can affect things? I will be setting up a little corner in my garage as a workspace, i live in Utah so really hot summers/ cold winters i have a window that opens for ventilation and i plan to get some form of climate control for the room as there is no heat or a/c in wondering how temp can affect the soldering/glass…etc.? thank you for all your great info!!
Your flux will dry out quicker in a hot climate so make sure you flux small sections as you go.
You can use a heating pad or seed starter to warm up cold glass if it really is freezing. I live in a temperate environment so don’t have any experience of cutting very cold glass. People say it’s better to warm it first. You could experiment and see.
When it’s freezing, heat your space before soldering as the cold glass is more at risk of cracking due to thermal shock.
Foiling in very cold weather can be tricky with less sticking power. Either heat the space, the foil, or do it inside!
I hope this helps.
Hello there,
I purchased a Hakko soldering iron about a year ago from a local shop. It has worked beautifully until suddenly it didn’t. I was using it and started to smell a burning smell. I had been cleaning the tip so didn’t think too much about it. When I picked it up again to use it, it was cold and the barrel looks all burned. Any ideas about what I might have done wrong? Everyplace I looked for reviews, said this iron is the BEST to get. I’m going to need a new iron and don’t want to have this happen again. Thank you in advance for your advice!
Sandy
This has never happened to me Sandy, but it may be the ‘burn on’ that occasionally happens with these irons. I have ways to avoid this happening on this page: https://everythingstainedglass.com/soldering-irons
If your iron’s not too old, it might be worth writing to Hakko themselves to report this – they need to know if things are going wrong, even if it is rare.
I’m sorry this happened to you and thanks for sharing.
Hi, Milly! How are you? What’s new?
I’m Larry, the applique guy from the U.S. of years past. In my dotage, I’ve just recently taken up acrylic painting — playing with colors again! My painting attempt called “Yucatan”, named for an iquana my Malay wife and I witnessed up close there:
https://www.saatchiart.com/art/Painting-Yucatan/1989483/9367017/view
Meanwhile, I happen also to have still a number of my s.g. window panels on my hands (in the U.S.), including the one depicted (as painting on glass) of an ancient Maya lord. I would like to upload an image to an online gallery, but I have lost track of my own s.g. photos. I remember that you had graciously post a photo of this one on your website; if my chance you still have that image saved, I would appreciate your emailing it back to me as a .jpeg, so I can upload it.
Many thanks, and cheers!
Larry
Hi Larry, blast from past 🙂 I only have it in the gallery on this page: https://everythingstainedglass.com/stain-glass-gallery You could screenshot it and change it to a .jpeg. Sorry I can’t help you any more than that. Take care, Milly
How do you incorporate dichroic glass frit flakes into your stained glass piece to add a little glitz
You’d have to fuse them (heat them so that they stick to the base glass) Sandra. I have a section on fusing here but you’ll need a kiln:
https://everythingstainedglass.com/tag/fusing-slumping
Good luck 🙂
I so enjoy your generous sharing of your beautiful designs which is enormously inspiring, and is motivating me to try some new ideas. Thank you so much. I know I reviewed your website about a year ago, but I am not sure if I ordered your book, so I will have to get to work. Thank you again for your encouragement and for sharing of your awesome gifts. CPH, Canada
Thank you for your kind words CPH 🙂 I don’t have a book but I do have a range of online courses. You can have a look at them here: https://everythingstainedglass.com/stained-glass-classes
Good luck with your next project.
Milly do you have a tutorial how to make picture frames? I have trouble making them the correct size without the back showing through. I don’t think I explained this very well. :(. 🙁 I use and love all your tips. Thank you.
Nancy
I wish I wish I wish Nancy… but I’m renowned for my mathematical misdemeanours and wood work and framing end up as carnage lol. I’d advise looking at YouTube. Good luck!
Even though I learned to do leaded stained glass many years ago I signed up for Milly’s Leaded Stained Glass class. That is the best decision I made. There were many things I had forgotten because I was living on a sailboat for several years and all my books on how to do leaded stained glass were very old. I love the look of a leaded stained glass panel. Do it! You won’t be disappointed.
Regards,
Anita MacDonald,
Elnora, Alberta, Canada
Aw, I’m so glad the course refreshed your knowledge and helped you pick up leaded glass again Anita. I totally agree on the look of leaded glass, I love it too 🙂
Thanks for your review.
Hello,
My grandfather did stained glass, and after he passed my dad learned and used the same tools to create stained glass. My dad died last year and I have inherited his tools and supplies and am overwhelmed with how to get started. I have wanted to pick up the craft for years now and with all the supplies I have, I am looking for any tips and advice I can get.
Oh what a lovely legacy Maggie. Those tools will hold so much history for you and will be treasured I’m sure.
Don’t be overwhelmed! I have lots to help you, both paid and free.
Starting with my classes.
I aimed Stained Glass Made Perfect and Conquering Curves at beginners such as yourself, to give a really solid start to your stained glass journey. No stones unturned!
Tools, cutting, safety, colours, soldering, pattern prep – all of it with videos and workbooks to follow along.
This is by far the best option if you like to know you’re not missing any vital information. You can see it here:
https://www.everything-stained-glass-school.com/p/stained-glass-made-perfect-1
If you prefer a more try and see, hit and miss approach I have lots of free tutorials here:https://everythingstainedglass.com/how-to-make-stained-glass
and one on tools here, with a video of essentials:https://everythingstainedglass.com/stained-glass-tools
I hope that helps.
Good luck, I know you’re going to love stained glass, whichever path you choose.
As most of you have experienced I have a lot of glass pieces l2ft from projects completed not to mention little buying sprees and project hoping to start. I know am blessed with a curious 6 year old granddaughter and am in need of storage ideas that keep her safe.
Oh great, another budding stained glass artist! I have a page on storage and studios here Zenita https://everythingstainedglass.com/stained-glass-studio-spaces I hope that helps some.
Hello Milly
Thank you for your regular email and tips. I started making stained glass over 30 years ago after a evening class so I have made many things for friends as presents and even Memorials the friends who lost husbands and wives. I even made a Tiffany-style lamp which took ages due to being in and out of the hospital, The pattern on the lamp I designed as I went along and it ended up as Spring, Summer, Autum, and Winter and had 835 pieces of glass in it, Strangely as I was making it our local auction house had an original Tiffany Lamp up for sale so I just had to go along and see it, it was the same size as the one I was making. The sale price was £40,000 it sold for £36,000 Of course it was far better than my one but I carried on and now it stands on our TV cabinet and the strange thing happens almost every night when it comes on for a lit moment I look up and wonder who made it. My last memorial was for my friend who was waden the warden for our country park and loved wild life so on the glass I put all the thing that he loved in his life not only birds and flowers I also put on the music he liked and ,him fishing and riding his motor byke ,As usual it took ages with no patern but I go there in the end . Keep the tip’s coming Best wishes Pete Day
Your glass creations sound amazing Pete, especially the one for your warden friend. That’s really special.
Shame you can’t sell your lamp for 40K !
Do you have a way of calculating the end size result of a piece based on the thickness of the foil?
Guess what I’m asking is how much does a project expand because of the foil?
Thanks. 🙂
Gayle
It shouldn’t expand Gayle. There is a narrow gap in between you cut pieces to accommodate the foil. 1mm for foil, 2mm for lead. The pattern shears cut a line out at this width (different shears for the two methods) to make sure you leave the requisite gap. This page has a tutorial on this: https://everythingstainedglass.com/stained-glass-how-to
I hope that helps.
I’m trying to find the pattern for Frank Lloyd Wright Butterfly Chandelier.
I tried ordering it from Dennis Casey of Prairie Designs, paid for it and they never sent it nor will they respond to my inquiries.
I’m wondering if any of your contacts might have purchased that pattern and would be willing to sell it to me
Sorry you haven’t had any joy to date Robert. These are weird Covid times; let’s hope Dennis hasn’t got caught up in it 🙁 As for the pattern; I can ask my kind followers and visitors to the site here might be able to help. Anyone? Thanks in advance and good luck with your search.
Hi Milly – I too have ordered a pattern from Dennis’s site and haven’t received it. Do you have any update on if he’s OK? I’m interested in purchasing some of his patterns, specifically one of his Lake Geneva patterns.
thanks!
No, I don’t know, sorry Venita. I’m trying to find out if anyone else has had any problems and will let you know via this page if so.
It’s a shame you haven’t received yours, I hope you do at some point.
I have had a long love affair with glass and I am so excited that I am finally dedicating more time and energy to it. I have some tools so far, and I am working from a couple of my own patterns but I am having some challenges with certain cuts. I think I need a ring saw, but I am wondering if it is really faster and more accurate than simply using a grinder with various diameter grinding wheels. Thoughts?
I love the intricate pieces you can cut with a ring saw, but for my current project I am not sure if I really need that now or if I need to get more grinding wheels. I want to invest in my work space but I want to be smart about where I spend as well.
Thank you for your assistance, I am looking forward to diving further into your site! It looks almost like I might be like trying to drink from a fire hose, there is so much here! 🙂
Ha! Drink away 🙂 I wouldn’t recommend getting a ring saw so early on in your exploration of stained glass. I’d suggest finding out what you can do with the essential tools (lots) before buying the tools you need as your interests and direction evolves. You can see the essential tools at the bottom of this page.
The saws are very good – verging on essential – for certain things but you might not want to do these things. I’ve written a post with 5 things saws do well here so you can check them out.
I hope that helps and enjoy your journey, you’re at a lovely stage!
Your website and all the information you provide is exceptional – I’m so impressed with you Milly! I started learning stain glass many years ago as a beginner and then moved several times, packed everything away until it’s now 15 years later. I’m now retired and have all my stained glass tools, glass, etc., out again and want to get started the right way in really learning this wonderful medium. I’d like to take your class. I look forward to spending many more hours on your web page and absorbing as much information as I can. Thank you so much for your willingness to help us “newbies”.
Thank you for your lovely comments Amy, it’s my pleasure. Welcome back to stained glass, it will be a happy homecoming I’m sure 🙂 My online Stained Glass Made Perfect class is here for you to have a look at.
THANK YOU FOR ALL THE INF. GREATLY APPRECIATE IT, WILL TRY IT SOON.
AGAIN MANY THANKS
IRWIN
I have a stain glass piece that will be an insert in a pantry door. The picture is of a harp but we’re not sure which end is the top. How can we verify this ?
It actually looks like a lyre. How can I send you a picture?
Hi Kathy – Intriguing! You can email it to me but I can’t guarantee I’ll be able to decipher it either 🙂
I am trying to figure out the exact measurements I need to do a window piece I’m not replacing the window just going over it
I have a page on measuring windows here Magda: https://everythingstainedglass.com/how-to-make-stained-glass-1 I hope it helps.
Good morning
I am re-constructing two panels into what I hope will be a small screen to place in a deep recessed window. But I am not too sure of the framing of this. ie, wood etc.
I do not work with lead came. Just copper foiling.
The height of each panel will be approximately 15″ x 10″. Advice is needed please.
Many thanks.
A wooden frame is easiest as you can use quarter rounds (beading in the UK) to hold the stained glass securely in place. It also hides the somewhat untidy edge you get when you just do copper foil without a lead border.
Hi Milly,
Could you give some advise on how to achieve shading effect, fading of colour, by wet acid etching. Two or more different shades is fairly simple but to go from dark blue to very pale gradually is a challenge for me.
Thanks,
Sebastian
I have a page on acid etching here.
Use a photographic tray for the watered down acid and hold it at an angle so that the area you want lighter remains in the acid. For shading you can make a ‘dibbler’ and gently brush the watered down acid along and above the line where the acid stops in a systematic way. This prevents a definite line forming.
Make this dibbler with a stick, wrapped at the end with cotton wool and finished off with a bit of a nappy liner or similar, tied on with cotton.
The weaker the acid the longer it takes but the more likely it will be successful. It’s tricky! Practice first on a test piece.
Just keep in mind that acid is EXTREMELY dangerous and lots of precautions need to be taken to preserve your lungs and skin. I can’t recommend this to you, not knowing your set up. I use a fume cupboard.
Hi Milly, I am a beginner in stained glass as i was wondering if you can tell me how to size up a pattern to fit the project at hand whether its square or a round area to be filled?
If you’re like me and anything to do with maths makes you feel ill, you might have trouble making small patterns bigger. Even if you don’t have Pattern Wizard, or other snazzy software, it can still be done easily.
Say your design has been drawn at a ratio of 1:10. Draw a grid over your design by dividing each section up equally in quarters. Multiply the measurements by 10 and draw a corresponding grid on to the full size outline of the window.
Then simply transfer the design by eye, using the smaller divisions to help you get the correct angles. I hope that helps.
Thanks for your question. I have written a newsletter on this very thing with images which you’ll receive soon!
Where can I find your price-list, please.
Hi Lawrence, I don’t supply tools and materials, sorry. I provide online stained glass classes.
Tempsford Stained Glass or Creative Glass (in Rochester, Kent) are over your side of the UK if that helps.
P.S. I’ve taken your address off as I think it’s safer not to have them on the web – call me old-fashioned!
Cut a line on a piece of mirror to see how your cutting pressure is. It should look like a hair is laying on the glass. If not, you’re not applying enough pressure. If the line has chips along the edges, you’re pressing too hard.
Thanks Barb, that’s a really good alternative tip. Anyone else have any tricks up their sleeves for pressure tests?
Hi
Just wondering if any of your on line classes for slumping and firing glass. I just a beginner and would like to find some classes but on-line as none are close to me.
Pat
Sorry, no; my stained glass classes are on the Tiffany (foil) technique and the lead came technique. I decided to concentrate on stained, rather than warm glass.
Hi Mills, love your website and newsletters. I’m interested in starting your online course but the price came up in US dollars. Have I clicked on the wrong place somewhere as I thought you are in UK
Hello Anna, thanks for your interest in my Stained Glass Made Perfect course.
You’re not the only one to be confused… You’re correct, I am in the UK. We had to choose one currency and chose US dollars as most of my visitors are from the US. Lots of people from the UK take the course; the conversion from $ to £ is done automatically at checkout.
I hope that helps. Let me know if you have any more questions.
hi,
for some time you show a little blue thing for glasses to hold in when you grinds small pieces. Where can I get on?
It’s called a Grinder Cookie – it’s so useful. There are more tools and materials I recommend on this page here.
Thanks for the question Anita, I hope you find the Cookie Grinder helps.
Hi Milly,
I just joined your community and I just love everything about it. I love working with stain glass but, I don’t use foil, I use grout and I work on rock, glass, tables and I make garden art. I’m very interested in how you cut the circles and all the tips and tricks you have learned. Looking forward to learning along with the others. I’m glad I stumbled upon your website and I downloaded your e-book and I’m on your email now!!
Welcome aboard Kathy, I’m very glad you’re enjoying the stained glass tips.
Hi Kathy,
I, too, work with glass in making yard art, glass on glass art and tables using grout. I just starting selling my pieces on Etsy and am always looking for others (there aren’t many) for inspiration and tips. Always learning.
Kim
Good question Denise. I use rubberised gardening gloves – I find them not too thick and they give enough protection when the solder drips. I only wear one – on the hand that holds the stained glass – not on the one holding the soldering iron. That way I get the sense of touch that is so important with the soldering.
I’ve noticed you wear gloves when your doing decretive soldiering. I like the idea of gloves to protect my hands and fingers but I also use my fingers for touch. Can you recommend a pair that protects but doesn’t take the sense of touch away?
Hi Milly ,
How do I add a photo of a piece of my work to your followers gallery please ?
It’s so nice to see other glasses work . Some great ideas .
Hi Barbara, I’m glad to see you’ve been inspired by the lovely work of my visitors! You’re welcome to send me an image of your work with a short bit about it and I’ll post it on my site. Thanks for your interest.