How To Make And Solder Hooks To Stained Glass
This stained glass tutorial shows you how to solder hooks to stained glass so that you can hang your piece up securely. You’ll learn how to make recycled jump rings and how to solder them neatly to your stained glass sun catcher. Making sure these final touches are done neatly will make your work stand out from the crowd.
Now you’ve created a lovely beaded solder around the edge of your piece, you’re ready to add the hooks. Ideally, these become part of your sun catcher, rather than just a means of hanging. Make them part of your design if you can.
Jump straight to How To Hang Your Sun Catchers Securely
Click here for a clever twine hanging tip
What You Need To Make And Attach Hooks
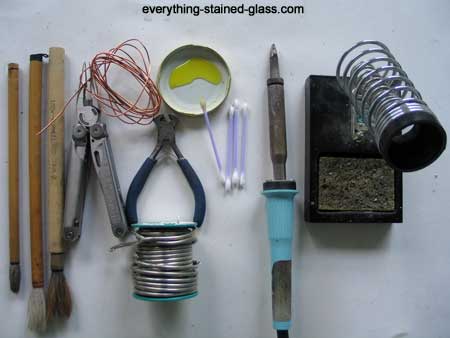
Flux
Soldering Iron* and Soldering Iron Stand*
Wet sponge for cleaning tip
Q-tips or cheap brush to apply the flux copper wire (either bought or recycled)
Needle Nose Pliers
Wire cutters and Bamboo Brushes or similar for making hooks.
(* = paid link).
Solder Hooks To Stained Glass
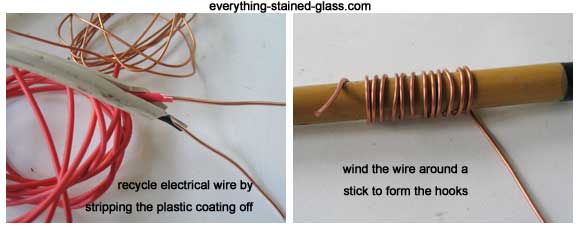
1. Make Your Own Jump Rings
You can make hooks yourself cheaply and easily. Either buy copper or tinned wire on a spool, or recycle electrical wire by stripping the plastic coating off with a craft knife. Be careful if you do this. Always direct the blade away from your body.
Here’s a short video if you prefer to watch rather than read:
- Simply wrap the wire around your cylindrical stick (I use a Japanese brush handle) about 15 times. You might as well make a few hooks and keep them for future stained glass projects
- You can make larger jump rings by wrapping the wire around a thicker stick
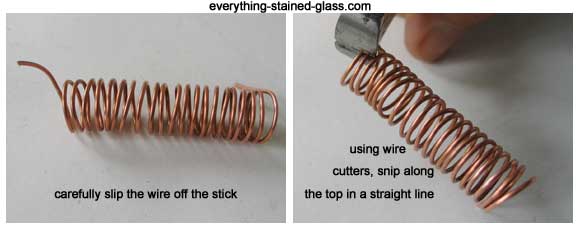
- Cut the wire and slide off the stick. You have created a spring of copper wire
- Using the wire cutters, cut along the top in a straight line
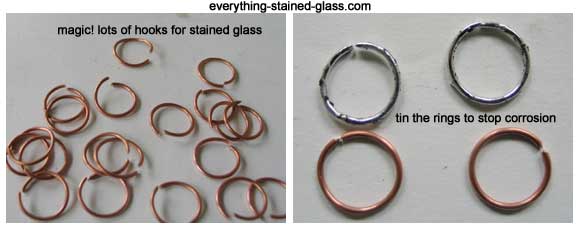
- Magic! Lots of hooks ready for tinning
- If the ring diameter is big enough you can insert pliers into the ring at the point where the two ends meet. Squeeze hard to make a flat edge. When you join the ring to your panel the flat part on your ring is easier to solder and it hides the place where the ends meet. Thanks to Gene Salvino for this tip.
2. Soldering The Hooks On
It would be negligent of me to not to mention iron maintenance when talking about soldering hooks on. Following a simple maintenance regime will make all your soldering tasks easier, including hooks. My Iron Maintenance mini-course gives you a blueprint to follow.
When you solder hooks to stained glass the hooks should always be soldered at a joint for strength. Never attach one on a beaded edge, as the weight of the glass will pull the foil off in time. Make sure you solder on a heat resistant surface.
- You need to tin the hooks first to strengthen them and to stop corrosion.
- Flux the hook
- Hold the hook with the pliers, and smear solder on the front and back to cover all the copper
- Now hang your sun catcher over the edge of your work bench
- Flux the tinned hook and hold it where you want it attached. Make sure the open end of the hook is at the join (see photo, left below). The solder will close the ring and make it secure
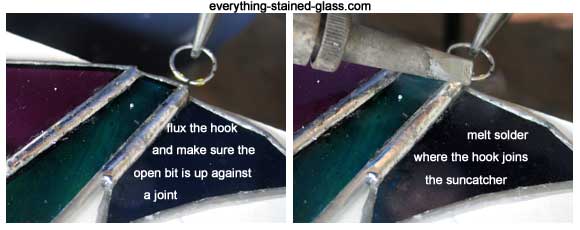
- Solder hooks to stained glass by carefully melting a blob of stained glass solder where the ring meets the sun catcher
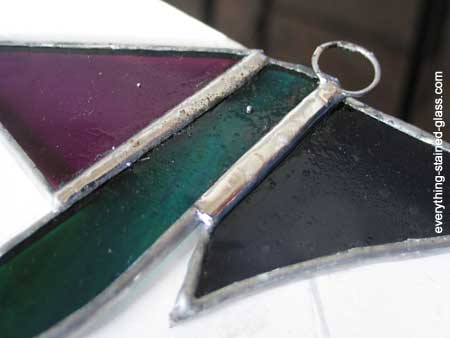
- Hold the soldering iron over the solder to neaten it up
- Turn the piece over and, if needed, use the iron to melt any solder that may have dripped to the other side
3. Cleaning and Polishing
That’s it, you’re done! If it hasn’t turned out as neat as you’d like, let the solder cool before melting and having another go. Don’t re-do too often as the foil will start to come away from the glass.
Everything may look a bit messy at the moment, but that will soon change because now you’re ready for the final stage, Patina and Polish. You’ll soon end up with a sparkly finished panel to be proud of.
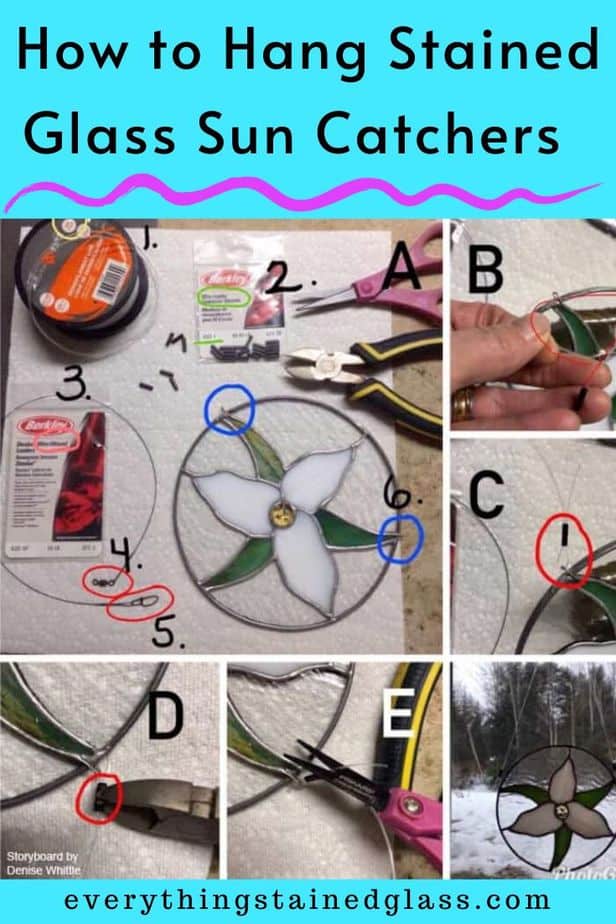
4. Hanging Your Panel Securely
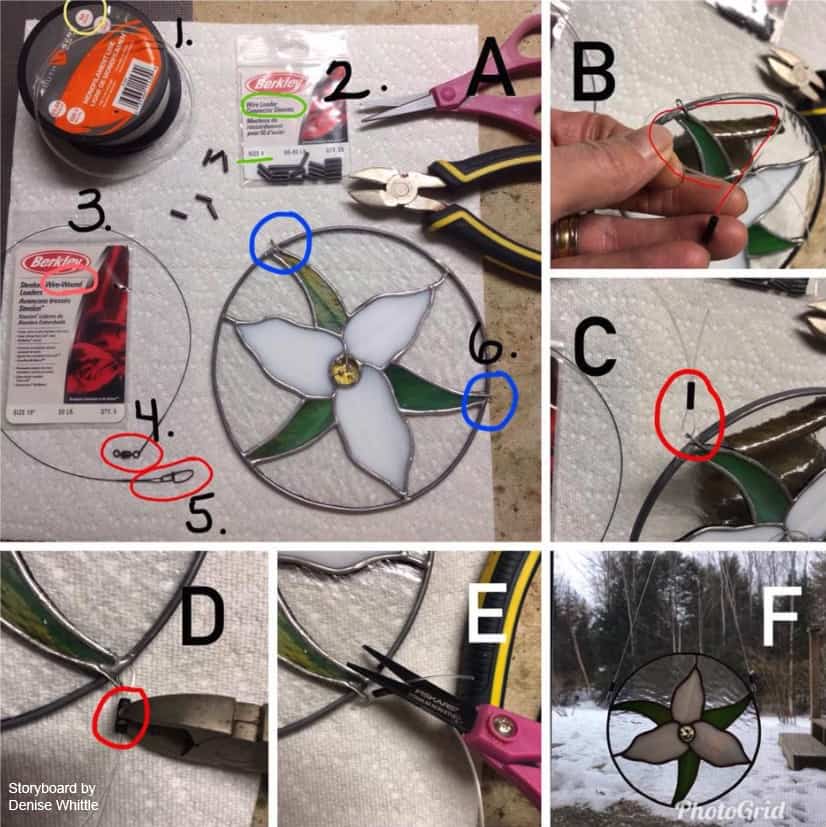
Photo A. Supplies
- nylon fishing line at least 50 lb weight
- connector sleeves size 3 or 4. These are Berkley® Connector Sleeves and you can find them on amazon.com here*
- wire wrapped leaders. Come in many different lengths. Up to 24”
- part of the leader. It is a spinner. Usually I just snip it off unless I’m using it on a twirler
- the actual fishing lure attachment. I snip that off too. But would be nice to keep if you were hanging a fish related panel or suncatcher.
- panel with hangers attached.
Photo B
Slide a connector sleeve over the leader or fishing line, loop through the hanger….
Photo C
Push the line back through the connector sleeve….
Photo D
Use snips to make 3-4 indents in the sleeve. Don’t worry you won’t cut through…..
Photo E
Cut off that extra bit of line sticking out. And….
Photo F
Hang your piece, securely!!
This excellent storyboard was compiled for us by Denise Whittle. Thanks so much, so helpful for everyone! 🙂
Create A One-Off Twine Hanger For Your Stained Glass
Feast your eyes on this… how cute can you get?

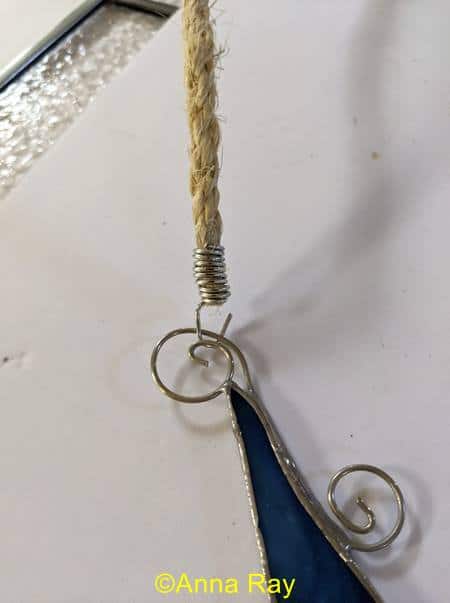
Online student Anna Ray has shared her clever idea of using twine to make a rope hanger. It’s especially perfect for this lovely hammock piece.
She held on to the twine with a pair of pliers so she could wrap the wire very tightly around it. She also crimped the wire with pliers as she went to make sure it was tight as possible. Before attaching she pulled it just to make sure it would hold – it did!
Crimp the wire with pliers as you go to make sure it’s tight as possible.
Before attaching give it a good firm tug to make sure it will hold.
Simple and incredibly effective. I’m sure that you’ll be able to think of some variations on this technique to hang your own stained glass.
Thanks Anna 🙂
If you need more instructions on the copper foil technique there’s a list on this page.
Go to Everything Stained Glass home page.
(* = paid link).
PIN IT FOR LATER!
Can you please tell me what kind of ring you used around the outside of the suncatcher? Also where could I get the large ring? Thankd
Not sure this is the right place to post this but… I like to make projects inside an 8 inch metal ring (or copper) but find it difficult to get a really neat edge – any tips ? Liz
Hi, Has anybody used outdoor command hooks for hanging sun catchers? Is using a ribbon ok to hang small sun catchers ?
Hello,
My husband cut a piece of wood to go across the top our my kitchen window and on top of a cabinet on each side of the window. He put small screws with hooks in the top and that is where we hang our sun catchers!
That’s a lovely idea Terry, thanks for sharing it 🙂
I’ve been hanging pieces using fishing line for over 25 years and have never had a line fail! I do hang with two separate lines just in case. I’ve hung fairly large pieces up to 18 inches this way.
Thanks for your experienced comment Barbara. It’s very reassuring for everyone I’m sure.
Milly, Your tutorial on attaching jump rings is very helpful. I have been doing stained glass for a number of years and my teacher has always taught us to wire around the outside of our project to add strength and stability to it. I usually use 20 gauge pre-tinned wire for this. If I need rings for hanging, I tack solder the wire to just before the joint where I want the ring. I build the ring at the seam by wrapping the wire around a pencil or dowel rod and solder the wire down over the joint. Then I continue with my wiring until I come to the next joint where I need another ring, following the same procedure again, before continuing on with my wiring. You do have to be mindful and not forget to build your ring when you come to the joint, as it is easy to forget and wire right past. I have started to mark those joints with a sharpie as a reminder. This method makes the rings a permanent part of the piece and more secure in my opinion.
Thank you for your great explanation of your method Bonnie, I appreciate it, as do all the others reading this.
That is a great description and I will try it on one of my pieces! Thank you
I’m still pretty new to glass and I’ve found that hanging your finished piece is less discussed so this has been greatly appreciated. And very excited to see Denise’s technique as this is essentially the same process as it is for crimping wire for jewelry making which I did as a hobby for several years. Hopefully someone will make a wonderful guide to making some smaller like tabletop stands or similar some day.
Is there anything wrong with drilling a hole in the glass with a diamond cutting bit near the edge of the glass, foil that edge, putting a hook through that hole, solder for more strength. Has anyone ever tried that? Just an idea.
I think it just depends on what you like and the style of you piece, just make sure when you use the diamond head bit to use water with it , what i do is i put the glass in a pan with a sponge under the glass where I am going to make my hole , i let the sponge absorb a lot of water so i can keep the drill bit wet when making my hole works great if item is small, if the item is larger and wont fit in a pan just make sure you keep where you are drilling wet, i still use a sponge under the glass as a soft support. I hope i explained this right to you, enjoy.
Thanks for helping Nancy out here Sandi, very helpful.
you can use a cilender around your drill whit a sponge inside the cilender
like this all time humidity on the drill
n utilisez pas les meches en pointe au carboramdum
elles ont tandance a faire eclater le verre
do not use carboamdum drill
the glass go in 1000 pieces easyle
Google translate:
Do not use carborundum drill bits.
They tend to shatter the glass.
Do not use carborundum drill bits.
The glass goes in 1000 pieces. Easy!
I agree Jacques – sintered diamond drill bits are the way to go.
Hi Milly,
I need help badly! I took on the task of repairing a large stained glass hanging I made 15 years ago as a gift. The hanger came off and I’ve been trying for a week to re-attache another hanger. I can’t get any solder to stick to the old lead came (and this was before they taught to use copper tape). The lead came looks and feels old. I did remove 6 inches and replaced it with new came but not where I need to put hangers. I have steel wooled and sanded on the old part I cut off and nothing will stick. The solder is Alphafey 50/50 solid wire, and another one made by Litton(Kester Solder) that’s all that’s on the label. I was able to solder fresh cut glass and new came into the damaged area but when I tried to put a hanger on nothing is working. Have tried too many things and am worn out!!! It is a very heavy piece so wanted to be sure to get good solid hangers on it this time. Any ideas? Sorry so long. Tough question since I feel like maybe I’m working with a lot of old supplies. You mentioned in one answer that she may not have gotten the soldering iron hot enough. Something else I need to learn. Thanks for any help.
You need to get back to the silver. Using a craft knife, scrape away the surface layer/s where you need to add the hanger and flux straight away once you have a silver area.
Make sure you have two separate hanging chains/wires rather than just the one; if one breaks it won’t crash to the floor.
I hope that helps.
Hi
I use dental floss instead of fishing line for small suncatchers, Christmas decorations etc.
I’ve never used that Debbie. Does it not break? I’ll have to get some and try it out, thanks for the suggestion.
I have made rings one at a time leaving a tail on each end, this gives a more secure attachment and I use gardening wire as it solders well. As the wire is silver without any coating I don’t have the problem of colour difference.
Gardening wire! What a good idea Lesley, thanks so much. The tail is a good idea too of course 🙂
When tinning wire it is often hard to coat all sides with flux to get good coverage. To eliminate that problem, I flux my solder and it will spread with the solder to the wire for easy coverage.
Thank you Karen, a very helpful additional tip 🙂
Milly, thanks for posting the wonderful Denise Whittle’s instructions for hanging things with fishing line and spinners. I was fortunate enough to be at one of the Hubbit Summits a couple years ago that took place in Kokomo IN. What a fun time and group!!!! One evening when the Hubbits got together Denise was kind enough to demonstrate this technique with the group. I’ve been using this method since she showed it to us.
I’m going to make one comment about the directions…I think it’s much easier to tin the wire before it’s wound on a stick and cut into lengths. I find it easier to tin a piece of straight wire than a small circle. Maybe that’s just me????
But BRAVO Denise. Another great story board.
Thanks for your extra comment Gail, much appreciated. Someone else mentioned the tinning wire – I have a video showing how to do that which I must put on my site. Thanks for the reminder 🙂
(For those who are bemused by the term ‘Hubbit’ – it refers to students of my classes who are members of the Stained Glass Hub. Think Texas=Texan; Hub=Hubbit 🙂 )
Milly, I work in a glass store in Texas. We have lots of folks bringing in Granny’s suncatchers for repair. Sentimental value = high, monetary = low. Often it costs more to repair than it is worth. Most of the damages could have been prevented with a couple of steps. 1. Solder your rings on an existing joint. 2. Use small chain rather than fishing line as the fishing line will fail eventually. 3.Hang from two separate chains instead of a single chain in an arc. If one side fails with a single arced line, the whole piece hits the floor. With the two chain system, there is still a chain holding secure and the piece can be rescued before it is damaged beyond repair. My heart breaks for those customers whose precious pieces are damaged thru no fault of their own!
Very good warning points, thanks Sherry. Someone else said about fishing line failing… I’m going to look into that as I’ve never experienced that. I’ll add the 2 chains advice to the page; I do advise that but it needs to be on the page. Thanks for taking the time to remind us 🙂
I have been told that it is the UV light that causes the monofilament fishing line to deteriorate. Commenter Sherry Fisher lives in Texas where the sun shines more frequently and more directly than it does in the UK. Chain is more secure wherever you live.
That’s something I didn’t know, thanks for adding it to the page.
Hi all. I’m a novice, so keen to draw on your experience in this tricky area. A thrifty tip I can pass on came from a friend who always checks the charity shops for jewellery with chains which can be repurposed to make decorative hanging media. It’s amazing what you can get for pennies!
And the chains might be a little more different than the standard ones. Great idea Jo, thanks for sharing.
Yes, I bought a CHEAP pile of broken jewellery on eBay three years ago and the chains and other bits have been very useful. Lots of red beads (for holly glass ornaments). Even metal stars , which my wife knits onto her Christmas decorations.
Great idea Mike, thanks so much.
I have done stained glass for many years and for many commissions, but I’m still not an expert. However, I do know one thing.
Fishing line aka monofilament is made to fish with. That means it is made to stay WET. When it drys off and out it WILL break under the weight of a glass piece. No matter the “weight” of the test line that one uses. This is NOT the best or only material to use. I have used the multi strand steel wire that’s nylon covered from the Jewelry department of most Craft/Hobby stores. Then you use the crimp/crush beads and the stained glass is safe. Provided the jump rings have been attached properly as has already been addressed in this Q&A.
That’s an important point you make MaryLee, thanks for that. I haven’t had this happen but will definitely be checking up on it. Thanks for the warning 🙂
sorry … I forgot that I had sent my suggestion the last time you posted this.
Ha ha and I’d forgotten I’d replied to it LOL. Between the two of us!
Milly: Great article about attaching rings to suncatchers at structural supports. My comment makes creating those perfectly round hangers even easier: They are hard to tin one at a time. Tin the wire before wrapping the cylinder. BINGO … problem solved and much time saved!
Thanks for sharing Paul, an eminently sensible idea 🙂
Love the hanger that you used as an example. Can you post the pattern for it? Love you Mail’s.
I don’t have permission to use this pattern, sorry Ben. You could always use it as inspiration and adapt something similar for yourself.
The flower in the suncatcher appears to be a Trillium. For photos and patterns, do an internet search for “stained glass trillium.” Some are gorgeous!
Oh yes, very lovely! I particularly like the multiples 🙂 Thanks Dennis.
Snipping the curved ends off of a paperclip also makes the perfect “jump ring.” I open a paperclip to where it looks like a skinny S, then use pliers to snip in half at the middle. I cross the longer part of the wire across the shorter part, and then snip off the extra from the shorter side. Then I take that longer part and line it up down a seam on my piece and solder it to hide the wire length. It’s perfect. And it takes patina!
That’s a neat quick tip for smaller sun catchers Natalie, thanks so much 🙂
I use also this it is trunger
also easyer to fix by guiding whit a magnet onther
no need of plier
you can plated it in copper or nikel by simple vinegar and salt
if you are interested I can explain howto the same for multi brain cable
Thanks for your comments Jacques. I’m interested in the magnet idea!
I found my flat magnet inside a foppy idsk 3 inch
vintage pc
easy strong cheep
recyling
jack 47 7 1
Make sure there is no plastic coating on the larger paper clips – take it off the clip pieces before trying to solder – less mess! I learned the hard way.
Thanks for this Anne, good thinking 🙂
Milly,
Very helpful tutorial and some nice comments as well. My question relates to actually putting this little piece of artwork on the window. It’s been my experience that temperature changes and/or humidity always cause the suction cup to eventually slip off and potentially break your creation. So, angry and determined to deny yourself the little oasis of beauty that brought so much pleasure, it doesn’t get RE-hung. Any thoughts on this pesky little problem?
Ha ha nicely put Annie! Yes, I should’ve warned about those suction cup hangers. You can regularly check them and re-attach them but truth be told, who of us will remember to do that? Better to drill a hook in and be certain.
I love doing stain glass BUT !!!!!! I can never get the o ring to stay solder or if I am making tiny bird legs and freather tails they don’t want to stick!!! I have fluxed then run solder over the o rings, feet and tails, but the just wouldn’t stay. HELP!!!!!
It should solder if it’s clean and copper or brass… It sounds as if you’re not heating up the solder enough so it’s rolling off.
Try holding the bird in a vice and soldering the legs together before soldering them to the body.
It’s always a tricky operation Monica, keep trying!
Hi. I’m making lightweight sun catchers and there is not asolder seam at the top. I’m not sure how to place the hook.
I keep trying to paste a photo but I can’t.
It’s a sun catchers if a police badge.
Thanks in advance.
It depends on the design as to where the jump ring will go.
After time any weight will pull the edging foil off so you do need to attach it on more than the outer foil.
The safest way would be to attach copper wire around the perimeter of the stained glass sun catcher and fix the jump ring to that.
Brilliant, thank you!
Hi Milly! One question: Do you tin the foil around the perimeter first, then add the wire on top? Or do you solder both at the same time?
I’ve done both Meg. I’m always pleased if I remember to tin first as I think it makes things a tiny bit easier but if I forget, that’s fine too.
Thank you Milly for your recent email, Yes I have been stripping electrical wiring for ages now and it does save a lot of hard endeared money very good ad vice. keep the ideas coming. Regards Pete Day
Good to hear you’re already on it Pete! Any other ‘thrifty tips’, let us know 🙂
I want to thank you for sharing so much helpful information that took so much work and time to gain. My sister is a college-level art teacher who gave me my first stained glass lesson at least twenty years ago, but my life hit a huge pothole since and I became paralyzed on one side (by God’s grace it was my left side so I still have full use of my right hand. Since I have figured out how to do everything to live without help from others, I’m eager to pick up this great art form from where I left off. Your site has offered me great help and inspiration to figure out how to do everything necessary to make stained glass Art again. This is a blessing straight from God’s hand because doing stained glass and sewing were the two hardest things I had to give up even though I hadn’t reached my full potential with either of them. You can be sure that if I need help I’ll be going to your website. Mary Jo Hutson
You sound as if you have a great deal of determination Mary Jo! I’m glad to hear that you have managed to pick it up again and I hope the same can be said about your sewing. Thanks for your lovely comments about my site – you’re most welcome to visit anytime!
Milly, in your tutorial about making rings for hanging, you do everything I do and it works very well. I do have one suggestion that might be helpful, however. If you tin the wire before wrapping it around whatever you use to make the rings, it saves a lot of time and I have found it is much easier to tin the whole wire rather than one ring at a time.
Thank you for your very helpful suggestion Paul. I have a video showing how to tin a length of wire – I should find it and put it on this page. Thanks for helping everyone out.
Yes, Milly! You should! I haven’t tried Paul’s suggestion yet, but I plan to do so. I was wondering if the solder would crack and fall off when the wire is wound but I guess I will find out.
If this works it will be very helpful as my rings…after cleaning…often have solder gaps with copper showing through and I have to redo them. Maybe I am not covering them thoroughly with flux?
Sure would like to see that video! Also, any other tricks for soldering the rings in place? Mine are often lopsided or fall off when I remove the iron. Such a klutz!
No the solder won’t fall off the wire Vicki. Holding them steady with the pliers is the way to make sure they’re positioned correctly.