Designing With Stained Glass Circles
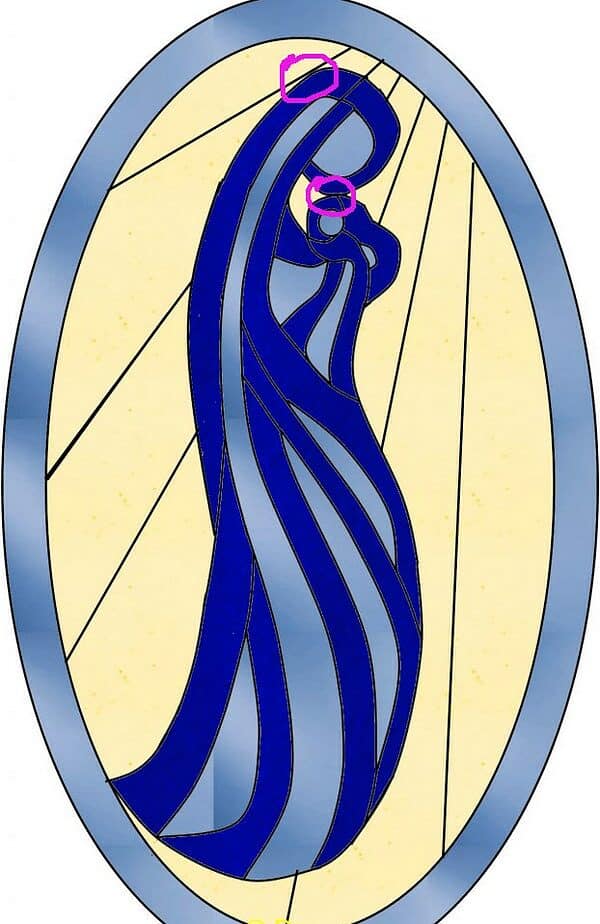
Do you ever design panels that include stained glass letters and circles, only to realise that the lead (or solder) line chops part of the letter or circle off? It’s frustrating.
Take for example the design above from my online student Donna Osborn. You can see the danger areas circled in pink. Without the necessary design adjustments the heads will have a flat edge where the seam cuts in to the roundness. And we don’t want misshapen heads.
There is a simple tip for avoiding this. Have a look at the diagram below.
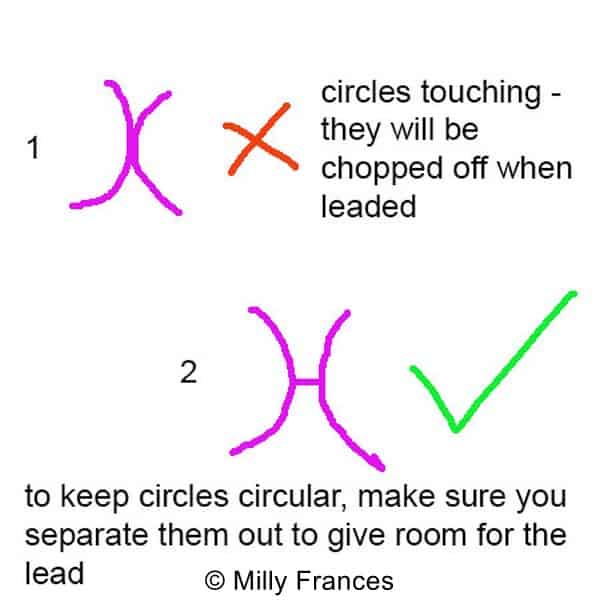
Can you see how, by separating the edges of the circles apart and adding a short joining line, it makes room for the width of the solder or lead seam?
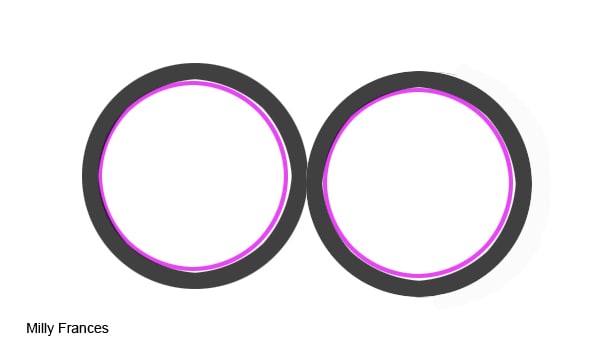
This short line will help you keep your circles retain their shape as you can see below:
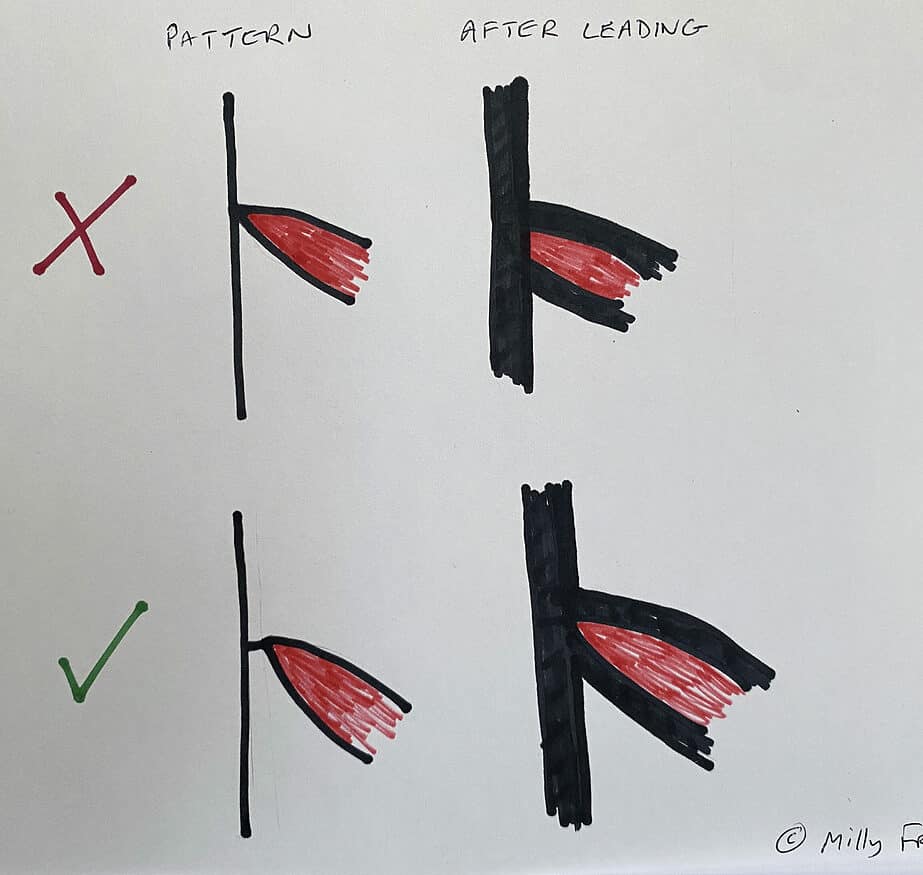
It’s not only circles. The same principle works for pointed shapes. My sketch below shows you how the point gets chopped off if you don’t have a short line on your pattern.
Designing With Stained Glass Letters
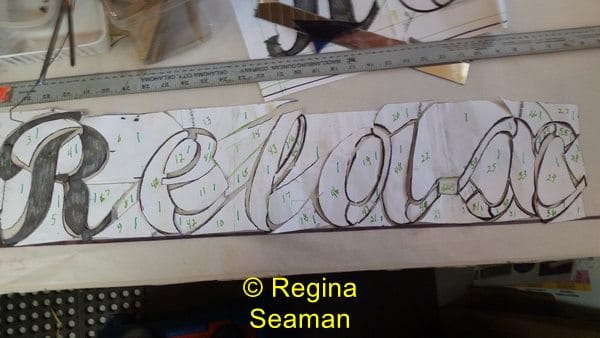
What about lettering? One of my online students Regina Seaman designed this panel but ran into trouble with the bottom edge. She could see that the lead border came was going to chop the letters off.
Given the examples above, what would you do?
I suggested the following solution.
The black shapes I’ve outlined at the bottom show how to avoid this. They have a joining arm to the edge of the panel.
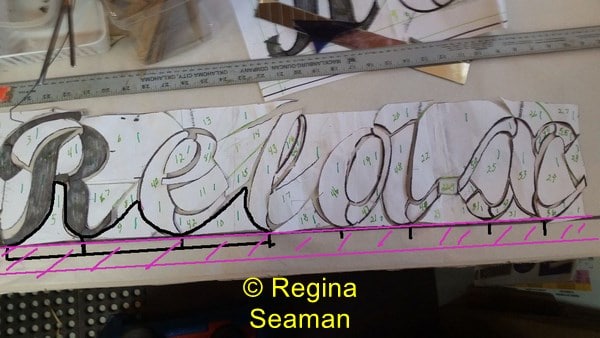
Can you see how the border lead (shown in pink) doesn’t cut the bottom of the letters off now?
In this case, the joining arm only needs to be just less than half the width of your border lead came. This is because the glass needs to butt up to the inside heart.
I’m confident that these two design tips will keep your circles circular and your stained glass letters legible!

Thank you. I have inherited a sizeable amount of what appear to be all the one pattern of bevels that must have been bought to be used in doors/windows as they all look like fleur de lis. I’m struggling to see how to use them in other patterns. Would you have any ideas please? any input would be very appreciated. Thank you.
Yes, I can understand your dilemma Mary. Sometimes when we have something we bend over backwards to use it, when really we want to do something else entirely. I’m not saying don’t use them but I would be wary of forcing yourself to find a way of using them if it’s not calling you.
That said, you might want to think about something rather than a flat panel – how about using them in a more 3-D fashion? I can imagine the refractions would be very interesting.
Anyone else have any ideas?
Good luck, I’m sure you’ll resolve this.
Very timely tip Millie, the panels I’m making include one with lettering so now I’m all set!
Great to know Andrea – I’m telepathic, didn’t you know? 😉
I use a progamme called Rapid Resizer. It allows you to make your photos or letters in a varity of sizes and different types and sizes for printing. I have used this progamme for many years for making a size for painting on canvas and now for my stain glass works.
Thanks Sherry, I love it. For those who don’t know how it works, I’ve written a page on Rapid Resizer here: https://everythingstainedglass.com/stained-glass-software
Exactly what I needed today as I am just getting ready to start a piece that has lettering- thank you Millie.
Serendipity Jan! There’s nothing more annoying that having half a letter cut off 🙁
I have a special folder of your tips and refer back to them often. Thank you so much.
That’s pretty special to know Barbara, thank you.
I always learn something from you, Milly. I love reading your posts.
Thank you Phyllis, that’s kind of you.
Milly, this is exactly what I needed to know for designing my next panel. Thank you for your fantastic tips!
You’re most welcome Justine, glad it was of help.
Great timing Justine 🙂
I always learn something from Milly. I love getting these tips from her. What a great teacher!
Thank you Mark 🙂
A good point well made! So easy to forget this until it’s too late….
Yes, that sinking feeling as your ‘a’ is more ‘u’ than ‘a’ 🙁
Milly, your tips are always so helpful and useful to those of us that are learning the art of making stained glass. Thanks so much for sharing your wealth of knowledge with the world. Everyone who is interested in making stained glass should sign up for your on-line courses. There’s so much to learn from you.
Oh that’s so sweet, thanks Gail. You’ve added a good few useful tips to this website too 🙂
Thank you Milly. Your reminders always seem so appropriately timed. Look forward to your tips each week.