Using Pattern Resizer – Stained Glass Software
Print Full Size Patterns From Home
What can stained glass software do for you? Lots and lots is the short answer! Here are just some of the things stained glass software can do to help your speed and creativity with designs and patterns:
- pattern resizing and full size printing
- letter and alphabet stencils
- calculate how much glass you need
- offer colour and glass choices
- create line images from photos
Rapid Resizer offers all this – and more – and is the stained glass software I prefer. It’s a design software programme that lets you resize stained glass patterns to any size and print it across various pages to get a pattern at the size you need. Simply stick the pages together for a full-size pattern. This is very helpful as it allows any stained glass pattern to be resized and printed full size at home. You can find plenty of ready-made patterns on the Internet or you can design your own and upload it to be resized. The pattern world is now your oyster!
Before you read any further I want you to know that I receive a small % if you buy Rapid Resizer through a link on this page. I never recommend anything I haven’t tried and tested out. Just so’s you know! Thanks for your support.
Check out the different Rapid Resizer versions here (paid link)
This post gives you a good look at Rapid Resizer, explaining how it works and what it does well and not so well. It starts with a tutorial on how to use the resizing part of the software. I thought that might be of use to you first:
Getting Started with Online Rapid Resizer Stained Glass Software
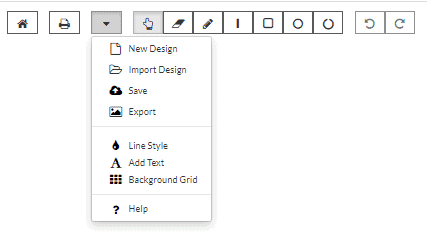
When you first create an account and log in to Rapid Resizer you’ll see this screen:
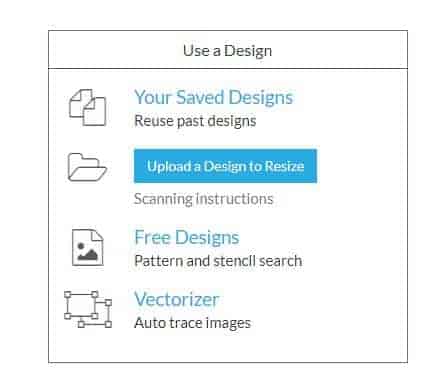
- Click the blue button and choose a file to upload. The file can be jpg, png or pdf (pdf is very handy as lots of free stained glass patterns are available as PDFs)
- Make sure your chosen file has enough detail (pixels). If you’ve chosen a tiny image (like a thumbnail) and you want to make it much larger, Rapid Resizer will show a warning message about a ‘blocky’ printout:
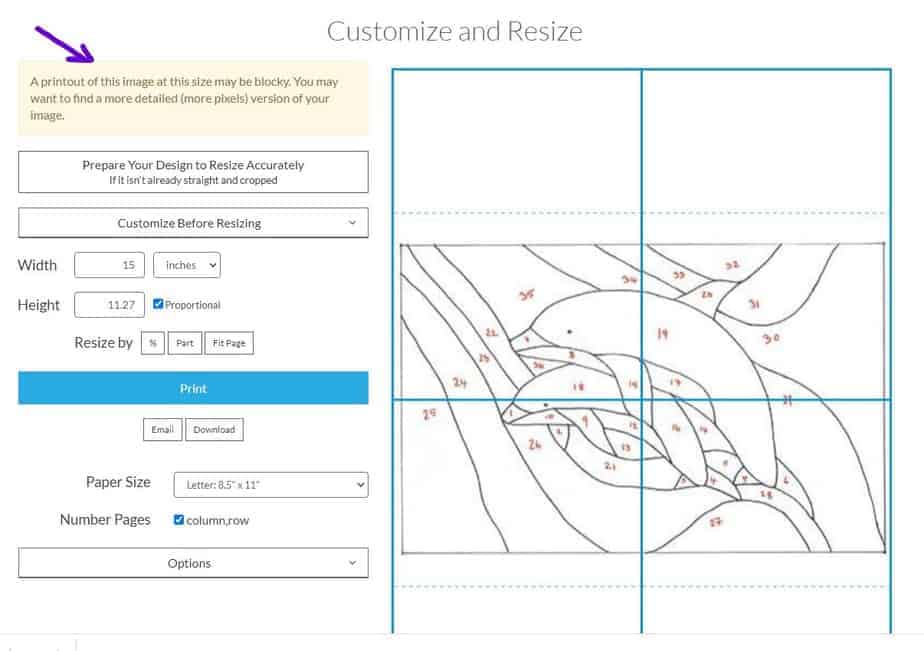
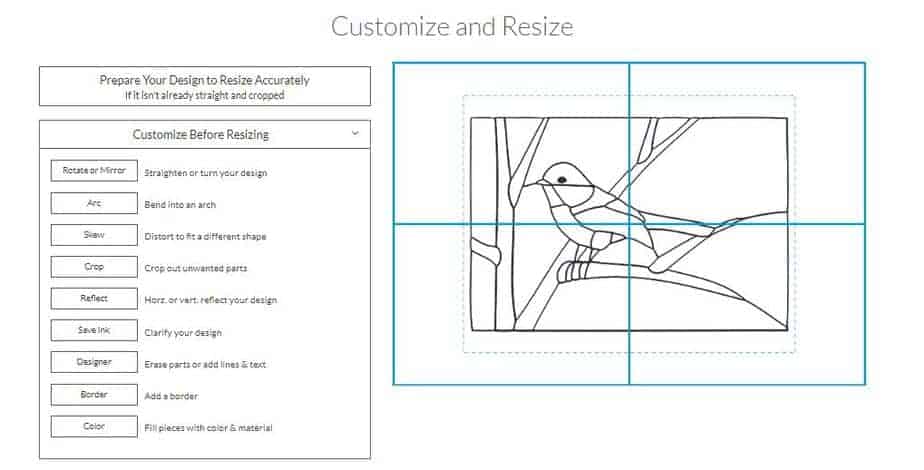
Once you’ve uploaded your image you can adjust and perfect your pattern very easily.
Perfecting Your Stained Glass Pattern
- Straighten it (by rotating) manually or by use the pre-set degrees for added accuracy. This fixes any little crooked-ness in your image (is that a word?!) and lines up your image correctly for printing

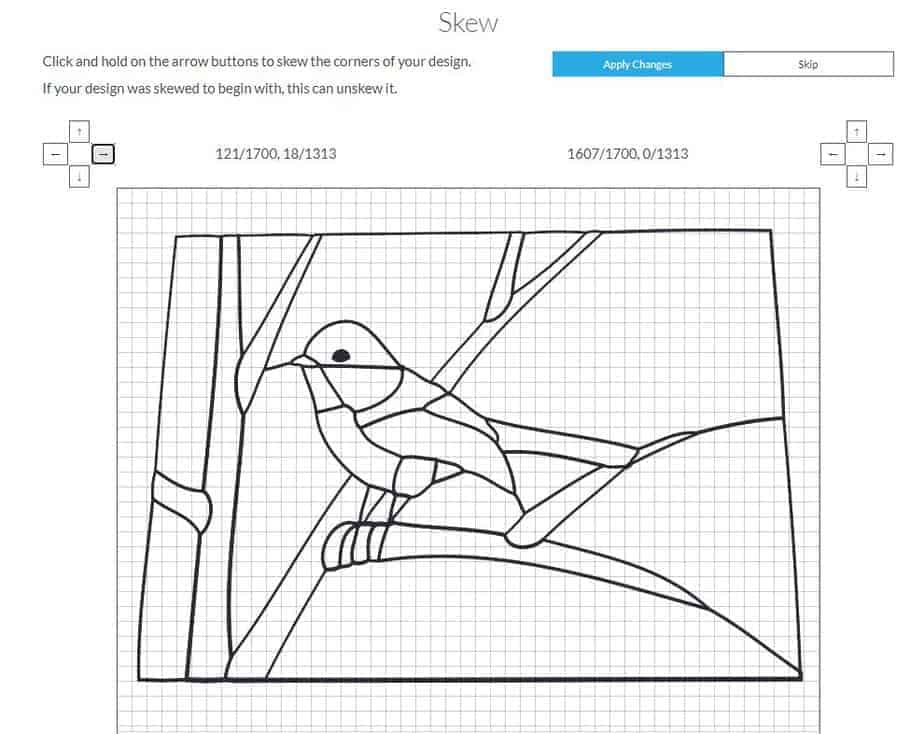
- Fix any skewing – sometimes an image gets a bit skewed – one edge is a different size to another. This often happens with photocopies or photographed images and is easily fixed by ‘deskewing’. I know that isn’t a word!!!
There are odd occasions when you might WANT a skewed pattern. If you measure the place where your stained glass window is going and find it’s not properly square, the Skew Tool will enable you to represent this misshapen window accurately without having to make a template.
- Decide if you want to flip or mirror your image. If your image is round the wrong way or upside down, simply rotate or flip it.

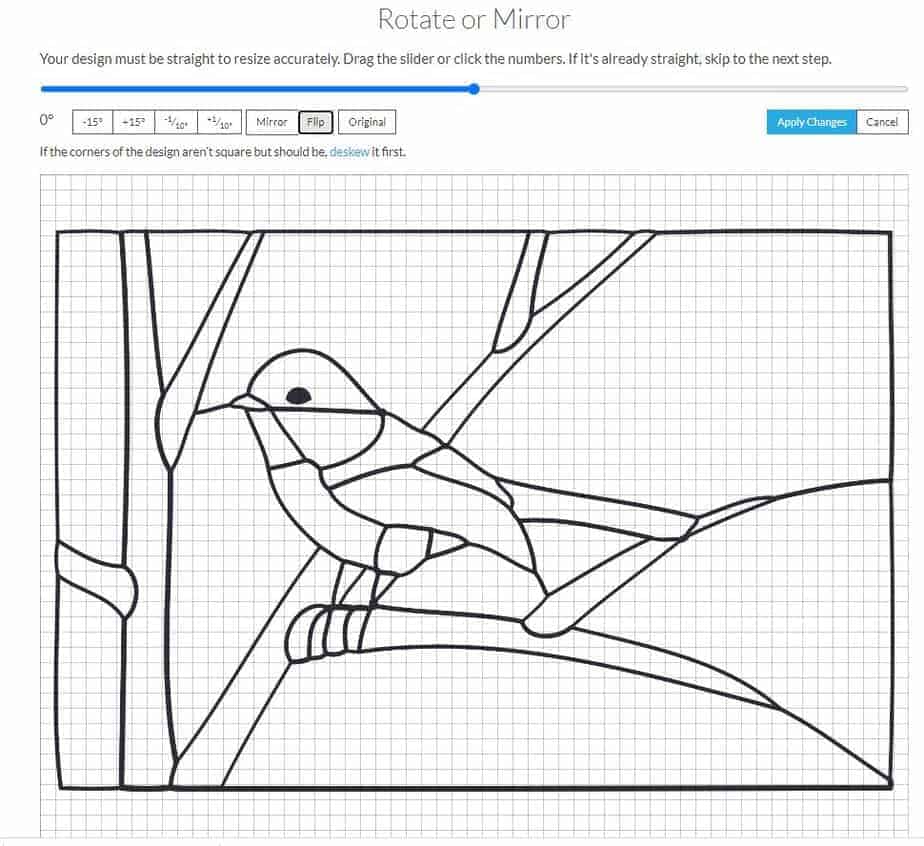
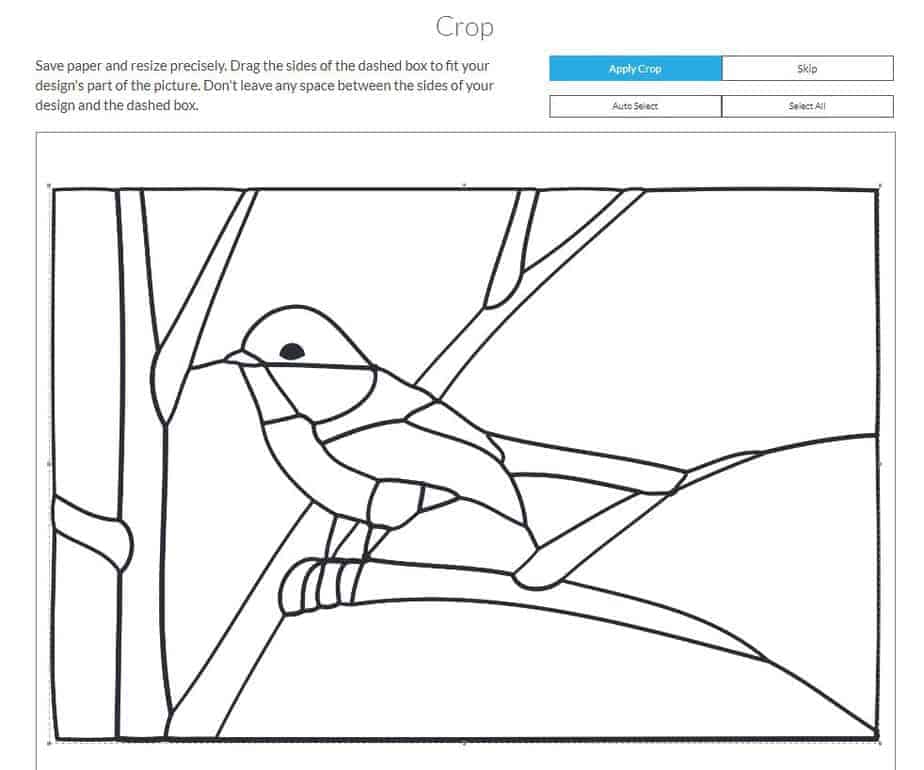
- Crop the image to get rid of unnecessary borders or edges to tighten it up.
Resizing and Printing at the Correct Size
After you’ve fixed any cropping or skewing issues and you’re happy with your design it’s time to get the pattern to the size you want it for printing.
See which version of Rapid Resizer is best for you here
Select your chosen width and height.
If you want to keep the image proportional then tick the little box. Rapid Resizer remembers the original width of the image but not the height so watch for that.
I also had a bit of an issue with the proportion box: it only works if you tick it before you change the image size. If you change the measurements and then want to go back and click proportionate it won’t remember the original height and it won’t apply this setting retrospectively.
It’s easy enough to “revert” though so don’t worry if this happens to you. Just remember next time to tick the box first.
Another easy way to resize is by using the “auto” buttons. These buttons give you 3 options:
- Resize by %
- Fit page or
- Part
‘Part’ is very handy in certain circumstances where the external dimensions of the image are less important to you than an element within it.
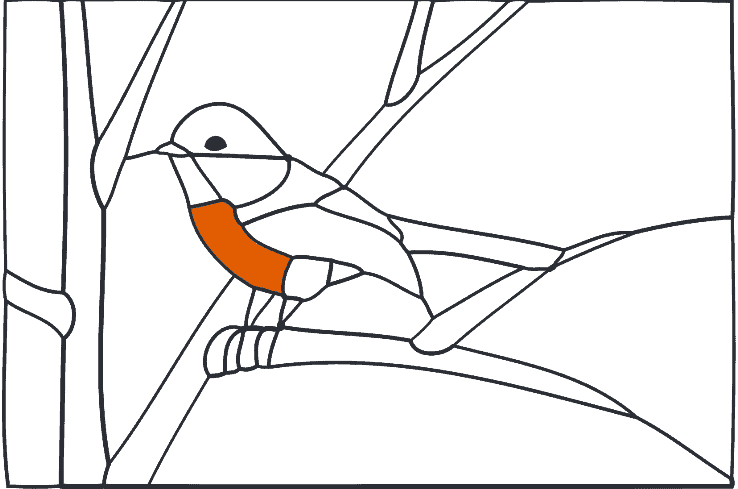
Imagine you have the bird design below and you want to set a certain size for the bird as a baseline and let the pattern resize around it.
Simply draw a line from top to bottom of the bird and pattern will resize around your settings for that bird. Or if your image had some lettering in which needed to be a certain size. Just click on the ‘Part’ button and draw a vertical line from the top to the bottom of one letter. The ‘Part’ tool will let you define the lettering size and the image will resize around it.
Pretty nifty don’t you think?
Don’t Miss The Lines Tool!!
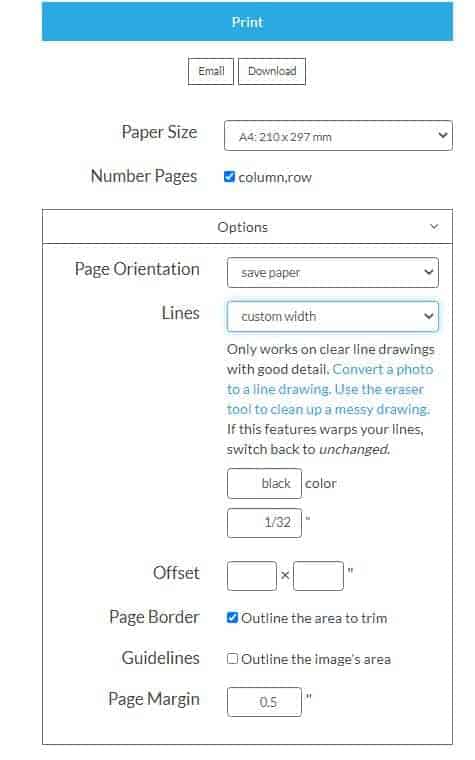
The “Lines” choice is where you decide whether to go for a custom width line or not. This tool helps eliminate the ‘stained glass’ problem of lines enlarging with an image as they would on a photocopier. It works best with a vector (SVG) file or a design you’ve created in Rapid Resizer. If you don’t have a vector file, see ‘Vectorizer’, below.
This Lines tool allows you set a standard width for the lines which is highly useful as you know. It would be a even better to be able to have a mix of line widths in the pattern – say you are using copper foil and lead together or steel core lead with a wider-than-standard-heart but that isn’t an option at present so you’ll have to adjust the pattern yourself to allow for that if needed. As you know, it’s vital that the line width doesn’t grow and grow with the image so, alongside all the other bells and whistles with the programme, this particular tool is really indispensable.
Saving and Printing Your Pattern
Once you have the pattern prepared and sized Rapid Resizer gives you 3 options:
- Email the image as a PDF
- Download the image
- Print the image
If you opt to print then choose the paper size. If you’re lucky enough to have an A3 printer then click that option. The more common letter or A4 are there as an option too of course. Once you have told the printer what size paper you are using the stained glass software automatically tiles the image across however many pages you need. The pattern shows how many pages but you have to count them manually as the software doesn’t seem to do that.
A word of caution – don’t do any lines in white as they won’t show on a white background. This is true of all programmes but just saying… hours can be wasted looking for a white line!
Other Rapid Resizer Features
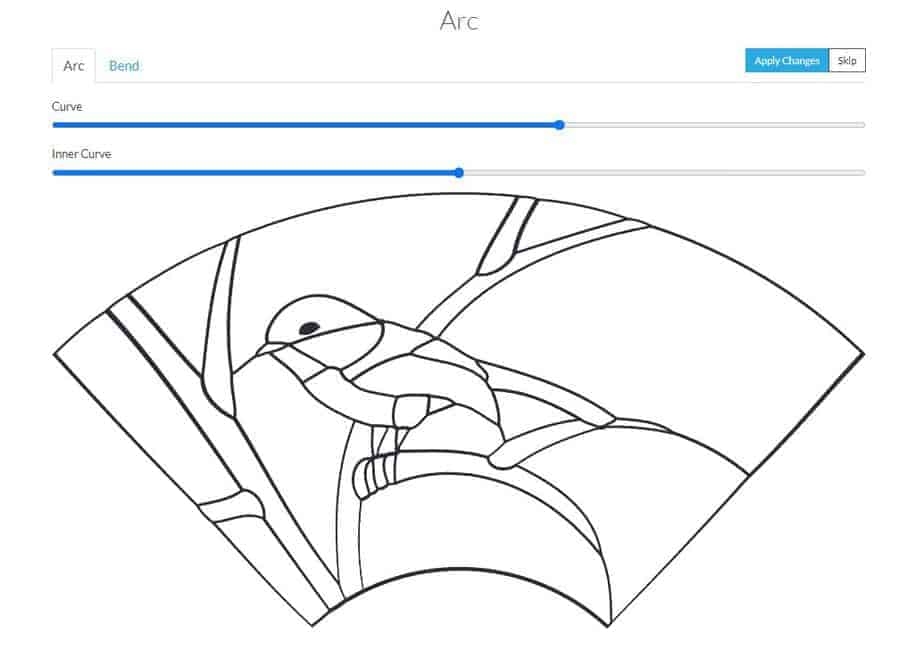
The Arc Tool
Have you ever wanted to get away from the more usual rectangles and make an arched panel? The Arc Tool lets you bend the image into an arc. You have to watch out for this a bit as it bends the shapes the more it arcs around. You could have lots of fun with an abstract panel but maybe stay away from representational ones with this tool unless you like misshapen birds 🙂
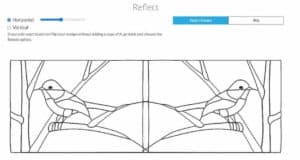
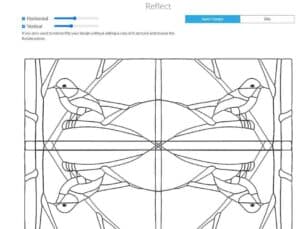
The Reflect Tool
You can easily create geometric stained glass patterns with online Rapid Resizer‘s magic Reflect Tool. This is different to the Mirror tool. Rather than flipping the image the Reflect tool doubles or quadruples your image.
I LOVE this tool. It’s so clever and gives a whole new set of options for design. Think “mandala” and you’re away!
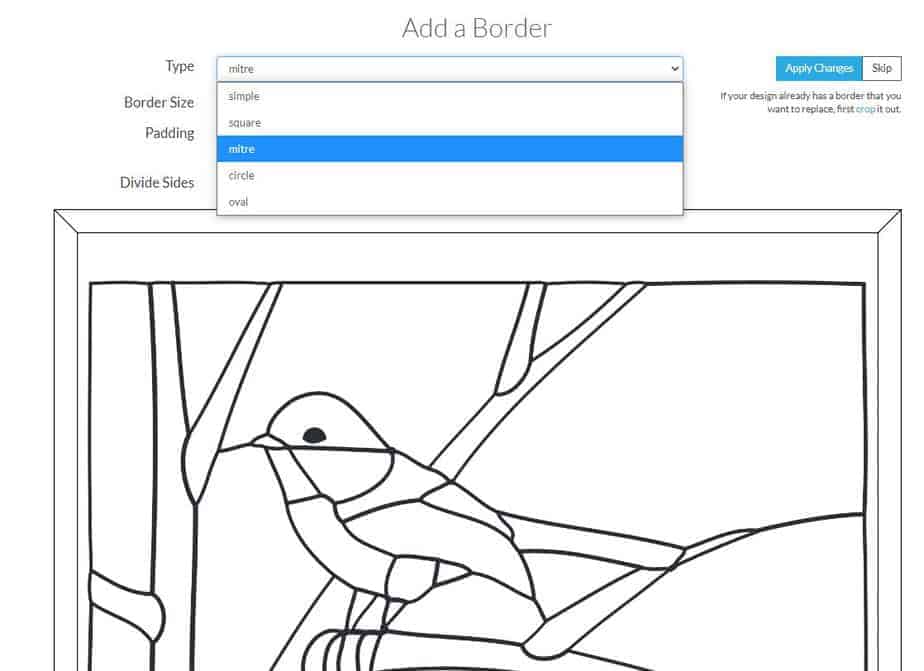
Add a Border Tool
This should be a very useful tool for stained glass software to include. Rapid Resizer offers a choice of borders including a mitred edge, circle and oval. You can divide the borders into evenly spaced shapes and adjust the border width which is great but I struggled a bit with lining the border up to the edges of my pattern. I really think this must be me; it’s such an important part of stained glass software that it must work!
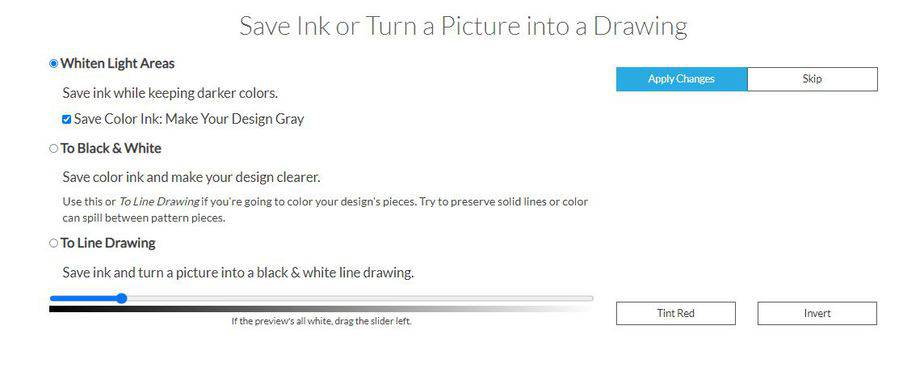
Ink Saving Tool
The final tool gives you a very practical way to keep costs down – Ink Saving. This is very useful as it lets you strip down what you need to print and save ink in the process. You can do this in a few different ways:
- remove colour from an image
- whiten the white parts to make the lines stand out
- choose to print in greyscale or
- adjust the opacity of the line in the greyscale setting.
You can also turn the image into a line drawing but unless I’m missing something this is less useful for stained glass projects but a very creative option for other crafts.
The Designer and Pro Versions – Top End Rapid Resizer Tools
There are some additional Tools in the Designer and Pro Versions that make your stained glass project easier. Designing patterns, choosing colours and calculating glass quantities are all crucial steps that online Rapid Resizer stained glass software helps you with.
Going up a step to these premium versions is particularly useful if you’re working your pattern up to a full colour design rather than just a line drawing for enlarging.
See which version of Rapid Resizer is best for you here
The Designer Tool
This introduces a whole new set of creative possibilities. It lets you add lines or elements to the design to enable you to make changes or add shapes and lines as you wish.
You can add text and combine images. This gives you the opportunity to put your own creative mark on your designs, personalising images and making them unique to you.
If you want to start with a blank canvas you can with the Designer Tool.
Tip from the software maker on undoing:
You can ‘undo’ up to 10 steps in Designer, using the ‘revert’ icon. Find it in the top menu bar. Similarly, you can redo by using the right-hand icon. I find it’s easier if you draw lines bit by bit, as you can only revert the last line – if you’ve done a complicated shape all in one line and want to keep a bit of it, ‘undo’ will erase it all.
Stained Glass Software – Specific Tools
The Pro Version also has some really helpful stained glass specific tools.
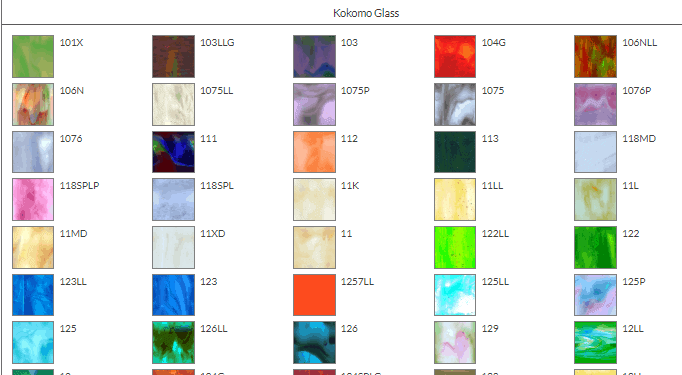
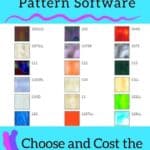
1. Glass Choices
You can try out different glass choices in your pattern to get a sense of how the finished project will look. This is great for when you’re deciding on colours for the piece and want to check how they balance up together. It’s really easy to swap things in and out.
To do this:
- select the material and then the supplier. This gives you a pretty good list of available glass with code numbers (very useful!)
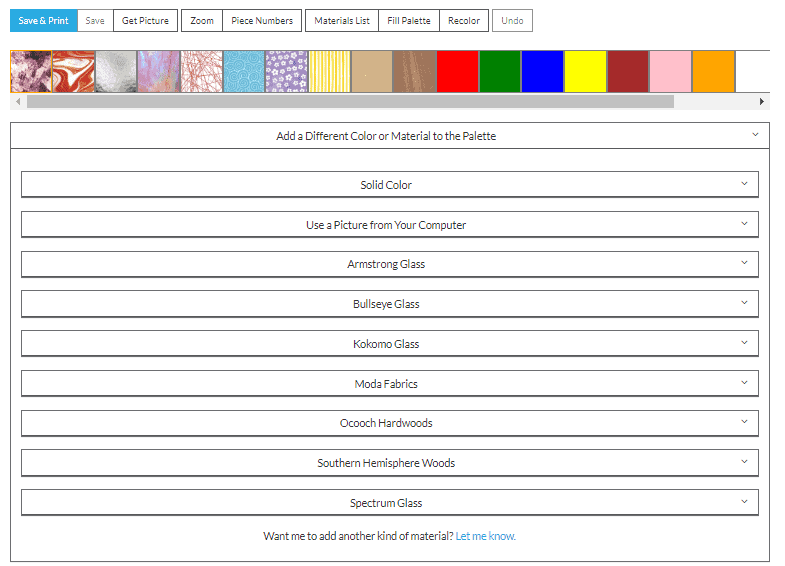
- select the one you like and click into your design and immediately the pattern is filled with the glass choice.
- You can easily share different colour ideas with others by downloading the picture files to share. If you’re doing the panel for someone else – say a relative or a commission – you can share ideas at this early stage. It’s a sure fire way to get results that you’re all happy with.
- Once your colours are all sorted the stained glass software numbers the pattern for you

- Lastly, it estimates the amount of each type of glass you will need. This is a fantastically helpful addition. It will help with pricing your work and with making sure that you don’t run out of glass mid-project. Yikes!
Other Helpful Tools in the Pro and Designer Versions
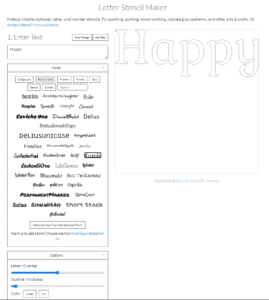
Letter Stencil Maker
- This is such a clever tool and will help anyone who likes using lettering in their work.
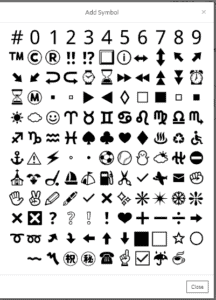
- Type in your phrase and select a font from a vast range of fonts from simple day to day like Arial or handwritten right through to fancy calligraphy. You can also add symbols from the font groups. Unleash your letters and free your fonts 🙂
- Once you’ve made your selection one click pops it onto the ‘Customise and Resize Tool’ to finesse your design.
Vectorizer
The Vectorizer turns a regular printed pattern into a traced vector image. This is a handy tool if you only have a paper image as it lets you enlarge it without the image pixellating. All you need to do is scan your image and upload it. The results depend on the quality of your image. The simpler it is and the clearer the contrast, the better the result. The Lines Tool works best with a vector file.
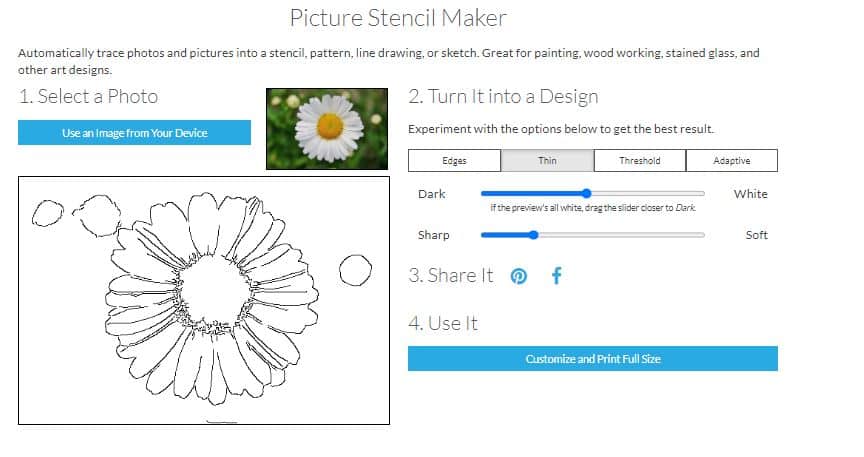
Picture Stencil Maker
This tool auto traces images that you upload. It’s a tiny bit weak to be honest. Theoretically you can upload a photo and trace the outlines of the main shapes. Handy sliders let you increase or decrease the dark or light colours.
I have tried it with several different images and it works far better with strong clear images with no clutter and lots of contrast. The Picture Stencil Maker gives you a starting point but the traced image will need to be tidied up and made useable before use.
You could trace it and then scan and upload the image for example. It’s not the strongest part of the software – it won’t give you a pattern straight from a photo without some adjustments but it certainly gets you started with the main shapes. And of course a single click will import it straight into the Designer and Resizer.
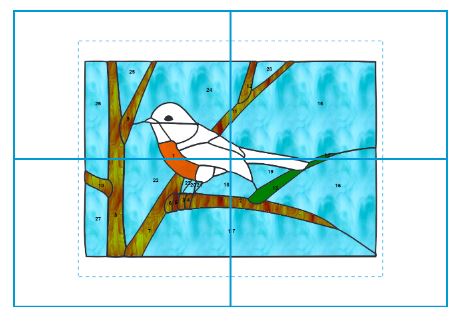
Here’s an example of a simple stained glass design ready for printing. It shows the design spread over 4 sheets of paper with a dotted line to help you line it up when you’re sticking it back together. You can choose to print a black and white version if you prefer.
Rapid Resizer – Final Thoughts
Rapid Resizer, as its name suggests, resizes images exceptionally well. The options available cover everything you need, including the crucial line width (with a vector file or a design created in the programme). It’s easy to learn and there are no fussy confusing features. And that’s me, Milly, talking – a person who constantly struggles with software 🙂 It helps that it works on my Mac (and any device), unlike other stained glass software I’ve looked at.
There are three versions available at different pricing tiers depending on the features you need. I have the Pro Version as it offers some important features I can’t do without. All the screenshots above have been taken from that.
In a nutshell, the Basic version lets you print unlimited resized patterns.
The Designer version is mainly distinguished by having the Designer Tool (for drawing original designs, customising designs and saving your designs online to your account). It has a good range of features but doesn’t have the glass swatches to help with colour decisions. Nor does it have the glass estimate tool that the Pro version has, leaving you to guess the correct amount of glass you need.
And the Pro version has all the above and adds the colouring feature that lets you fill in your pattern’s pieces with images of real material so you can see how it will look.
All three tiers are monthly or annual subscriptions. I have the Annual as it works out cheaper.
I get a small % if you click through from this page and purchase it. As I hope you know by now, I’m not going to be recommending things I don’t find tip top and incredibly useful. Thanks for your support.
Rapid Resizer – Tip from a reader:
I am using waterproof labels to print my patterns onto and I use 2 x-acto blades in one holder (a bit of a struggle to insert in the holder) to cut out my patterns for soldering. It gives just the exact space for the foil. I have tried various methods of getting my pattern onto glass and find that this works best for me.
You can get them on Amazon, this is a link to something similar.
Just so’s you know, if you click and buy through the link within 24 hrs I get a small % from Amazon, (not you!). Thanks in advance but no worries if you have a local store – I’d always support them first 🙂
Stained Glass Software – Questions And Answers
Q. If wanted to do this cat in stained glass would it actually make a pattern for me and resize it to A3?

A while back Patrick (the developer of Online Rapid Resizer) kindly did a Q+A in my private members group. Here are some of the questions and answers. This was a while back and the software has evolved and improved since then.
Q. Can the program be set for the thickness of foil and pattern lines? If so, how?
Yes, in the step where you enter a size, there’s a Lines option below. You can opt to simply keep lines smooth as they’re enlarged. Or you can set the line width. If your design is from an image file — not from a vector file such as SVG or from Rapid Resizer’s word stencil maker or drawing tools — it has to vectorized (aka auto-traced). Rapid Resizer does this automatically but tracing can distort your design. So the quality of the result varies, depending mainly on the detail and clarity of the image.
Q. I have a project that I found in a book that you can make copies from. When I make the size copies that I need, the lead lines go from a usable size to lines that are 1/2″ in width. Is there any way I can enlarge the pattern but keep the lead lines at 1/16″?
See above for the Rapid Resizer Online solution. Regarding alternatives, I’m not aware of a free simple design tool that includes centre line auto-tracing. Free programs such as Inkscape can outline trace (like the line smoothing option in Rapid Resizer) but to control the line width, you want to center-line trace and then set the thickness of the resulting centre-lines.
Q. Can we merge two or three designs into one and obtain one thickness of the line at the end? . Can we play with the lines before the final print?
This feature is included even in the Basic version of Rapid Resizer Online.
Q.When I scan a pattern that needs tweaking, does the program suggest lines or is that something I need to work out myself ?
Not yet but that’s an interesting idea.
Q. I was told that if you scan or upload a picture, the software will convert the pic to a pattern. Do I understand this correctly?
The software uses a few tricks to convert a photo to a rough line drawing. It’s not magical but it’s helpful in cases where there’s a good contrast between the object of interest and the background and the image isn’t too busy. At the least, it can give you a good starting point from which you can just erase or add lines. You can download the image to customize in a program you already have. Or you can use Rapid Resizer’s Designer to erase and draw on it then print full size.
Q. Does the program assess a pattern we might design for pieces that may be too small to cut or impossible cuts or construction weak points such as a horizontal line that crosses the entire width?
That would be a brilliant feature, but unfortunately, it doesn’t have anything like that.
Q. Does the current program give the user a method to indicate design features such as where false lead lines might go or placement of hooks or placement of something to be attached to the surface of the glass after assembly?
The drawing tools in Rapid Resizer Online are simple so aside from dashed and dotted line types to draw with, there’s nothing specially intended for adding notes or marks to the design.
Q. A customer has given me his company logo and the target size for the sign. Can I put this information and have the spacing between the letters be figured out by RR?
Rapid Resizer can’t selectively resize regions of a design. Sounds like the text needs to be repositioned while preserving other elements of the design, which is really more of a design than an enlargement job. Ideally, you have a Photoshop or other vector form of the logo and you or a graphic designer can change the layout.
Q. When enlarging a pattern do I just type in a size and the program does the rest? I have enlarged patterns before (not with your program) and the pattern had been distorted. What can I expect from Rapid Resizer?
Yes, you usually just type in a size, maybe set a few other options, and you get a full size PDF of your design. If you’re asking about the distortion that usually occurs when extremely enlarging an image, see my answer to the first question.
Q. I scanned a purchased pattern into your system and was able to remove some very busy looking sky, and to draw a new sky in with no problems other than my lines being sloppy (I’ve never used a drawing program). My pattern is of a Blue Heron standing in water with sun in background. I want to cut and paste the bird, and to enlarge it a bit. Is there a way to do this?
Unfortunately, it doesn’t yet support cutting & pasting out of an image in a design. The workaround would be to crop it. After you crop it and get to the sizing step again, that copy is saved to your account. Then you could go back to drawing your main design, click on the button at the top left and add that cropped piece into your design.
Q. What are some of the features you’re most excited about?
- The fact that Rapid Resizer is a website so it runs on everything: Windows, Macs, tablets, even phones
- The enlarging tools are top class and it’s great for quickly customizing existing designs
- There’s a variety of quick design making tools; word design maker, 1000s of symbols, picture to stencil and celtic knot designer
Q. If all my work is done on your website, do I save my work to my Mac or iPad or does it stay resident with your site?
The Designer and Pro versions save your designs online as a convenience. But with any version, there’s a Download button so you can save designs to your Mac or iPad.
Q. May I save my pattern as a .jpg so I can get it printed full size, say 24″ x 36″, at a print shop?
Yes, you can download designs as PNG (similar to JPG) or SVG.
Q. Can we give any size we want for a pattern?
There’s something like a 200-page limit, though as a practical matter a design can get pretty ugly at larger sizes. The more detailed (in terms of pixels) the original file, the better the result.
There’s an article here to help you price your stained glass work
Here are some more design and pattern related posts for you

If I buy Rapid Resizer, can I use it with my PC, IPad, & phone or can you only use it from the electronic you bought it with. It seems if you have a login that it would be able to access it with all compatible electronics. Am I correct?
Yes, all of them Betsy
Hi Milly – I have been receiving your emails for a few years now and I’m finally thinking of getting myself a program to help with turning pictures from friends into stained glass. I see you are using Rapid Resizer. Have you ever used Glass Eye 2000? Besides price, do you have a preference? Are there major differences?
Hi Natalie, I have a mac so don’t have the option for Glass Eye. Lots of people like it though.
Rapid Resizer is web-based and updated regularly with prompt customer service. I’ve heard users say that Glass Eye is becoming a bit slow and clumsy with no updates. Sorry I can’t be of more help with GE.
After editing, I save the pattern as a PDF file so it is universally compatible. The pattern goes onto a thumb drive or my iPhone. In the USA there are several office supply stores, such as Staples and Office Depot. I take my pattern there and have them print 2 or 3 copies. They have paper 36” wide and on a continuous roll so length is unlimited. I tell them exactly how big I want the pattern to be and they adjust the size with their computer print system.
Good plan Alan, it’s nice to have a single piece of paper rather than stuck together A4 size (which does work of course).
I’m so glad I found this review! I’ve been trying to resize my stained glass patterns to fit a larger space and it’s been a pain. This software looks like it would make the process so much easier. I can’t wait to try it out and see how well it works. Thanks for sharing!
Hi,
how do i purchase your program?
I’m in south Africa.
I’ve been looking for such a program.
thanks: Philippe.
Hello Philippe, if you click through the link on this page it’ll take you to the site where you can buy Rapid Resizer. I hope that helps, Milly
Millie, can this software change a square design to a rectangular design?
Hi Suzanne, any changing of dimension will come with a stretching of the shapes so that they will look totally different. So, theoretically yes, you can, if you don’t mind your design changing dramatically to accommodate the new dimensions.
I hope that helps.
I have all of the tools you recommended (except Rapid Resizer) and since I gave classes for a while I have many other tools and I can fully back the products you recommend.
I use Silhouette Software Business Edition for design and resizing. I can do everything that you mention that Rapid Resizer does. I save all drawings in their .studio3 format but I can save in PDF or JPEG. I lose the editing capability if I save in the the others formats but I suppose I could save in both if I didn’t have hundreds of drawings.
That’s great to know Karen, thanks for the additional suggestion and explanation. Very helpful.
And thanks too for the endorsement of my recommended tools 🙂
Interesting but I did not see any pricing?
For the pricing you have to click through to Rapid Resizer’s page from one of the links above Philip. I don’t sell it, I just reviewed and recommended it. There are various levels of subscription that Patrick Roberts (the guy who made and sells it) details on his page.
I hope that helps.
I purchased a subscription for the month of January. It was money well spent! I was particularly interested in the letter stencil feature. Thank you for sharing so many more tips and tricks!
That’s really good to hear Andrew, thanks for letting us all know.
Milly, I love getting your Sunday emails with lots of tips, tricks, and ideas.
This idea of making stained glass projects from a child’s drawing is wonderful. What a great keepsake!
Since taking your foiling class years ago, I have enjoyed being one of the Hubbits on your Facebook page.
Your knowledge, combined with the information the other Hubbits share is a priceless combination.
Aw, thanks Gail. I’m glad you found the drawings inspirational. They’re so great, they all made me smile 🙂
Hello I use to have rapid resizer years ago. Unfortunately with rapid computer upgrades ever changing it stopped working. Please let me know how much and whether I would receive a disc or need to download the program. Thank you.
Rapid Resizer is a web-based service Patricia so you won’t need any discs or downloads. Patrick Roberts at Rapid Resizer keeps everything up to date so that it works without any bother.
I hope that reassures you.
looking to make stained glass patterns, from photos can your software help.i already have rapid resizer
You can upload a photo to RR Steve. Photos with high contrast are better. RR will extrapolate a pattern from it, which you’ll then have to work on.
I hope that helps.
My computer crashed with rapid resiser in it. No longer have program. How do I get it back?
Oh dear that’s frustrating. You’ll have to get in touch with Patrick Roberts at Rapid Resizer; he’s the owner and is very helpful and responsive. You can find his contact details via the link to Rapid Resizer above.
Good luck.
Is this program compatible with a tablet? Also I can’t actually find where to get this program.
Yes it does Ginger; it works from a browser and can be used on tablets. I hope that helps.
I bought rapid Resizer and for years I love it! It made it possible to do any of my projects
I like that I got to buy the program, but it doesn’t have updates and I don’t want to pay a yearly or monthly fee is there anyway to purchase an update version, without paying yearly fees? And also I work on a Mac but there hasn’t been any programs for that?
Glad you love it Sandy. I’m on a Mac too which is why RR is a good option for me. I haven’t seen any other programmes I like as much but I haven’t looked at everything I confess!
Anyone else out there got any software ideas for a Mac?
You’ll have to write to RR and ask if they’d be willing to add a ‘buy once’ option, I can’t influence that I’m afraid.
Thank you Millie for your emails and guidance! You’re always helpful and a great teacher! 😃
Thanks Johanna, that’s sweet of you 🙂
Master Milly what is the best in your opinion the Glass Eye 2000 or the Rapid Resizer Stained Glass Software?
For the reasons outlined above, I prefer Rapid Resizer. I just find it more intuitive (and I’m not great with software!)
Is this software ONLY for flat projects? Can it do lampshades that will be worked on a mold?
Yes, it’s only for flat projects. Good question Regina, and one I’ll add to the page, thanks for flagging it up.
I have tried and tried to get my Prairie design to resize from a scanned page in my pattern book to my window cut line size and this software adds a considerable border line that I cannot get rid of. I am quite frustrated. Any help you can give me would be appreciated. I just have the basic software.
LATER
Voila! I have found the problem. My printer had a default setting of 100%.
Glad you sorted the problem before I got to this question Gisele, well done!
It is great to have a design software for stained glass. I use Glass Eye 2000 to design, color, number my pieces, resize, flip, estimate, and create templates for my stained glass. What I especially like about it is that I can bring in any photo, fade it a bit, and draw over it to create my design. When I bought it a couple of years ago, it was $150. There are other versions (more $$) that offer more capability. I have it on my computer so I don’t have to pay any more to use it. I have taken photos of previous designs, and then redesigned them on the software. Easy to use.
Thanks for your thoughts on GE2000 Pamela, very helpful.
Apart from being a mac user – which doesn’t work on GE2000 – I’ve had a look at it on a PC and it felt a bit clunky. A software literate friend of mine said it was out-dated but I can’t comment on that as I’m certainly no expert on that!
I use for years GlassEye2000 the complete all options. It was not cheap but I use oft my own drawings and also, al the things with Fotos, automatisch trace options. May be it is a little bit old software, but it is still perfect working with windows 10.
Ook de kosten van een glaspaneel kun je precies calculeren. Also you can use an plotter, so you do not need siscors to cut your template. Etc. Ik beveel iedereen GlassEye de complete serie aan. Succes, veel plezier. We love it.
Wow! this look like a pretty powerful and useful software. Thanks for sharing!
You’re welcome Bill, I find it handy for all sorts of things.