How to Make Light Pass Through Glass Using Fiber Optics
Have you ever wanted to have tiny spots of really, REALLY bright light (thinks stars or eyes) in your stained glass?
It’s notoriously difficult to create intensely bright areas and make them stand out but reader Byrne Pedit found a way. He kindly shared his ingenious idea to show us how to make a pin point of light travel ‘through’ glass.
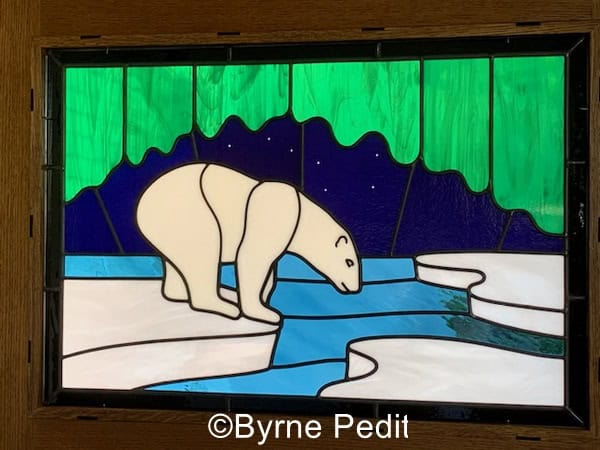
His secret? He uses fiber optics (optical fibres) to create these magical light points.
What You Need
- A piece of glass
- Fiber optic strands
- A glass drill bit
- Strong glue (like superglue)
- A sharp razor blade
- Optional: fine-grit sandpaper or a small flame for polishing
The Simple Science Behind Light Points
Before we start, let’s understand why this works:
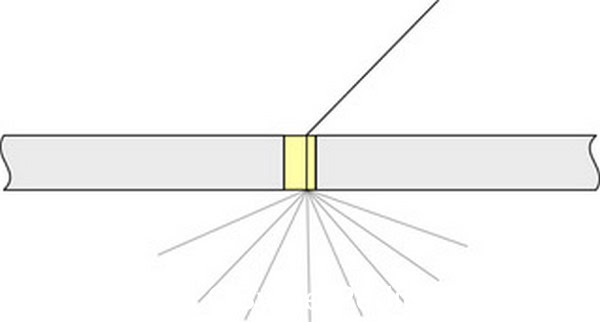
- Normally, a small hole in glass looks dark because light bounces around inside the hole and gets absorbed.
- Fibre optics are special materials that act like “light pipes”. They can capture light on one end and guide it to the other end, even if the fibre is bent.
- By filling a hole in glass with a fibre optic, we create a path for light to travel directly through the glass.
Step By Step Instructions
A tip before you start: This technique works best in darker areas of glass as the contrast is more dramatic.
- Drill a Small Hole
Carefully make a small hole in your glass using a special glass drill bit. This is the trickiest part, so take your time and use proper safety equipment. Diamond sintered bits are best for this job. You can find out about them and drilling holes in glass on this page - Insert the Fibre Optic
Cut a piece of fibre optic a bit longer than your glass is thick. Gently push it into the hole. - Glue It in Place
Use strong glue to secure the fibre optic in the hole. Let it dry completely. - Trim the Excess
Once dry, use a sharp razor to carefully cut off any extra fibre optic sticking out on front and back. Aim to make it flush with the glass surface. - Optional: Polish the Ends
For better light transmission, you can lightly polish the ends of the fibre optic. Byrne couldn’t quite remember how he’d achieved this; he thought experimenting with fine-grit sandpaper or quickly passing a small flame over each end would work. - Finishing Touch
For extra protection, you can choose to add a tiny drop of glue to each end of the fibre optic. This could go badly wrong so you might want to practise first or hold off on this!
The Result
You’ll see a bright spot of light on one side of the glass when you shine light on the other side. It’s truly magical – as if you’ve created a tiny tunnel for light to pass through 😊
Additional Ideas
- Try coloured fibre optics for different effects.
- Make patterns with multiple holes.
- Experiment with using different sizes of optical fibres.
I’m sure you’re as excited as me to try out all the ways you can use this light-transmitting technique to add a unique artistic touch to your own stained glass.
Thanks Byrne 🙂
Very nice & creative, a vision for further exploration.
Thanks for sharing.
And the light dots forming the “ plough”
Great idea!
Glad you spotted that Tom 🙂
This is exciting! There are stars in the pattern “floating around” in my head right now. I bought some tiny swarovski crystals to glue on, but I definitely will investigate the fiber optic cables.
Yes, do Pat. Let us know how you get on.
Fantastic! Love that you both are willing to share. It’s a must try.
Very cool. Thanks so much for sharing.
Wow!!! I am definitely going to try this. What a novel idea.
Question, where do you get the optic fibers.?
I know, me too Bette! You’ll have to snoop on the Internet – I’m a bit in the dark about this too.
You’ve helped me so much Milly, I’ve gotta give back when I can! Fiber optic cable (as it is called) comes in many sizes (thicknesses) and some different colors, they can be found on Amazon, Temu, Walmart, etc. and lighting specialty retailers online like superlightedled. The items are made of PMMA. Have fun and I can’t wait to see what you come up with!
Thanks so much Kirsten, I appreciate (and needed!) your help here 🙂
This is a fantastic idea. I am going to try it when I get my nerves up. I’m sure that like all your information it will be beautiful. Thanks for sharing.
Aw, you’re most welcome Gail. And of course you’ll be fine – try it on a scrap piece first and then take deep calming breaths for the real thing.
Good luck
Does the fiber optic strand need a source of power to light it?
No, it channels natural light. I can’t wait to experiment with this myself; it’s an ingenious and effective idea of Bryne’s 🙂