Slumping Molds
Slumping means heating glass in a kiln over a mold until it takes the shape of that mold. The slumping glass process is used for making bowls, platters or decorative 3-D objects.
There’s a huge variety of commercial moulds for sale, or you can make your own and create something truly unique without too much extra work.
Ways To Slump Glass
There’s three main ways of shaping glass – into, over, or through a mold.
- Into a mould
– This is the most widely-used method and is very good for bowls and shallow plates. Most of these moulds are ceramic.
– The glass is balanced on the lip of the mold and sinks into it when heated in the kiln.
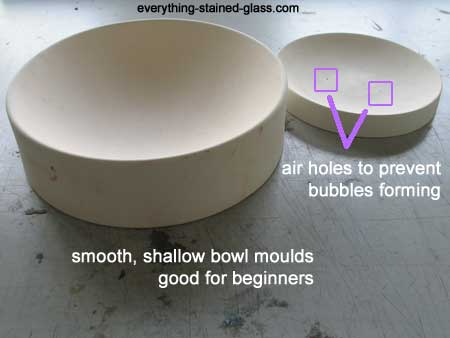
– A small air hole is needed at the bottom of the mould so that air can escape during firing.
– When you slump into a mould, the glass remains shiny inside the bowl.

- Over a mould
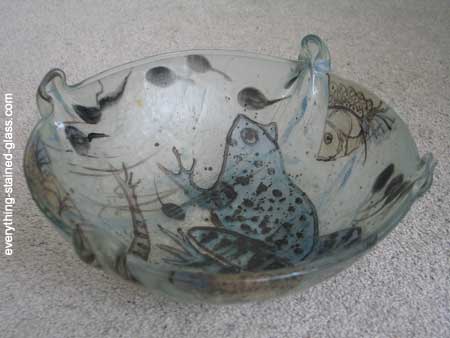
– This is when the glass is placed on the top of a convex mold and drapes over it during firing. Most of these are made from stainless steel.- The edges of bowls fired in this way fold over like material when heated. This is not controllable but can produce some very pleasing results, as in the photo above.– When you slump over a mould, the glass remains shiny on the outside of the bowl.
- Through a mold
– These molds are called drop rings, and have a hole which the glass droops through during firing. You can buy small clay ones.- Firing this method is a little bit trickier because you have to keep peeping into the kiln to see how far it has slumped.
Glass Slumping Molds
There’s lots of different types of materials that can be used for slumping molds. You can buy ready-made ones, use metal bowls or even found objects.
The two key things to remember are:
- the material must be able to withstand temperatures of up to 1150F/620C in the kiln
- that you use a separator (kiln wash, powder or thinfire paper) to prevent your work from sticking to the mould during firing

Types of mould
1 Clay
– The good thing about these moulds is that they are re-useable. You can either buy a commercial one made especially for glass, use a found pottery bowl, or make one yourself.
– As long as the clay has been bisque fired, and has a small (1/8″/3mm) hole drilled in its lowest point (see photo above) it should be fine.
– Clay moulds need to be brushed with kiln wash to stop your work from sticking.
– It’s best to slump into, rather than over, clay moulds, as it shrinks less than glass when it cools down. Slumping over clay can cause the piece to crack.
2 Stainless steel
– These moulds are cheap, easily available and very strong.
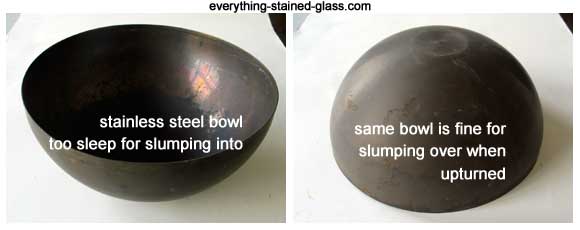
– As the steel contracts more than glass when it cools, it’s best to drape over this type of mold.
– It will need a separator, so brush kiln wash on with a haike brush. This is easier if you heat the mold to 1200F/650C first. Use heat resistant gloves!
– As long as the sides aren’t too steep, it is possible to fire into these moulds, but there’s a higher chance of breakage.

3 Fibre blanket/board/paper
– This is the most flexible of the materials on this page. You can shape this material to your own designs.
– Wear latex gloves and a mask when using fiber.
– You don’t need kiln wash for fiber material, as the glass comes away from it easily after firing.
Blanket
– The blanket is quite thick and can be gently shaped in the kiln with the glass fired on top. If you want more dramatic shapes you can place kiln props underneath the blanket in the kiln.
– You can buy a rigidizer if you want to make more permanent, complex molds.
Board
– This is great for slumping texture onto a fused piece.
– Using a craft or exacto knife, you can carve into the surface of 1″ (25mm) fiber board. Place your fused work on top and fire.
– The board will need pre-firing to 1400F/760C before it can be used as a mould if the manufacturers haven’t done so already.
Paper
– By cutting shapes out of and into 1/8″ (3mm) or 1/4″ (6mm) fiber paper, you can create shallow ‘moulds’ for your glasswork.
– These can be layered on top of each other to make a stepped mould that looks like a bas relief.
– Place your glass on top and fire.
4 Miscellaneous objects!
Lots of found items can be used as moulds. There’s a couple of things to remember:
– it’s best to heat them up slowly, in case they have any water in them (stones etc)
– they don’t have any ‘undercuts’. These are areas that the glass could flow into during firing which will prevent the mold from being released on cooling.
What Moulds Work Best?
If you are a beginner it’s best to start with a mold that is smooth and shallow with gently sloping sides.
Anything deep, with steep sides is tricky, as the glass will want to ‘shrink’ at the edges as it slumps.
Textures and wavy edges are difficult, so try and choose one with wide, smooth rims to start with.
Helpful Resources
The following books are great for learning about slumping. You can find them on Amazon.
– Warm Glass: A Complete Guide to Kiln-Forming Techniques: Fusing, Slumping, Casting by Philippa Beveridge
– Kiln Firing Glass – Glass Fusing Book One by Boyce Lundstrom
Now you know about molds you’re ready to start. Click here for a beginner’s tutorial on how to slump glass.
If you haven’t made a fused blank yet, there’s instructions here for you.

