Simple Fusing Instructions
Fused glass is one of the easiest and most exciting techniques for beginners.
There’s lots of things you can make with it… jewellery, plates, coasters, sun catchers, clock faces… or small windows and panels for your home.
There’s also many different creative things you can do. You can fuse it flat or with a texture. You can mix big shapes with small bits of glass frit. There’s gold mica powders, decals and iridescent surfaces. You can create bubbles, add wire, use stencils. The list is endless.
What is fusing?
– Fusing is heating two or more pieces of glass in a kiln so that they melt together.
– The temperature for melting glass is from 1400F/760C to 1500F/815C.
The top heat depends on what type of glass is being fired, and what result you’re after.
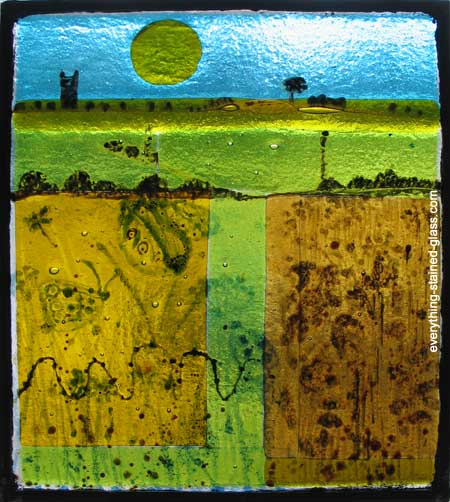
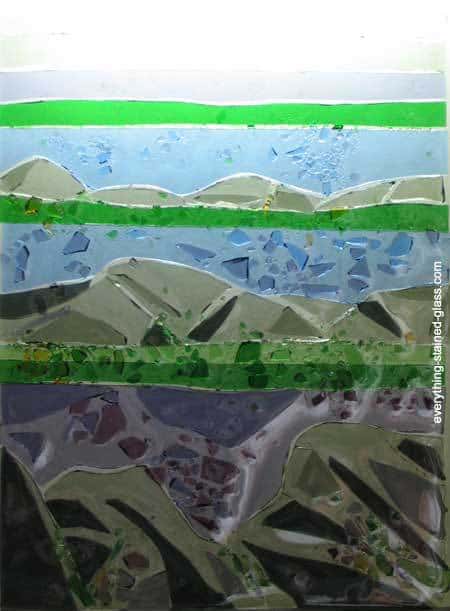
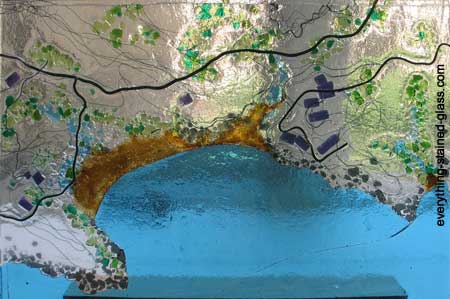
Imagine you’re making a landscape panel like the one above. To keep the texture on the hills it’s important not to melt it too much. This panel was fired at the lower end of the fusing heat scale. This is called a ‘tack fuse‘.
A higher temperature would be used if you wanted it smooth – for example for a coaster. This is called a ‘full fuse‘.
Before You Start
Fusible glass
The type of glass that you use for fusing is very important. It has to be glass that won’t break when it’s heated up and cooled down in the kiln.
Sadly this means that all your leftover bits from other projects will probably not be suitable for fusing.
All the pieces have to be compatible with each other for successful fusing.
Called ‘Fusible Glass’, the most popular ranges are made by Bullseye and Spectrum . Spectrum call their fusing range ‘System 96’.
Glass behaviour when heated
The best thickness for fused glass is 1/4inch (6mm).
If you fired one square piece of 1/8 (3mm) sheetglass in a kiln the edges would shrink in and it would no longer be exactly square.
Fire three layers (3/8inch/9mm) and the square would become rounded and bigger as the volume of glass melts and pushes outwards.
Two layers? Perfect. The glass stays the same size and is square.
What You Need
A selection of fusible glass, pattern, glass cutter, grozing pliers, detergent cleaner, safety glasses, dustpan and brush, access to a kiln.
Optional: a grinder
How To Fuse Glass
If you’re a beginner it would be best to start with something small and easy. Coasters are a good idea. Keep in mind that two layers are best, and design something to suit.
It’s a good idea to lay the shapes underneath a top layer to make sure you get a flat surface. This is called ‘capping‘.
If you have the smaller shapes on top, you might get some texture where they meet.
1. Designing
– Draw a square – say 4 inches (10cm) on a piece of paper.
– Sketch your ideas inside the lines.
– Keep it simple, especially if you’ve never cut artglass before.
– Don’t worry too much at this stage about getting it perfect. At this point it’s more about learning about how the glass behaves in the fusing process and getting the hang of each step.
– If you don’t feel able to design something yourself, then there’s some free patternshere that might get you started.

2. Cutting and cleaning the artglass
– There’s a whole page on how to cut glass here, which takes you through each step. It includes drawings, photos and a video to help you.
– Once you’re happy that you’ve cut everything to size, clean each piece with detergent, and dry.
– Any oil or fingerprints will be permanently fired if you don’t do this thoroughly.
3. Loading the kiln
– Put the coasters in the kiln, either on Bullseye thinfire ceramic fiber paper, or on a kiln shelf painted with batt wash.
– These act as a separator and stop the glass from sticking to the shelf.
4. Kiln firing schedule
Be aware that this program can only be a starting point, as each kiln has its own character and behaves differently.
It is a generic schedule for a full fuse on two layers of artglass up to 1foot square (30cm sq).
Segment 1 – Heat the kiln up at around 400F/222C per hour to 1100F/600C
Segment 2 – Slow the heating rate down to around 200F/111C per hour. This helps prevent bubbles trapping between layers.
Segment 3 – Hold the temperature at 1240F/670C for 30 minutes. Don’t bother with this soak if you want bubbles.
Segment 4 – Fire as fast as possible to 1480F/804C.
Segment 5 – Soak for 10 minutes.
Segment 6 – As fast a possible to annealing temperature recommended by manufacturer ( 900F/482C for Bullseye, 950F/510C for Spectrum)
Segment 7 – Hold at annealing temperature for 30 mins.
Segment 8 – Cool to room temperature at around 200F/111C per hour.

5. When can I open the kiln?
Impatience has cracked many a masterpiece!
It’s best to wait until the kiln reaches room temperature, but you can hurry it along a little by ‘cracking’ the kiln (opening the door a little) at about 200F/90C.
This isn’t advised if you have anything complicated in the firing, for example extra thick pieces, wire or copper sheet.
6. Cleaning your work
Only wash the piece once it has reached room temperature. The water will cause thermal shock otherwise.
Helpful Resources
This is a good video explaining the fact that glass likes to be 1/4 (6mm) thick. It also helps understand how it behaves in a kiln.
Video showing how glass volume spreads in kiln
If you want to slump your fused piece, then go to the Slumping page.
Hi, I have a bunch of stained glass that I wanted to fuse, I am just starting out and learning. How can I tell if I have the right type of glass that won’t break when it’s heated up and cooled down in the kiln? Also I came across an article on how to make a raku kiln (https://thepotterywheel.com/how-to-make-a-raku-kiln/). Would this type of kiln work for fusing glass?
If it’s not labelled you can’t tell from looking Tiana. You’ll have to do tests and see if it cracks… but this can happen after a period of time so isn’t immediately obvious.
A kiln that heats up to the required temperature with shelves will work. I don’t do pottery so don’t know if a raku kiln will fit the bill.
Can you to make one piece of fused glass: large deep blue with fused white frit for stars? This is for a display for an incredible German hand-made, hand-painted pewter nativity set of 26 pieces. The fused piece would be the night sky background. I can send you a pic from the ones who made it. They used a digital pic for the nativity set photo. I’d like to make a display that is as nice as the nativity set is. For the base for them to sit on, maybe use a piece of wood covered with adhered sand with a slot in the back to hold the vertical piece of glass background. If you have ideas for a better way to display the set, let me know. I can get the glass & frit online or if you have some, that can be used.
I live in Charlotte, NC.
Hello Gary, I live in Ireland and am concentrating on stained glass now. I don’t do fused glass commissions, sorry.
I live in Riverside, CA I inherited my mother’s kiln and a good amount of glass. I would like to start doing fused glass. just not sure here to start and I found you. I am hoping perhaps you would have some recommendations for me. Also, when we moving the kiln a piece of the inside was broken I kept it but I don’t know if it can be repaired or if I should replace. Its round about 2 long and 1 to 2 inches in diameter.
Any thoughts to get me started would be very much appreciated.
You can’t mend the kiln shelves Adrienne but they’re not too expensive to replace.
I only have a few pages on fusing which will get you started but there are dedicated fusing sites that would be better suited for you I think. Good luck.
Is there an at-home kiln you’d recommend for home use? Looking for something to do smaller pieces (coaster or small plate size, max).
Thanks!
You can get some nice tabletop fusing kilns Marci. I love Kilncare but they’re in the uk. I’m not sure where you are – Paragon are a good make.
I hope that helps.
can you fuse glass more than once? for example if you didn’t like a piece that you made could you reuse……thank you.
secondly what metals are compatible with fusing glass? thanks again!
You can re-fuse Maria but you have to watch for devitrification.
Hi Milly,
I love your site and have learned much from it! I make a lot of fused glass dishes and like to stencil on them prior to fusing. However, I find it very time consuming and difficult to paint on glass either by hand or airbrush using Glassline paints and making them thin enough so they don’t get “clumpy” looking. Then, there’s the cleanup after removing the stencils… Do you have any thoughts on a better nontoxic paint I could use, or other ways I could use stencils that would be less time consuming? Many thanks and happy fusing.
Thanks Sallie. Sadly I haven’t done fusing for a good few years so it’s not my speciality. Have you thought of approaching the suppliers or manufacturers? Or Bullseye Glass; they’re top notch on everything ‘warm’ glass. Sorry I can’t help more.
How about glass nuggets do I have to make them or can I use the ones I already have, they don’t say coe
You have to use compatible glass Joan, whether it’s from a sheet or a nugget. My rule is ‘if I don’t know, I don’t fuse it’. Sorry I can’t give you the answer you want!
At timeless tiffany in Elton maryland they sell fusible nuggets with the coe you need to fuse with, maybe the person looking for them can find them at their local stained glass supplier.
Thanks for the help Sandi. They sell online too so will ship.