This glass cutting guide takes you though five different ways of how to cut glass in a straight line. You might be wondering why you should spend time learning five different methods, when you can cut stained glass with just one? Very good question, which I’ll answer after you’ve tried all the options shown in this video!
5 ways to open a score
And the answer? Because all five together will give you the foundation skills needed for creative freedom. Once you’ve got the hang of these techniques, you can adapt them to cut any shape in stained glass you want.
Bonus!
There are actually 2 more ways to separate glass further down the page; they involve rulers and table edges 🙂
If you’re struggling with accurate cutting there are many easy-to-learn techniques that will help you get better.
If you don’t have a local class my Conquering Curves course has taught lots of people the skills to cut shapes accurately. And we all know how important neatly fitting shapes are!
The course is self-paced and online so you can learn these cutting techniques even if you are unable to get to a class. You can find out more about it here Conquering Curves.
Making The Cut or ‘Score’
Glass is ‘cut’ in two stages. First, you make a cut or score line across the glass from one side to the other with the wheel of the cutter. Then you break it apart, safely. Don’t be alarmed! ‘Separating’ is a better description than ‘breaking’.
The cut is made in exactly the same way for each method, so you only have to learn it once! It’s how you break the stained glass apart that differs.
My preferred glass cutting tools are Toyo pencil grip (paid link) and Toyo pistol grip cutters (paid link). Before you click I want to let you know I get a small % if you click through from my website and purchase. As I hope you know by now, I’m not going to be recommending things I don’t find tip top and incredibly useful. Thanks for your support.
I always wear safety glasses and use a dustpan and brush for the shards. I cut on scraps of linoleum, it’s cheaper than the cutting mats you can buy.
-
- First choose the smoothest side for cutting on – turn the pattern over if you want the texture on the front of your panel
- Then make the cut. This goes from one edge to the other
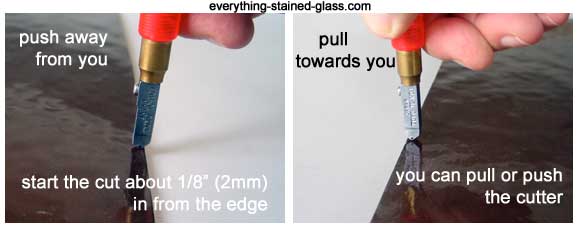
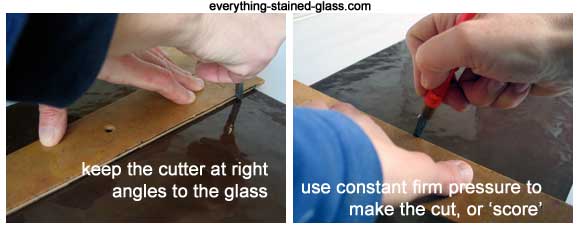
- Hold the cutter up right, just in from the edge – say 1/16″ (2mm). Make sure the little screw is in front of you. You can either push or pull the cutter
Use consistent firm pressure to scratch a continuous line across the stained glass. Too hard (producing a white residue) and you might break it. Too soft (no scratch mark) and it will shoot off where you don’t want it to go.
- Move the wheel across the stained glass at a steady pace. You can stop for a breather, but keep the wheel in the same place when you do
- Listen for a lovely shoooshing sound. Don’t worry if you don’t hear this on all opalescents and other specialist artglass. It will still separate if you’ve made a good cut
- Don’t stop a score half way, it must go from one edge to the other
- It’s best not to go over a cut twice, you’ll ruin your precious cutter wheel
Once you’ve made a cut you’re happy with, you’re ready to separate it.
How To Cut Glass – Method 1
Tools. This technique uses the least amount of tools. Just a cutter and two thumbs.
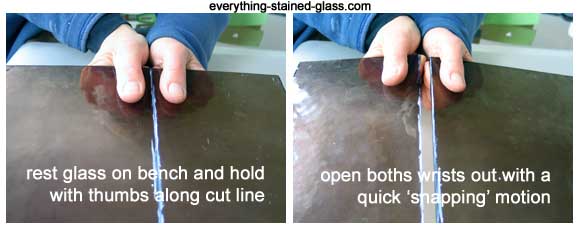
- Make the cut line as shown above
- Turn your glass around and hold the end where you ended the scoreline
- Place your thumbs either side and parallel to the cut
- If it’s a biggish sheet, make sure the other end is resting on the bench for safety
- Simply ‘snap’ your wrists outwards
- Magic! it’s in two pieces
When to use Method 1. Best used for smaller hobby-sized pieces. Works well with straight or slightly curved lines. There needs to be enough room on either side of the score for you to be able to get a good grip, so this isn’t any good for removing small narrow slithers.
Cutting Glass – Method 2
Tools. For this technique you only need a cutter and two hands!
- Make the cut or score line as shown above
- Use linoleum or newspaper to cushion the stained glass
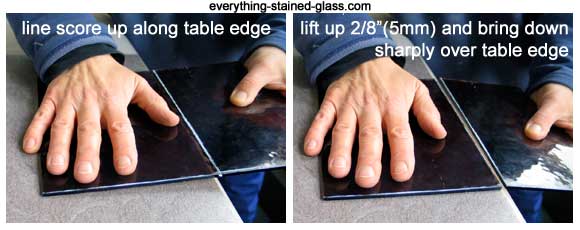
- Line the cut up with the edge of the table
- Spread your hand over the stained glass on the table
- Lift it up about 3/8″ (5mm) off the bench, making sure you’re holding it securely with your left hand (if you’re a ‘righty’)
- Bring it sharply down with your left hand and snap it over the edge
If it doesn’t work first time, your cut is either not consistent enough, or you haven’t brought it down hard enough. It’s a short, sharp ‘snapping’ movement.
When to use Method 2. This technique is the one to use for large sheets. Stand holding the stained glass with both hands and bring the sheet sharply down over the edge of the table. The weight of the glass on the bench will keep it in place.
Good for medium sized pieces when there’s a reasonable amount of stained glass either side of the cut, but you will need to use your spare hand to weight it down, as above. No good for curves or taking small slithers off.
Cutting Stained Glass – Method 3
Tools. A cutter and a rule.

- Make the cut line as shown above
- Put newspapers or linoleum down to protect the stained glass
- Place the cut line along the rule, with the largest amount of glass under your left hand (if you’re right-handed)
- Hold it securely with your left hand
- Bang down sharply with your right and it’s done!
When to use Method 3. Good for medium-sized hobby pieces. You need a fair amount of glass either side of the score to hold it safely. Straight lines only.
Glass Cutting – Method 4
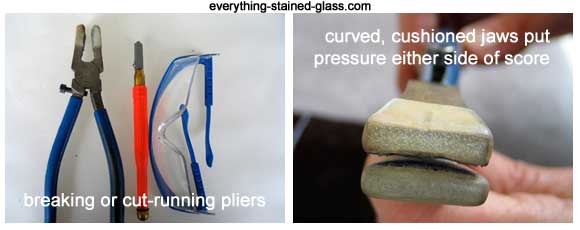
Tools. A cutter and breaking pliers. These are sometimes called cut-runners or cut-running pliers. They can be bought in any stained glass suppliers – like DelphiGlass – for about $10. They’re optional, but very useful.
- Make the cut line as shown above
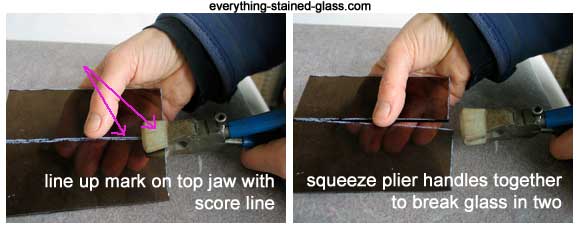
- Place the curved jaws on the score. The line marked on the cushioned jaws needs to be lined up with the score
- Make sure you’re holding the stained glass underneath and holding it close to the bench
- Squeeze gently but firmly. This (just like your thumbs in Method 1) creates pressure on either side of the cut and breaks it in two
When to use Method 4. Very good for smaller pieces as well as larger pieces. Works with curves once you get the hang of them. When doing curves, use the pliers at both ends of the score and gently squeeze to ease it apart if it doesn’t break straight away.
Stained Glass Cutting – Method 5
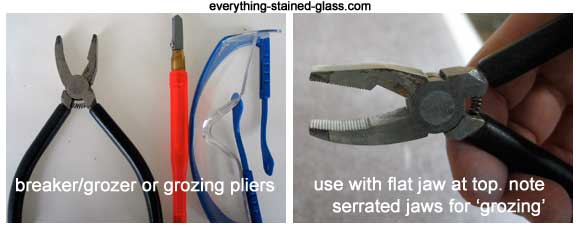
Tools. A cutter and breaker/grozer pliers. Sometimes called grozing pliers. They cost around $9 from any stained glass supplier. They’re an essential item for your cutting toolkit.
1. Breaking
- Make the cut as shown above
- Use the grozers with the flat jaw at the top
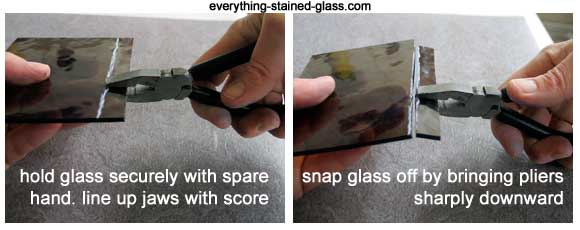
- Line the end of the jaw along the score
- Hold the stained glass underneath with your spare hand to prevent it falling
- ‘Snap’ your wrist down
If it doesn’t snap off in one piece, you can move along, repeating the action. If this happens, you’ll be left with a jagged cut, and need to ‘groze’ the edge.
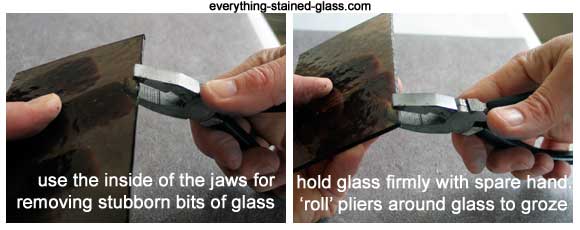
2. Grozing
Unlike the breaking pliers, grozer pliers have more than one use. With the serrated jaws you can ‘groze’ the nubs off if the cut hasn’t been a clean one. You need safety goggles for all cutting, but particularly this process as bits do ping off.
- Hold the stained glass firmly underneath, close to the edge where you’re grozing
- Open the jaws of the grozer pliers, and place them over the stubborn bits that haven’t broken off
- ‘Roll’ the pliers around the edge, and you’ll hear and see the serrated edge getting rid of the nubs
If you have a grinder, you can use it after grozing to get the edges smooth and safe.
When to use Method 5. Use for cutting small slithers off when the breaking pliers are too wide. Good for all inside and outside curves. Very versatile method for easing tricky shapes from glass. No good for whole sheets.
Stained Glass Cutting – Frequently Asked Questions
Q. Should I pull the cutter towards me, or push it away from me? (see first picture above)
A. You can do either.
- Pull. If I’m cutting a straight line using a rule, I’ll pull the cutter towards me. This is because you don’t have to see where you’re going as the rule guides you
- Push. If I’m cutting around a template I’ll push, as I can see (and follow) the line before the cutter wheel as I go.
Q. Is it best to use a rule or can I do it freehand?
A. You can cut straight lines either way. Some people find it easier to use a rule, some freehand. It doesn’t matter, as long as it’s straight!
If you’re using a metal rule, make sure it has rubber grips on the underside so that it doesn’t slip. Otherwise you can use a plastic cutting square especially made for cutting, and available from stained glass suppliers. These are held in place over the top edge of the stained glass by a ridge.
Q. I haven’t got a cutter yet. Would you recommend a certain type?
A. Yes, there’s different types of cutters, the main ones being pistol and pencil grip. The pistol grips are good if you have trouble holding things tightly with your hands and exerting pressure at the same time.
Make sure you buy a cutter with a carbide wheel. Lubricate the wheel with oil or get an oil-filled one and put oil into the cavity. There’s a page explaining the different types of cutter and what they’re best for here.
Q. Which end of the scoreline do I start the breaking from?
A. Always start opening the cut from where you finished the score line
Q. When I use my thumbs the score starts running where my thumbs are, and then stops half way. Help!
A. Carefully turn the stained glass around and try the same technique from the other end. This adjustment works for breaking pliers, too.
Q. Do I need to groze if I have a grinder?
A. Yes. It’s always best to use the grinder as a final tool to finish the cutting off, rather than using it to grind your mistakes away! You’ll save money on grinder heads if you get used to grozing.
Using copper foil? You need to wrap your glass pieces in foil
Using lead came? You need to lead your panel
I snap glass a lot on straight cuts. The score is already up so I align it with the edge of the table, lift the overhanging edge up with both hands, thumb and forefinger and snap it against the table. Not too hard.. It makes a satisfying kind of ping sound as it comes apart. It saves a few seconds.
It might have less chance to run out because the whole score breaks at once, maybe.
I love that satisfying ‘ping’ Rabbit 🙂 Thanks for your tips.
in the video you have at 11 min probaly the best cutter ever see
https://www.youtube.com/watch?v=lqvz4jGP0Hk
because it use a bering
I built a cutter like this have heas and add abearing that work perfectly
also some c utter have a kind of sping loader
that is perfect for beginner that know hpw much pressure toput on
jack 47 7#
Hi Milly,
When I have a challenging cut, especially on thicker glass, I warm the glass on a heating pad before making the cut. It seems to cut and break better for me. Works well for smaller projects.
Also, I chant, “you always screw up when cutting glass” which is how I remember the correct position to hold my cutter.
Thank you for all tips!
Susan
Hahaha that made me laugh Susan; I must remember that! Thanks for your warming up tip, too.
Hi Milly,
I just went to your ‘pliers page’ and you are sooo right that the Silberschnitt pliers are a cut above all others and well worth the money. I have had mine since 1989 and they are still like new because you can replace the breaking pads. They make cutting an inside curve a lot easier because you can turn the pads to different angles to get into a tough position. I rarely break pieces. Just thought I would put in my 2 cents.
Thank you Linda, it’s nice to have someone agreeing with me so wholeheartedly, LOL! They really are brilliant aren’t they.
I would like to know how you turn over a very large panel after you have soldered the front.
I’m assuming you’ve soldered side one on a board. If so, place another piece of board on top of your panel. If not, slide a board, under the panel carefully and one on top to sandwich it. Get another person to help if it’s really big.
Move it so half (no more!) of the panel is hanging over the edge of the bench – make sure it’s the shortest half.
Then, with one hand supporting the “hanging” edge, and the other hand placed on the top half that’s still on the bench, bring the panel so it’s vertical.
Then turn the panel in the direction you want it and reverse the process to lay it back on the table.
Once the panel is finished handle it vertically. I hope that helps.
Another way to separate complex cures. After scoring, turn the glass over and lay it down on a flat surface. Then using the ball end of the cutter, tap the glass all along the score line. Go back and forth if it doesn’t separate the first time.
Good suggestion Jeff, thanks. A variation on the tapping and using thumbs to press the line – and perfectly valid! So many ways to do the same thing thankfully – it leaves us able to choose the one that works best for us.
Occasionally I tap the back side of the glass with the handle of my cutter to get a particularly stubborn piece to open the score line. Tapping right on the score from the end to the beginning of the score usually opens it up.
Thanks for your suggestion Linda, I find that helpful too.
Hi Milly,
I found one more way to break glass. I learned this technique when I first started making stained glass. You take the glass piece you are about to cut and simply drop it on the floor. Very effective. Well, I didn’t say I would recommend it, but I actually did drop it once.
Cheers!
Frank
Very funny Frank 🙂 I should make a video of ‘5 ways to drop glass’ – as I’m sure you know there ARE different ways to fumble and drop glass!
Milly,
I always enjoy your videos.
Wonderful instruction from someone who obviously loves the art form and Freely shares.
No one does it better.
Aw, thanks Birney, nice to read your words on this Monday morning 🙂
Milly,
A minor criticism. Breaking and Cut Running pliers are different. Breaking pliers have parallel straight faces on the jaws. Cut runners have a curved face on each jaw. Breaking pliers are good for long straight(ish) scores that are relatively narrow; even narrower than is possible with cut running pliers.
Thanks for pointing out my slip of the tongue Stephen. (I assume the mistake was in the video, as I checked the text and it has the correct nomenclature.)
If anyone wants to learn about the pliers in more depth, I have a ‘pliers’ page here 🙂
Pressing with the padded handle is a new method for me. Thanks!
Give it a try Lisa, I hope you like it. The more strings we have to our bows the better 🙂
Hi Milly,
Spending so much time on your site that I am not getting to work on my project! Learning is addictive!
My question is about cutting oil. Can I use food grade mineral oil which is way less expensive than novacan?
Is the dip or wipe on an oil coated cotton ball any better than filling my cutters? By dipping, am I getting tiny glass shard off my wheel?
Thanks!
I wouldn’t go for food oil, it’s too heavy. You can use sewing machine oil.
I keep the pencil glass cutters and pistol grip cutters upright as the oil has a tendency to spill out. Try putting a bit of oil on a bit of sponge and resting the head on it in a jar for storage.
You can roll it back and forth to oil and clean the wheel simultaneously.
I hope that helps.
I keep a brush in my oil and use it on by brushing on the line I am about to cut! It usually works really well!
Brilliant idea Lyssa, thanks so much for taking the time to post it.
This was very informative and helpful as my current project needs three circles and I have broken my first couple attempts. Now I will make real progress. Thank you so much for the teaching.
Cutting glass circles shouldn’t be intimidating Denise. If you break the scores down into smaller pieces to start with to gain confidence with it. Good luck!
This was very informative and helpful as my current project needs three circles and I have broken my first couple attempts. Now I will make real progress. Thank you so much for the teaching.
You’re most welcome Denise. I’m glad you found it helpful.
Millie, I am enjoying your tutorials SO much! I took 1 beginners stained glass class in Alaska 20 years ago, plied my skills for several years then moved several times leaving my equipment packed. Now, I find myself unsure and timid working with my beautiful collection of glass! BUT, I am gaining confidence again in my cutting and soldering. THANK YOU!
What a lovely comment Judy, music to my teacher’s ears 🙂 Thank you.