Squaring Stained Glass – Making Your Panel Fit
Squaring stained glass is a combination of accurate cutting and constant checking. This tutorial is for those who struggle with making sure a copper foiled panel is perfectly square – or rectangular.
It’s worth knowing that the process of squaring stained glass lead came panels is a tiny bit different. I’ll cover that another time.

Getting The Basics Right
- First off, make sure your pattern right angles are absolutely accurate before you start cutting. This may sound obvious but you’d be surprised how many people don’t check this!
- Then cut accurately. You won’t achieve any squaring of right angles if you haven’t done both 1 and 2.
If you can’t seem to get your pieces cut accurately there are a many techniques you can learn to improve it.
If you don’t have a physical course near you my Stained Glass Made Perfect class has helped many students improve their cutting. And their soldering and finishing 🙂
The course can be done in your own time as it’s online. You can see if it looks right for you by clicking here Stained Glass Made Perfect.

Squaring Stained Glass With a Jig
- Use a jig to keep your stained glass square. You can either use Morton Layout System pinned into a homasote board or just bang 2 X 1″ batons of wood at right angles into chipboard or plywood, using the edges of your pattern as a guide.
- Double check everything with a T square before you bang the jig in place.
- Use a jig set up like the one below to hold your glass pieces in place.

Note the corners of the jig and how they butt up against each other – this is what you need to do for squaring stained glass panel.
4. Holding The Glass In Place
- Finish cutting the pieces and place them on the pattern together. There should be a small gap between all the pieces of stained glass to accommodate the copper foil and solder. You can use sewing pins to make sure of this on fiddly patterns like this one to hold the pieces in position. This helps with squaring up – if you don’t have this tiny gap uniform the panel will grow and become misshapen.
- Be careful that you don’t catch the edge of the glass with the pins when you tap them in, this can result in chipping the glass.

Trouble Shooting
You can jiggle the shapes about a bit within the squaring jig once you have all 4 sides secured and grind only where necessary.
If it’s too difficult to move the pieces with all 4 batons in place, you can just use 2 – a vertical and horizontal – and pin the stained glass pieces one by one, grinding as you go.
If you choose this way, then carefully bang in the remaining 2 wooden batons or pin in the Morton Layout when you’ve finished cutting all the stained glass shapes and you’re happy that everything is fitting.
Take note: If you don’t have the necessary gap in between each piece, your panel will grow and grow, so this is crucial.
Constantly check with a T square / right angle and keep measuring and squaring the edges. You have to work at squaring stained glass up, it doesn’t miraculously happen!
Reader’s Suggestions
Alan Belisle has some great ideas maintaining a neat channel in between pieces and for keeping glass in place. Thanks Alan 🙂 :
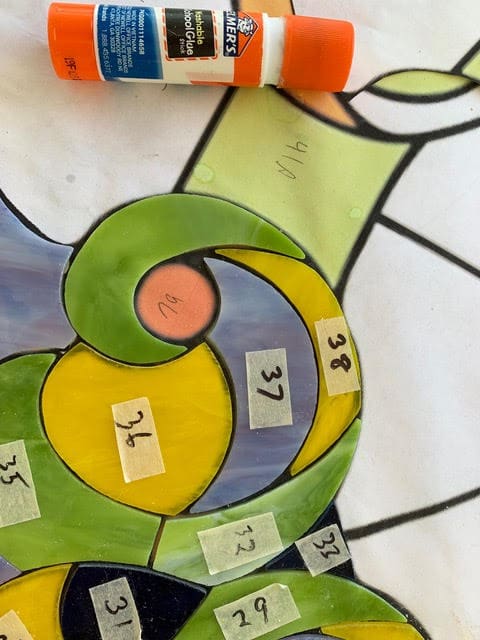
Once a piece is cut and ground to shape, I stick it to my master pattern with a couple of dabs of glue stick. This prevents shifting and can come apart easily enough if I want to change anything. No pushpins or horse nails to be in the way and no shifting alignments. In most cases, I can simply eyeball the glass against the pattern lines for a close fit. For larger patterns, I use a ball chain for spacing. Slipping a ball chain between the pieces allows me to get a very uniform gap between pieces. The extra space between the glass pieces takes a little more solder to fill, but that makes it a stronger bond, since I am not using lead came.
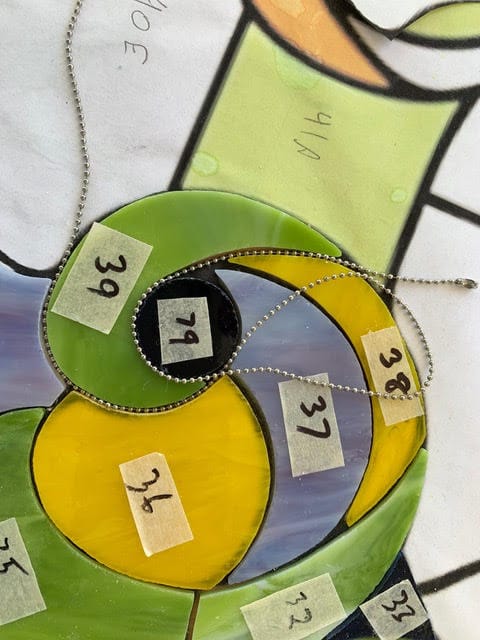
Once the whole pattern is cut, disassemble it a piece at a time, wash each thoroughly, then foil the edges, reassemble, and solder.
Go here for some more Free Tutorials on the Copper Foil Technique

I’ve used the pin method for spacing dou you #1 or #2 chin for spacing?
My bad – I didn’t know that pins come in different sizes Jeffrey. I use standard pins… the most important thing is that the channel is the right width. 1mm for foiled work. Don’t worry too much if it’s a bit bigger; the solder will fill it of course.
Another way to confirm that your layout is square is to measure the diagonals, lower left corner to upper right and lower right corner to upper left. They need to be identical for a squared project. If not, you will have a diamond.
As for protecting the pattern from dampness when grinding and fitting, try covering it with Contact brand clear adhesive vinyl. I have re-used patterns several times with this method.
Just remember to remove the pattern after tack soldering.
Fabulous tips Micki, so useful. Thanks 🙂
I use 1/2 drywall(gypsum) board for pinning and soldering. When it gets worn and really ugly I turn it over. Eventually I just replace it. It is readily available at any building supply store and fairly inexpensive. It will last for a long time.
Thank you for your tip Sharon! I love your pragmatic approach.
I find it very helpful to draw my patterns on quadrille ruled paper. Then the layout blocks can be pinned for fitting during grinding and tack soldering and you can see immediately that the window is square.
Also, I cover my homasote board with butcher paper to keep it clean during soldering. It’s non stick and and I just throw it in the garbage when the project is done.
Sound tips Marilyn, thanks so much for taking the time to share them 🙂
Thank you for these tips! Makes total sense to this absolute beginner. The pin tip and the reminder to constantly check the jigs came at just the right time. I have been just playing and experimenting with the tools, grinder and a very basic pattern. Cutting skills are a work in progress😏 and I found myself spending way too much time on the grinder seeking perfection. Now that I know gaps are our friends, I may be able to move a bit more quickly. Then again, as I am trying to learn all this from books, videos and trial and error, maybe not as quickly as I should be! Your straightforward descriptions and illustrations are really helpful. Thanks again!
Cutting skills are learned gradually so try and enjoy your progress. Great that you’re finding my tips helpful Lori, makes me happy!
If you needed to make a copper foil panel to an exact size, how much would you take off for the edge beading?
2mm. But if I was doing a panel I’d be using lead came or zinc for the edge as it’s stronger. I’d then measure depending on the width of the lead came.
I hope that helps.
I agree with Milly. I frame my panels in u channel zinc. I do not foil or bead the outside edges that will go into the zinc framing. When figuring the exact size you subtract the width of the zinc came that does not include the channel. The zinc came manufacturer gives that exaxct size. I use 3/8″ zinc came with a 5/32 ” deep u channel. You subtract the 5/32″ from the 3/8″ = .21875″. Multiply that by 2=.4375. That is almost a half inch. So I would subtract half inch from my pattern width (1/4″ from each side) and again, 1/4″ from top and bottom of the pattern to get the close to exact size. When making the “exact” size I always measure where the “exact” size needs to go. Trusting someone else to measure can be risky. I generally like to leave 1/8″ on all sides for an “exact” install. But you have to adapt to your own situation.
Brilliant explanation Sharon, thank you 🙂 And thanks too for saying ‘don’t trust others to measure for you’ – it’s so hard to explain what you actually need and no-one will do it as thoroughly or accurately. They don’t know what goes into making a stained glass window!
This is an invaluable tip! I recently took a class at the local community college (Intro.) and this entire subject was never presented. I’m still working on my first piece and was hoping to get it “assembled” this week – you saved me!
I saved you! What a lovely thing to read, thanks Sierra 🙂 When you’re teaching stained glass to a class it’s hard sometimes to fit everything in so maybe the next step was to talk about squaring a panel. Good luck with your next project.
I use pieces of ceiling tile which doesn’t react as quickly to heat so I can tack the pieces together – without the smell and it will hold together when I remove the tacks. Ceiling tile may be a less dense than homasote. I’m looking forward to trying the pin in between pieces to strengthen the panel.
Thanks for the additional information Stephen. I hope you find the pin trick helpful – if a bit fiddly!
To put needles between the pieces is the answer to a proplem, I did not hear of it before, but it makes absolute sense and surely will help me to avoid unwanted dynamics in the future, like growing in size or weak soldering, because of to tight fit on some spots. Thank you for such good advice! I have my present project on a notice pin board, what helps me with the right angle and to put needles btw. pieces, but can I do soldering on that cork board? I have now my Christmas break. I am sorry about my English, my mother tongue is German.
You can tack solder on the cork board, making sure that all the stained glass pieces are steady and don’t move. Then solder on a heat resistant board. If you can find homasote board in Germany you can pin and solder on to it.
Glad you found the tip useful Roswitha. And your English is a million times better than my German so please don’t apologise 🙂
This tip has more to do with pining than squaring.
When I first learned the pin trick from Milly, I tried using it on my piece of Homasote. It was too dense to easily accept the pins. I had an old piece of rigid foam insulation in the garage. It worked perfectly. The jig tacks are easy to push in and the pins go in with no effort at all. If I miss wiping a damp spot on the glass after grinding, the foam just repels it. Of course, the water doesn’t do my pattern any good, but I always make an extra as a grinding pattern anyway.
Just don’t forget to move the project off the foam once you are ready to solder! You will only make that mistake once!
Great tip Vicki, and perfect for those smaller stained glass panels. I can imagine the smell and fumes if you soldered the foam… oophs :-0
If you can’t get the insulating board you can always use a small hammer to tap the pins in the homasote board.