Making Stained Glass Templates That Fit
Accurate stained glass templates are crucial for creating beautiful panels. Once you’ve designed or found a stained glass pattern that you’re happy with, the next thing you need to do is make copies of it and cut the individual shapes out accurately. These will be used as templates for cutting all your glass pieces. You can cut stained glass templates most accurately with Foil Shears* or Lead Shears*, depending on which construction technique you’re using.
(This article contains some affiliate links – look for the *. Just so’s you know, if you click and buy through the link within 24 hrs I get a small % from Amazon, (not you!). Thanks in advance but no worries if you have a local store – I’d always support them first 🙂 )
How to Cut Stained Glass Templates
The following steps are all easy but it’s worth taking a bit of time doing them accurately. Think of it as a puzzle. If any of the pieces don’t fit, making the final picture will be difficult.
What you need:
Your stained glass pattern. Strong tracing paper. Carbon paper. Thin card. A pencil. Scissors.
For copper foil construction: Fine felt tip pen. Pattern shears for copper foil.*
For lead came construction: A 1/16 (2mm) black felt tip pen. Lead pattern shears.*
1. Making Copies
This is all about the order:
- Put the card at the bottom. Then the carbon paper (face down), followed by your pattern. The tracing paper goes on top of the pile.
- Pin or stick the edges down. It’s very important that nothing moves at this stage.
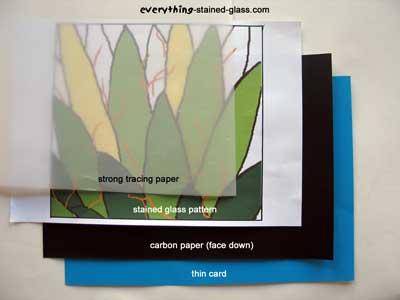
2. Tracing And Numbering The Shapes
- With the pencil, draw over the pattern with a constant, firm pressure. You want to make sure that the pattern reads clearly on the thin card at the bottom.
- It’s very important to number the shapes now, when all the pieces are together. I number mine at the top of each shape. This makes it easier when I’m trying to find how they fit together after they’re all cut.
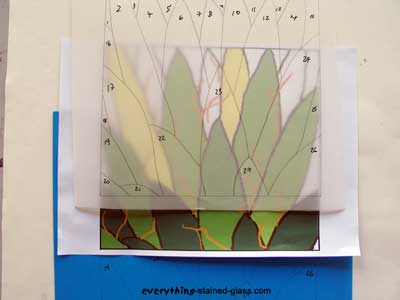
At this stage you should have your pattern drawn on the tracing paper and the thin card.
- Put aside the carbon paper and your stained glass pattern.
- For foil:
On the tracing paper, go over all the lines – except the outside lines – with the fine pen. This will be used for assembling your panel when you’re ready. - For lead came:
Do the same as above, only this time with the 1/16″ (2mm) thicker pen. This line represents the gap which the heart of the lead will fill later on.
3. How To Cut The Stained Glass Templates Pieces
- Now move on to the thin card. You are going to cut the stained glass templates from this. Cut neatly around the edge of the whole design with regular scissors.
- The next step is to cut a thin strip of card out between each shape. Why? Because either the width of the copper foil and solder, or the heart of the stained glass lead came will fill the gap when you assemble the panel. This means that you have to cut all the glass pieces a tiny bit smaller to make room for the foil and solder or heart of the lead.
- Luckily, the copper foil and lead shears are designed to cut the correct amount of card away from your pattern. Simply place them so that the line is in between the two outside blades.
Cut around each pattern piece. Do it slowly, especially around corners, as the strip can get caught up. Break it off every inch or so to stop this happening. You can rub candle wax on the blades to prevent the thin strips sticking. - Once you’ve cut them all, check their accuracy by placing them on the tracing paper. You should be able to see the black felt pen line between each shape. The photo below may help.
- Make sure you have the correct shears for the technique you are using, either copper foil or lead. The lead shears cut a wider 1/16″ (2mm) slice than the copper foil ones.
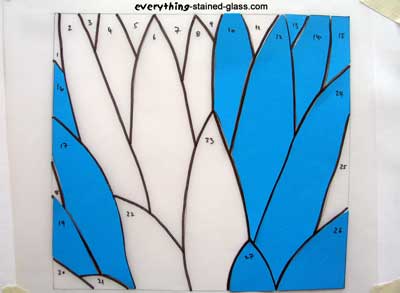
By now you should have:
- one coloured design or pattern
- one sheet of tracing paper, with your pattern drawn in either a fine line (copper foil) or a thicker 1/16″ (2mm) line (lead came)
- each shape numbered on the tracing paper
- all your stained glass templates cut out of thin card and numbered

If this is the case then you’re ready to start Stained Glass Cutting.
Make a Double-Bladed Knife for Cutting Templates
Do you find copper foil pattern shears tricky to use? If you struggle with the paper getting stuck or hurting your hands then this idea will help you.
It’s an ingenious way to adapt a box cutter to create the perfect alternative for pattern shears.
This idea was shared by Georgia Hamilton who kindly gave permission for me to pass it on to you. Thanks Georgia 🙂
Taking The Knife Apart
1. Take your box cutter apart. Take notes about how it will fit back together. Yours may be slightly different .
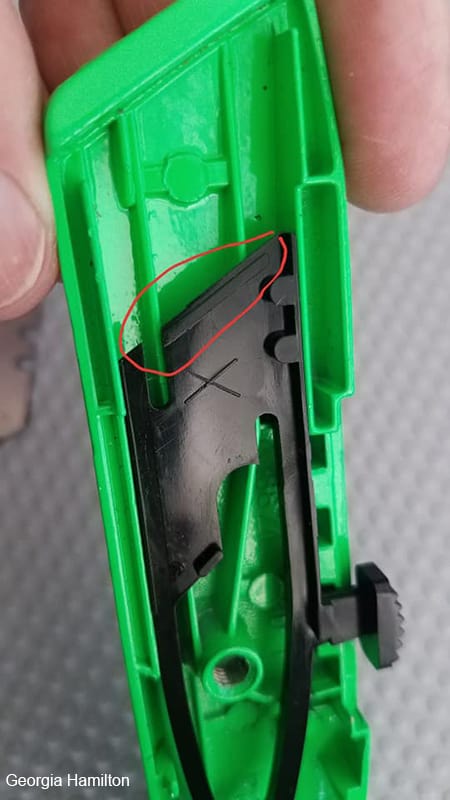
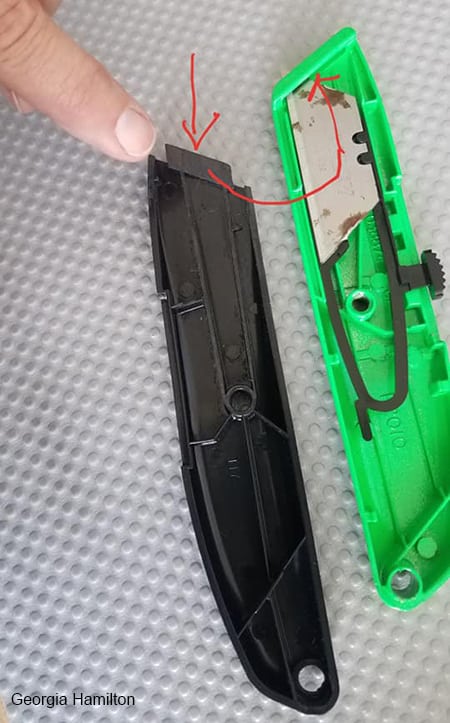
2. The 2 areas of importance are circled in red. They will need adjusting for the added thickness of the additional blade.
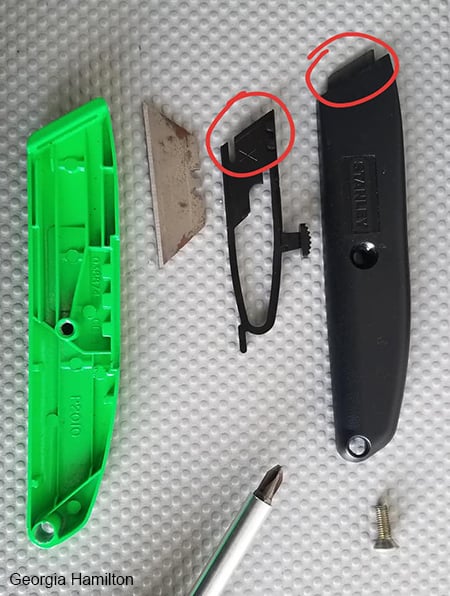
Sanding Down
3. Here’s a close up of one of the areas you’ll need to sand down to accommodate the 2 blades. The black plastic piece has a little ridge. Don’t sand down more of the ridge than you have to as it helps stabilise the blade(s). You want the double blade to fit on the slider at the same even depth as the single blade did.
4. The tab here rests on top of the blade when the handle piece is turned over. It fits into the same slot as the blades so it will also need to be sanded a bit to compensate for the added thickness of 2 blades.
*Important – sand the side of this tab that is contact with the blade – the inside of the black handle piece. Don’t sand any other ridges on this piece, just the tab and only as much as necessary. Keep checking the fit. This will help keep the blades fitting snugly.
Soldering 2 Blades Together
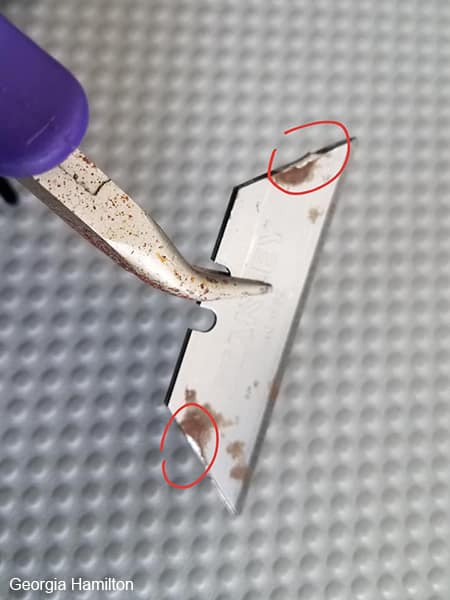
5. Use pliers to hold the blades together while placing a dab of flux and soldering. Just a smidge on both ends will hold the blades together.
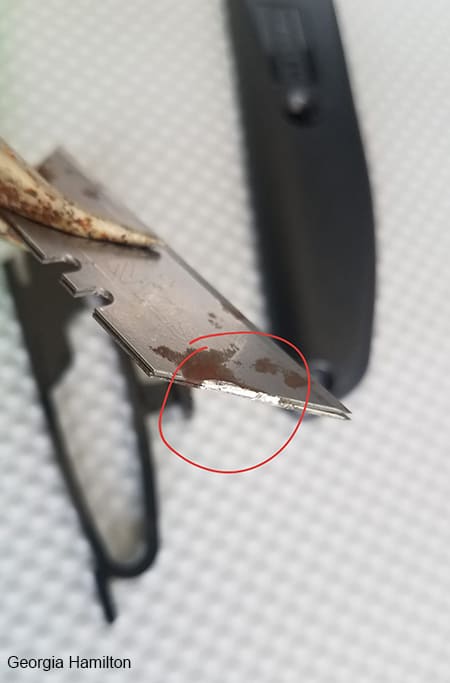
If you’re using them for foil construction you don’t need to do any spacing of the blades. The blades are tapered at the edges (like a knife edge is) so the upper part of the blade provides the space needed to cut the correct width for foil construction.
You can see this natural gap in the blades below.
Putting It Back Together
6. Reassemble the cutter making sure the tab (circled in red) goes into the slot with the blades. The two handles should fit together smoothly. If not, you may need to sand a bit more.
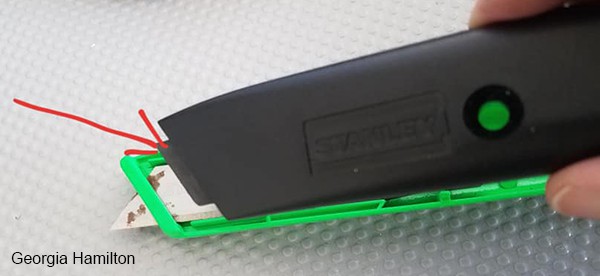
The beauty of the box cutter blades is that when one side gets dull, you simply take the blade out and reverse it.
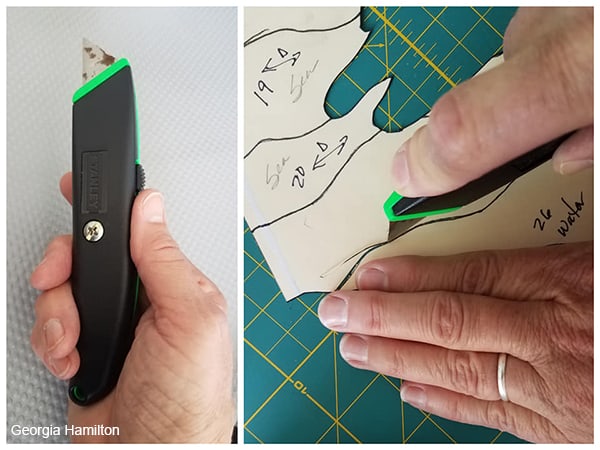
Georgia got the idea after watching a video of a master glass artist at work cutting out a pattern with a (vintage) double bladed tool that looked something like a modified lead knife. Excellent all round, thanks Georgia 🙂
There is more help with the copper foil technique here if you’re interested


Hi Millie,
I love to read your information. I have worked (starving artist) in s.g. for over 47 years. I’m 84, and had my own studio. Joy is working in glass. Used to make large windows for homes/businesses. Now instead of juried shows, I’m more of a hobbyist. Carrying heavy glass to shows is the hardest, but I love what I do, and customers appreciate buying small panels and suncatchers. No more 12 hour days, have time to read and learn something new from you every time I get your emails. I appreciate your “tips” and the comments. Thank You So Very Much.
Oh my goodness Connie, 47+ years… you could teach me many a thing I’m sure 🙂 I’m glad you’re still able to make stained glass. It’s hard to be away from it.
Hi there,
this is about making the double knife box cutter. Brilliant! Just wondering how you or Georgia sands the pieces of the knife to make them fit? dremel? sand paper?
thanks in advance!
Good question Rose. A dremel with the right bit is easiest – take is slowly and keep checking as you don’t want it too big either.
Good luck with your adaptations.
I’ve had an absolute mare with loosing my pattern while grinding!!!! I’ve used normal sharpie, oil based sharpies (which floats away in chunks as i grind!) sticky backed paper, gluing down paper (both lift, warp and slide off) it’s really slowing down my process and killing my enjoyment, I have to keep re stcking re appling or just guessing as I grind. Why is this happening!! 😂 I’ve heard about cricut working but I’m so skint and deflated by so many failed attempts I’m going nuts trying everything that’s recommended, please, anyone, HELP ME!! 😂
Oh no… I can recognise a desperate woman when I see one Bethan, lol. Have you tried petroleum jelly or mink oil rubbed over the line? It’s a bit trickier to wash after but worth it to get the grinding accurate. Good luck.
You already know me better than most 😂👍🏻 I’ve never heard of that tip! Fantastic I’ll try it as soon as I can thank you so much for all the wonderful advice and information you share, really appreciate your contribution to the world of stained glass 🤘🏻
I cut out pattern pieces from a pattern copied on my printer. I glue it down with a “PERMANENt” glue stick. Then if I’m in a hurry I make sure the glue is dry by placing it under my goose neck lamp warm bulb over my grinder or saw. Then I cover the pattern piece with chap stick! To remove the pattern soak in dish of water or sponge it off. If using marker, chap stick the line but I use oil based marker pens and let dry thoroughly and again rub chap stick over it for insurance. My pattern pieces never lift off doing this. Elmers makes a permanent glue stick. “Elmers Craft Bond extra strength glue stick -permanent bond” . Order online. Sometimes Michael’s has it. Good luck. Don’t give up!
Thank you for these extra thorough tips Barbara. Much appreciated.
I apply duck tape (2″ wide) to the glass, lay my cardboard piece over it and cut around it, leaving the duck-taped shape I want stuck to the glass. I can use my ring saw, then grinder to get the final, finished shape. With all but the smallest pieces, the duck tape remains stuck to the glass until I’m ready to peal it off.
hi, i am trying to resize my pattern for a transom and when i enlarge it , the lines get too wide…how can i reduce the line width? I have tried with Rapid resizer but my patterns gets distorted and i contacted the RRsoftware designer but i still can”t reduce the line width without it distorting the pattern…I plan to cut the pattern pieces with my cricut but this is holding me back. Please help!
thanks
The problem is that a standard raster file (jpg, png etc) will enlarge all the elements equally so the line will grow as the image grows. If the image is a vector file (svg) the line width can be fixed independently.
There is a Vectorizer Tool in Rapid Resizer that will let you trace a raster file and convert it to vector.
Alternatively I have just come across this new tool (I haven’t tried it yet) that allows you to upload an image and change it to a vector file. Its not free but you can buy a one week pass for $4.99. https://www.vectorizer.io/
I hope that helps Tira.
Hi Milly – I LOVE all your hints emails….keep them coming :o)
I don’t know why I have never seen anywhere the technique I use for templates. No fiddling with glue or disintegrating papers.
For my pattern templates I use a removable adhesive solid white contact paper that comes in rolls named “easyLiner” in Canada. I have been using it for a dozen years every time I have complex pieces so I can accurately draw the pattern onto the product. It is so simple and so effective.
For a pattern where I want the textured glass face-up on on the project:
Trace the pattern on the grid-side of the product, then place it onto the smooth side of the glass you want to cut.
For a pattern where I want the smooth side of the glass face-up on the project:
Trace the pattern on the plain side of the product, then place it onto the smooth side of the glass you want to cut.
Once you have determined the position that you want on your glass, you just peel back a tiny bit to set the position and then slowly peel away the backing, pressing it smooth and it sticks! If you do this a day or so before you want to finish the piece with some grinding, it won’t fall off with the grinder water.
When you are finished grinding, made any tiny adjustments for a perfect fit, then it peels off easily leaving no residue. It’s a never fail & no waste method.
Thank you Lois, that’s SO helpful for everyone. A real Top Tip 🙂
I trace my patterns on to contact paper It sticks beautifully to the glass and makes cutting the glass so much easier and grinding easier also.
Thank you Pam. A great tip and so sensible 🙂
I just completed a circle design and used the inside of an embroidery hoop to hold the inside glass pieces. I cut them to match the curve of the hoop. I used nails around the outside of the hoop to hold it firmly in place. It was easy finish by putting lead came around the finished piece to make it look professional. Hoops come in all size.
Laura
Thank you Laura, that’s a great tip 🙂 I’m sure it’ll be useful for everyone.
Hi Milly- I was wondering what “board” Georgia was using to cut the pattern on with the utility knife? The green. lined one in her photo. Thanks for all your help, slowly going through your foil class.
It’s a cutting mat April. Search ‘cutting mat’ and you’ll find one in your area.
I’m looking for advice on the best card for templates. I try to use the minimum amount of water on my grinding bit, but if I’m not careful the card can get soggy and start to disintegrate. My current strategy is to either rub a candle over the card or apply a thin film of petroleum jelly to try to waterproof the card. Ideally, the card should be water resistant but I print my patterns with an ink jet printer, so it can’t be totally waterproof! Not all card is the same (different weights and quality). Any thoughts on the “ideal” card for templates?
Try vellum (Mylar is a brand name) – it’s a sort of plastic paper and stands up to the grinder.
I hope that helps Gordon, good luck.
Hi Gordon
Try using acetate for you template instead of card board, that way it doesn’t deteriorate.
You can often find bits of acetate for free on the inside of packaging etc.
Good luck,
Jean
I’ve used wallpaper ‘lining paper’ for years and it’s perfect. It’s inexpensive and almost ‘card’ like . I have used Pritstick to glue my templates to my glass and it’s always been successful, the templates remain in place while grinding and a water soake easily cleans up.
What a great – and cheap – idea Fred, thanks so much for adding it.
I think this is a great idea. I do have another idea that might help those that are technically challenged (me perhaps):
Excel Blades 30608 Dual Strip Cutter, Dual Twin Blade Knife Parallel Number 59 Blades, Adjustable Width Strip Cutter, Cutting Tool for Paper, Clay etc.
I couldn’t get the picture to come across, sorry. I am a fuser also and I use these to cut the fusing paper into the size strips I need. Makes it so easy.
Thanks for this link Stephanie. I’ve tried and liked these too but they seem to frequently not be available so a bit frustrating to recommend!
Where in the US can you get these tools? Maybe Ed Hoy’s for the paper clay tool?
I have found that the trick to using pattern shears efficiently is to take very small bites before moving forward. Think of it as a little pac man eating small bites at a time. This keeps the waste material in the channel and keeps the shears moving freely.
I totally agree Jeff, thanks for adding your thoughts. I hadn’t thought of likening to Pac Man LOL – how I loved playing that, scary as it was!!
Thank you, Milly, for your tips and classes. I am making my own pattern for leaded glass and am using pre-cut beveled diamonds in the middle of the design. When making the pattern, how do I compensate for the fact that the size of the diamonds won’t change? Do I use a thick marker for the adjacent pieces that I will cut out, use regular scissors to cut out the diamonds and then use shears for the rest of the pieces? Maybe you have a tutorial on this that I just haven’t found yet?
Thank you for any guidance you can send my way!
You need to include the bevels in the pattern as if they were a regular glass shape. You still need to accommodate the width of the heart. Think of them as a fixed shape that you need to draw into your pattern.
I hope that answers your question Susan.
Milly,
I have a question about cracks. I finished a panel and didnt notice till done that is has a crack in 3 spots. How do I fix? It has been patina on it and polished.
Oh no, that’s a sorry tale Diana! It depends where they are on the piece, how big they are and if the piece needs to be weatherproof and strong. If it’s a small decorative free-hanging piece you might be able to do some patching up as per the example here but with foil and not lead (or lead if it’s a lead panel!).
If not you’ll have to take it apart and recut and redo the pieces. Either way you’ll have to touch up the finishing.
Fingers crossed for the former.
It might also be thinking what it was that made this happen 3 times… so that you can avoid a repeat.
I realise this is a tutorial on making templates, but what about a no-template tutorial. Making without templates would reduce a significant amount of work prior to cutting the glass.
I have a page on cutting glass covering 3 different approaches – including without templates – here: https://everythingstainedglass.com/cutting-glass-shapes . You’re correct, it does save time but lots of people find templates give a more accurate result for them.
Thanks for your thoughts Stephen.
Thanks for another of your always-helpful tips. I’ve seen (online) people put two blades into an X-ACTO knife holder, I forget if they soldered the two blades together. I, and many other SG makers on some Facebook pages, just use regular scissors, and cut off all of the edges of the printed lines. It seems to work for many, though takes a long time. Not as much time as fighting with the benighted “pattern scissors”, however. Somebody’s making a bunch of money selling those contraptions to the unwary.
‘Benighted pattern scissors’, love it!! Thanks for your comments Lisa, made me smile 🙂
Hello Milly ,
The question about incorporating bevels has reminded me that I have some agates which I would like to use .
The edges are very uneven and I’m not sure it’s possible to foil them . I haven’t tried grinding them yet , any ideas ?
Yes you can foil agates Barbara. Wash, dry and foil. You can carefully grind the edges if necessary and use lead for those that have a looser, sandy edge.
Be careful when soldering as they can crack. Also take care with chemicals and patina because they stain easily too.
Remember too that the coloured agates are stained and can fade from the sun.
More great tips and tricks. Thanks Georgia Hamilton for sharing the wonderful idea of making pattern cutters out of two utility knife blades!!
Milly I am learning so much from your web site thank you so much. Is there a round brace to hold your glass in place when your tacking it like the wooden board with the corner? My round panel was tight but when I went to tack it I ended with a lot of gaps. Gail
If I understand correctly Gail, you mean a jig for a circle? If so, you can cut these out of 3mm hardboard and either nail straight on your work surface or on a piece of chipboard.
I think Ed Hoy’s International, Delphi, and maybe other companies in the US have circle frames that you can use to keep the pieces in place. It’s not something I have ever tried. I just use a short piece of U lead and a horseshoe nail to hold the glass in place. It has worked for me for 38 years.
Hi Milly, I love your tutorial and it is very helpful! However, I am having a problem with bevels. Since they are a set size, how do you include them in your own pattern. I don’t want to grind them down to fit the template so it becomes a challenge to allow for that small gap. What do you suggest? Thank you so much.
You have to make adjustments to your design to accommodate the bevels Heidi. You may have to grind a little to make them more uniform – it depends how important that is for your design.
I’m glad you found the tutorial helpful.
Thank you so much for the tips! I am beginning a picture now of my brother’s airplane. There are so many little details I was having a hard time trying to figure it out. I will post a picture when I finish.
Brilliant, thanks Judy I look forward to that 🙂
Milly, I love all your tips and tutorials. Since I live in Northern California nd don’t have any idea where you live, there’s no way I can attend any of your classes. 🙁 So therefore I read everything you put on line. There’s only one stained glass shop near me and it’s 20 miles away, not real convenient for an 83 year old glass crafter. 🙂 Thanks for all of the tips and tutorials.
Hello Nancy, thanks for your lovely comments. I’m glad you find all the free stained glass tutorials of use.
I could teach you; online! I have 3 online courses to help people who can’t get to ‘live’ classes. One on copper foil technique, one on the lead came method and another on cutting curves. If you’d like to have a look to see if they’re right for you, they’re here.
Good luck with your future projects.
Milly’s online courses are magic! I love the detailed explanations plus the ability to stop/review as needed which you can’t do, of course, in a live seminar. Jump in: you’ll love her online courses!
‘Detailed explanations’ is what I’ve found people need to learn properly Lois, I’m glad you found it helpful too.
Thanks so much for the ‘thumbs up’, that’s very kind of you.
Brava! So good that you are making art .if its any comfort, here in the middle of Vermont, glass supplies are at least 55 miles away. As is the one Trader Joes on the state!
Thank you so much! I’m a beginner so this information is great it helped with new tips as well as refreshing my memory from class.
Oh that’s good to know Joyce, thanks for taking the time to comment. I hope you continue to improve your stained glass skills.