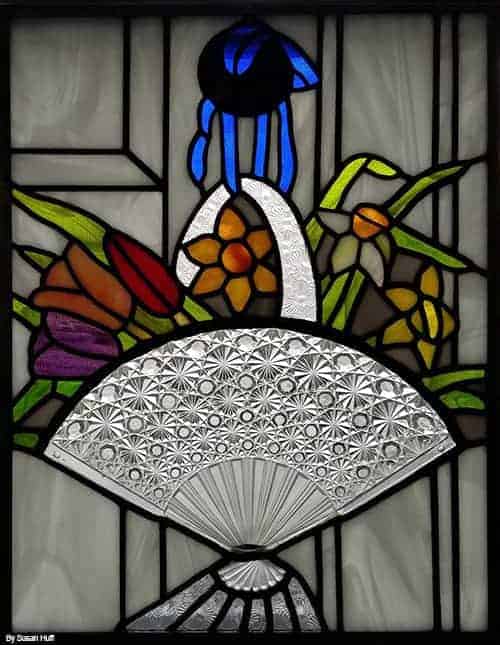
 Using a vintage plate in stained glass is not as hard as it seems.
You can use both the leading method and copper foil to do this.
Using A Vintage Plate In Stained Glass
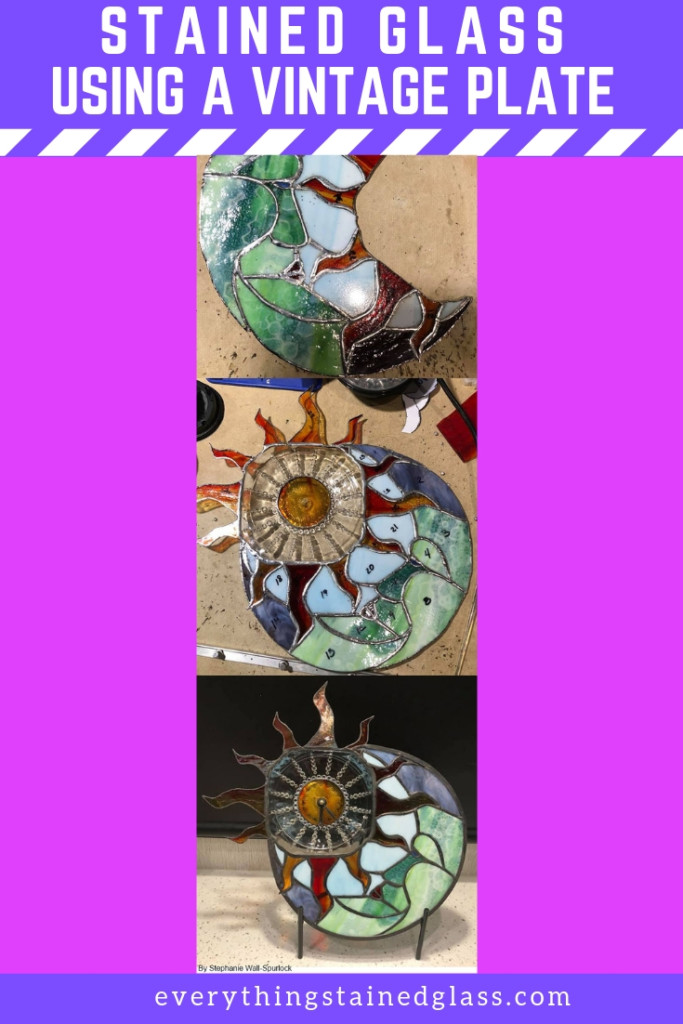
Instructions for Copper Foil Method
- Decide on the size of the finished panel, and draw it out accurately.
- If you want to make a geometric design, make a mark the half way down on each side of the plate. To find the centre point, join these lines up to form a cross.
- Place your plate face down, so that the centre of the plate is directly over the middle of the cross. They normally have a very helpful design that shows you the exact centre. Now draw around your plate.
- Remember, if you want the rounded side of the bowl at the back you need to reverse your design.
- Design the rest of the panel. The pictured one shows you how creative you can be. You could have sun rays radiating out from the middle – anything you like. Have a look at the two videos below for some mind-blowing ideas!
- Cut all your glass shapes and copper foil them as usual. If the plate is thick, or you think your design might need extra strength, then use a wider copper foil around the plate. You might have to use 2 strips of foil to get the desired width to cover the edges.
- When you solder it all together, solder it with the plate face down first. This is easier as it’s flat.
- Then use an old blanket around the edge of the plate – or something similar – that will support the panel around the edges when you turn it over to solder the second side.
Using A Vintage Plate In Stained Glass – Questions
Q: Do I have to grind the edges of the vintage plate before foil is put on?
A: It’s not necessary for the foil to stick, but if you need to to make it fit, you can – as long as it’s not tempered glass. You can’t cut or grind tempered glass. See this great page here to identify whether your plate is tempered:
Q: How do you foil a thicker vintage plate?
A: Use wider foil or overlap foil if you don’t have any wide enough.
Q: My question is in regards to using a vintage plate in stained glass. I have a client who would like me to use some plates that are cut in the design. What type of saw would do this kind of cutting? Can you recommend a brand. I currently have a wire saw and obviously it will not work.
A: I like the Taurus Ring Saw (paid link). I’ve written a page on my blog about what stained glass saws are good for here.
Ideas For Using A Vintage Plate in Stained Glass
If you’re wondering how you can use a vintage plate in stained glass be inspired right here! The videos show the spectacular results of the Vintage Plate Challenge that just took place in the Stained Glass Hub (a FB Group for students of my online courses).
In case you’re confused about the names, think darts! It was my take on the way the announcers say….ooooone HUNDRED and EIGHTY!
Thanks to all the ‘Hubbits’ who made such amazing plates and for Maggie Winters for organising it.
This lovely piece was made by Donna Ray for a friend. the plates were her mothers. Beautiful – thank you Donna.
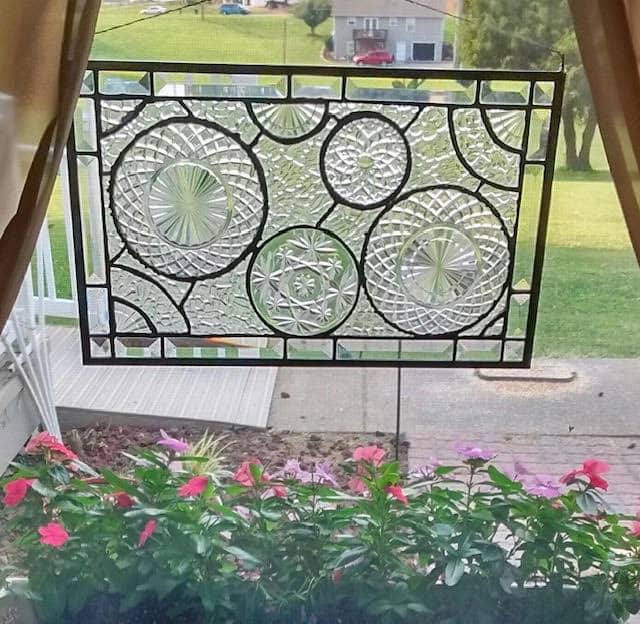
This lovely piece is by Nita Wiebe – thanks for sharing Nita
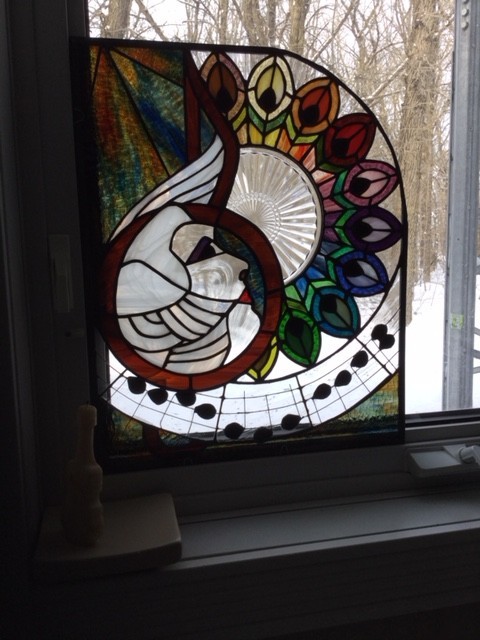
This was a piece my daughter and I designed on a hymn theme and her hymn was ‘Be Thou My Vision.” The profile is her profile, and the music notes are the first line of the tune. My idea was that our vision expands and creativity comes to life when our minds are enveloped by the beauty of the spirit of God. Chaos and confusion can be crafted into clear messages that breathe life to the planet.
PIN FOR LATER
Layered Agate Roundel*
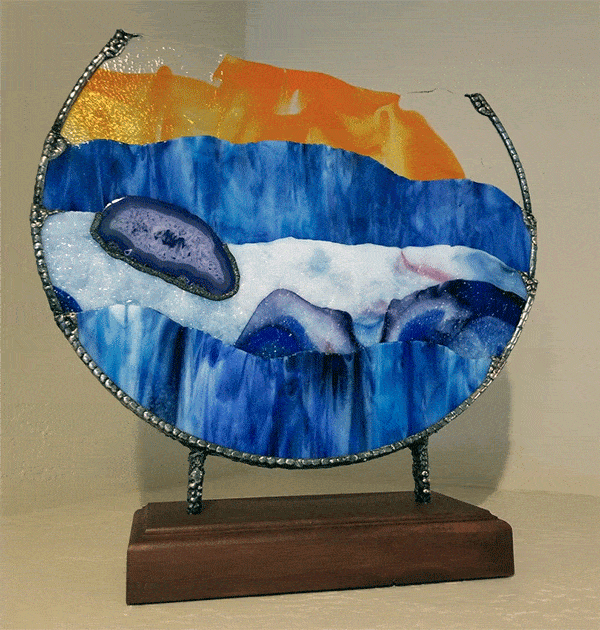
What a spectacular project this is! Here’s how you do it:
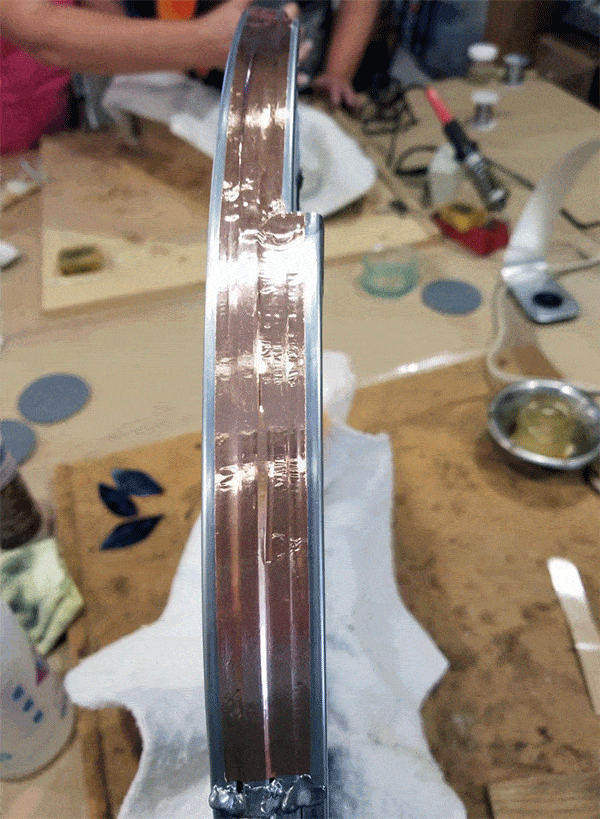
- The agate roundel has 4 layers. Each layer is wrapped with zinc u channel came.
- All the layers are then stacked and foiled along the edge to seal them.
- They are then soldered together.
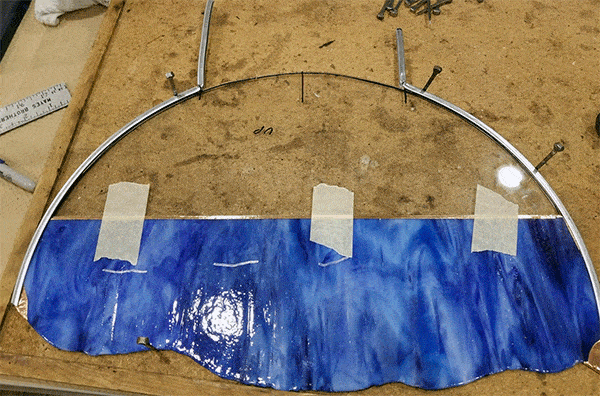
- Each layer – except the front – has pieces of double strength window glass added to complete the semi circle shape. This makes it easy to solder together.
- The glass used was the gorgeous heads & tails glass. These edges of rolled glass give you those lovely organic tops to each layer.
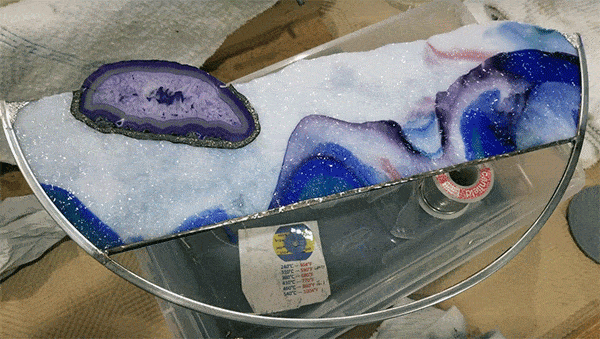
- For the agate, cut into the white glass and then soldered around it. You can see the soldered line around the agate.
- The decorative solder effect was make by making little indentations on the soldered line using the corner of the soldering iron tip.
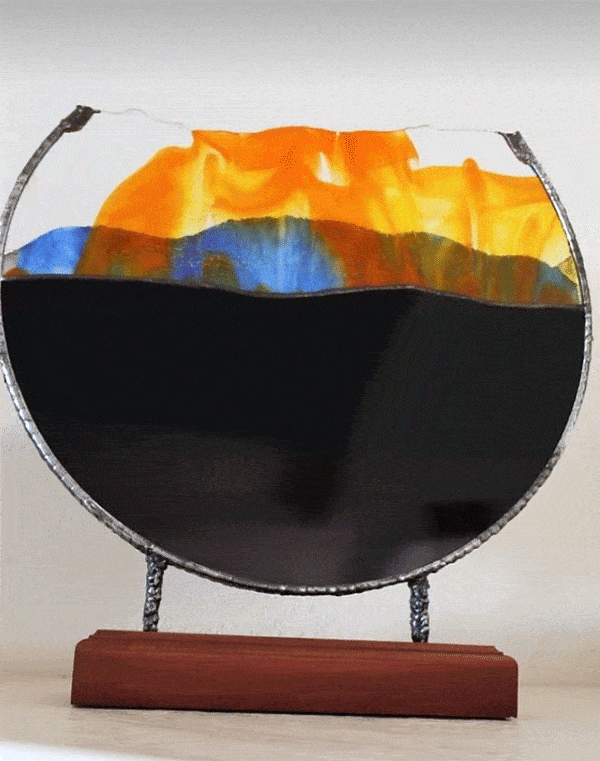
- Here’s the roundel from the back. The dark glass is necessary to ‘hold the light’ of the layers in front.
I think you’ll agree that this has to be one of THE most splendid projects. If you try it yourself, play around with the layers before committing yourself to soldering anything.
Add any comments in the box below and don’t forget to share on FB and Pinterest. Thanks.
*Made and shared by Gail Unger. Thanks for your generosity Gail 🙂
Agates in Glass made by readers
This is from Lyn – thank you for sharing.
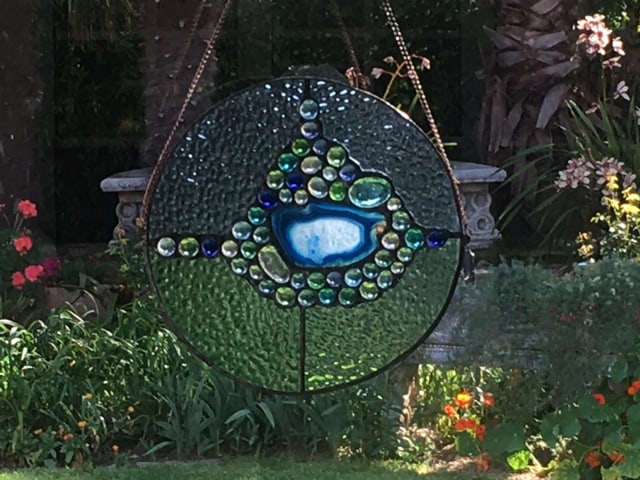
The design for this piece comes from this book that you can get on Amazon.
(Just so’s you know, if you click and buy through the link within 24 hrs I get a small % from Amazon, (not you!). Thanks in advance but no worries if you have a local store – I’d always support them first 🙂
Amazon Link to the Stained Glass Basics Book
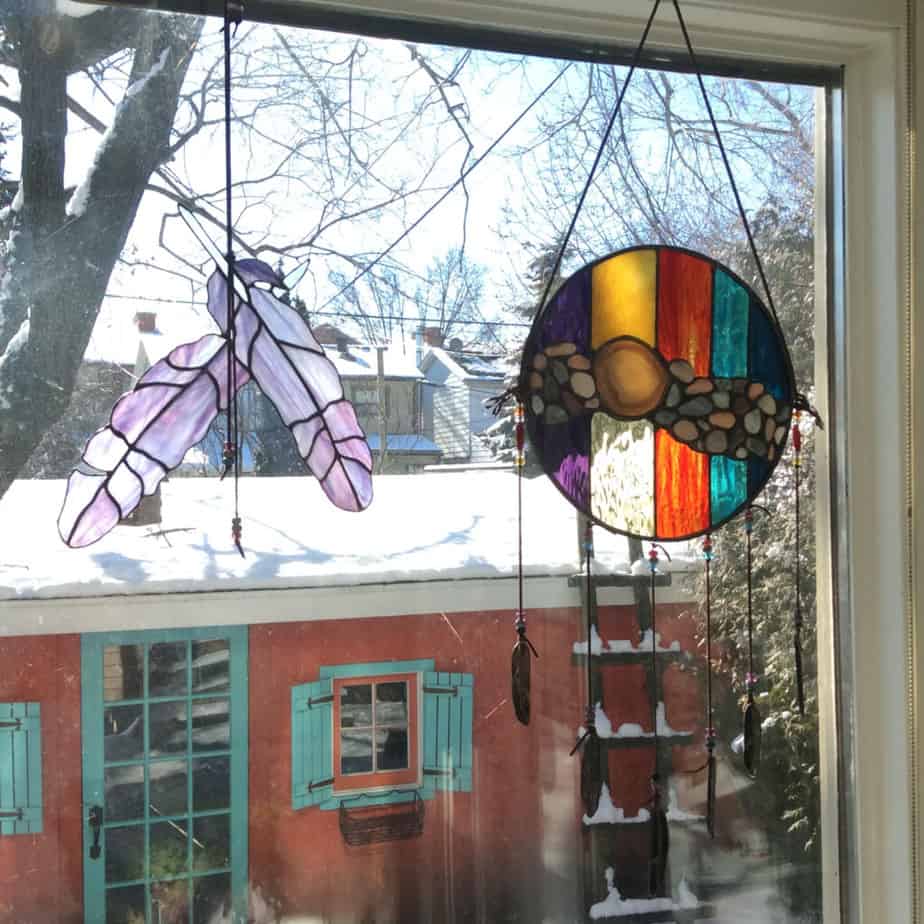
This is another lovely agate in stained glass sent in by Marie – thank you!
Ray Piezon has used Brazilian agate slabs to make this lovely piece:
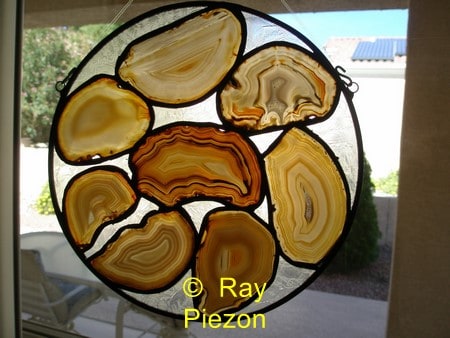

Donna Rays mothers plates and Ray Puezon’s agate in circles were the best of the bunch.
Pretty work
Everyone has different favourites James. I’m glad you liked them and found them inspiring.
Milly-
I am sure you have received this request before, and I have looked and “goggled” to see if I could answer my own question, but cannot. Do you know if there is a pattern available (for purchase) of the Glorious vintage plate by Stained Glass Hub member Susan Huff which is posted at the top of this article?
Many Thanks-
Tommy
It is glorious isn’t it Tommy. No, sadly there isn’t a pattern. You could use it for inspiration for your own plate though.
I’ve seen stained glass incorporating a plate and fussy cut pieces of other plates. Beautiful. But… it presents several headaches in my mind. The different thicknesses and a few LARGE gaps to fill.
I see there is 1/2” copper foil. My LARGEST question is 🤷🏻♀️ How would you fill the LARGE GAPS? I saw one picture where the artist cut and bent pieces of solder to place in the LARGE gaps… small gaps filled / and sometimes covered over with crumpled/folded or slivered strips of copper foil.
Strength is a concern also.
Any thoughts? Tips? Advice? Would be “LARGELY” 😉 appreciated.
Thank you for your time and attention ❤️
Haha Cathy, funny. I have a video here on filling gaps: https://everythingstainedglass.com/filling-gaps-video
I hope that helps.
So so beautiful! I have been wanting to incorporate plates and bottle bottoms for some time, but have been afraid. Are they kilned to flatten or are these very much three dimensional? Thank you!
I’m happy you’re inspired Jane. They’re not slumped in kilns, they’re all textured and dimensional, which gives them their charm.
Milly, I’ve watched your wonderful videos of you cutting glass and am wondering what kind of surface you lay the glass on that keeps it from moving while you score the glass. Is it white vinyl?
It’s actually white paper on top of lino, Janet. I use the paper for filming as it makes everything clearer for the watcher. I just use lino normally when I’m not on ‘TV’ LOL 🙂
What a fantastic way to upcycle those plates that are collecting dust! Are these entirely completed with copper foil? Or are any with lead?
I think they’re all foiled. You could do them in lead as long as the edges of the plate can be accommodated in the lead (they’re not too thick).
Good question, thanks for asking Patti.
Beautiful work and great inspiration! I have several pieces I had considered using silicone and put on old wooden frame windows. Now I need to rethink my options. 🙂 Thank you for sharing with us.
You’re welcome Sue, they really are inspiring aren’t they? 🙂
This was a great inducer to pull out my grandmothers plate and start working on the design I drew up 15 years ago before this art was even thought about. Got the idea of how I can use the quilt pattern she always made, and the round circle plate. Then get it to all come together.
Thankfully I have a Taurus ring saw, I can see by some of the designs and plates I already have, that it will be needed to make a complete piece of art.
Brilliant Channah, I hope it goes well. Feel free to email it to me when it’s finished, I’d like to see it.
I just bought a beautiful red saucer and cannot wait to try this!
Sounds lovely Kim, email me an image when you’re done 🙂
For frames I use old antique wood floors. It’s tongue and groove. I cut off the tongue and figure out how deep the groove is and then measure lengths minus the groove. Put glass in frame and nail it up!
Brilliant Jan, thanks for sharing with us 🙂
Could you use a porcelain plate? Or do a video on how to add cut pieces or broken pieces of porcelain that has flowers or birds on it or something?
You might have trouble getting the foil to stick to the porcelain unless the glaze was super shiny and smooth Nancy. Another possible problem could be heating the edges of it while you solder. It’s worth an experiment with one that isn’t precious!
If it does work, you might want to choose opaque glass as the plate will be opaque – visually it will work better in my view. Let us know how you get on, you could be a pioneer with a new technique 🙂
I have just started to play around with porcelain plates that I’ve picked up at thrift stores. I used part of the curved outside edge to form the bottom of an angel “dress.” I then used matching glass to make the rest of the dress, and patterned, clear glass plates to make wings. I used a glass nugget for the head, and used tinned, twisted copper wire for a halo.
My biggest problem was adjusting the height difference between the plate and the rest of the glass. I’m hoping to perfect this, so as to make something for my mother-in-law with her wedding china, which can no longer be used due to lead contamination.
Great idea to use porcelain plates too Deb. Thanks for your helpful observations.
I am looking for instructions on how to make wooden frames for a few of my pieces. Can you help?
Oh I SO wish I could, Ann! When I taught at Art College the technician tried to show me and then I tried to teach my class… disaster. All my angles went awry. Luckily my class thought it was dead funny.
I don’t find any YouTube videos on this specifically for stained glass. A regular wooden frame making video will give you the principles, then you would need the correct depth of wood and rebate for stained glass.
Another alternative is to buy them; if you’re in the US, Northern Hardwood Frames make them.
Sorry I can’t be of any help in the woodwork dept 🙁
I have made lots of picture frames with some being for stained glass projects. Making 45 degree corners is not easy but if you paint them you can dab wood filler or caulk to fill any gaps. You can buy an inexpensive miter saw new or used and they have a 45 degree setting. Most are fairly accurate so you can get close and use a sanding block to fine tune it. As for holding the glass panel I saw or rout a groove wide enough and deep enough to cover the zinc channel. You put glass panel in frame before securing corners. The secret is to cut frame pieces a hair longer than you need and sand down to finished size. I hope this helps ?
Oh yes that’s brilliant William, thanks so much. I’m pretty rubbish at frames – ask my students when I tried to teach them, I had to get the technician to help me out LOL!
I go to my local lumberyard and have them dado a 1/2” deep x 5/16” wide into 1” x 2” x 96” strips of lumber of my choice (usually red oak for unpainted and poplar for painted). They do up several at a time for me and they are ready to accommodate my 1/2” x 1/4” zinc u channel came around my project. I mitre them myself around the piece and carpenter glue them in a clamp. The lumberyard is very reasonable, have all the equipment, and are far more talented at a dado then I could ever be. 😊
Oh great idea Patti, thank you! They have the tools, too, which is key to decent woodworking I think.
Wow! I am very much at the beginning of my stained glass journey, but these designs inspire me to hang in there and be ambitious. I’ll also be filing away for future reference the practical pointers from you, Milly, and From the stained glass community. Thanks everyone!
Happy to hear that you’re now scouring thrift and charity shops for vintage plates Jo 🙂 It won’t be long before you’re making one yourself.
I found you on FB and started looking through all of the wonderful information here! I can’t wait to find some of these old plates and create something wonderful. My husband was looking over my shoulder when I clicked on the picture of the basket and he asked what it was made out of and I explained how it was done…he’s hooked. His response was “I guess I’m going to have to start searching for those plates.” He loved the look they create especially when I described some other designs I’ve seen online. He is so supportive in my wonderful hobby and is proactive in designing my studio. What a wonderful husband. Doesn’t hurt that I made him a beautiful schooner as an anniversary gift (he spent 22 years in the Navy and loves all things ocean).
So looking forward to your next class!
Glad you were inspired by the plates Pati. They’re so inventive! A new stained glass studio, how lovely. Looking forward to working alongside you in the Design Magic class too 🙂
Great inspirations!
Hi Milly ,
What an unusual piece .
I’ve had some agates in my ( to do ) store of glass for a while , intending to make them my next project .
You know how it is , then you need to make another piece so the agates are still waiting !
Having seen this its spurred me on to see what I can do with the blue & green agates that are looking down from the shelf & saying ” use me ” !!
Thanks for the update
Barbara M.
That’s great to know Barbara. Stained glass and associated ‘stuff’ – agates in this case – often shout ‘use me!’. We just have to wait until the time is right before we listen.
Email me your finished piece when you’re done and I’ll add it to Gails. Thanks!
be careful using dyed agates if you’re hanging in direct sunlight. They often fade over time!
Good reminder Anita, thanks 🙂
Do you have instructions for the wooden base? Thank you.
Gail didn’t make the wood base but she says it is made from a 2 x 6 piece of wood with holes drilled in for the bolts to go through. Then nuts are screwed in the bottom to tighten piece to the wood. Good luck with yours Jean!
Milly,
It appears that the panels are not soldered across the face of the piece, only on the sides. Am I reading this correctly? And the only piece that is soldered is the agate itself. Also, the clear glass was used just as a “place holder” and not a part of the completed piece.
Thanks,
Lisa
You’re absolutely correct on both counts Lisa. The clear glass is used to make the semi circle to match each layer of glass so that they can be soldered at the edges.
Good questions, thanks for asking 🙂
Milly,
Based on the instructions, I think each of the last 3 layers do have clear glass in the final piece. This allows each subsequent layer to rest safely on the clear glass below w/o touching the front glass. What is confusing to me is that 4 layers of zinc are soldered together into 1 piece!
I’d love to see the finished profile. Anne
I’m sorry I don’t have a photo of the profile you’re after 🙁
How did you make and attach the legs to the zinc frame?
Gail says the legs were made from the zinc came and then a bolt was inserted and soldered in. I hope that helps.
Concerning the above captioned Stained glass piece with a vintage plate. I would like to do the same thing the only difference is that I want cut some of this plates to put in the design.
How do I cut the plates?
Good idea Cynthia. I’d use a glass saw to cut these plates. I particularly like the Taurus ring saw; you can read about it here.
I have some of these plates, they are tempered glass, is that right? I didn’t know I could cut those on a ring saw
Great question Lisa. You can’t cut tempered glass. Some plates are tempered, some not. There’s a fascinating article here about how to tell: https://glasswithapast.com/knowledgebase/fusing-vintage-plates
I hope that helps – I certainly learned something new!