Welcome to Plating. What do you think of when I say that word? If it’s ‘FOOD’, you’re in good company! Thankfully for us, it applies to both food (lovely) AND stained glass (even more lovely).
Stained Glass Plating is when you stack or layer glass up to create limitless special effects; depth, shadowing, textures and colours galore. It adds a huge amount to your work.
This video takes you straight to the Top of the Plating Tree with work by Tiffany and Robert Oddy.
It highlights the stunning effects they achieve with plating and how it can be used to add a sense of dimension that you simply can’t get with a single layer of glass.
Enough words! Here’s the video I made for you, showing the Plating Masters at Work. Don’t forget to look out for that background 🙂
It’s a stunning technique, isn’t it?
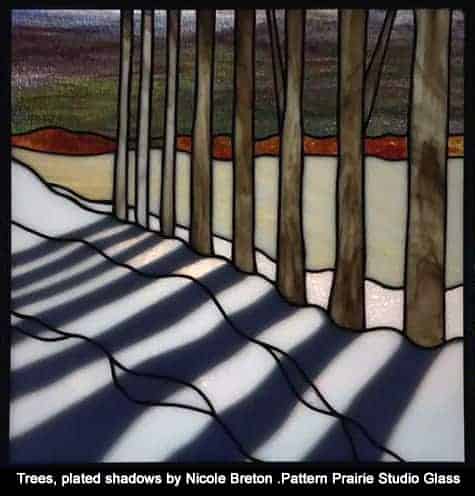
- *If you’re eagle-eyed you will have noticed the faded solder lines in the background of each of the panels. This is made possible because these panels are more than one layer deep. The faded solder lines are created by putting a semi-opaque glass in the top layer which diffuses the colours and textures of the glass shapes in the bottom layer underneath.
The semi-opaque glass also makes the solder lines appear lighter and less obvious, giving the effect of distance to the panel.
It’s a simple but ingenious trick of the eye, and one that has a huge impact on the success of the stained glass panel. Using this method – even in it’s most simple form with 2 layers – will open up infinite new horizons for your stained glass.
If you’re inspired to give plating a try yourself
FIND OUT MORE ABOUT my PLATING MAGIC course here
Once you get started with all the colours and effects it’s hard to imagine doing stained glass in flat panels ever again 🙂
“I have had a dream panel in my minds’ eye for 10 years now, but knew I needed to do plating to get the water portion the way I wanted. Now I feel like I could tackle it.” Jan Rollman, Plating Magic student
This is very interesting information. I’ve used the simple trick of flipping textured glass with the texture forward and back to create depth and of using different thicknesses of glass to emphasize different elements of a design, but this will put a new skill in my design toolbox.
I’m particularly interested in layering textured glass with colored glass since so many colors aren’t available in textures — or, not in the texture that I want.
Looking forward to the next video.
I’m so glad to hear your interest is awakened Mary. This plating technique is unrivalled in the sheer amount of options for artistic expression in my view.
I’m curious whether plating works with leading or whether the weight would be too much.
Yes, Tiffany plated with lead. He also had a LOT of reinforcing, but they were huge windows that would’ve needed reinforcing anyway.
You need high heart lead to accommodate the double glass thickness.
is the second layer of glass also copper foiled? Can you do the second layer with paints/fusing?
Yes, also foiled. You can paint the glass either on the top or second layer. You could use fused glass I guess (I never have, interesting idea!) but you’d have to make sure that it lay absolutely flat so that it could be foiled and soldered to the layer above/below.
Great questions, thanks Kathleen.
Milly,
I took up stained glass when I retired. Have enjoyed working with glass but never dreamed of how far you can go with it. Thank you for opening my eyes to new horizons!
That’s fabulous to hear, thanks Midge. There are so many possibilities 🙂
Thank you for your website and tips, tricks, and your passion for Stained Glass teaching.
My first piece, Meyda Tiffany, is two sunflowers. the two sunflowers looked like two big eyes looking at you. So, instead of changing out the pieces, I put a root beer colored behind, found out it was called Plating, and I did use a pin when soldering for heat expansion. Looks outstanding. I am looking forward to the different aspects of plating.
I’m delighted that you’re appreciating the transformation that plating brings to stained glass Nick. Have fun with it in future projects 🙂
Thank you so much, Milly! Very beautiful …I have a question regarding framing. I made a Stained Glass Piece and did the technique “plating” having no idea it had a name. My problem is that it’s about 17 1/4 X 12″ and at first I had simply copper foiled it and soldered it. It hung over my kitchen window for a year and a half and one day…it fell! I was so lucky; however, it didn’t break! Whew!
I bought 1/4 ” Came to secure it and tried to widen it…but it is not wide enough. What would you recommend?
I thought about having it framed…any of your thoughts are greatly appreciated.
Thank you so much for your incredible sharing of your talents!!
Normally with plating the top layer (Layer 1) has a stained glass frame on it that isn’t plated. This is so that you can subsequently frame the plated panel as you would any single-layered stained glass.
I’m assuming you mean that yours is double depth at the edge and therefore too deep for the heart of the lead channel? If so, you can either buy high heart lead and fit it in, or have a wooden frame made to accommodate the additional depth.
I hope that helps, and I’m glad it didn’t break 🙂
Mildly,
I’m interested in the plating technique you outline. Is there any additional equipment needed to work in this way beyond the usual stained glass hand tools and grinder ?
I just want to be aware before I start so I can consider any costs.
Many thanks,
Dawn
Sorry auto correct changed the spelling of your name from Milly, to Mildly 😬🤔😬🥴
Hahaha – that’s nothing! I sometimes get ‘milky’ or worse ‘milk you’ when I’m signing off!!!
Good question! I’m happy to say you won’t need anything special for plating Dawn. What will happen is that you’ll end up being able to use all that weirdy glass that you couldn’t use before 🙂
The page with the information about the Plating Magic class is here if you’d like to see it again – please give me a shout if you have any more questions.
You never cease to amaze me. After all these years of glass learning and experimenting you give me something new to try. Thank you.
This made me smile Karen 🙂 Glad to open some creative doors for you. If you want to open more I have a full course on Plating here, with lots of ideas as to how to get the most out of your current glass selection: https://www.everything-stained-glass-school.com/p/stained-glass-plating-magic
I’m a beginner but I can’t wait to try it. Just wanted to let you know that thanks to you and your videos I’ve learned a lot and I enjoy it so much. Thank you
That’s so great to read Wanda, thank you. I know you’ll love stained glass – you can forget about all your troubles when you’re in the thick of it (if you have any, that is 🙂 )
Looking forward to the next video! Thank you 😊
Thanks Ruby. The next video is live already on this page: https://everythingstainedglass.com/stained-glass-layering
I hope you enjoy it.
I’m thinking of plating a clear iridescent glass behind a translucent light violet GNA glass. Excited to see the next video!
Oooh you’ve got a plating mind already Kristal 🙂 The class explores glass combinations a LOT, so if you’re interested in learning the types of glass that work well together to get particular effects you’re in the right place 🙂
thank you Milly for all the tips and info you send in your newsletters. I am french so sorry for the errors of grammar…. I am retired and I started stained glass and started to repaint 3 years ago. I am very perfectionist and plating will help me to get the colors and dephth in my glass works. So I am very happy to here about plating. I am wondering how to subscribe to the video course starting on sunday? will I get it on the newletters?
thank you for everything!!!! Continue your excellent work
Suzanne Seguin
I’m so happy you’re interested Suzanne! Yes, the email with all the details about the class is on Sunday.
We will soon have French subtitles for this class – and Spanish 🙂 We’re going all international!
Thanks for your kind words.
Looks very exciting and looking forward to the next videos. Like everyone has commented you present Stained Glass in such a way we can all learn and follow along so easily. This sounds like the next steps to bring the glass to life, I just hope I can join in but I still have so much to learn and areas to grow in. Thanks for all you do!
Aw, thanks Jerri, that’s kind of you. Plating will absolutely bring your stained glass to life. I’m sure you’ll be fine! The class offers lifetime access so if you need to touch up on a couple of things first, there’s time 🙂
I’m very excited to learn this!
Great Jeanette! I’ve been very excited about teaching it, too. All the possibilities it offers and the difference it makes IS very exciting.
I am so ready!!!
I love it when something comes along at exactly the right time Ilona 🙂 I’m sure you’ll love the effects you can achieve.
This sounds amazing! Can’t wait to learn more! Thanks Millie for sharing!
FYI I save everyone of your newsletters and refer back to them every now and again!
Love your enthusiasm Pamela – which plating certainly deserves 🙂
Looking forward to this lesson!! Thanks
You’ll love it Keith, it opens many doors…
I have two of Robert Oddy’s pattern books. One for large Panels and one for minis. He starts off very simple. I have made a few of his abundant some of my own. I’m really looking for your next video. I haven’t from much information about Plating on the web.
Lucky you Donna. I’ve never seen any pattern books he’s done – didn’t even know he HAD any! There isn’t much on the web at all, I really don’t know why because it’s such an amazing technique.
So excited for the next video Milly! Such an exciting technique…I have an old watercolor of layered shells from college that I’ve always wanted to make into a window. It could possibly be a good candidate for plating! Fun to learn something new…thanks again!
Oooh, layered shells Laurel… my mind is already off… Plating will definitely add texture and depth to this. I can see you have a ‘plating’ mind even before you’ve done it LOL!
I must add a thanks to you, Milly. My number 1 teacher. Wait…my only teacher! Looking forward to the next video.
Ha! Thanks Richard. Much as my ego likes this, it is always good to snoop about and learn all sorts from all sorts 😉
I am excited to lean more about this. It is beautiful. Can’t wait 🙂 thank uou
You’re welcome Kathy, I can’t wait for you to be hooked 🙂
Thank you Milly for our sneak preview. I can’t wait to see the second video and try this technique. Thank you again for sharing
Thanks Maureen 🙂 Glad your interest is piqued! I feel confident plating will live up to expectations!
Hi Milly, thank you very much, that’s what I was waiting for; a new technique. I’.m looking forward to see your next video! Greetings from a really cold and snowy Holland.
I love new techniques. Especially when they make this much difference to your stained glass.
I love snow too but that’s harder to come by!
This is great! Absolutely interested to learn more!
Brilliant, thanks for sharing your enthusiasm.
So happy you are able to show this technique, can’t wait to see if I did it right on my owls or how to close up the gap in between the plating glass, have a great day
Hello Sandy, your owls are great as they are! These extra techniques will show you how to close the gaps to seal them, yes 🙂
Hello Milly
An interesting side note on plating is the restoration and conservation techniques required to bring very old plated windows back to life. It seems that the air in the cavity created by plating, expands when heated during the day and escapes the window. During the chill of the evening that air contracts and is pulled back into the cavity. The problem is that the air of 100+ years ago was polluted with coal soot from the fireplaces of thousands of homes and that soot was drawn into window cavity. On the second floor of the Cincinnati Art Museum (Cincinnati Ohio, USA) is a display showing the cleaning technique, that involves separating the glass, cleaning with a Q tip and distilled water, refitting the glass and then resoldering. I was amazed at the amount of soot that was removed as well as the sparkle that returned to the glass. I am happy to see that you are bringing plating to the forefront as it is truly a beautiful technique.
Thanks for that info Tom, an interesting read. Soot! Who’d’ve thought?! Happily the windows are back to their twinkly selves now. I hope plating takes off; it really is such a transformative technique and all the options it opens up are astonishing 🙂
This is absolutely fascinating! Can’t wait to learn more. Thank you, Milly!!
Hello Diane! You’re going to love this… I just know 🙂
This is great Milly. Really looking forward to adding a whole new dimension to my work. Thanks so much for this.
Literally a whole new dimension Rick 😉 You’re most welcome, glad you’re excited about it.
Thank you, Milly, for this fabulous video. I am so excited to learn this technique since I knew that Tiffany had used it to create so much depth in the panels. This is exactly the kind of learning that keeps us juiced up to keep going and trying something new. Looking forward to the next installment. BTW, will you have a place where we can revisit these videos later?
So glad this has interested you Murleen. It really does transform a flat panel into something so much more, doesn’t it?
Dear Milly
Every now and then I just want to dip in and thank you for all your videos! They are so helpful, from how to cut a circle without a circle cutter..(one of my favourites) to all the soldering help and advice you give and inspiration with new techniques to further enhance our work. I have not heard of Plating and look forward to the your next video. I always share your videos to any one needing help with cutting or soldering. Such a great resource.
All best wishes
Jane
Thank you Jane, that’s so kind of you. I hope you find the next video interesting – it’s about the ‘how to’ of plating.
Hi Milly
Been with you for a few years and yes I am really interested in this Glass Plating. Looking forward to your upcoming videos and information on Plating
Great Mike, I’m happy to hear that you’re up for learning something new 🙂
Hi Milly,
I will certainly be waiting for your part 2 on plating.
Thankyou for all your wonderful tips and tricks.
Can’t believe that at 75 I am still able to add new things to the glass work I have enjoyed for the last 30 yrs.
cheers
Bev
How wonderful that this is new to you Bev! You’re going to love it, especially with 30 years of experience to apply to it… can’t wait to see what you come up with.
Milly, thanks for the sneak peak into the world of plating. Such great examples of the technique! Can’t wait to see your next video!
Hey Gail, glad you enjoyed The Greats 🙂 The next one is more about how it’s done… in a much simpler way of course.
*@****ud.com
Bev, did you want to sign up for my Newsletters? There’s a form on this page you have to fill in. I’m going to edit your email above as it’s not a good idea to put it on the web like that.
Oh, thank you! I love your emails and they make me feel confident that you can teach me enough that I can try plating. I’ve looked at a couple patterns, in the past, and felt that it was beyond me and I better stick to plain old copper work. I want to join your class and give it a cut and a solder.
Oh I love hearing this Gypsy, thank you! You absolutely CAN do this – I’ll prove it to you both in the next video and in the Plating Magic class 🙂
Something to look forward to! Thanks Milly. One question – do the pieces you show in this video also involve painting the glass? The detail is incredible. Stay safe. Ron
Good question Ron, and good spot! Yes, the Oddy flowers are painted.
I will be very glad to be learning a new technique. I won’t be able to try it at first as all my glass supplies are in storage until the new shop is built. But, ideas create hope.
I love that Karen; ideas DO create hope! The class comes with lifetime access so you can do it when you’re ready. It’s open on Sunday 🙂
I am so looking forward to trying this. Mille, you really inspire me. Thank you so much and God Bless, Jackie
Yay, great Jackie, welcome aboard 🙂
Thanks, it’s all very new to me and exciting. Looking forward to the next part. Sadie
Fantastic Sadie, I love ‘new to me’ things – sparks off all sorts of ideas. Not long to wait until Friday! 😉
I’ve experimented with plating on one window for depth in my wine glasses (wine glasses, bottle, and fall leaves), but am very interested in revisiting/ reviewing the techniques. Your lessons are so informative and interesting; helps me brush up on my technique and learn new ways! Thanks!
Thanks Patsy. The class includes all sorts on choosing glass and the best types for achieving the effects you want. I hope you enjoy the second video on Friday.
Thank you very much Milly; can’t hardly wait for the next bits of information on plating stained glass.
And I can’t wait to share it 🙂 Thanks Sherry.
This plating glass (soon to come) video class sounds really interesting. Can’t wait!
You only have until Valentine’s Day to wait Bonny. I’m so looking forward to students doing it and seeing what they come up with. The effects are limitless!
Tiffany and Oddy were latecomers and copiers (very effective copiers) to the plating trick. Cathedral builders had been doing it for centuries. I bought 2 windows from a sadly demolished church in Massachusetts that in a couple places have up to 4 layers of glass. Sometimes for depth, sometimes for color and once to emphasize a panel that had actually been stained and fired. One window is 5′ of Christ and the other is 5′ of an angel. Would send pics but both are too fragile to pick up. I have a fantasy of restoring them when I retire (I’m 75 now so it will be a few years before I can afford to).
Thanks for your historical additions William. Tiffany gets all the credit for lots of things he wasn’t first at; I guess that’s fame for you 🙂