How to Photograph Stained Glass
Photographing stained glass is tricky! Unfortunately for us, what the human eye sees is not the same as the camera.
The camera will try and give a balanced image with average exposure across the whole panel. This often means bright areas are too light (overexposed) and dark areas are too dark (underexposed).
However, both of these lead to a loss of detail or a dull image that doesn’t pick up the glorious glassiness and/or colour that we love so much and want to show off.
I get SO many questions about photographing stained glass that I decided to gather all the best ideas – both mine and readers – to help you overcome some of the more common problems.
Hopefully, these 4 areas of focus will help you produce better photos:
- Light – Natural and Artificial
- Background
- Frames and How to Hold Work
- Camera Settings
Sadly, there’s no magic bullet or ‘one size fits all’. Each panel has its own unique challenges and you’ll need to experiment and try lots of different approaches to see what works best for your particular piece.
1. Light – Natural and Artificial
Light is top of the list as it is the magical ingredient that makes our stained glass so special. There are different ways of lighting your work which broadly fall into 2 categories:
Transmitted = light from behind shining through the glass. This is good for showing colour, texture and detail within the glass.
Reflected = light from in front bouncing off the face of the glass. This is good for texture and can also give a good idea of what the panel would look like in artificial lighting.
TIP: Direct sun may highlight colours well but it may introduce overexposed areas that are too bright and leave more opaque glass looking dark. Indirect sun may give a more even light.
A Question to Ask Before Starting
Do you want reflected or transmitted light through your panel?
The answer often depends on what type of glass you’ve used and where you’re going to hang it.
For example, if it’s opaque glass and against a wall, reflected light is more appropriate. If it’s transparent and highly textured, transmitted light may be better.
After you’ve answered that question you can start looking for a good place to take your stained glass photographs. I’ll start with Transmitted Light. Scroll down for ideas on Reflected Light.
If you LOVE playing around with the effects of light, I know you’ll be interested in my Plating Stained Glass course.
It’s a razzle-dazzle exploration of the joys of layering glass and the effects you can achieve with it.
It combines a more ‘arty’ approach with solid practical ‘how tos’.
I dare you to try it 🙂
Transmitted Light
a. Is the sun bright? Is the light shining directly on the panel or is it indirect?
Firstly try experimenting with the following:
- finding a favourite window
- backlighting a piece with direct sunlight
- taking stained glass pictures in different stages of sunlight throughout the day
- photographing stained glass with indirect light from behind if direct sunlight is too overwhelming
- taking stained glass photographs from different angles
TIP: Find a window that has the light you want and experiment with the time of day to get direct and indirect light
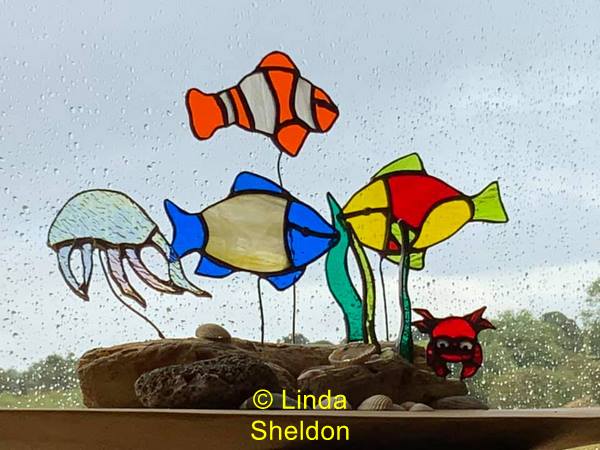
Linda Sheldon took this photo at her favourite window. The cloudy sky results in the great colours and textures being shown off. Even the raindrops suit the watery piece! Use natural occurring accidents like this to your advantage.
b. Is it cloudy or overcast?
Overcast skies may give a more even light. They can also help avoid overly bright areas which can dilute colours and texture where the sun shines through.
Bright cloud may be perfect as it gives a good bright illumination without ‘hot spots’. Look around to see if you can find somewhere outside to try this.
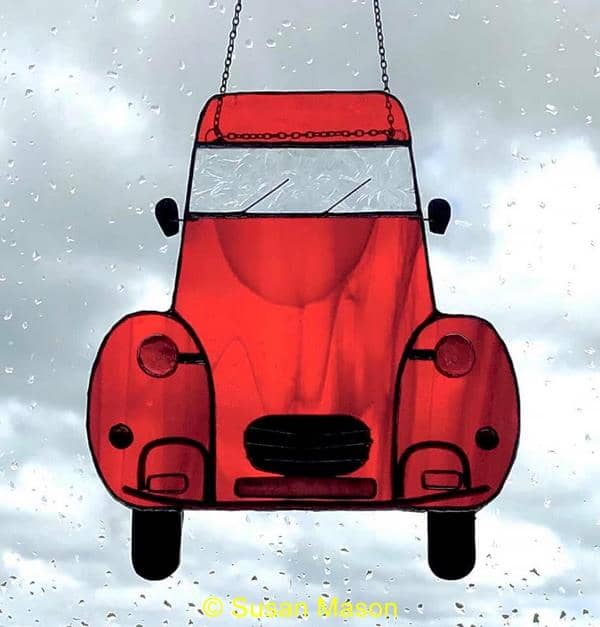
This stained glass photograph was taken against bright cloud. It picks up the glass beautifully without any burnt-out areas.
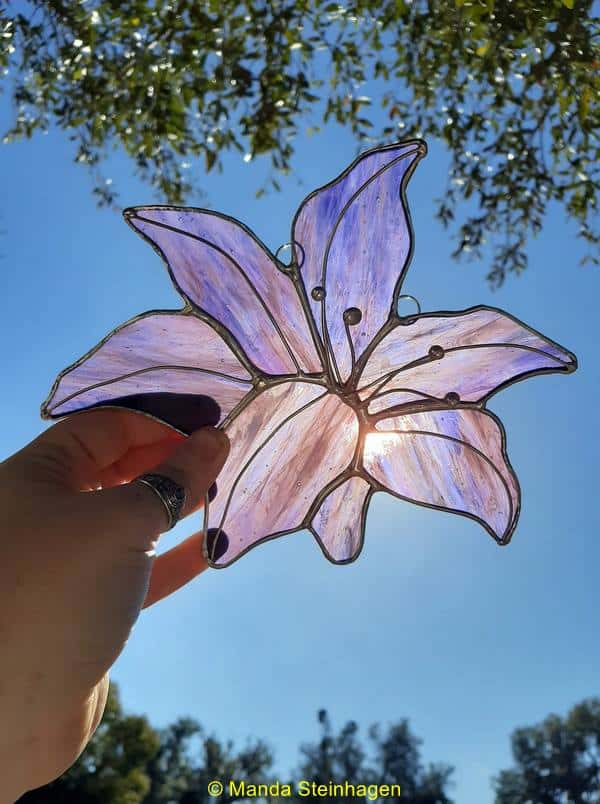
Don’t be put off bright sunlight though. With the right glass, photographing stained glass in direct sunlight outdoors works perfectly.
You can see below how Manda Steinhagen uses direct sunlight to show colours and textures well.
If the glass is right, you can even use a hot spot as a spotlight for the centre of your piece. Don’t be afraid to use rain and sun to your advantage 🙂
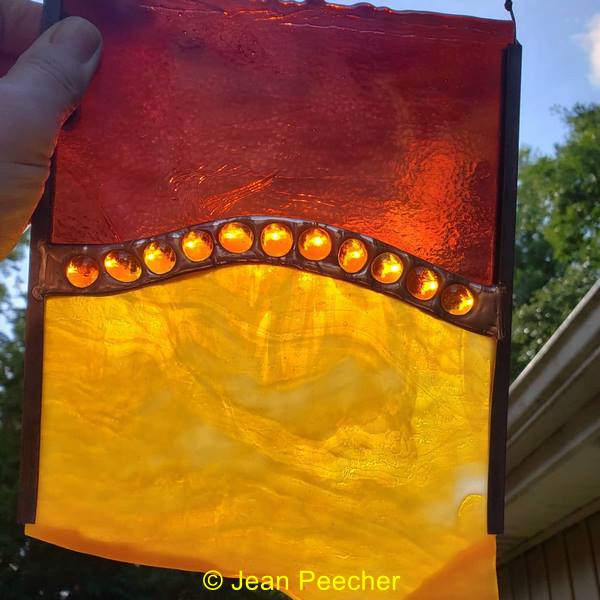
TIP: Try to zoom in close to remove most of the background – this will help the camera get the best exposure and may remove distracting backgrounds.
Jean Peecher’s image below shows off the advantage of zooming in; it really does show off the glass in all its’ colourful, textured glory. This trick works particularly well with semi-opaque rather than transparent glass and picks up the ‘little worlds’ in the glass blobs wonderfully.
c. What time of day is it?
The direction and intensity of the sun falling on the panel will also change throughout the day. Professional photographers recognise and actually seek out this change in intensity and colour. They even have names for it, calling early morning/sunrise “the blue hour” and sunset “the golden hour“.
You too can use this to emphasise the colour of your work but you might have to get up very early 🙂
TIP: Light quality changes throughout the day. Generally it’s ‘colder’ (or bluer) in the mornings and ‘warmer’ (or yellower) in the evenings.
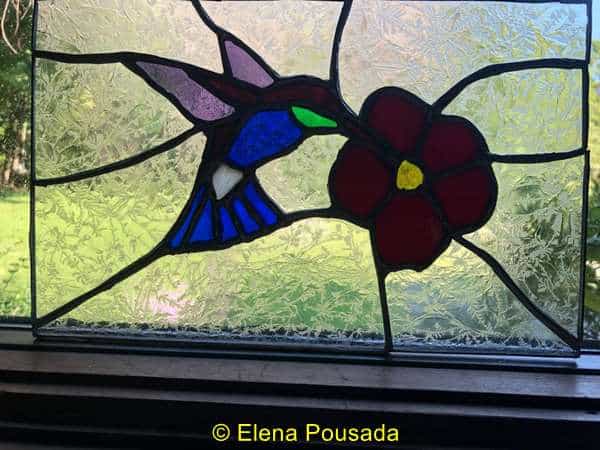
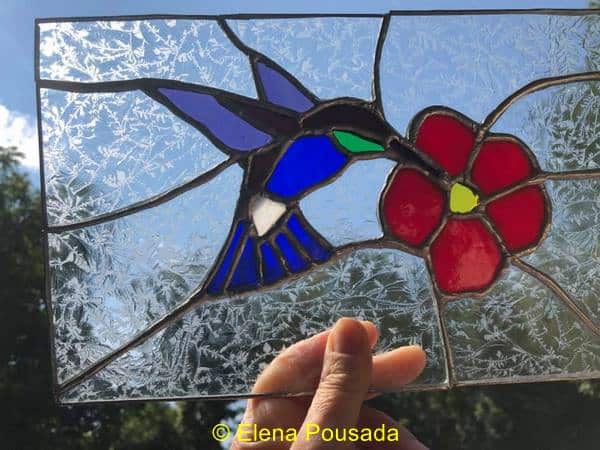
Elena Pousada shows us a great example of this change below. The first stained glass photograph is on a windowsill at 5:30 pm without much sun. The second one is held up to the blue sky in the morning sun.
I think you’ll agree that the difference is marked.
TIP: Take pictures at different times of day to show how the panel responds in different light
Buy me a coffee‘ is a way of helping me in the creation of this Everything Stained Glass website. The information is given freely but if you’d like to support me I’d appreciate it.
Reflected Light
d. Are you going to use a flash and/or artificial light?
If you use artificial lighting it gives you more control over the outcome but loses a bit of that beloved ‘glassiness’ that we love so much.
Flash can cause an unwanted glare if you take the photograph face on. But an angled flash across the face of the panel can be used to pick up texture. If you’re lucky, a sparkle from an angled flash might give the panel a lift and increase its ‘glassiness’.
You also have to watch for unwanted colour changes. Have a look at Judy Bludworth’s 4 panels below and marvel at the differences. Take particular note of the background green, the tongue and the greys.
This panel has a tricky combination of very dark opaques and reasonably light semi-transparent glass that makes photographing it problematic.
You can see the dramatic changes that lighting makes to the colour and texture. Which is your favourite?
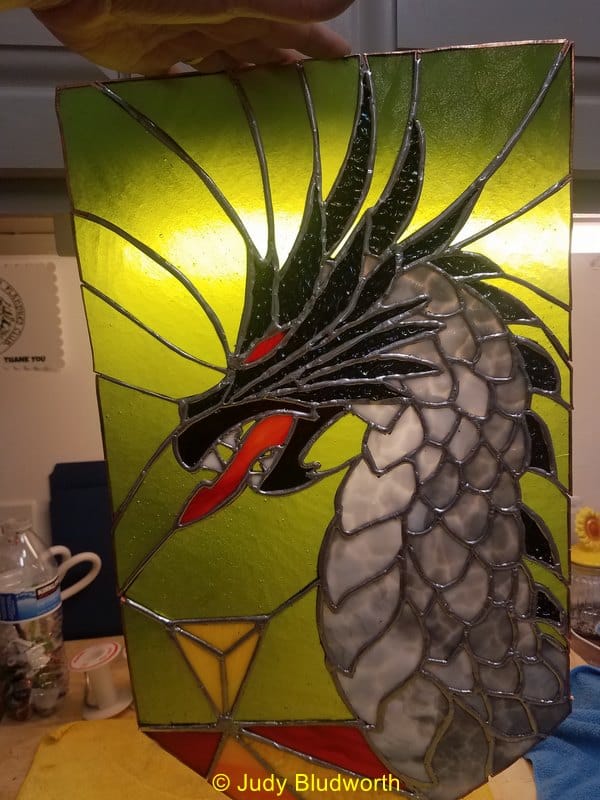
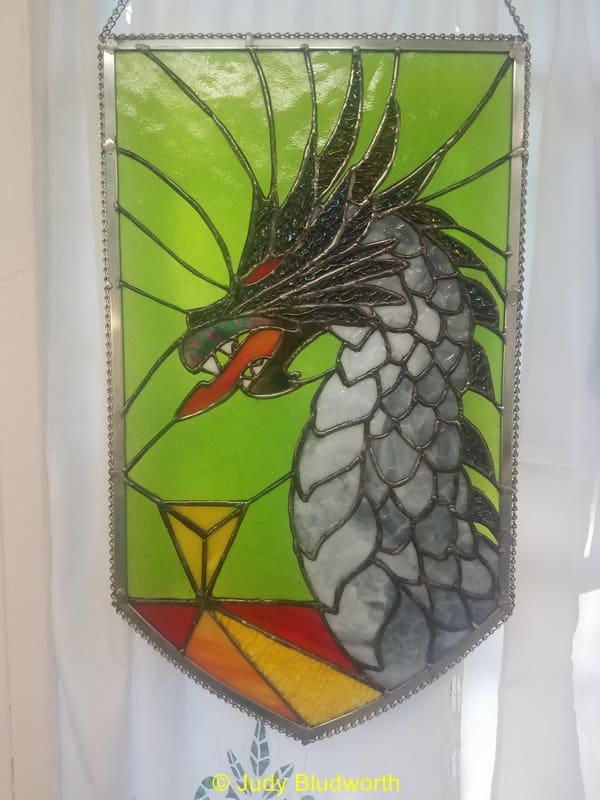
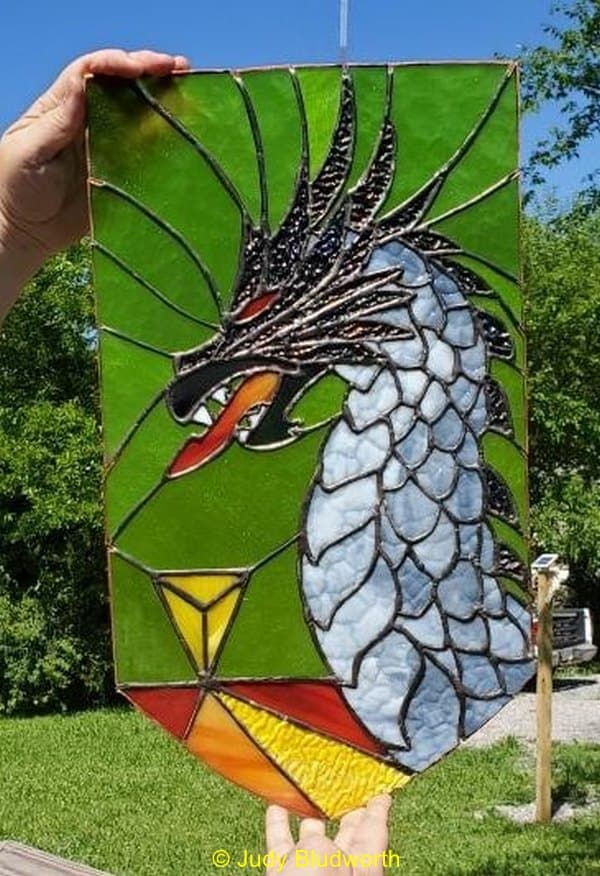
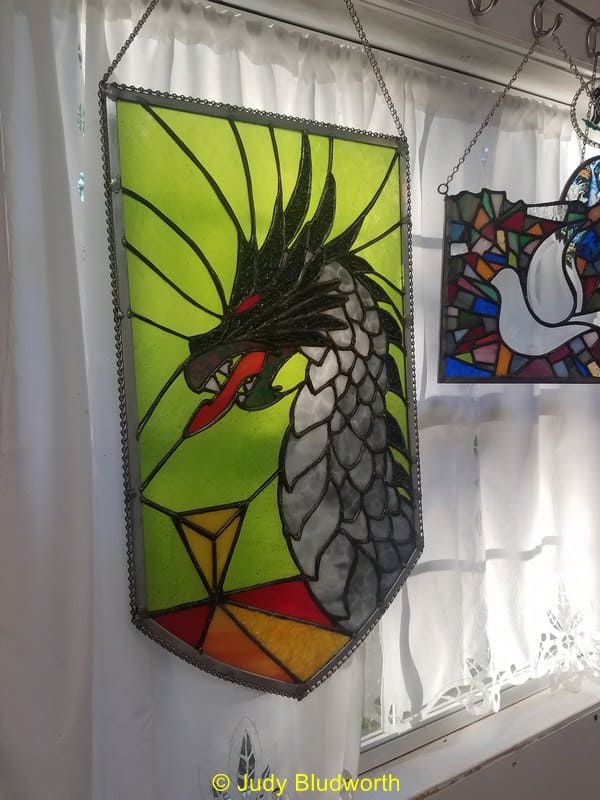
My favourite is… TWO of them 🙂
I love #2 and #3. It’s a good idea to take different photographs like Judy has and choose two that show the panel off differently. This enables you to show potential customers various aspects of your stained glass and give them a sense of how stained glass changes over the course of a day. (Another thing we love about it!)
Sometimes the colour difference is even more dramatic in reflected (left, below) and transmitted backlit (right) light. Both have their own charm and are not ‘right’ or ‘wrong’.
What is important is that you work out what aspects you want to emphasise before you start, and work towards that aim.
Start experimenting now!

e. Using both transmitted and reflected light
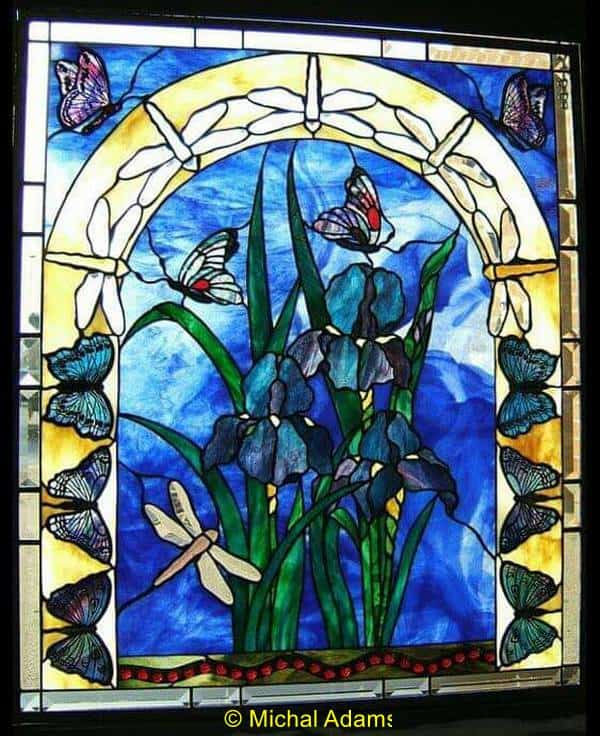
Michal Adams’s panel below has a different trick up its sleeve. It’s called ‘Copy Kat’ and has been hung in a window with bright indirect light from behind (transmitted) AND has the inside lights turned on to bounce off the front (reflected).
It’s a pleasing result and helps to pick up detail in the panel especially the lovely ladybirds at the bottom which may otherwise have been lost to darkness.
There’s a tiny bit of detail lost in the dragonflies at the top but it doesn’t detract from the whole feel of the panel.
If the skewed angle is problematic for you, you can always straighten your photos using software such as Photoshop.
Tip: You can combine light sources – sunlight and interior lights for example – to widen the range of detail in your photograph.
f. How to use reflection, shadows and changing angles to create interest
If the work is a dimensional object rather than flat, try moving it around and photographing it in different environments.
This maximises shadows and reflections and makes the photo much more interesting. It’s also easier for the viewer to contextualise your stained glass.
Linda Sheldon shares these creative tricks by using reflections in the photographs below.
Tip: See if moving the object to different places and emphasising the shadows looks good.
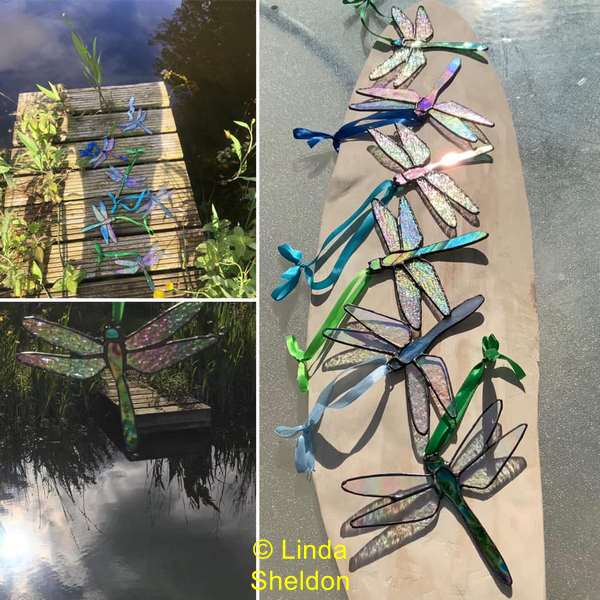
You can also try photographing stained glass from different angles. Try taking images in from underneath or over the top of your work.
This trick works beautifully for 3D objects but not so well for a flat stained glass panel as it distorts.
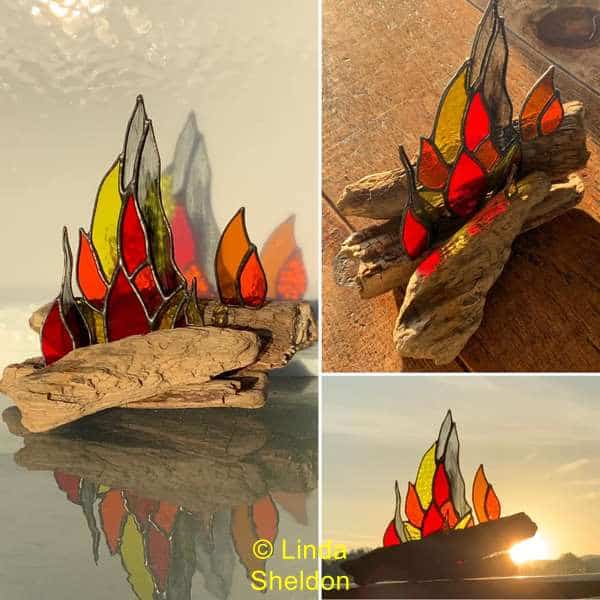
Notice the use of low sunlight, bottom right. Yes, it’s a hot spot but it’s inspired! It makes the stained glass truly come to life and emphasises the heat of the flames.
g. Mirrors
Mirrors and their reflections create their own additional challenges. Catherine Conaty suggests taking stained glass photos of mirrors outside on an overcast day to avoid any bright sunlight.
If the sun shines relentlessly try taking a photo of the mirror on the floor to reflect a white ceiling.
Equipment for Light Diffusing
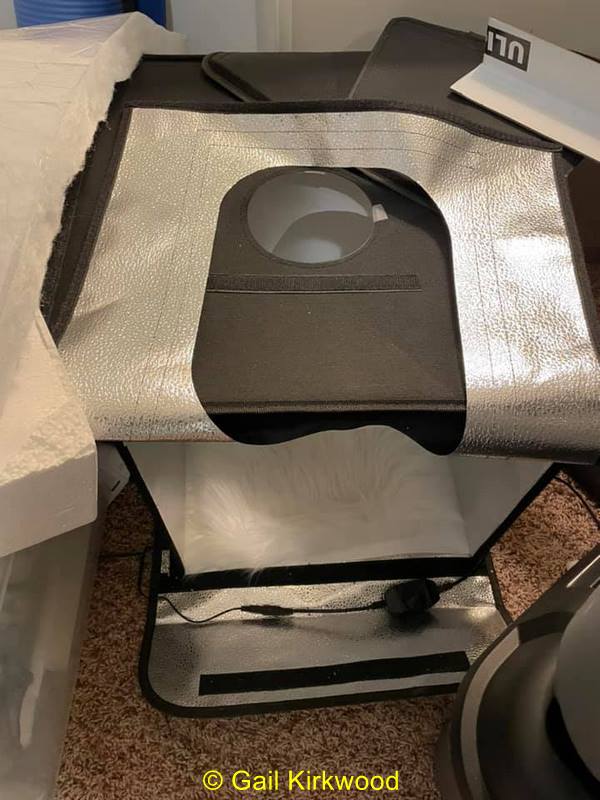
h. Do you want to use a diffused photography lightbox?
If you want to photo your glass in a very controlled environment you can use a lightbox.
The top has a hole for you to shoot your photo through. Try putting the objects on something neutral but textured to add visual interest.
Stained glass photos taken in a lightbox tend to showcase the shape and colour of the glass more but lose a bit on that special ‘glassiness’.
You can offset this by photographing them both in a lightbox and then outside to show both aspects.
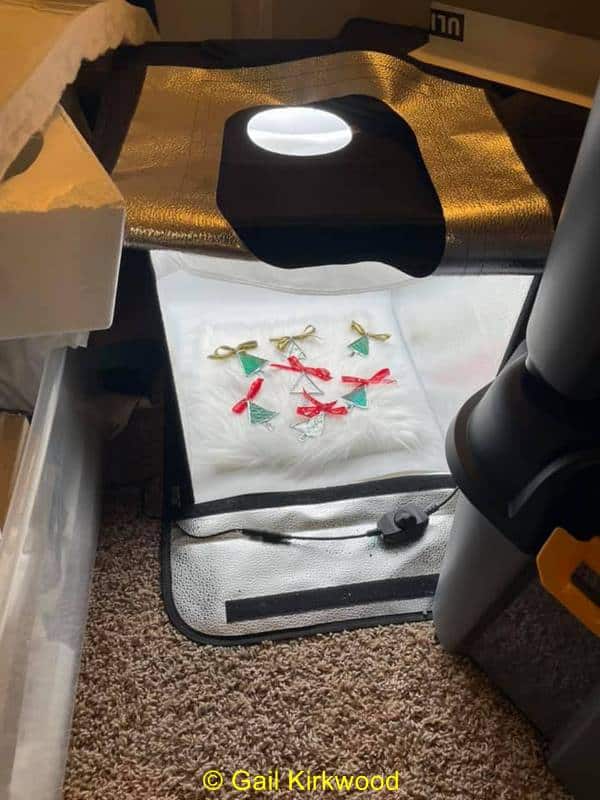
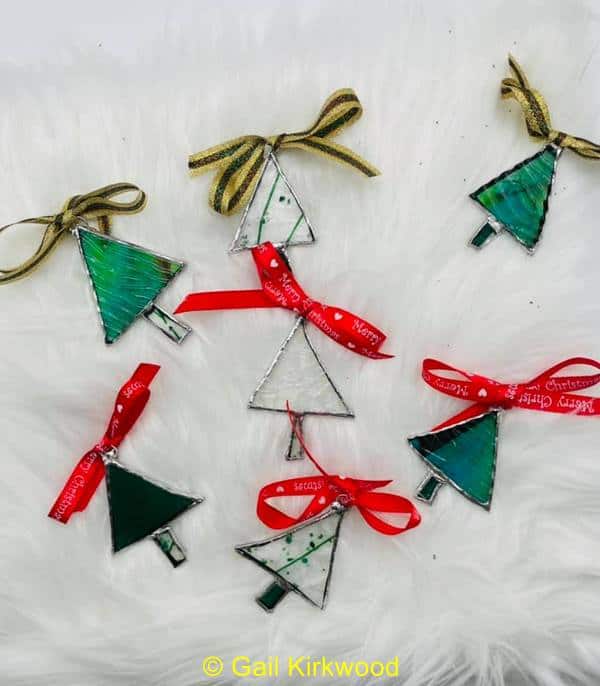
Gail Kirkwood’s resulting photograph has a fun element and a clarity that would be hard to capture hanging from a tree or window.
One disadvantage of lightboxes is they are limited in size so are only useful for small things.
Tip: Try adding an ‘outside’ object to your stained glass and photographing in a light box. This adds interest and provides an edge so that we can see the glass texture.
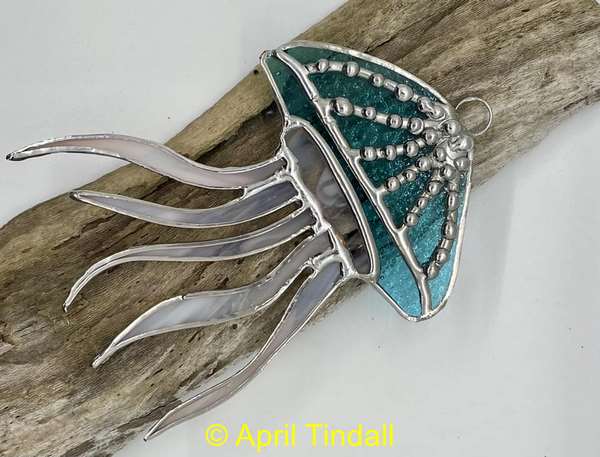
Here’s another controlled light box environment that works beautifully. This time April Tindall has used a piece of driftwood to create interest and context.
This time it’s not a neutral background but the glass is such that it complements, rather than fights with it. The decorative solder detail shows up perfectly too.
This is a recommended lightbox on Amazon (paid link)
i. Video
Video is a great idea for showcasing 3D work in motion. To capture this effect you can use a little turntable in a light box and phone to capture a 360 of your work. You want to show off every angle!
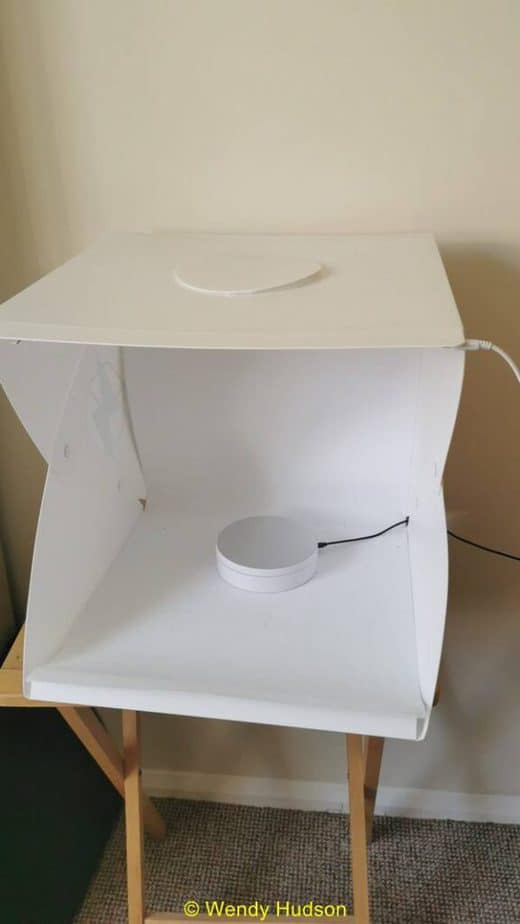
This is Wendy Hudson’s set-up. Ingenious, eh? She places her lantern on the turntable and videos away.
The compromise you make by having so much control is – again – a slight loss of glassy vibrancy. The deep green colours and patterns are showcased very well.
Have a look at Wendy’s other videos on her TikTok page. There are some shot in natural light. See which approach you prefer – and then do more of that!
Clue: Neither are better or worse, they merely show different aspects of the lanterns.
A similar turntable is available on Amazon (paid link)
‘Buy me a coffee‘ is a way of helping me in the creation of this Everything Stained Glass website. The information is given freely but if you’d like to support me I’d appreciate it.
2. Background
On a scale of photography importance, the background is the next critical consideration after light.
The type of glass used in your work will influence what type of background you choose.
For example, if your panel is largely transparent you will need a white or uncluttered background. A cluttered background can detract from your piece and create distortion.
If the panel is opaque it will block out a busy background. This allows you to benefit from unfiltered strong natural sunlight without visual distractions.
Consider these points before starting
- Avoiding single, flat darker coloured backgrounds as they make it hard to get all the colours showing well
- Washing your chosen window and deciding whether to remove the screen
- Changing the angle of the photo to alter the background in view
- Closing a sheer curtain, pulling a net across or taping tracing paper on the window to reduce background clutter without blocking the light
- Experimenting with white vinyl, a white sheet, a roll of white paper, a table cloth, white Perspex. Try out different opacities of white
- Finding a plain wall to use as a backdrop
- Watching out for greenery as it darkens and changes colours
Tip: Your choice of glass will inform your decisions regarding the background.
a. White Backgrounds
I’m sure by now you’ve guessed… white backgrounds are great for clarity and colour but lose glassiness.
Sadly, this is the perennial compromise you’ll have to make when photographing stained glass.
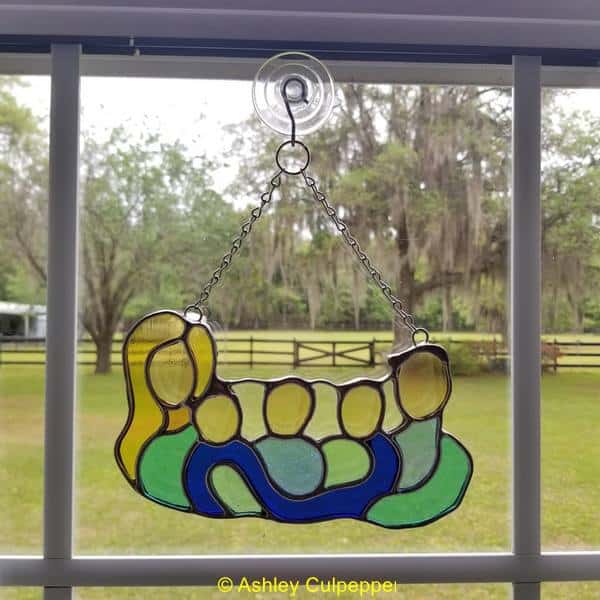
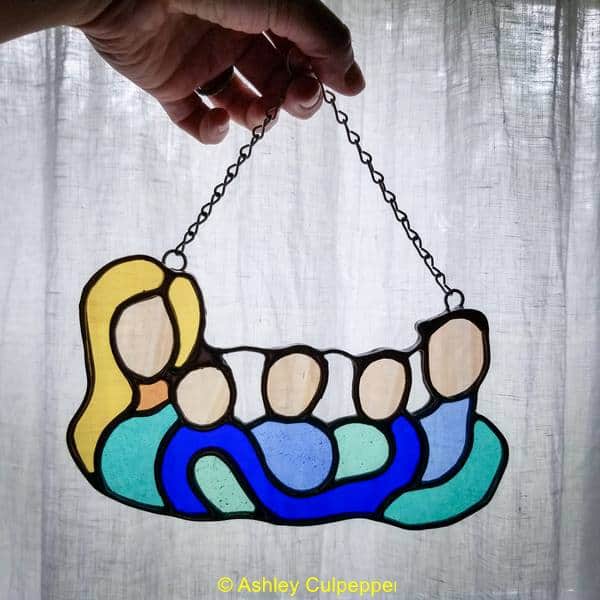
Ashley Culpepper shows us the advantage of a sheer white background curtain by first showing us the green, busier background and then the clearer, more colourful version.
It’s far easier for the viewer to focus on the stained glass in the second photo.
This is a good compromise background, as it evens out the image without killing the glassiness too much due to its slight transparency.
As an aside, notice how the greenery radically changes the colours, giving the stained glass an overall yellowy tint in photo #1.
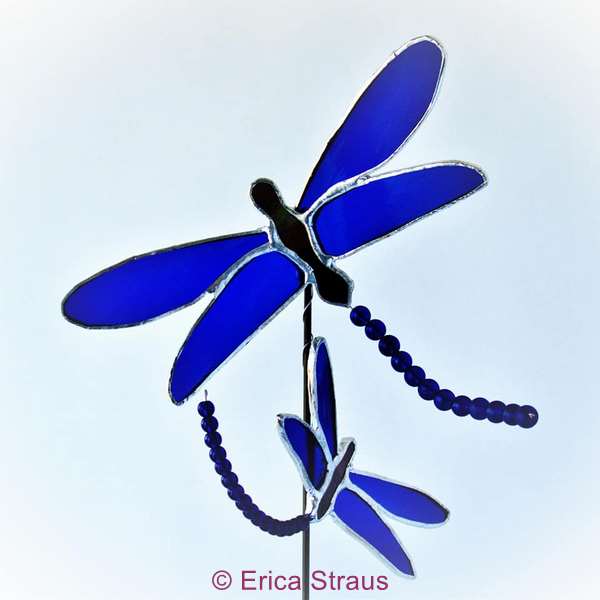
A similarly clean effect is created by Erica Straus’s dragonfly, but this time the light source is brighter and the effect more luminous.
It’s photographed in front of a window with white paper covering it. The outline form of the work is captured nicely without any glare and the cool colours are good as a complement to the stained glass.
The compromise here is texture. This approach works perfectly for colourful, transparent, minimally textured glass.
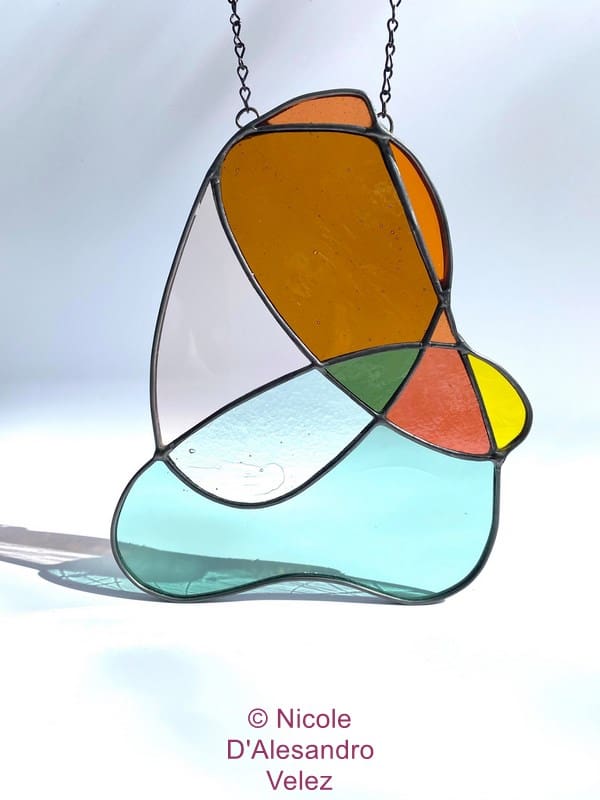
The photo below is a great example of the whiteboard in use from Nicole D’Alesandro Velez. Using reflected and natural transmitted light and her use of shadow (created with an angled light) coupled with the white background shows the texture of the glass in the shadow, rather than in the glass itself.
This both grounds the image to prevent it looking like it’s floating and adds more interest and form. It’s a very clever solution.
Buy me a coffee‘ is a way of helping me in the creation of this Everything Stained Glass website. The information is given freely but if you’d like to support me I’d appreciate it.
b. Plain Walls
Plain walls can act in a similar fashion to a white background if you prefer to take your photos outdoors.
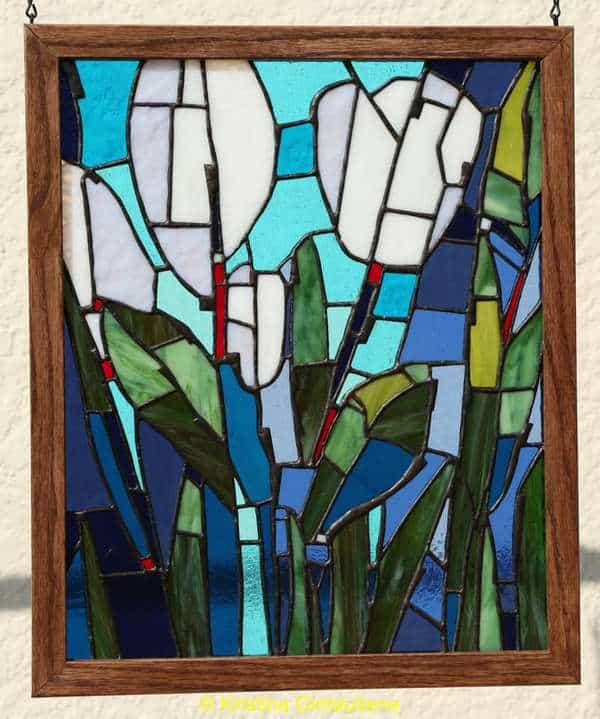
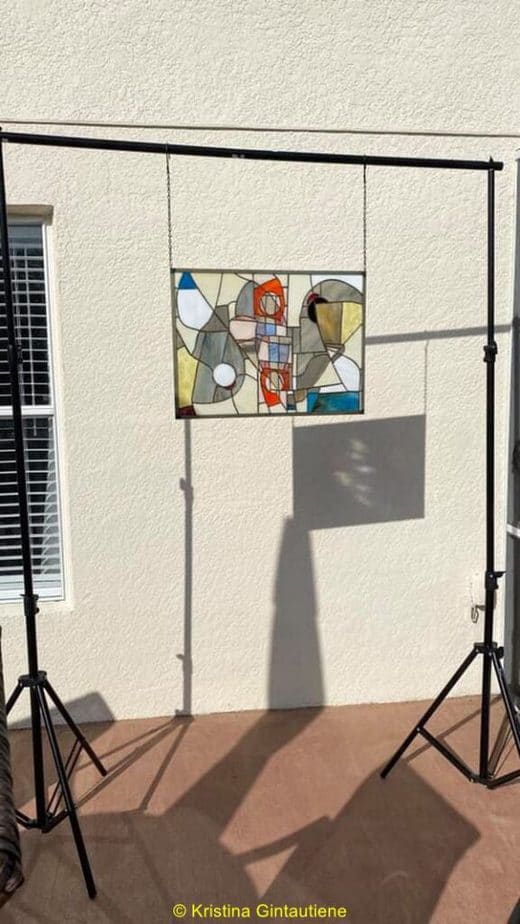
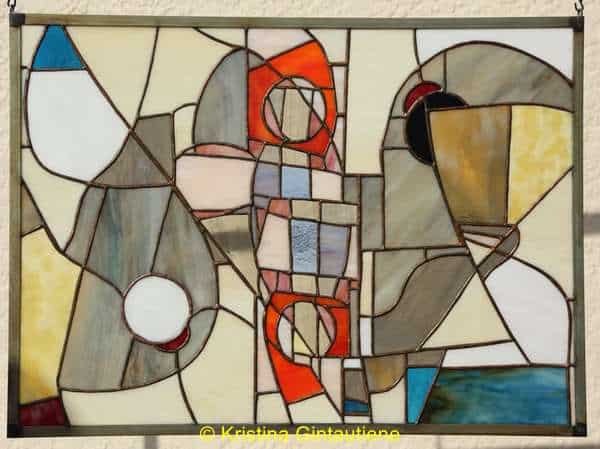
Kristina Gintautiene’s photo below was taken against a plain wall background with some transmitted light (from behind) but mostly reflected light (from front).
It’s not that it’s a bad photo at all. It shows the balance of the colours and the overall design very well but suffers from the lack of ‘life’ we normally associate with glass.
Now have a look at the same panel in front of a window in the sunlight. The inside of the house is quite dark, which serves to strengthen the power of the sunlight. A transformation!
The overall opacity and heavy texture of the glass panel obscures most of the outside distraction of the background while the sunlight shows off the beautiful subtleties of the glass. The greens are positively pinging out at us.
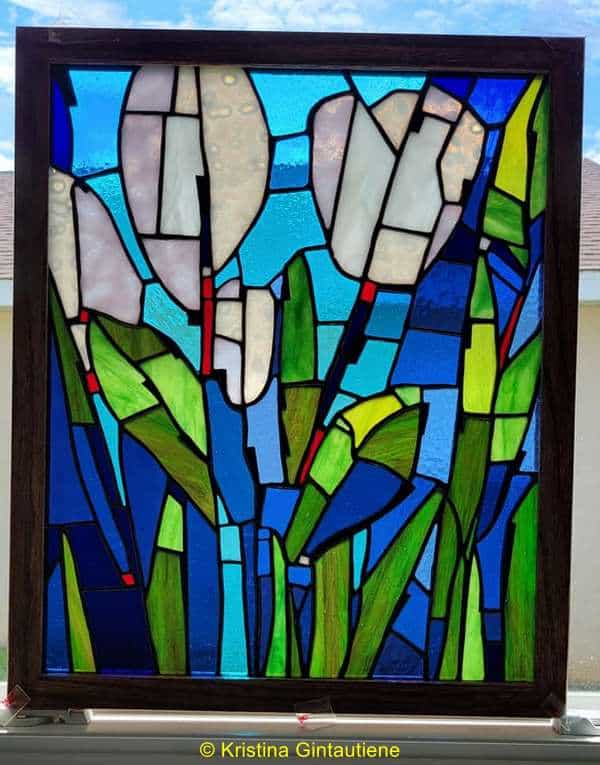
This is an excellent example of how background AND light can change the appearance of your photo.
You may not be lucky enough to have a sunny, big and light enough window without unwanted distractions in the background. If this is the case, a plain background like #1 above with a slightly flat but overall balance of colour and design is more than acceptable.
c. Green Background
Sadly for us as it’s everywhere, greenery doesn’t make a good background for photographing stained glass 🙁
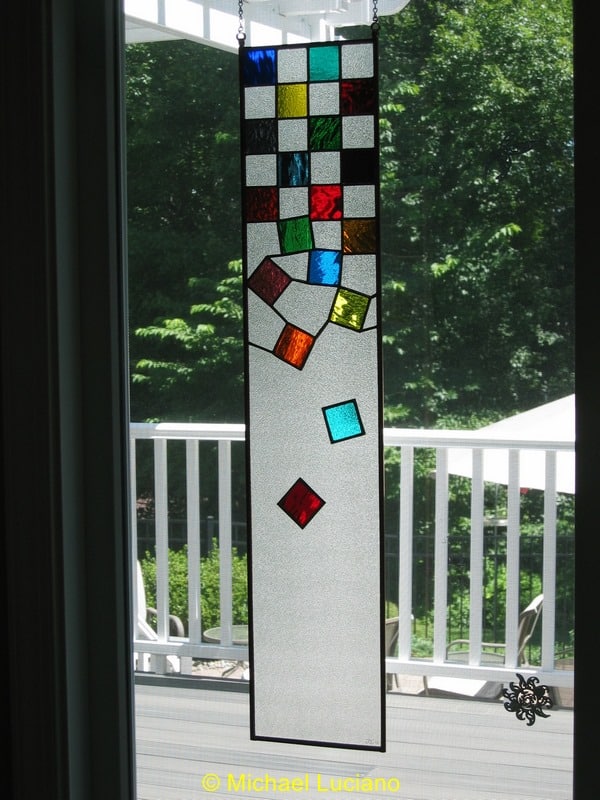
It can darken the colours and give them a more yellow appearance. Michael Luciano’s image below shows the impact of a green background on a stained glass photo.
The bright colours look great and have a good texture but the darker colours have become a bit deadened and have lost their liveliness.
3. Hanging Things and Holding the Glass
One of the biggest problems when trying to photograph a panel is how to hold it in the optimum position while you take the picture. Hence many stained glass photos showing thumbs and hands 🙂
Hanging Suggestions for Photographing Stained Glass
- Construct or buy a frame to hold the work in front of an uncluttered background – a wall for example. These can be placed on tables in the garden for additional height
- Hang the work a short distance away from the wall so that the lights can come from both the back and the front
- Use metal flower holders filled with sand to photograph garden items on a stick
- Make wooden display stands of differing size that can be moved around to find the perfect light for a shot
- Create a frame for multiple smaller objects and hang them in front of a light source
a. Frames – Natural Light
Frames can range from simple homemade wooden ones to large professional stands. The size of your piece will determine which type you need.
One big advantage of outdoor frames is the flexibility of background and the choices it gives you regarding light source.
Combine different backgrounds and some of the ideas in the ‘Light’ section above to experiment and get the best results.
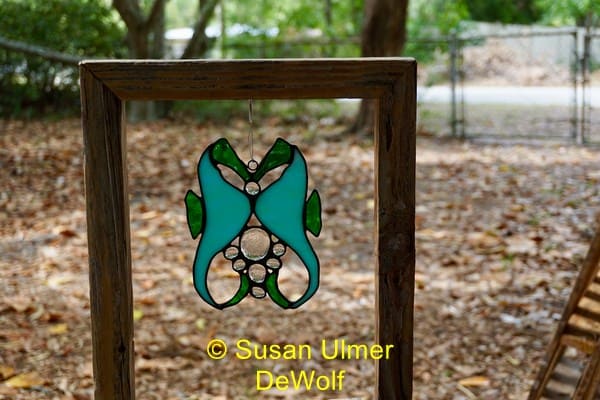
This is a great example of a small wooden frame from Susan Ulmer DeWolf. Your frame will need two feet to enable it to balance as you move it around the garden for the best background.
These feet can be made from wood. Glue and screw them perpendicular to the frame.
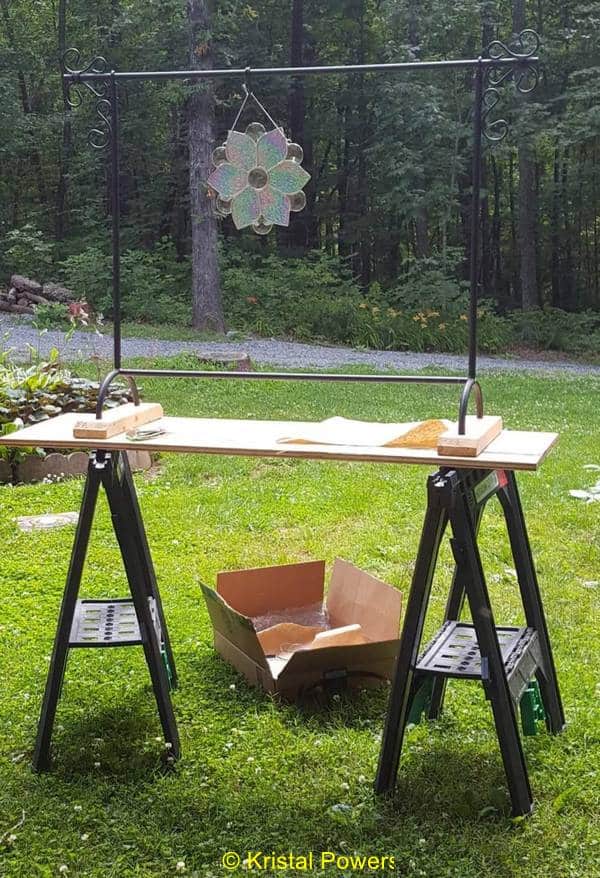
Kristal Powers has a shop-bought wrought iron display stand that is perfect for small to medium-sized work.
Her table set-up allows her to get more height which is helpful if you want to vary the angle of the shot. She can move it around easily to maximise the background and light she’s looking for. Genius!
If you work with larger panels you might want to invest in a photographer’s frame used for backdrops. It’s a bit trickier to move about but still possible.
This is a similar one on Amazon (paid link)
The resulting photo is below. It shows how moving in close so that the stained glass fill the whole shot works well in terms of colour and light balance.
There is some loss of vibrancy but the panel has no dark or overexposed areas.
b. Frames – Artificial Light
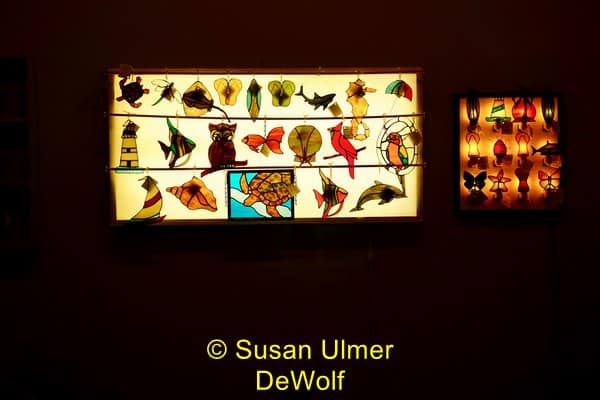
You can use wooden frames for photographing multiple small objects, for example if you wanted to show off your work in an Etsy Store.
Susan Ulmer DeWolf divided her wooden frame horizontally by fixing poles to either side. This enabled her to hang and photograph a whole family of sun catchers 🙂
She covered the back of the frame with a white background before backlighting it. This diffuses any hot spots of light.
I think you’ll agree that it’s a very effective solution.
c. Hanging Solution – Reflected Light
You can take a different approach to hanging your glass if you have no suitable outside space or hit a period of relentless rain!
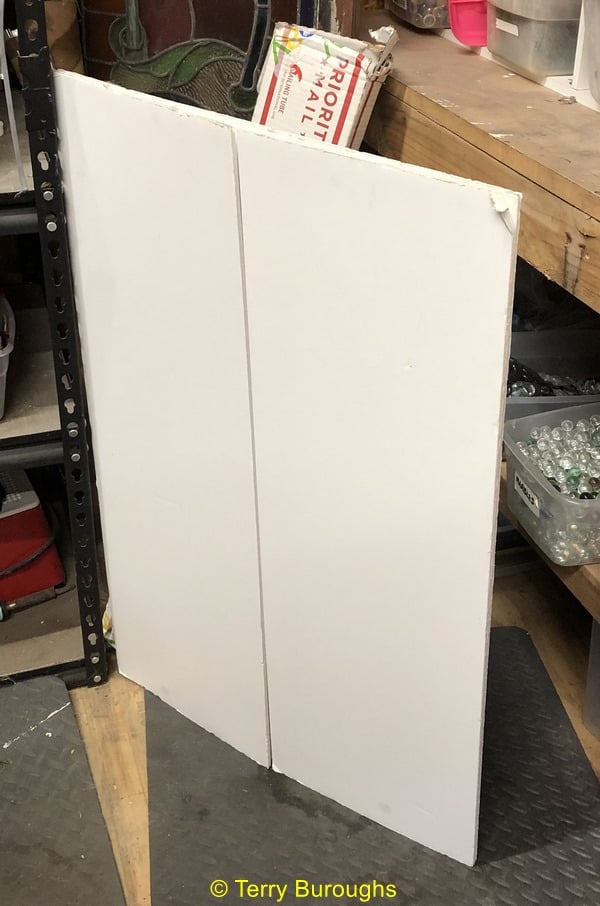
Terry Burroughs’s idea combines a white background with a hanging solution.
She has this tall heavy cardboard folding piece that has sides that fold out to serve as a stand.
It’s placed on a workbench and the work is hung from a long hook that projects out from the pegboard behind and above the stand. This enables the project to hang in front of the cardboard for the photo.
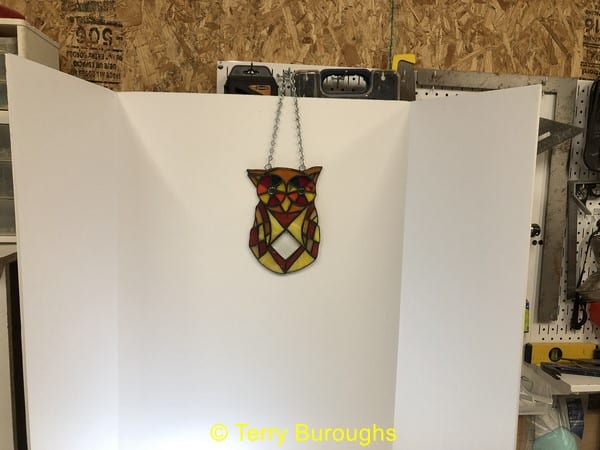
This allows Terry to come in close to the owl so it fills the camera lens for the photo. Ingenious.
Camera Tips
Photographing glass is a challenge even for experienced photographers and it’s possible to get lost in all the technical options.
For this article I’m assuming you’re an amateur photographer (like me!) and are photographing glass with either a smartphone camera or a decent smaller camera. I’m guessing you don’t want to do lots of post processing work on the computer.
a. Non-Technical Tips For Photographing Stained Glass
Keep the camera still.
No amount of light or background changes will save the photo if it is blurred from movement.
Focus on the panel itself rather than the background.
Make sure the glass is sharply in focus and you haven’t accidentally focussed on the background.
Take the photograph flat face on.
Keep the camera and the panel parallel to each other. This increases the likelihood that the whole panel will be in focus and free of distracting skewing.
Disregard this if you’re deliberately aiming for an angled shot.
Consider the distance from the panel.
By getting in close and filling the image with your stained glass the exposure may be better as any surrounding frames or walls won’t be affecting the settings. This is an artistic choice, you may want more context.
Tip: Use a tripod or steady the camera on something solid. Steady yourself by standing feet apart or bracing on a doorframe or similar. Hold your elbows close to your body.
b. More Technical Suggestions
Spot Exposure
Cameras on automatic settings try to achieve an even ‘average’ exposure across a whole scene. This is a problem with glass as some areas are brighter, some darker, some transparent and some opaque. By letting the camera average the whole thing you end up with a flat dead panel.
You can offset this by using the Spot Exposure or HDR (High Dynamic Range).
If your camera lets you set the exposure meter to be spot or centre weighted, experiment by exposing for different parts of the image and checking until you are happy with the result.
This can be done on an iPhone. I’m assuming Android phones offer similar:
- Touch the screen to focus on a particular part of the panel
- The camera automatically sets the exposure for the part of the panel where you touched the screen
- If you don’t like the result, experiment by touching the screen in either a darker or lighter part of the panel
- Take the photo when you’re happy with the exposure generated
Tip: Experiment with changing the point of focus, the exposure and the distance you are from the panel
HDR (High Dynamic Range)
In HDR mode the camera takes several shots in quick succession at different exposures and then merges them into one image.
It’s a good way to overcome the natural variations of light/dark in the glass and helps maintain the details of both the darkest and the brightest glass.
Historically this was hard work! You would’ve had to take 3-5 pictures yourself and merge them using software. Luckily for us, most up-to-date cameras have this as an option.
iPhones have HDR on as default but it’s a good idea to give yourself more control so that you can choose to have it on or off. Why? Because you may WANT to emphasise an area in your photo that HDR automatically flattens out.
Go to Settings/Camera and turn OFF smart HDR.
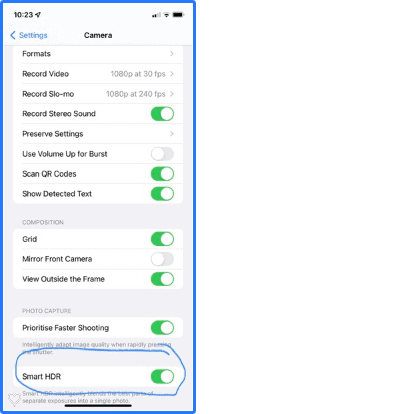
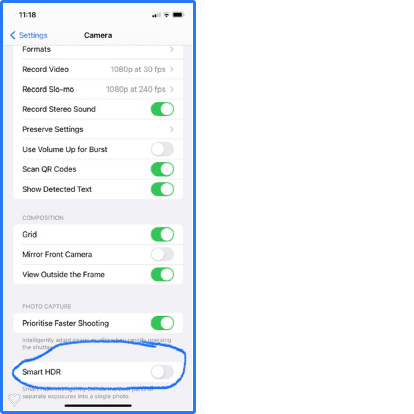
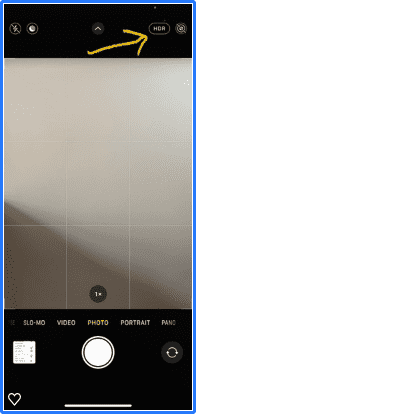
When you go back to the camera you will see the HDR button, top right. Now you have the option to turn it on and off as you choose.
Try experimenting to see the different effects on your photo with HDR on and HDR off before deciding which is best for your particular photo.
More Technical Suggestions
TECHIE TALK ALERT!
This is where we part company if you’re not interested in a more technical approach to taking stained glass photos. You’ve seen from the great examples above that it’s possible to take great photos without going overboard in the techie department 🙂
Editing Software
There are a raft of options available to help you improve the look of your photographs after you have taken them.
These range from complex paid-for software like Lightroom or Photoshop, through to simple apps that can be used on your phone.
Snapseed is a free iPhone app with a mind-boggling array of options as you can see in the screenshot below.
You can adjust all the usual suspects, for example, brightness and contrast, but you can also select highlights and shadows and alter these separately. Wow.
If you are using editing software do check the White Balance. This is to eliminate the unpleasant yellow tinge that artificial light can cast across an image.
It might be enough to select one of the preset white balances such as Tungsten/Incandescent but if that doesn’t work you’ll have to adjust it manually.

Using RAW File Format
RAW file format is when the camera captures a VERY wide range of detail and keeps all the visual information available. They’re HUGE. The clever thing about them is that they only show us humans looking at the picture a small JPG of the image with average exposure.
Imagine an iceberg; you just see the tip of it!
It may look just right as a JPG but if you want more detail it’s floating under the surface and can be retrieved by an app like Snapseed.
This extra visual information (in the form of pixels) gives you a lot more scope to manipulate your images to please your artistic eye.
You can buy apps for phones that let you take images in RAW (for example Halide). Newer iPhones now have a similar option called ProRAW which works on a similar principle.
Final Thoughts on Photographing Glass
Phew. As you can see, taking pictures of stained glass is a very complicated subject. I hope I haven’t worn you out.
Wrapping up, I would suggest that you ask yourself ‘which aspect of my stained glass do I want to emphasise most in this photo?’ for each piece of work you’re photographing.
Do this before you even start clicking with the camera!
Be clear.
Is it ‘glassiness’, colours, textures, context? This will narrow down your approach and help you achieve the image you’re looking for.
These aspects aren’t mutually exclusive but as you’ve seen above, ticking them all off in one photo is very tricky.
Be aware that compromises have to be made. If you want to emphasise TWO features of your stained glass panel that you simply can’t capture in one photo, take two photos.
Treat them as different photography projects, setting up the conditions for each one separately. Display the two photos side-by-side to give a clearer idea of your work.
Biggest thanks for all the amazing photos, tips and tricks shared by Michael Luciano Linda Sheldon Susan Mason Sarah Fitzpatrick Jean Peecher Ed Parker Chris Spriggs Judy Bludworth Helen Sexton Michal Adam Catherine Conaty Gail Kirkwood Susan Cox Stevens Min Edmonds April Tindall Wendy Hudson Barbara Mitchell Nicole D’Alesandro Velez Ashley Culpepper Bridget Brunner Jessica Sexton Justice Jamie Korb Brenda Calhoon Sheik Mat Shelton Erica Straus Kristina Gintautiene Susan Ulmer DeWolf Kristal Powers Berna Verstappen Terry Burroughs Wes Eller Manda Steinhagen Elena Pousada and Paula Fitzpatrick for the technical section.
You’ve made this article infinitely more comprehensive and useful for everyone else with your generosity and time. We appreciate you greatly.
Es un articulo fantástico. Soy aficcionado a la fotografía y voy a aplicar tus consejos.
Carlos
It is a fantastic article. I am fond of photography and I am going to apply your advice.
Carlos
Qué bueno escuchar a Carlos, gracias. Espero que te funcione y mejore tus imágenes de vidrieras.
That’s great to hear Carlos, thank you. I hope it works for you and improves your stained glass images.
I think it would be nice to be able to print or save these tips to my computer to make it easy to refer back to. Would you consider making something like that available?
Thanks for your question Stephanie. I don’t have any current plans to do this but I can see it would be useful. Will think on!
Hi, Millie. Great article for a challenging process. To photograph my smaller sun catchers, I purchased a deep shadow box, removed the back so light comes through, and added a clear plexi Command hook to the front glass panel for hanging the piece. (This can be removed easily but is very strong – better than suction cups.) The box can be moved around to capture the best lighting in the room for photographing so it’s like a portable window of sorts. Much better for capturing textures than hanging in front of an opaque background with diffused lighting. I tried that too, but the pieces looked too flat since you couldn’t see through the glass. By the way, this is also a great way to display small pieces in an art show or at a fair!
Oh thank you Polly, that’s a Top Tip. It IS a dense subject with LOTS of suggestions. All have their merits – yours sounds a great idea. Thanks for adding it.
This has been very helpful. For lack of adequate windows available I have mounted the last two pieces I have done in light boxes. Each was approximately 1’ x 3’. I used led strips run around the sides with the back of the box painted white. The last one has several brightness settings for the led strip which is very effective. I would be interested in seeing this topic addressed by you or others with more experience with light boxes.
Glad you found the page of use Brian.
I have just such a page in the pipeline, so keep coming back and using the search box to check. It sounds like you’re doing fine with the light boxes as it is.