Stained glass studio spaces are our little piece of heaven. We obsess over them… how best to store stained glass sheets, how to organise work areas and how high the cutting bench should be…
…and that’s before we get on to ingenious stained glass tools to fill them with. You know – the ones that you’ve made cheaply or adapted from something else. It’s such a thrill to make or find stained glass tools that work for you.
Tip 1. Make Your Own Stained Glass Storage Rack
Tip 2. Make Your Own Layout Bars
Tip 3. Make Your Own Grinder Splash Guard
Tip 4. Removing Water from Grinders
Tip 5. Shelving Your Studio
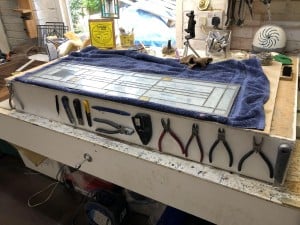
Tip 6. Storing tools
This article contains some affiliate links – look for the *. Just so’s you know, if you click and buy through the link within 24 hrs I get a small % from Amazon, (not you!). Thanks in advance but no worries if you have a local store – I’d always support them first 🙂
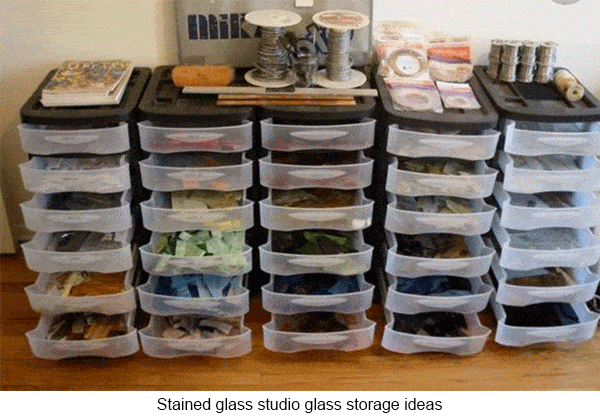
Stained Glass Studio Spaces – Ideas
Ever wished you could see a whole load of stained glass artists’ studios to see how they organise their spaces?
Well now you can. Delphi Glass have put together this fascinating slide show of stained glass studio spaces entered for their “Most Organised Studio” competition. Hit the pause button if you want to have a good look at anything in particular.
Which one do you envy the most? You’re welcome to add other ideas of your own below.
Stained Glass Tools – Cheap Ones!
Tip 1. Make Your Own Stained Glass Storage Rack
These shelves will give you a lovely tidy mind which will spill over into your pleasure when you make stained glass.
The board was about $10, and the dowels cost about $17. If you don’t have the time to make you own you can always *buy ready made ones from Amazon here.(affiliate)
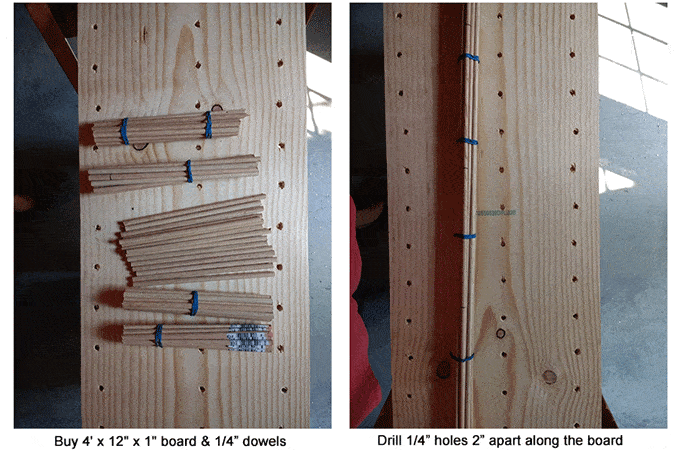
Thanks to Gail Koebke for sending in the photos and idea:
- you need: 4′ x 12″ x 1″ board/s and a quantity of 1/4″ dowels, drill, 1/4″ drill bit, wood glue, hammer
- drill 1/4″ holes all the way through the board 2″ apart
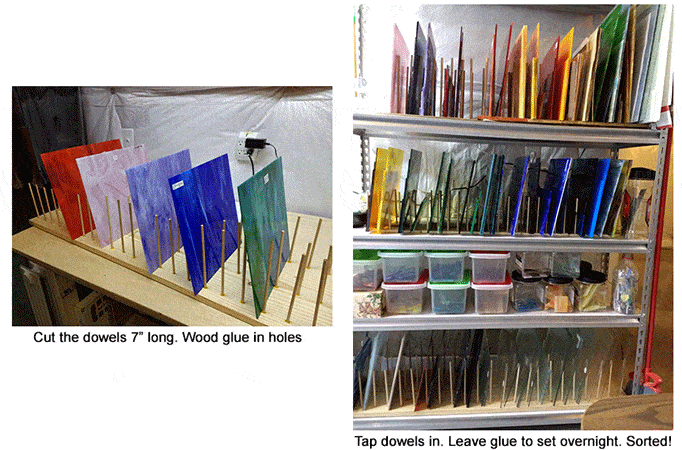
- cut the dowels into 7″ lengths
- put a dab of wood glue on the end of each 7″ dowel and tap into the holes with the hammer
- leave overnight for the glue to set
- that’s it! You now have tidy stained glass sheets 🙂
I think you’ll agree they’re a MUST HAVE for all stained glass studio spaces. Gail says the rack is very strong and that “the dowels barely flex when several sheets of glass lean against them.” Thanks so much for sharing!
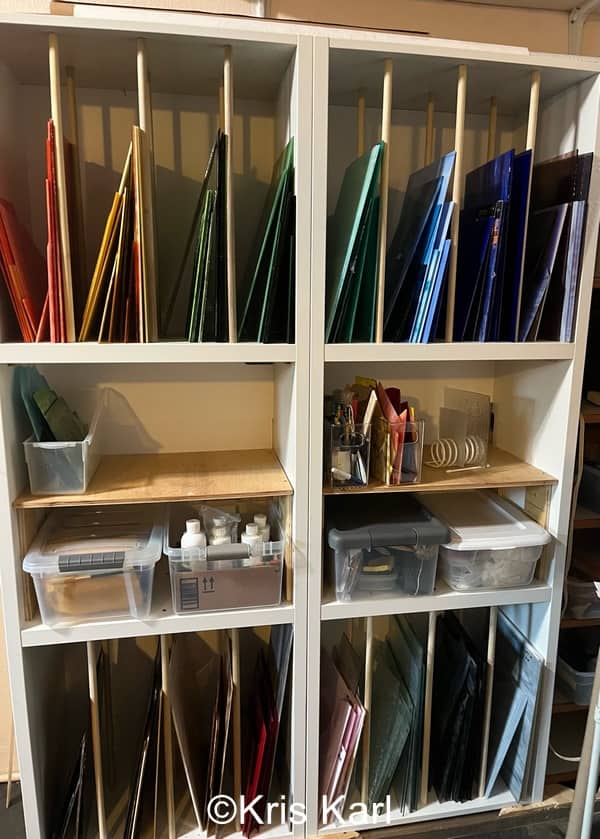
Kris Karl shared a clever use of Ikea shelves in the image below. They found 2 IKEA entertainment units on Facebook marketplace, turned them on end, added the dowels and created a great storage area.
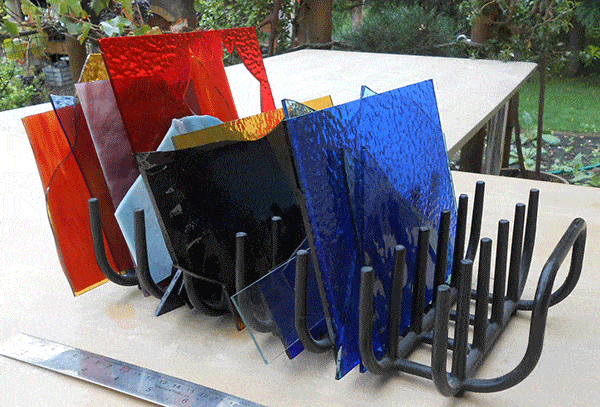
Everything Stained Glass follower Janusz N has added a simple idea for racking. He uses a plate rack from IKEA for small pieces of glass and says “it is portable and works well“. I think we can see that below! Thanks Janusz.
Plus Kathleen says:
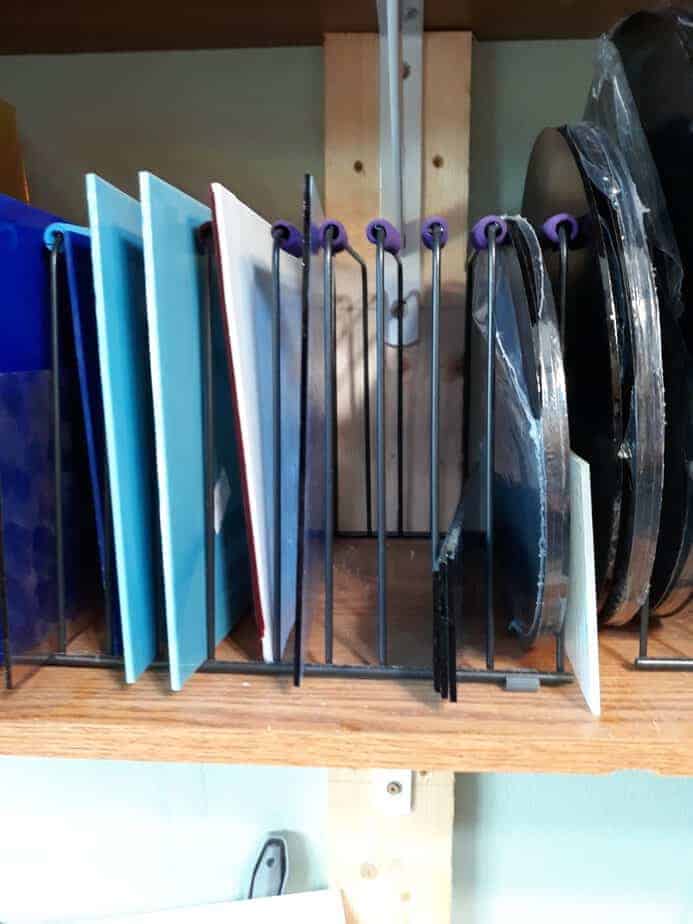
I made my own glass storage system using file folder racks and pencil grips. I just cut the pencil grips in half lengthwise, filled each halfway with hot glue and pressed one onto each rack section. It was simple to make, works well and cost a lot less than the ones they sell at glass shops. It holds my small pieces as well as 12″ squares and circles. Here’s a picture. I got the supplies on Amazon but I am sure any office supply store will have these items.
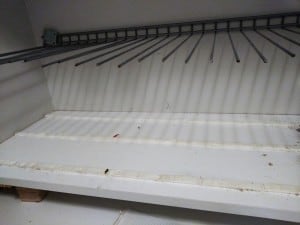
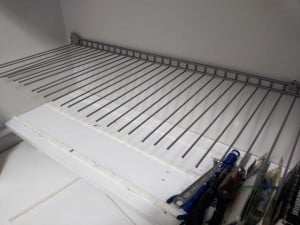
Ron has this clever idea for glass storage: “I use an old wire shoe shelf rack at 48″ x 12″, with the outside rod cut off. The wire tines are 1″ apart so this gives 48 slots at 1″ x 12″. It is mounted 8″(can be more or less depending on your median glass size) above a 48″ x 12″ x 5/8″ shelf with 3 strips of weather-stripping to grip the glass pieces. Works like a charm. The only hassle is cutting off the outside rod with a wire cutter, Dremel or metal saw. It takes a little time and effort but the result is a 48-slot frame to hold any size of glass.”
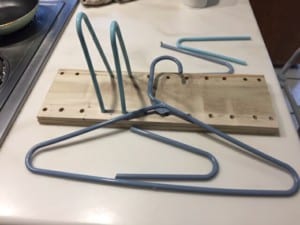
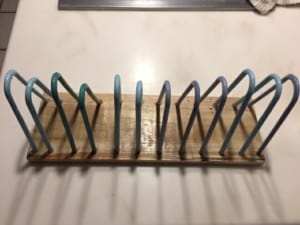
More storage cleverness from Ron using coat hangers – thanks Ron
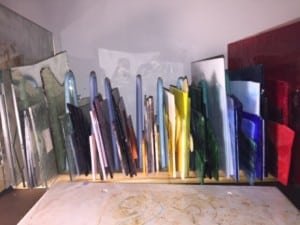
Paula sent this great idea to share:
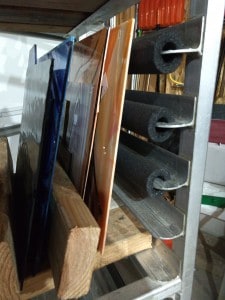
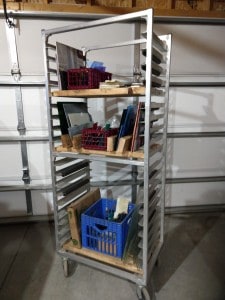
Here’s a different idea for storing glass: a Baker’s rack. They are light (made of aluminium), sturdy, ready to move around, and you can adjust the shelves. Look for used ones on Facebook.I used pieces of 2×4 for the shelves and pipe insulation to protect the glass from unused shelves.
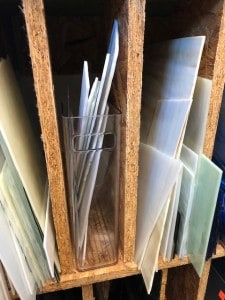
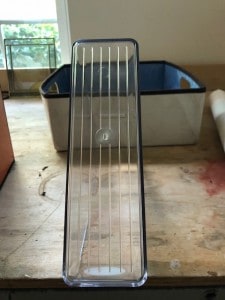
Beverly kindly sent this idea using magazine racks.”You may be familiar with these organizers for magazines that I just found on Amazon but they are perfect for storing those odd shaped smaller pieces of glass that sometimes get lost on the shelf. This magazine holder has a handle on the back which is a cut out it’s also ribbed on the bottom so it feels safe. So I can take the holder out of my glass closet safely to see what pieces of glass I have. *On Amazon the 3 inch comes in a four pack or an eight pack (affiliate) . I especially like that it has a “handle “
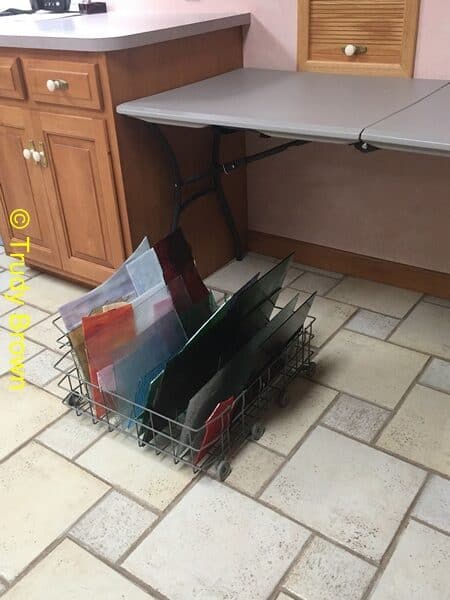
Trudy Brown uses old dishwasher racks. She keeps her larger pieces of glass stored in the racks under my table. When I want to check out some glass she just rolls out the rack and start sorting. When done the rack is rolled back under the table. What a great idea! They make great glass storage units.
Tip 2. Make Your Own Layout Bars
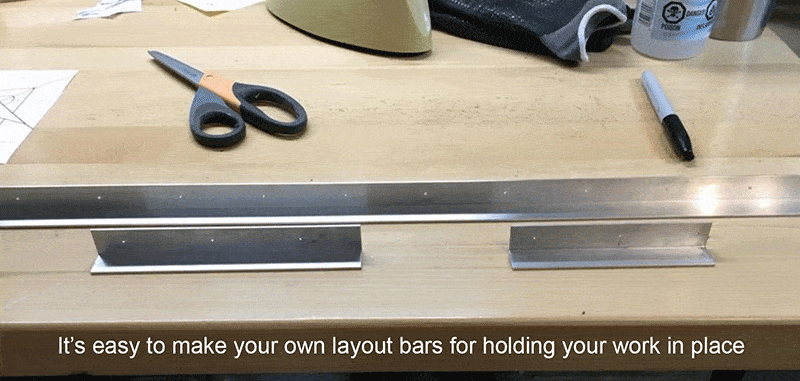
Here’s a top idea for making Layout Bars instead of buying them. Simple and effective. If you don’t have the time (or the will!) to make your own then you can buy * affiliate – Morton Layout Bars here on Amazon
.
Thanks to Maggie Winters for sharing this. She suggests:
- buying strips of 3/4″ aluminium angle stock at Home Depot. She recommends the 1/16″ thickness
- drilling evenly spaced 1/16″ holes along it
- cutting them to your desired length
- and voila! You have all the layout bars you need
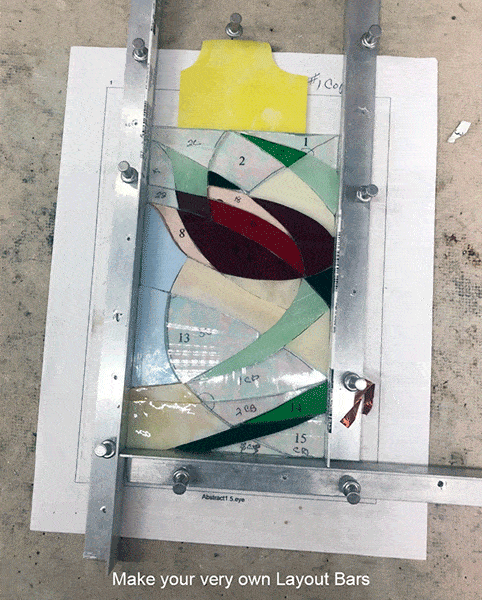
Here are the layout bars in action (photo courtesy of Hubbit Terry B)
Tip 3. Make Your Own Grinder Splash Guard
Here’s the second Cheap Stained Glass Tool Tip for you. This one was kindly shared by follower Diane Ritter. If you have any more ideas for tools, feel free to add them below. Thanks, we need to fill our stained glass studio spaces with them 🙂

- Instead of buying a splash guard box, Diane suggests the following:
- Buy a cheap a plastic storage box.
- Set the grinder in the box with the opening facing you. Having the top and bottom catches a lot of water and stops it going everywhere.
- Cut a small hole in the back for the cord to pass through.
- If you need to put the grinder away, turn the box back to the normal top up position and reposition the grinder in the box. Put on the lid and you’re ready to go.
Diane says she needs a lot of light, so she bought a light strip and put it around “top” of the box (i.e. top when in use.)
The splash guard works perfectly and costs less than any of the 3-sided items seen online. Thanks to Diane for sharing.
Floyd T. Hopkins has kindly shared his idea for a splash guard too. Floyd uses a 20 gallon aquarium on its side. He says: “It’s clear and the lip works great for holding water” and suggests putting a LED light with a magnifying glass on top. Ingenious. Thanks Floyd!
Ron has shared images below of his 12″x 8″ x 18″ tote box that he keeps the grinder in. One side is cut away for access. The box keeps water and glass residue from splashing all over the place.
Tip 4. Removing Water from Grinders
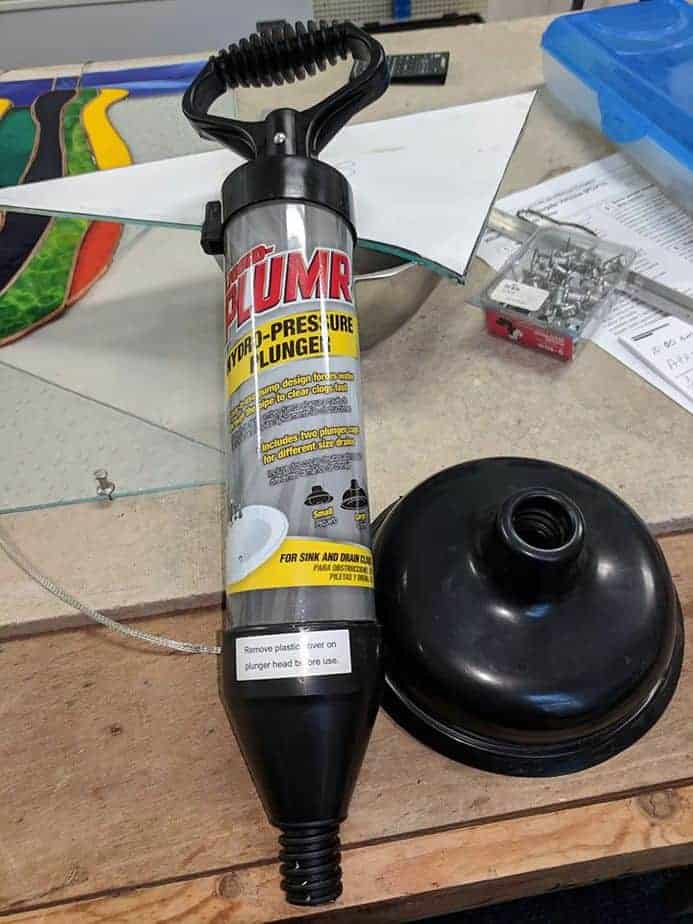 Oh yes, we’ve all been there… dirty murky water in your stained glass grinder and a mile to wobble your way to the sink to dispose of it… No longer!
Thanks to Mitzi Mallon’s inspired idea you’ll be sucking up water from your grinder without making MORE mess in the process.
She uses this rather grandly named *affiliate ‘Hydro Pressure Plunger‘, borrowed from the plumbing industry.
- Simply screw on the cup
- Slowly pull up the pump handle
- Voilá! All your dirty grinder water is sucked into the pump reservoir.
Any more ideas for stained glass studio spaces or cheap/adapted tools? Feel free to add them in the comments below.
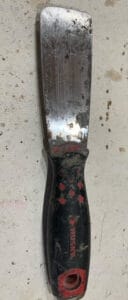
Another useful tip for cleaning your grinder from reader Cynthia Cappello. Use a 1 1/2 inch joint knife like the one pictured below ( as used with dry wall) which fits perfectly behind the grinder to clean out the base of the grinder.
Tip 5. Shelving Your Studio
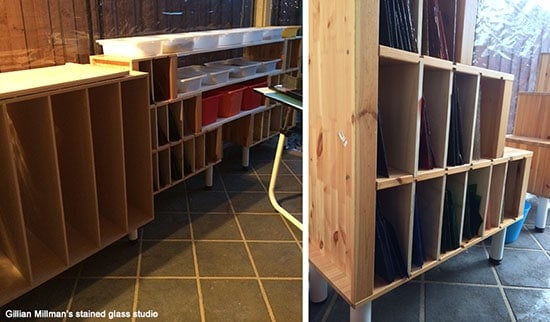
These are good old IKEA toy boxes in follower Gillian Millman’s workshop. The toy box is on it’s side with some legs screwed on. Have a look at your local IKEA catalogue and with a view to glass storage… you’ll be amazed and go rushing out to your nearest outlet immediately.
P.S. Paul Lloyd-Jones uses the storage trolleys on wheels from Hobbycraft when they’re on offer 🙂
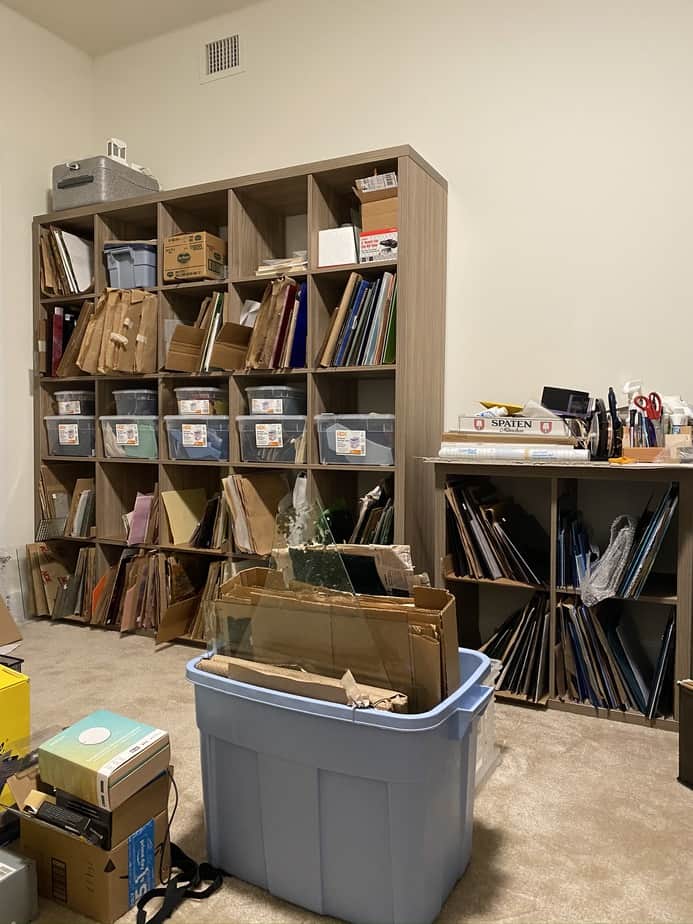
Thanks to Tom from Philadelphia for this idea using an Ikea unit:
Stained Glass Tool Storage Ideas
Vaughan very kindly sent this idea to me:
This page gathers ideas about stained glass studio spaces and cheap tools in one kid-in-a-sweet-shop-place. If you think it might be useful to others, feel free to Pin on Pinterest and Share on Facebook. Thanks.
Make your own lightbox – Click Here
There are more Stained Glass Tools and Materials on this page if you need more advice
Everything Stained Glass Home Page
Just so’s you know, if you click and buy through the *links within 24 hrs I get a small % from Amazon, (not you!). Thanks in advance but no worries if you have a local store – I’d always support them first 🙂

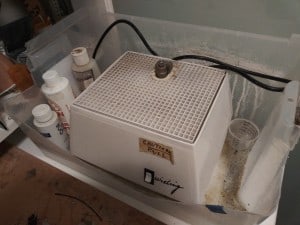
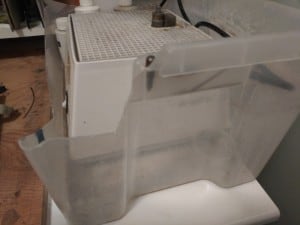
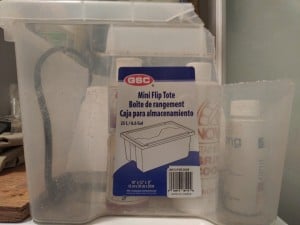
Hello just a tip for containment of mess while grinding. I purchased a sandblasting box made of metal. I place my grinder inside. It perfectly contains the mess and only my hand is exposed. I can look through the top while grinding without being exposed.
Fabulous tip, thanks so much for taking the time to add it Eva 🙂
I have the plastic drawers, 3 high, but they have collapsed, I can’t open the bottom drawer. any ideas on how to strengthen them????? I have 5 stacks of them & really can’t afford to throw them away & buy something else, they are under my work table. REALLY need some ideas
Oh no what a shame. Maybe they weren’t robust enough or over-filled. I’m sorry I don’t have any ideas to fix them – anyone else?
Bonjour de France ! Pour stocker mes verres j’ai récupéré des plaques de mousse épaisse de 6 cms et très dense, tous les cms j’ai tracé au cutter un trait profond de 3 cms sur toute la largeur de la plaque et j’ai inséré dans chaque rainure mes plaques, rangées par couleur. La plaque de mousse est posée sur une étagère et c’est très pratique pour choisir mes verres et pas de dépense ! merci pour toutes vos vidéos, astuces et pour ce groupe, je me régale de vos vidéos et j’apprends beaucoup !
Hello from France! To store my glasses I collected plates of 6 cm thick and very dense foam, every cm I drew a deep line of 3 cm over the entire width of the plate with a cutter and inserted it into each groove my plates, arranged by color. The foam plate is placed on a shelf and it is very practical for choosing my glasses and no expense! thank you for all your videos, tips and for this group, I enjoy your videos and I learn a lot!
Thanks for your tips Nathalie. I’m glad you’ve learned some tips from the my site too 🙂
Merci pour vos conseils Nathalie. Je suis heureux que vous ayez également appris quelques conseils sur mon site 🙂
Hello Milly and friends,
To store my glass, especially the 12 x 12 pieces, I bought about 10 of the white shelves from, it was either Hobby Lobby or Micheals. They were the cheapest for me because I bought them as I expanded my glass inventory. They were about $29.00 on sale. They had four shelves usually. I turned them on their sides and they made lovely storage vertical shelves and space for glass. They are pretty and can take probably about 5 pieces of 12 x 12 glass and I put thin cardboard or any kind of paper between the glass when on their sides to keep each piece from scratching other pieces next to them. It looks really cool too and clean with the white shiny finish. My husband put some together but I also did a few. Negative things: The shelves are quite heavy. You have to put them together (not hard) but use glue with the dowels. My husband also put together some metal rugged 3-tier cabinets for the white shelves to sit on. I put plastic 12 x 2-inch flat things from Micheals on those three selves for smaller pieces of glass and other supplies. It works really well for me. I think we stained-glass artists get pretty darn creative when it comes to storage. I didn’t have hundreds of dollars for glass so how could I possibly spend easily another $1,000 to store it in! lol I loved looking at others creative works for storage. I wasn’t sure how to post a picture on medium. If you want, I can take a picture of my studio and you can post or tell me how to do here. Thanks! Best regards! Deb from Maine
Thanks so much Deb, I appreciate the time you’ve taken to share your tips – as will everyone else 🙂
Retired hospital RN here. Often a patient would be given a plastic wash tub that was never used. With a good disinfecting, they’re perfect for holding small scraps of glass, sorted by color. I’m now using short-sided cardboard that canned dog food is packed with to sort and store bigger scraps. With a little care, these are stackable, and of course, color-sortable.
Milly,
I use a lot of inexpensive stacking bins to organize my area. The bins are sized for shoes, so are big enough to hold a fair amount of stuff, but are not so large that everything falls to the bottom. This is not an entirely new concept, but with about 36 bins, they look a lot alike. My tip is to use an adhesive labeler to label both front and back sides. Two labels allows me to put them back in either direction. I can change the contents simply by replacing the label when I want to re-purpose the bin.
This is great Bruce, thanks for taking the time to share your tips with everyone 🙂
Milly, I use various sizes or little suction cups to pick a peice glass out of the frame when in the grind or foil phase of my projects. It’s easier than prying the glass out or removing half the other pieces to get at one!
Oh that’s a good idea Ted, I’ve never heard of that. Makes total sense. Thanks for adding it.
Cost effective way to remove Grinder Gunk.
To remove the grinder water and gunk, I use a Turkey Baster. They are cheap, you don’t have to touch the glassy bit water and they do a fabulous job. Just another idea especially for the newbies out there who might be looking for ideas. Thank you for all the ideas. You can teach an old dog new tricks!!!
Thank you Dee, it’s kind of you to share your tip.
BTW, I’m sure you’re not an old dog, LOL
Thanks Dee! I have such a difficult time cleaning out my grinder! Duh. I never thought of using a turkey baster. Probably because I hate to cook but I love to make glass! lol I use to love to cook but since making glass, my husband usually has to call me down to eat from my studio. My sisters, when they call, always say when I answer, “Are you in your studio?” I always say yes because I am! I find it so much fun and get so excited when I think of designing something new. Right now I have about 7 pieces all finished except for foiling and soldering. I usually have about five going at once. This is the most I have out. Do you or others do this? It is a horrible habit to get into. Help! lol Deb
Interrupting here – I love that you have multiple projects on the go at the same time. It can really help with not getting stuck… as long as you don’t get overwhelmed. I love your enthusiasm 🙂
I do the same thing! Always have at least three ‘going at the same time, then foil and solder at the same time. Never get bored on one thing! Also polish with a spray can which cleans , Removes black from zinc, cleans the glass, and polishes at the same time. It is called Gel Gloss, kitchen and bath protector and polish! Try it, it works.
Gel Gloss, never heard of that Lyssa. Thanks, that’s a great tip.
What a brilliant idea! Thanks for sharing 👍🏻
I don’t use a light box very often, and really don’t have room for one. When the need is there, I go into my husbands wood shop, and collect two 6″x6″ short pieces of lumber, a piece of Plexiglas, that I did purchase for this project, and husband’s shop light. All goes back when I am done, and out of my shop.
A very neat and portable solution Mary, thanks so much for sharing it with us all, very helpful 🙂
I am working on my space and am wondering what material is good for the table top. I am hoping for something that is not too slippery when cutting glass but is easy to clean up.
Simple lino is great Katie; it’s cheap and easily brushed and kept clean.
Hope that helps.
I use old berber carpet scraps stapled to my wooden table top.
If you’re having trouble with slippery glass I use a small piece of cupboard liner under the glass, make my cut then set it aside before making the break. Game changer!
I had a large self-healing cutting mat that I wasn’t using for cutting quilt pieces. It’s perfect for topping my glass-cutting counter.
Great ideas, thank you all. I place the smaller savable scraps of glass in zip top freezer bags and then store the bags in a clear shoe box. This keeps the different shades of the same color separate and easy to find when I need just the right color or texture. It saves on storage as I can use one box for multiple shades of the same color. The bags also keep me from getting cut when I’m searching through the box.
Freezer bags! What a great idea Laura, thanks so much for taking the time to share it.
Love this idea! Thanks for sharing.
Also great for labeling COE in case it is important on the next project.
Yes, very good point Karen, thanks for commenting.
Years ago before vinyl LPs (‘records’) became popular again, I found an old metal LP rack where folks used to stand up their records in the record cover, at a thrift shop. This rack is about 18″ long and would have held many records. Turns out the width of a record in its cover is about the width of glass! It works perfectly to hold all the glass I’m currently working with on a project – I think it was $3! My daughter is now into collecting LPs and wanted my LP rack – no way!
Ha ha ha, funny Amanda! Thanks for adding your vinyl tip. Great idea to use it for your current project, keeps things safe and easy.
I do the same.
I do the same. Great minds and all that 😉
Hello Milly from Western Australiia and thanks for sharing all the wonderful tips and ideas, love the studio space section. I am just new to this journey and have orders coming from all over the world as decided to do my own start up kit. Not as many sources in AU Compared to the US\UK and very expensive so I got most supplies from the good old USA although postage is a bummer SOOOO expensive. Found a couple of local glass stockists locally with reasonable pricing. I’m Learning as I go so your tutorials are invaluable to me.
Thanks Milly please keep up your great work it really makes a big difference to newbys like me.
Thank you Graham! It’s kind of you to show your appreciation for my teaching work 🙂 Makes me happy.
Thanks Milly for sharing…just waiting on my husband to get my “she shed” so I have a dedicated space to work from. These tips are giving me some great ideas in getting set up.
You’re welcome Gina, I hope you don’t have to wait too long.
Hey Milly,
I absolutely LOVE the rapid resizer program!!!! For those folks out there who create their own designs or want to resize a pattern from a book this is the program for you.
The price is very reasonable for a year’s subscription.
I’ve already uploaded a dragonfly pattern and printed it out. You can even choose colors and add numbering.
Check it out. And a big thanks to you , Milly
We’re on the same page with the Rapid Resizer Sue, I love it too. If anyone is thinking of giving it a try, I’ve written a review of it here:
https://everythingstainedglass.com/stained-glass-software.
This sounds amazing. I can’t wait to try it out !
When I moved from NJ to TN, I got a bunch of thick styrofoam boxes with lids from my vet. Medications came in them and she had ones that were big enough for 12″ x 12″ glass. I put thin sheets of foam between the glass (you can buy a roll at Home Depot or other hardware stores, in the moving department.) It allowed me to move my glass safely. Now those boxes are stacked on shelves. I do need to organize the glass sheets by color. Smaller boxes contain scraps. I bought a pair of craft gloves that allow me to handle glass safely without cutting myself.
When I set up my studio, I purchased a marvelous work bench from Home Depot. It has two drawers and you can adjust the height with a handle that you turn. I love it because I am short!
What a great idea to have an adjustable work bench. I too am short so know how you feel. I’ll look that up. Thanks for telling us about it.
And your glass storage idea is something that hasn’t been shared before, thanks for that 🙂
I made the glass storage design using the wood and dowels. It is great! I plan to make another one. It’s easy and inexpensive. I can also make them different sizes to fit in my small work space. Thank you for the idea!
Yay! Thanks to Gail for sharing her idea and to you for proving that it works 🙂
I use medium sized clear bins to sort all my remnants. They go on the shelf of a bookcase and each one holds 2 or 3 colours. I label
The sides and it’s very handy to sort and I go along and keep organized. Thanks Milly love the tips.
Good idea Jacquie, thanks for adding. You sound nice and organised.
I use my old wet vac to clean out my grinder. Rajesh 30 secs and
Goes into all the corners with the right attachment. Thanks for all the tips.
Fantastic idea Jacquie, thanks. They can cope with some of the ‘gunk’ too I’m guessing, as they’re workshop friendly 🙂
I also use a wet/dry vac to clean out the grinder and the workbench as well. The trick to making sure you do not suck up small things around the grinder and the workbench is to put a handful of plastic straws (enough to fill the diameter of your vac hose) into the nozzle. Tape or glue them together. I will suck up water and fine dust without having to worry about things you don’t want to pull up, and they are easily removable
What a brilliant idea Daniel – never heard that before. Ingenious. Thanks
Hello. Thanks for the guidance. I have been interested in organizing a stained glass work room for a long time. Unfortunately, I haven’t been able to get what you sent me so far.
The images are very eloquent and very helpful. In this pandemic, making stained glass can help me bear and overcome restrictions more easily. Be full of life!
Stained glass is so good for the mind and heart isn’t it Ilie? Thanks for your comments and good luck with your studio set up.
Does anyone have any ideas forf the best way to store and identify all the sizes and backing of copper foil?
I need an easy way to identify all the sizes and color backings without picking up each one.
Any suggestions?
Great question Steve, it IS annoying trying to find out which foil is which. I’m going to ask my students and get back to you. Any ideas anyone?
Write in on the inside of the plastic spool with a permanent pen.
I keep mine in their original bags and then keep them in a conveniently sized round tin, keeping them stored airtight and out of the heat and light.
Thanks for this tip Stacey, very useful 🙂
Use old CD cases to store and label each spine
Thanks Andy! I wish I hadn’t thrown mine away. Great idea.
You can purchase empty CD cases on Amazon.
Thanks Ron, good addition!
I mark mine inside the roll. Place rolls in shoe box seperated with stickey note paper.
Zip lock storage bag… write all the info on the outside, plus it seals it against the air and you could hang it on a wall board or what other storage idea you have
Thanks for adding your suggestion Charlie, very helpful.
I save those little things they put in vitamin bottles to keep the pills dry. I keep those in the bags, in hopes of keeping moisture out.
A vacuum seal canister also works.
You can then put the plastic bags in a 3 ring binder, or a shoe box w dividers made from old file folders, cardboard from cereal boxes, etc. labelled with the foil size.
I have 2 foil dispensers…. the black on is for black backed, the orange one for copper backed.
Then I write the size of each foil in 2 places on the inside of its spool. I can usually see the size without having to take the spool out of the rack.
Top organising Elizabeth! Very good tips, thanks 🙂
I use kitchen vacuum seal bags to keep them from oxidizing. I label the edge with a sharpie and prop them up in a box in some semblance of an order.
Thanks for your useful tip Laci, much appreciated. ‘Some semblance of an order’ is a lovely phrase to aspire to, I’m going to try it! 🙂
Hi! I run a glue stick, radiating out from center plastic outward to edge, I think the commenter’s CDs is a genius idea. I just realized that maybe I’ve been “fighting gravity, maybe a vertical approach? (Please be kind, I’m new here. I worked at a stained glass studio for 5years, bout thirty years ago) I didnt work with copper foil much, cept doin repairs. Thank yall for such wonderful tips & tricks! It takes a LOT of genuine kindness to share knowledge with others. Yall pat ourselves on the backs!
I love your accent, even in print 🙂 Glad you’re finding the tips helpful, there are so many stained glassers willing to share, it really helps us all!
I found a very cheap ready made way to stack my glass sheets, also from a well known Swedish store. In the market place they sell plate racks, with movable prongs.
Thanks Sue, for the subtle reference to that Swedish store LOL! I’ll have a look at it 🙂
I use a small metal putty knife to gently scrape up the glass sediment I’m my grinder after letting it settle and before I clean out the water. I just wipe the sediment in a paper towel.
Eminently sensible Elizabeth 🙂 A very nice simple solution, thanks.
What does everyone do with the water left in grinder? It has glass dust and particles!
I remove water and let the damp sediment settle before using a small palette knife to scrape it up and put it in the bin on a paper towel. Any other ideas people?
I use a small putty knife. I don’t have room for a wet vac but a large Turkey baster and small plastic trash bin works for me.
Putty knives are the perfect scraping tool Lin, thanks for that. And for the other suggestions, all good 🙂
Milly,
Thank you for having thus site and sharing your expertise. I have started to do some stain glass again after about a 8 or 10 yr rest! I just showed my 12 yr and grandson how to cut glass. Grind and foil.
I wanted to add a tip for cleaning the grinder out after water is poured out. I use a wide putty knife /spatula.
Thank you for adding your tip Pat :-). Thank you too for getting the next generation hooked; we need them!
Cheap Grinder Splash Guard – The clear plastic box is EXCELLENT especially if you don’t have a face shield. However, a REALLY inexpensive guard can be made with a medium size Amazon box! Collapse the box flat, cut off one side so it looks like a cardboard “U”. Reinforce the inside corners with duct tape and cut out the bottom of the middle of the “U” to accommodate for the electrical wire. Grind to your heart’s content and throw out when you want. BEST OF ALL it store’s flat, costs nothing and you were going to throw out the box anyways!
Ha ha, brilliant Nat, thanks so much for adding your uber thrifty splash guard idea. Very helpful for everyone I’m sure 🙂
USING STOP BLOCKS
WHEN looking for a long “stop block” for a panel similar to the “push pin/aluminum right angle method” – I use a home depot yard stick! The wood is quite light enabling you to screw to the work surface or hold with the pins. Since it is a yard stick – you immediately see if your panel is getting too large if you’re not using a pattern AND it’s great to quickly measure came or anything you need! Lastly, they’re only 98 cents!
That’s a brilliant idea Nat, perfect for smaller projects and a cost saving too. Can’t go wrong 🙂
Wow, that IS a brilliant idea!!!
I love love love this idea and soooooo going to try it
Hi Milly, Thanks for this space. It is great to see what other artisans are using in their workshops etc.) My grinder sits on a plastic waffle grid (The hard plastic tiles (?) you can use to cover long fluorescent lights in ceilings) that I cut to size with wire cutters (that was a bit tedious but worth the effort for keeping control of all the bits of glass etc.) so the little bits and splashes fall through the little squares and out of the way until it is time to clean up. I use fluted polypropylene (old election or business signs) to make my splash guards. They are easy to cut to any size. I just score the first layer of the back into thirds, (just enough so the plastic sheet will fold), then I tape that seam with duct tape so it is flexible and will stand at any angle I want then just set it up around the grinder. It is easy to clean up since it wipes easily and storing is easy too because weighs so little and can be folded down with the flexible duct tape hinges. I hope everyone who is not homebound these days is staying well and safe from the virus. Take care everyone!
That’s a brilliant tip, thanks so much for taking the time to share it Tamara. You take care too 🙂
For under your grinder I used a drilled out plexi sheet and have a paint roller tray mounted on wall hanging under my wall mounted grinder to catch all splash and flying debris
Thanks for these additional tips Dale, very useful.
I like Diane’s idea. When finished one could just take the tub outside and wash it out with the hose.
I took book shelves and laid them on their sides for glass racks.
Good idea with the book shelves, thanks.
I use plastic turkey basters to get the water out of the grinder tray! I like to use two for a quicker job, but not necessary! I have a small bucket to put the water in, unless you’re right by the sink!! Works great! Also, you don’t want all that glass sand down your drains, get a bucket and fasten a clothe baby diaper or thin white kitchen towel over the top. Pour grinder water into the bucket to catch most of the glass particles! Saves your pipes!!
Saving your pipes is a very important point Peggy. Ground glass sinks to the bottom and could cause blockages. I can see you with a turkey baster in each hand and a diaper to boot! Great ideas thanks for taking the time to let us know about them.
Love this one-haven’t basted anything years!
Ha! Good bit of Roast Stained Glass on a Sunday is good for the body and soul 🙂
😂
LOL!!!
Peggy found this extremely helpful thank you.
Hi Milly, to empty my grinder, I use a turkey baster and squirt the water in a plastic container and then dump it down the drain. I got the turkey baster at the Dollar Store.
A turkey baster is a great idea Sue, thanks for that. Cheap too.
Hola!!! Me fascinan tus trabajos .
Thanks Sonia, glad you like my work 🙂
I use the racks used to slice the bread made in the bread makers. Not as many people are making the bread now, so I find them at Good Will etc. They are very sturdy.
That’s a brilliant thought Linda, thanks for adding it so that others can use it too.
I made a glass rack out of recycled pallet wood and plastic coat hangers no cost I have photos but could not post them here
Pallets, that’s a great idea Ron! Thanks so much for posting.
I’ve emailed you so you can send me the photos for this page if you’re still up for it.
I would love to see how this is made with the pallets.
Yes, I agree. We need the maker to take photos!
Milly, thanks for the email pointer on 1/12/2020. I decided to declutter my studio bench yesterday – it had gotten overrun with pattern bits, tools, glass fragments, etc. I also installed new lighting over the bench. When I started (again) doing stained glass last year I wanted to get get some proper glass storage. I happened on this at Michael’s ‘organizer-cube-four-shelf-by-ashland’ I bought 4, assembled them vertically, labeled the slots, and stacked them up. Thanks for all the tips.
Oh these shelves look perfect Bill, thanks for taking the time to share the link.
By the way, I laughed at your description of the detritus that gathers on our studio benches 🙂 It happens to us all!
Hi Bill, are these sturdy enough to stack 3-4 high with glass in slots?
Jodi, I would not stack them over 2 high without some external support.
Thanks for the link and Michael’s picture. After being on clearance for $20, they are gone here in Maryland. There will be others, I’m sure.
I use a putty knife to clean out the glass sludge in my grinder.
I use plastic milk crates that I have zip tied together for glass storage.
Inexpensive and they don’t tip over.
Thank you Helen, a very good tip about the milk crates – I’ve not heard that one before 🙂
Oh my! You just gave me an idea, Helen, thank you!
For the last four years I’ve been the proud owner of a tower of square black plastic crates I bought from a neighbour who imported thousands of Dutch tulip bulbs for a charity garden project he was doing. He was selling the empty crates for a couple of dollars for the charity and they’re very sturdy – like a milk crate but a little bigger – so use them to create a glass storage unit … Yippee! I just KNEW I’d need these crates for something some day! 😀
Love your site, Milly. Thanks so much for all you do to help enable your fellow glass addicts!
The rack from an old dishwasher makes a great glass rack that you can slide under a table to pull out easily whenever needed!
There are some more stained glass rack storage ideas here to go with yours Jackie. Great idea, thanks!
I have three cats and use many boxes of cat sand – the boxes are large and strong – I stand them on their side (not the cats) with top off – stand my glass by color in boxes – works really well and a good way to recycle the boxes. Love all your ideas. I also use a large fish tank for my grinder. Steve Maunder
Cat sand boxes!! I’ve heard of lots of solutions but never that one. That’s such a cool idea Steve, thank you!
that’s a great cheap idea, I hate throwing those boxes away
. I also use quarter round and screw it to my sheet rock piece on my table, and use a square to make it perfectly square. then when I’m doing a piece, I know it’s totally square.
Thanks for this Lyssa, a very good tip.
To set my grinder in so my work surface stays nice I use the plastic trays that go in the bottom of pet/dog crates. They come in a wide variety of sizes. I found mine at Farm n Home Supply. I placed a smallish throw rug on my washing machine. Then placed the tray on it, then in went my grinder. I did the same thing for on top of my dryer. I placed my cutting board in that one. I used my laundry room as a temp studio while insulating my garage to use.
I love all these great ideas Betty! Thanks for sharing them with us. I hope you’re happily ensconced and warm in your insulated workshop now 🙂
I use a 10 gallon fish tank turned on it’s side as a splash guard for my grinder. The The glass makes for an umimpeded view of your work. I haven’t tried it yet, but I have read about lining your grinder tray with aluminum foil for easy clean up. I plan to try this one!
Brilliant ideas Michelle, thanks so much for taking the time to let us know.
I just love all the ideas, tips, and tricks that you post on your website. I also love the courses you offer to teach us the art of making stained glass!!! Being able to belong to the Hub FB group is such a wonderful plus. So much information is shared thanks to your efforts!!!
Aw, thanks Gail, that’s kind of you. You’ve done more than your fair share of sharing 🙂
Milly, I came across your site while exploring Pinterest for design ideas. Your site has been a great resource. I have just embarked on the stained glass adventure. My daughter enrolled me in a class as a gift. Fast forward to her recent gift of a dozen boxes of glass scrap and a glass grinder. I added an glass area to my workspace. I am using a cubby and plastic storage boxes. Concern about my two young (5 & 7) grandchildren prompted me to purchase an inexpensive mesh fire screen to place in front of it to shield them from sharp edges. They are not allowed in there without supervision, of course, but this gives me a little more peace of mind.
What a great idea Colleen, you don’t want any anxiety in your stained glass studio! Your grandchildren will be making stained glass soon, you’ll see 🙂
I’m happy to hear my site is of help. You’re welcome to sign up for my newsletter here if you’d like more tips and a free Cutting Curves eBook. Good luck with your next project.
I just made my storage rack inspired by the drill into a base piece and insert wood dowels method. Ran out of wood dowel so improvised. I had a pile of plastic tubular hangers and just cut them to use the longest straight piece for dowels. Worked perfect and I like the extra height and bit of buffer from the “plastic dowels”. I was lucky enough to use the hubbys radial arm saw for cutting my hangers which took about 30 seconds to get through all of them but I know from past experience it’s not difficult to use a bolt cutter or small hand saw, wire cutters, sand paper or wood files also work if you need to taper one to get a good snug fit in the hole.
That’s a great extra tip Susan, thanks so much for sharing 🙂 I’m glad the storage rack worked out for you. Now you can buy more glass, result!
An aquarium hand operated pump with a bucket could also be used to empty the grinder water. Possibly cheaper and smaller than the one shown.
I use a set of shallow filing drawers for my glass as they stand neatly in my work area. I also save the powdered glass from the grinder, to hopefully use in my kiln on clear glass to see what effect I get. Waste not want not and I never pour it down the sink as it would build up in the sink trap.
Great points Lesley, thanks for adding them 🙂
I have an 8 cubicle IKEA shelving unit I have used for my 12 x 12 glass pieces, but didn’t like how they just leaned against the sides. After reading your idea on building a box with dowels, I found and bought 8 Bamboo Dish Drying Rack Plate Holder Stands on Amazon ($12.99 for 2) that have 5″ dowels and are spaced an inch apart. I plan on gluing them down to the shelves so they don’t move.
I wish they had larger ones for my full sheets of glass, but I will build something for them from your idea.
Sounds good Leslie. Just to give credit where it’s due; the dowel idea was offered to me by Gail Koekbe, so it’s Gail that deserves your thanks in this instance.
Thank you for all these tips, amazing, lots to be thinking about and lots to do/ achieve. Thanks to you all and especially Milly for all the e- mails and tips, keep em coming, all help appreciated very much as I have re started doing stained glass again after retirement
THANK YOU MILLY AND EVERYONE FOR THE SUGGESTIONS POSTED. TOMORROW IS MONDAY, AND I WILL BE USING THE IDEAS TO REORGANIZE MY “STUDIO” :)! SO LOOKING FORWARD TO THE NEW, ORGANIZED “ME & GLASS” WORK AREA. OH, AND I FORGOT TO MENTION THE SMILE ON MY FACE………AGAIN, THANK YOU FOR ALL THE HINTS. HAPPY STAIN GLASS, PATTERNS, CUTTING, WORKING, SAFETY AND ETC.
This made me laugh Dianna! I’m happy that you’re getting some helpful tips from the Everything Stained Glass site and all my lovely followers.
If you are soldering brass or lead and want to leave an area unsoldered, go to a plumbing shop and buy “Plumbers black” paint this on your brass or lead where you dont want solder and the solder will never stick, It was the way we made wiped joints look tidy in the old days picture below, copy and paste
https://chestofbooks.com/home-improvement/construction/plumbing/Manual-Plumbing-Practice/images/Fig-243-Combination-Branch-and-Round-Joint.jpg
Great tip. Thanks, Edward!
In Jewelry making we use yellow ochre mixed w 3 in one oil. The heat is much higher with a jewelers torch though so this may be complete overkill for stained glass.
Paint it on with a tiny fine brush and be careful to control because it is an effective flow stop and it will stop the flow of solder. This is as applied to torch fired silver solder.
I have not had the opportunity to try this as I am the most beginning of beginners in glass. I Haven’t had the chance to try mechanisms yet.
I store my sheets of glass in a hanging file folder that sits in a plastic milk crate. Each sheet has its own file folder and if I have a couple like shades I can combine them using a folder w/o the metal clips.The crates are the size the kids used to hold vinyl records. I have at least six of the crates and it is easy to locate the glass I am looking for.
Ingenious Gail, thanks for sharing your idea 🙂
20227 N. 126th Ave.Thanks for all the neat ideas for organizing our shops. I normally keep my leftover cut glass pieces for possible use in future projects. I use plastic bins with covers and label each box with basic colors and/or styles of glass stored in each bin. Makes it easy to find useable pieces without having to buy a new full piece.
Very helpful tips Skip, thanks for sharing with us 🙂
I wanted to share a couple of ideas that we have used in our class to store glass. One is using plastic shoe boxes for used glass. They are see through and sturdy, as well as stackable, and easy to mark what color of glass the box is holding. Another idea that I have been using for storing a sheet of glass is a dish holder.
I also wanted to thank you for sharing so much useful information in regards to stained glass. I have shared your link with a few of the girls in my class, and they too have found your tips very useful.
I hope this ideas are helpful for someone, and i look forward to receiving your emails.
These are great ideas Dina, thanks so much for taking the time to share them. They’re very useful indeed.
HI Milly
I am sure that I am not the only one who does this, but, will tell you anyway. I used to use the “plastic” trays that come with roasts/steaks for putting my cut projects in, but, at the Dollar Tree they have those rectangular little plastic baskets in all colors, 2 for $1 that are invaluable. Also, I have about 4, wooden crates, some highly decorated that I have bought @ garage sales/thrift stores. My hubby makes my frames for big projects as well as for the “fan lamp” bases & he also makes me the small “pushers” I use when grinding my glass (he is so supportive of my glass)!
I am sure I am not telling you anything you didn’t know; have a great weekend.
Sandy Kunkle
This is a great additional tip, thanks Sandra. It will be a new idea to someone ‘out there’ I can guarantee it!
Hi Sandra, what do you use the little plastic baskets for? To save glass scrap? Do they have lids? Thanks!
Hi Laura, I use the plastic baskets from the Dollar Tree to hold my “cut” pieces for whatever project I am making. At Christmas time, I can then stack em by the grinder for easy grinding. I keep them stacked under my work bench/light box; when I cut my project then I immediately put ea piece into the “box”, check it off on my numbered sheet, and onto the next piece.
I don’t have much space, but I also don’t have a huge inventory of glass. I use pizza-type boxes labelled opaque, cathedral (clear coloured), pattern and clear. Not as elegant as being able to reach in and immediately get what I need, but it works for me.
That’s a brilliant solution for a small workshop space, thanks Debra.
That’s a great idea!
Think I’ll order Pizza 😀
Milly, pardon my ignorance, but my daughter bought me the Glastar Super Star 11 grinder and it has the hole where the water is stored but no plug . Had to use blue tack. Was there supposed to be a plug ?
If I’m understanding correctly, the hole you’re referring to is near the grinder bit? If so, this needs to be plugged with a bit of sponge that dips into the water below and against the grinder wheel above. It draws water up from below to stop overheating and to reduce airbourne particles.
I hope that helps and that you enjoyed the pizza 😉
You can find extra stoppers at Ace Hardware.
My grinder sits in my laundry sink in utility room. Allows for fast & easy clean-up with no mess outside sink. I do have to lift out grinder when sink needed for other uses but this does not occur often. It worked so well I’ve rearranged my laundry room as my “studio”.
Great idea for those with a spare sink, Pat, thanks for sharing. I’m all for ‘stealing’ other parts of the house for stained glass 🙂
I made a glass cube-like thing with four sides …and I put it down over the grinder. It works really well to keep spatter inside, and is large enough to enclose the grinder but small enough for me to be able to see what I’m doing. I’d show you a picture, but I’ve been unable to do glass for a while and the workshop has become a gathering place for other things so it’s hidden beneath all that stuff. The pictures of tidy workshops are an incentive for me to get back at it! Great ideas!
That’s a good idea as you can make it the perfect size to fit your own stained glass grinder. Thanks for sharing Carolyn. I hope you’re able to resume glass soon.
I use old steel office standup file organizers to sort and keep upright my stained glass pieces. They are heavily anchored on the bottom so it doesn’t tip over. Unfortunately they only make plastic file folder sorting trays now which tip easily. They easily hold a square of glass in place.
Great idea for storing glass Geri, thanks for sharing it. Plastic is taking over the world unfortunately… perhaps once the glass is in it stabilises the files a bit?
I use wodden file organizers like these:
https://www.traevarer.dk/catalogsearch/result/?q=Tids
II have placed it on an open shelf, so I can look down into the organizers and easily pick the glass piece I want.
That’s a great storage tip Lone, thanks so much for taking the time to share it with others.
I found several steel file organizers at Goodwill, and that is what I use also. Now, I always look for them, just in case I need more glass, LOL.
My issue with using the storage tubs or fish tanks is that I’m short and can’t see over the top when grinding. I’m also short on work space and with 3 grinders I don’t have room for the splash guards. I’m using “presentation” board cut down to height needed & cutout for power cords. I wear safety glasses as my shield and yes I do feel debris hitting my face from time-to-time. I’m open to suggestions.
That sounds a good solution Bud. Kathy (further down this page) suggested a fish tank that you can see through. I wonder if that might be a useful idea for you?
Try a full face shield similar to welding shield. Wood workers use them with turning lathe. They are light weight and cover your whole face. You can flip them up when needed. They fit very comfortably. Handy if you wear regular glasses. Your glasses stay clean.
Oh that’s a really good idea, thanks for suggesting it. Hopefully Bud will give it a try.
I use 2 3-ring binders standing up behind the grinder, and the grinder has a piece of clear floatglass protecting your eyes. The grinder and binders sit in a boot tray, the kind used to keep the melting snow from spilling onto the floor. It works for me!
A boot tray! What a fantastic idea Jolanta, thanks for letting others know about it. I love the ingenuity of stained glassers 🙂
I use the boot trays, too. My splash surround is three pieces of plexiglass hinged with clear packing tape.
Thanks for the additional tip, Tom. Very useful 🙂
Hi Bud, great idea, but, for me, I feel like everything that people have said here, limits my movement cause I usually set my pattern/glass pieces on the left next to the grinder. Thank God my shop has a tile counter that I just wipe down.
Good point Sandra. You’re lucky to have the tile counter as you say.
My stained glass instructor knows someone who designed CapN Shield. I bought a few. They fit over a baseball cap and are very light weight. They can be rinsed or cleaned so you can always see through them. I have used the same one for quite some time.
They look ingenious Sheila! It means that you can wear headgear that feels comfortable and be protected too. Hopefully they protect f
from flying glass but as I’ve never tried I can’t recommend.
Thanks for sharing that idea.
Thanks for the tip about the grinder splash guard Milly and 3 x cheers for Diane. 👏🏾 👍
I’ll second the 3 cheers Robert, I’m glad you liked it.
Loved the idea from Diane about putting the grinder inside a cheap storage box and being able to use it as a cover for the grinder when not in use.
I still have to organise my workspace, but seeing these suggestions is giving me ideas. Thanks
That’s good to know Barbara. There’s nothing better than an organised studio for making you feel good…one step at a time!
Milly Thank you so much for the helpful info. I would love to show you my little
studio. Thanks again.
You’re welcome Richard, I’m glad you found it of use.
Hi! Milly! I use a 5 or 10 gallon fish aquarium for a splash guard. They cost about 5- 10 dollars, are easy to clean and you can see through the top clearly. I have a small Battery LED that sits on top to give me great lighting where I need it. No wires for the light.
That’s a brilliant idea Kathy, thanks so much for taking the time to add to it to the page.
I visited a double glazing shop. They gave me scrap glass and I Copperfoiled a top, sides and back to make a splash protector. The advantage is that it leaves base free for grinder to sit steady. Cost just my time and a bit of readily available materials. The thicker glazing material provides strength and protection.
Ingenious Karen, thanks so much for sharing with us all 🙂
Looks great Milly!! I have just tidied my studio today – after a prolonged period of illness I suddenly feel I must get in there – but it had become a dumping ground! Still a way to go but a tidy studio is a great beginning to getting back into work I am hoping.
I wish they were my studios but they’re not Penny! Delphi organised a competition a while back and people sent images in. These are the best of them. “Tidy stained glass studio, tidy mind”… adapted quote?! Anyway, it works I think. Glad to hear you’re well again.
Hello,
Could you please send me the “top tidy stain glass video”? I can’t open what is on the web page. Thank you so much!
Maybe you have a local setting on your computer that is stopping you see it Deb. If you go to Delphi Glass FB page and then go to their videos – it’s the one dated 22 August 2012.
Millie,
I have enjoyed and utilized points of interest from your wealth of stained glass knowledge many times! This tidbit about storage made my day, so simple but effective. I have glass stacked in various mixed containers from projects all over my work area, your storage system gives me hope for the order I have dreamed about. I wonder why I never thought of it . . . . . . Thanks for sharing!!!!!
I wish I could take all credit Judy but I’m just the messenger here… passing on the slideshow of other (tidy!) studios… An inspiration to us all 🙂
Thank you so much Millie, as always. You always have something relevant to say and put it so nicely that I don’t feel a complete twerp for not thinking of it myself!!! With love, thanks and best wishes. Annie
‘Twerp’, now there’s a word I haven’t heard in a while 🙂 Glad you found the slideshow useful Annie – sadly not my studio/s this time but many good ideas to share.
Thanks for telling us about your studio environs. I feel so much better as mine is also somewhat in disarray and not heated. Thanks for sharing!
I don’t know why but it always helps to know that someone else is in disarray too! I’ll think of you when I tidy my studio and you think of me – that way we’ll sort it!
Milly, this is so timely as I really need to get into my workshop to re-organize. Thank you!
You’re most welcome Mitzi. There’s lots of suggestions here to keep us dreaming of the perfect studio space…