A Beginner’s Guide from a Seasoned Pro
Hey there, fellow stained glass enthusiasts!
After nearly a decade of selling stained glass at US craft fairs, Bette Playford has picked up masses of tricks to turn her passion into profit. She was helped at the beginning by her daughter’s experience and they have since shared many happy times together in adjacent booths.
Bette has VERY kindly distilled all her experience and has taken the time to share what she’s learned with us. She takes us through ALL the processes, from finding a venue right through to setting up and packing safely.
This is the guide for you if you want to make money from stained glass at craft fairs.
Bette, I can’t thank you enough and I know that all my readers will be both grateful and amazed. Thank you 🙂
Are you ready? Let’s dive into the colourful world of selling stained glass!
Picking the Right Shows – Quality Over Quantity
When Bette first started, she said yes to every fair that came her way. Now, she’s far more selective, doing about 5 shows a year:
- The Big Indoor Bonanza: This is a 2-day event where Bette sets up a 10’x10′ booth. It’s climate-controlled (goodbye, weather worries) and brings in about a third of her yearly income. Not too shabby for a weekend’s work.
- The Outdoor Extravaganza: This 4-day event is Bette’s bread and butter, bringing in about half of her annual sales. It’s a lot of work, but the payoff is worth it. Plus, the atmosphere is usually fantastic.
- School Sale Trio: Bette does 3X 5-hour sales at local schools. They don’t bring in big money, but they’re great for connecting with the community and often lead to custom orders down the line.
HOT TIP
When you’re starting out, try a mix of different show types. Keep a record of your sales, the booth fee, and any other expenses for each event. This will help you figure out which types of shows work best for your style and price point. Don’t be afraid to drop the duds and focus on the winners – you’ll be all the better off for it in the end.
Pricing Your Art – The Million Dollar Question
Ah, pricing. It’s one of the trickiest parts of selling your work. Work out a basic formula to use as a starting point but remember it’s not set in stone. What you can charge is dependent on many different factors. You can read more about pricing here.
Don’t forget to account for the time it takes to create a complete design, not just the materials and assembly time.
Your prices should cover:
- Materials
- Your time (including design time)
- Overhead costs (booth fees, travel expenses, etc.)
- A profit margin
Don’t be afraid to adjust your prices as you go. If everything’s selling out immediately, you might be priced too low. If nothing’s moving, you might need to reconsider your pricing strategy.
Getting Your Glass There in One Piece: The Art of Packing
Moving a bunch of fragile glass items without breaking them is definitely an art form. Here’s what Bette recommends:
- Trailer: For big shows, use an enclosed trailer. It keeps everything safe and dry.
- Bank boxes: For smaller pieces (which Bette charmingly calls “littles”), use cut-down bank boxes with accordion-style dividers. You can fit about 100 pieces in each box!
- Plastic tubs: Great for medium-sized pieces. Use dividers to keep them from bumping into each other.
- Individual wrapping: Larger pieces get wrapped in bubble wrap or special glass-moving bags.
- Custom packaging: For odd-shaped pieces, Bette sometimes cuts cardboard or foam board to size and lines it with bubble wrap. Ingenious 🙂
PACKING PRO TIP
Always transport large pieces upright, never flat. Brace them against the side of the car or between sturdy boxes.
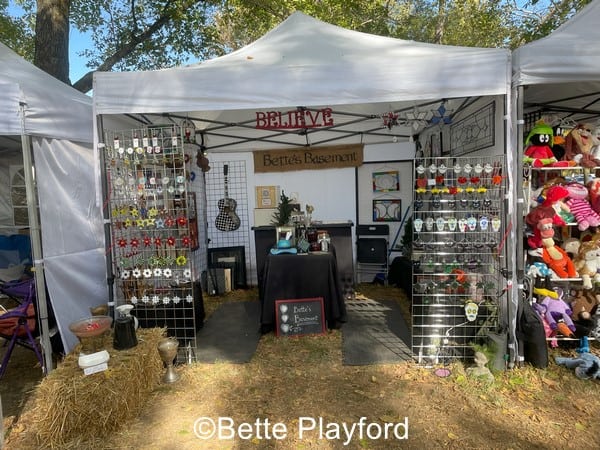
Setting Up Shop – Your Home Away From Home
Your booth is like your little storefront, so make it SHINE. Here’s a helpful list of what Bette brings to make her space stand out:
- A waterproof canopy with walls: This is a must for outdoor shows. It will save your bacon (and your glass) from unexpected showers.
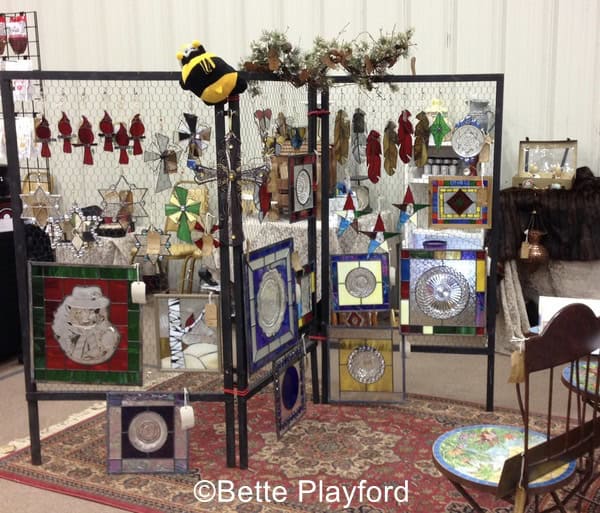
- Grid walls: These are Bette’s display workhorses. She managed to snag some from a Macy’s that was closing down, but you can find new ones online too. They’re great for hanging pieces of all sizes.
- DIY displays: Bette has a homemade screen made from chicken wire, and uses old fireplace screens too. Be creative – unique displays can be conversation starters.
- Hooks galore: Believe it or not, plain old paper clips make fantastic hooks for hanging smaller pieces. Cheap and effective.
- Tables and tablecloths: Bette uses a mix of sizes. A 2.5′ x 6′ table is great for larger pieces, and a couple of 2′ x 4′ tables work well for smaller items. Don’t forget nice tablecloths – they really polish up your look.
- Lighting: If you’re doing indoor shows or evening events, good lighting is crucial. It makes your glass sparkle and catch people’s eyes.
- Banner: Bette made her own with her business name on it. It hangs across her canopy frame and helps people remember her.
- Business cards: They might seem outdated but never underestimate the power of a good business card. Including a photo of one of your pieces is a good idea.
PRO MOVE
Have a trial run. Set up your booth at home before the show. It will be time well spent. It’ll help you work out any kinks and make sure you have everything you need.
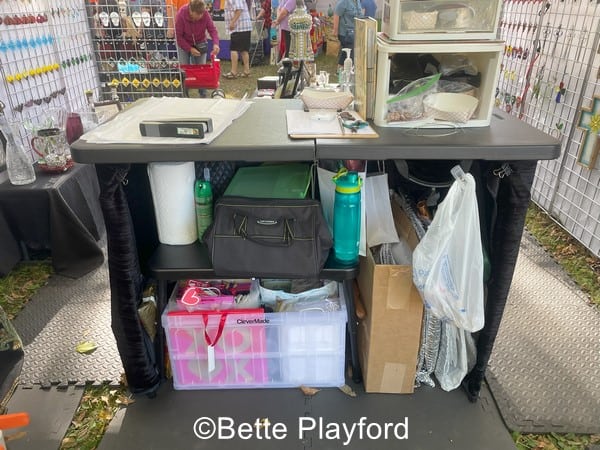
Staying Organised – The Key to Sanity
When you’re in the thick of a busy fair, being organised is a lifesaver. Here’s how Bette keeps everything together:
- Plastic drawers: Buy a small set for all those itty bitty things you always need – pens, tape, scissors, price tags, etc. Bette sits hers on top of a larger box that she uses to hide bulkier items. Keeps things tidy.
- Wrapping station: Leave a small space in your booth for wrapping purchases. It’s usually tucked away but easily accessible.
- Inventory list: This is crucial. Compile a sheet listing everything you’re selling and its price. It will help you keep track of what’s sold and makes totalling up at the end of the day much easier.
- Sales sheet: This is separate from your inventory. It keeps a running list of individual sales and prices. It’s a great double-check to make sure everything’s accounted for.
NEWBIE TIP
Make a packing checklist of everything you need for a show. Update it after each fair as you figure out what you really need (and what you can leave at home). Your future you will be so grateful when you’re packing at 5am for an early setup 😉
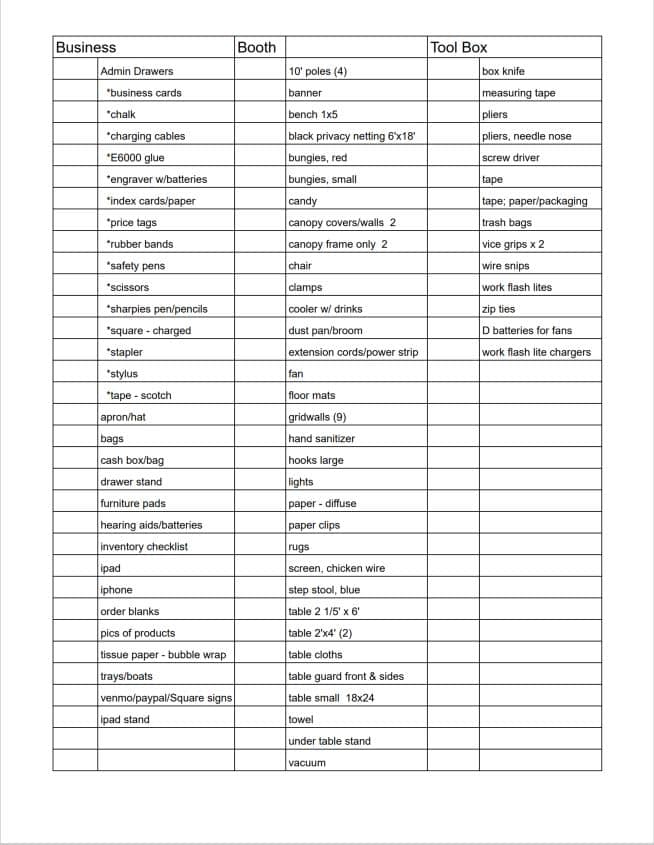
Left Column: Business
Admin Drawers*Business cards* Chalk* Charging cables* E6000 glue* Engraver w/batteries* Index cards/paper* Price tags* Rubber bands* Safety pens* Scissors* Sharpies* Square – charged* Stapler* Stylus* Tape – scotch* Apron/hat* Bags* Cash box/bag* Drawer stand* Furniture pads* Hearing aids/batteries* Inventory checklist* iPad* iPhone* Order blanks* Pics of products* Tissue paper – bubble wrap* Trays/boats* Venmo/PayPal/Square signs* iPad stand
Middle Column: Booth
10′ poles (4)* Banner* Bench 1×5* Black privacy netting 6’x18’* Bungies, red* Bungies, small* Candy* Canopy covers/walls* Canopy frame only* Chair* Clamps* Cooler w/ drinks* Dustpan/broom* Extension cords/power strip* Fan* Floor mats* Gridwalls (9)* Hand sanitizer* Hooks large* Lights* Paper – diffuse* Paper clips* Rugs* Screen, chicken wire* Step stool, blue* Table 2 1/5′ x 6’* Table 2’x4′ (2)* Table cloths* Table guard front & sides* Table small 18×24* Towel*Under table stand* Vacuum
Right Column: Tool Box
Box knife* Measuring tape* Pliers* Pliers, needle nose* Screw driver*Tape* Tape; paper/packaging* Trash bags (2)* Vice grips x 2* Wire snips* Work flash lites* D batteries for fans* Work flash lite hangers*Pen/pencils
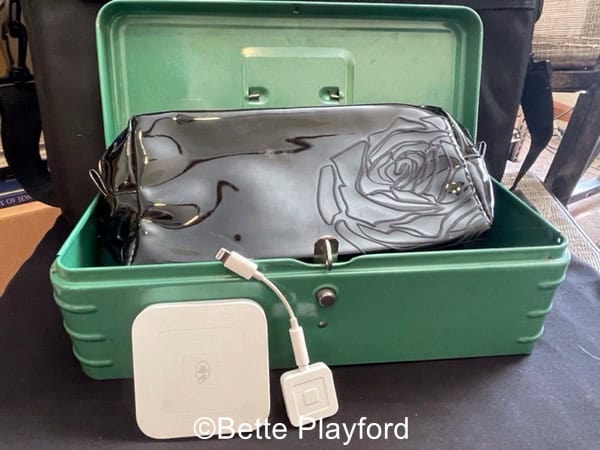
Taking Payments – Show Me the Money!
In this day and age, you’ve have to be flexible with payments. Here’s what Bette accepts:
- Cash: Still king at many craft fairs. Start the day with about $50 each in ones, fives, and tens for change.
- Cards: Bette uses Square, which lets her take credit card payments through her phone or tablet. There’s a small fee, but the extra sales are worth it.
- Venmo and PayPal: Great for those who prefer to pay digitally. Bette ingeniously has QR codes displayed so people can easily pay this way.
REMEMBER
- Put up a sign explaining any extra fees or taxes. Transparency is key where money is concerned.
- Make sure you have reliable internet access for digital payments. Bette uses her phone as a hotspot if the fair’s WiFi is spotty.
- Consider offering a small discount (like 5%) for cash payments to offset those card processing fees.
MONEY MATTERS
Keep careful records of all your sales, including the payment method. It’ll make your life much easier when tax time rolls around.
Wrapping It Up – The Final Touch
How you package your sold items can leave a lasting impression. Here’s Bette’s very professional approach:
- Bags: Keep a variety of sizes to hand. Top Tip – Bette once bought all the Valentine’s Day bags at Walmart when they were 90% off after the holiday. Great for year-round use.
- Tissue paper: Essential for protecting small, delicate pieces.
- Bubble wrap: For larger or more fragile items. Better safe than sorry.
- Business cards: Pop one in every bag. It’s an easy way to encourage repeat business.
- Care instructions: A little note on how to clean and care for stained glass goes a long way. Customers really appreciate it.
SMART MOVE
Your packaging is a chance to extend your brand. Consider using tissue paper in your brand colours or adding a ‘thank you’ sticker to each bag.

Finding Your Next Show – Always Be on the Lookout
To find potential venues:
- Chat with other vendors at fairs. They’re often a goldmine of information about upcoming events.
- Join online vendor groups. Facebook has tons of these, often specific to your local area.
- Follow craft fair organisers on social media. They usually post when applications open for their events.
- Ask your customers! They might know of events you haven’t heard about.
- Check with local chambers of commerce or tourism boards. They often have lists of upcoming events.
Final Words Of Wisdom
It’s important to recognise that selling your stained glass at craft fairs is as much about the experience as it is about the sales. Each fair is a chance to meet new people, get feedback on your work, and spread the word about your unique creations. Don’t get discouraged if your first few shows aren’t blockbusters – it takes time to find your groove and your ideal customer base.
So, there you have it – a glimpse into Bette’s extensive experience of selling stained glass at craft fairs. It might seem like there’s a lot to remember and do, but don’t worry. Take it one step at a time, and before you know it, you’ll be a craft fair pro. Good luck out there, and may all your pieces find happy homes.
You can find out more about Bette by searching for Bette’s Basement on FB. Thanks again for such a valuable set of pointers Bette. We all appreciate you 🙂


Wow and Thank you!!!!! Your insight and experience is invaluable.
So glad Bette was able to help you Pamela 🙂
Thanks for the awesome information and pictures Bette and thanks for putting it all together Milly! I got lots of inspiration and the ideas flowing now!
Great to hear Linda. Get thee down to your nearest Craft Fair now 😉
Although it’s many years since I sold my work at craft fairs, the one thing I wouldn’t be without as a square of carpet to stand on! Inside or out, if the floor is cold or hard it makes the world of difference.
Great addition Carole, thanks for posting.
I totally agree. I use the foam 2 foot square “puzzle” mats. They also hopefully help protect glass if it gets dropped. And they control mud and dust in outdoor booths.