Stained Glass Copper Foil Tips
Oxidised Copper Foil
Make Your Own Hand Foiler Here
When stained glass copper foil oxidises it’s difficult to solder. What is the best thing to do when this happens? You might be surprised to learn that this simple vinegar and salt trick can help you.
Try the following on your oxidised stained glass copper foil and see the magic for yourself:
- mix a quarter cup of white vinegar and a quarter teaspoon of table salt until the salt dissolves
- dip the pieces of foiled glass into the mixture and swirl it around for about 30 seconds
- rinse the pieces with water and dry them
- that’s it! They are now ready to solder together
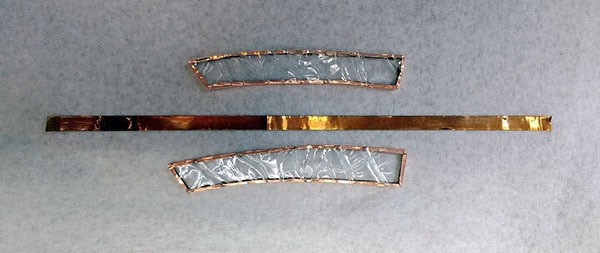
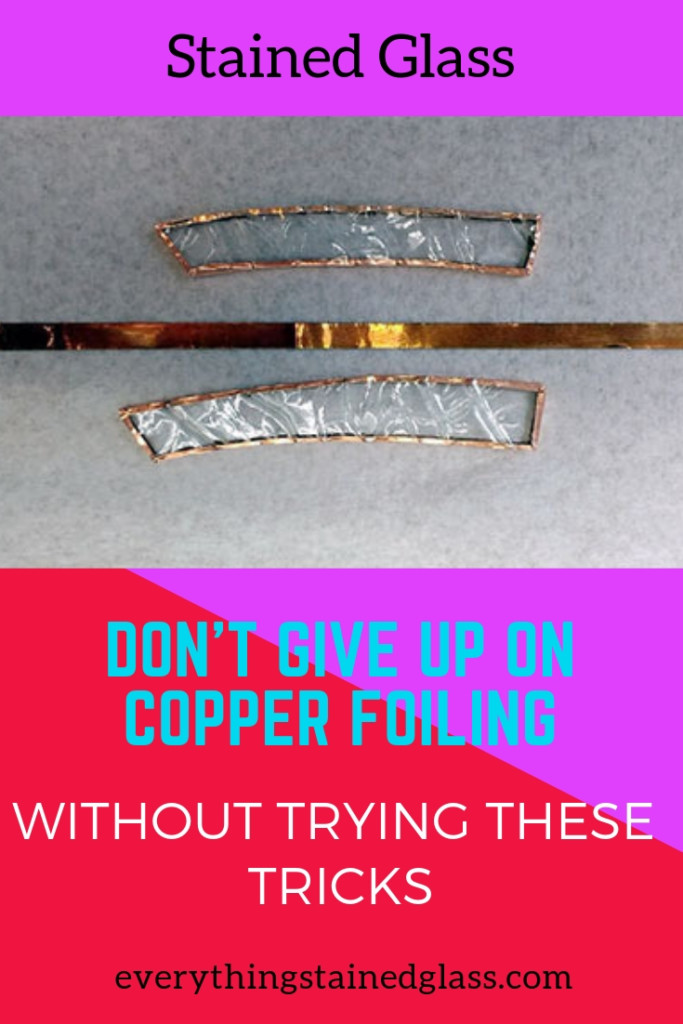
When Gail Koebke shared this with us she said ‘all the ugly oxidation was gone and I was left with bright shiny copper’. You can see this in the shiny shapes, above. She also added that, despite the foil being old, the above procedure didn’t stop it sticking.
If it works for old stained glass copper foil, it will work for new!
One note of caution; don’t get the vinegar/salt solution on any soldered work as it will turn it black. It might work as a black patina, though 😉
More Tips for Oxidised Stained Glass Copper Foil
- Keep the foiled pieces in a sealed bag – a zip loc or a plastic bag to prevent air getting to it.
- Mr Clean Magic Eraser has been recommended for cleaning foil. They’re cheap and don’t smell. Watch out though, they do shred easily.
- Use fine steel wool and rub the foil until it shines copper again. Use a mask and wear gloves, it’s horrid stuff and makes lots of fine particles.
Hoover or sweep up all those particles thoroughly before soldering – they get everywhere.
Patina Discolouring On Panels
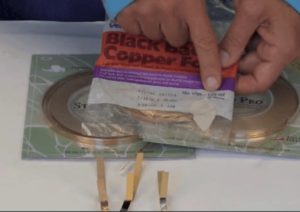 Question: When I wash my finished piece of stained glass, dry it, and apply the black patina and wash again, a month later, there appears a whitish stain, like the solder is leaking, when I rub this away or re-polish it, most of the stain goes away. How can I prevent this from happening?
Milly’s Reply:
There are a couple of options here. You can wash after soldering to neutralise the flux, scrubbing with a general purpose household soap (e.g. Dawn) with one of those green pan scrubbers until it froths up. Dry thoroughly with a paper or lint-free towel.
Or you can use Kwik Clean to clean off the flux. This is great for larger panels as you don’t have the problem of rinsing off.
Then use a polish to get rid of the invisible black dirt. Don’t ask me how, but it’s there! This can be done with either 1. a dedicated metal polish like Simichrome (paid link) which comes in a tube. You might’ve seen it recommended elsewhere for stained glass use.
Or 2. you can use a standard car polish. Either way, you need to buff it repeatedly until no more black comes off. At this point it should look beautifully silver. If you want the finished work to remain silver, you’ve almost finished. Just wax it to give it a layer of protection against further oxidation, and you’re done.
If you want copper or black patina, now’s the time to apply it. Make sure you dry it off the excess with a paper towel as some glass is liable to staining. Let the patina dry.
Then wax the panel as above, leaving the wax to dry for a few minutes before buffing up.
If you’re using lead came, you need to polish it as shown on my site here: Polishing
Make Your Own Hand Foiler
Here are some practical and thrifty solutions to the hours spent hand foiling.
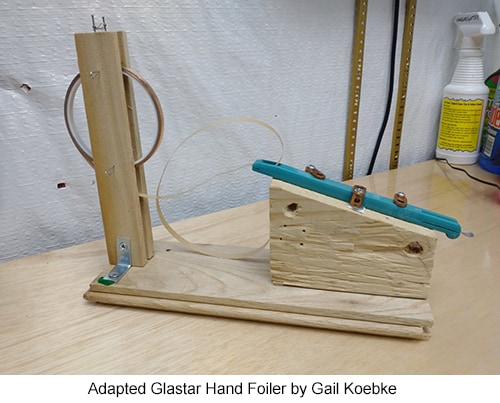
Gail Koebke made her stand from pieces of wood she found laying around the house.
The base is a piece of floor board.
The wedge-shaped wood that the Glastar foiler is attached to is scrap 2×4.
The 2 vertical pieces of wood holding the roll of foil between them are shims.
You also need 16 gauge wire, 2 L-brackets, 3 terminal lugs, 2 nails and a scrap of thinner wire.
How To Make It
- Attach the shims to the base with 2 small L-brackets
- Drill tiny holes in the shims just big enough for the wire
- Place and screw in the 3 terminal lugs to hold the foiler. If you can find them, clamps used to hold screens in a screen door work well.
- Bang 2 nails in the top and wind the wire to tighten the shims together after inserting the foil
This wire allows you to accommodate different widths of foil and stops it unravelling
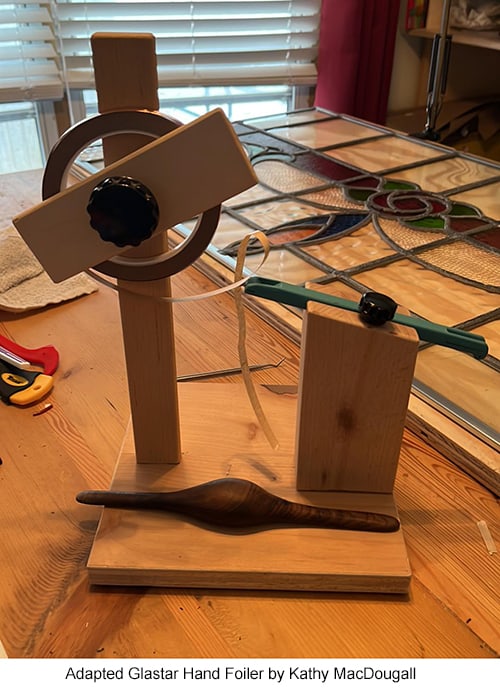
This idea can be adapted with materials you have on hand. Kathy MacDougall has come up with a similar version here:
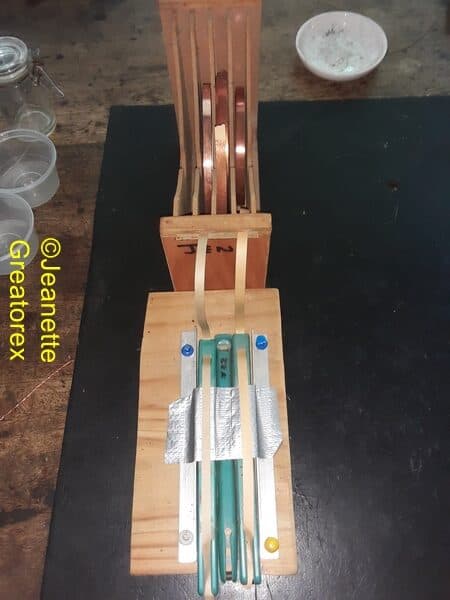
Jeanette Greatorex has come up with an alternative but related solution that accommodates the different widths of foil.
She bought the hand foilers in the different sizes – 3/16, 7/32, & 1/4″ – and secured them to a wood off cut with aluminium right angle strips 12mm wide:
It separates the foil from the backing and centres the foil.
And there you have it. It’s time to get a’foiling – speedily and accurately 🙂
Thanks Gail for your wonderful invention, to Kevin Palmer who gave you the original idea, and to Kathy and Jeanette.

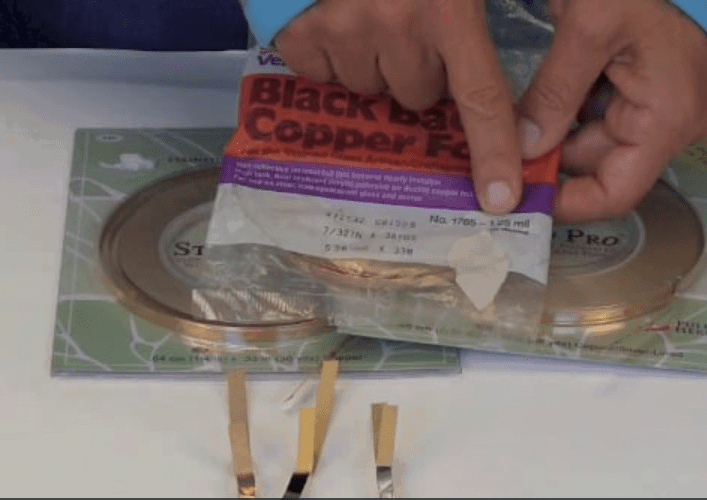
Hello from Montreal. Instead of leaving my foil just laying around, I empty a CD case, make a hole for dispensing foil, and place roll inside. The only limit is if your foil is too wide.
Great tip Judi, thanks for taking the time to share it with us 🙂
Great tip about CD cases! I’ve been frustrated for years with that gray stuff that appears after even waxing. I do find Milly’s info to be invaluable as I miss a lot of important advice in class.
I would like to pass on a few things that have worked for me.
1) I prefer Edco foil over other brands. You may not be able to mention brands, but just say that some brands may stick better than others. Try them all and see what works best.
2) I bought empty 1 gallon paint cans with lids at my local hardware store. I store my foil in the paint cans and seal airtight with the can lid as I would for paint. I have a can for each different size and backing. I write the date I receive the foil on the front of the package and rotate my oldest packages to the top when I add new foil to the cans.
3) I wash all of my pieces in Dawn dish soap and then dry them before foiling. The edges must be scrubbed. I use a non abrasive sponge. Make sure the edges are dry before foiling. Either leave on a clean dish towel until completely dry or use a hair dryer or heating pad to warm and speed up drying.
4) I use a wallpaper seam roller to burnish my foil after attaching it to the glass. The ones with wooden rollers are best if you can find them but plastic rollers work well also. For those tricky curves I use a large eraser or one on the end of a pencil for smaller, tight parts of a curve.
5) If the copper foil splits when foiling a curve, I have had some success “patching” the foil by overlaying a small piece of foil across the split. I can trim it with a hobby knife to the exact width on both sides of the glass if necessary.
6) Hands must be washed and clean at all times. Cutting oil and grinder oil have to be washed off all glass and hands before foiling. Absolutely no hand lotion, ever ,when working with glass.
7) When foiling and soldering , I have the foil or the solder roll dropped over a nail on my workbench so I can pull as much foil or solder while working and the rolls of foil or solder stay on the bench and do not drop onto the floor.
Now I have a question! What is “roll on adhesive” ? With the cost of glass supplies ever increasing perhaps this “roll on adhesive” can save us from wasting very expensive copper foil when it has lost some of its adhesiveness.
What a plethora of fantastic tips and tricks Sharon, thanks SO much for sharing them with everyone.
Now, can anyone help Sharon in return with the ‘roll on adhesive’? I’ve had no experience of it and don’t know what it is. Hopefully someone out there can help her?
Sharon
I use simple Elmer’s Craft Bond with my projects. I use it for my pattern pieces and it holds really well and its repositionable. I don’t know if it would work on your foil but I don’t see why not. I love the tips and a going to do a little test project and use some 20 year old foil I have. Let me know if it helps you. You can get it at Walmart or any Craft store.
Joey – Brandon Florida
I’ve been using a vacuum sealer that comes with various size bags. I suck all the air our and keep the bags in a drawer in the house.
Can you use water soluble aqua flux for copper foiled stained glass projects??
Yes you can Mandy. It’s a bit easier to clean off. It’s a matter of preference.
A good all around cleaning chemical is citirc acid. It acts by chelating the oxidisation. It does not introduce a corroding chemical. The process is as for vinegar – immerse until bright, rinse and leave until dry. It works well for old copper foiled pieces too.
https://glasstips.blogspot.com/2021/07/more-information-on-citric-acid.html
Thanks for this Stephen, a very good suggestion and a good linking article of yours.
These foiling solutions are good, but why re-invent the wheel? The Diegel Foiler is my favorite time-saver for foiling. It is basically the same as these DIY foilers but has rollers for all sizes of foil, is amazingly long lasting (I am still using my original from 1995) and doesn’t require replacing parts, although you can get them if need be. I mounted it on a heavy slab of wood and clamped it onto the table for stability.
Thanks for your valuable addition to the page Barney. It adds another option 🙂
Lots of people have tried a variety of foilers and they haven’t suited – including this one. It’s a very personal thing.
Another consideration is cost; this solution is far cheaper than the Diegel Foiler you mention.
Thank you Millie and Glass Community!
I have been working in Stained Glass for quite a few years
and recently found that I had a lot of foil wrapped nuggets that were oxidized.
I hav been painstakingly using 4/0 steel wool and taking time to clean each one.
I am going to use on of the methods mentioned in these “Don’t Give Up”
hints and expect that I will save a LOT of time!
Glass people are great with sharing!
Thank You ALL!!!
Paul S
Glad you found something of use Paul; I hope one of the tips works for you. Let us know 🙂
I agree, glassers are the best for not hoarding information.
Why are there different widths of copper foil?
To accommodate different thickness of glass, for added strength and for visual emphasis. The strength angle has to be used sparsely as you can make the window too heavy and unbalanced – and less strong as a result.
Good question Frank, thanks.
Milly
Thanks for all the great tips.
I have one to share that was shared to me by the owner of Salem stainedglass co.keep your foil in a baggie sealed and keep in the refrigerator I haven’t had any problems with my foil especially if there is high humidity in the area you are working in .
Thank you Milly you are a blessing to all.Dawn Land
Thank you Dawn, that’s very kind of you to pass on the tip for others 🙂
I add those silica jell packs to my bags containing rolls of foil to control humidity. Not much cost, they come in many new products.
Thanks for the tip Wayne, that’s a good one 🙂
I’m just getting started in stained glass after receiving grandma’s supplies. One problem I am having is with the foil. There were a number of different sizes of copper foil rolls in her stash but the adhesive appears to be gone. Is there any way to salvage them?
In a word Brenda, no 🙁 It’s best to throw them and start afresh. There’s nothing worse than foil coming off unbidden…
Don’t throw them out! Use them for copper overlays, super glue or E600 to front or back of glass depending on desired effect
Good thinking Jane, thanks for the reminder to use what we can rather than throwing things away.
What a great suggestion, thank you.
You can also use the foil that has no stick um left, for filling in any small spaces in seams before soldering your pieces together. Fold your foil with copper side out and slip between any seams that are too wide.
Or, use some folded up to fill gaps…we all get ‘em!
Beste Milly,
Ik lees met interesse steeds u website-tips.
Ik ben goudsmid en heb de volgende tip:
Stained Glass Copper Foil Tips for Oxidised Stained Glass Copper Foil
Problemen van oxidatie verhelpen
Een mix van vinegar en salt, is een etsmiddel!
Als het niet wordt geneutraliseerd, gaat de werking voor altijd (for ever) door.
Het metaal(indit geval koper) zal verpulveren, erkomen gaten in.
Etsmiddelen moet je altijd neutraliseren. Dat kan bijvoorbeeld met sodakorrels of amoniak(vloeistof). Amoniak is een vrij agressief middel voor de ademhaling. Dat stinkt erg met gevaarlijke damp.
Onze voorkeur heeft SODA.
Prettiger om te gebruiken is 1 literwater met een eetlepel sodakorrels. Goed roeren tot de soda is opgelost.
In deze oplossing moet het stuk messing/koper worden afgespoeld en daarna weer in schoonwater naspoelen en goed drogen.
Dan pas gaan solderen.
In flux zit ook altijd een etsmiddel!!! en moet ook worden geneutraliseerd.
Sorry, ik spreek slecht engels,
Vriendelijke groet, Lize
Thank you for the great tip, very helpful Lize!
Translation from Dutch (Google Translate) I am a goldsmith and have the following tip:
Stained Glass Copper Foil Tips for Oxidised Stained Glass Copper Foil
Fix problems of oxidation
A mix of vinegar and salt is an etchant!
If it is not neutralized, it will continue to work forever.
The metal (in this case copper) will pulverize and have holes.
You should always neutralize etchants. This can be done, for example, with soda grains or ammonia (liquid). Ammonia is a fairly aggressive respiratory agent. That stinks a lot with dangerous vapor.
Our preference is SODA.
More convenient to use is 1 liter of water with a tablespoon of soda granules. Stir well until the soda has dissolved.
In this solution, the brass / copper piece must be rinsed and then rinsed again in clean water and dried thoroughly.
Then start soldering.
Flux also always contains an etchant !!! and must also be neutralized.
Thank you for translating this tip, good advice.
You’re welcome, thanks Sandi.
I just did a large piece in the salt vinegar and rinse each piece in water afterwards. What will happen if I go ahead and solder?
They should be fine Vicki.
Thank you for mentioning soda! I started doing stained glass probably 35 years ago. The first pieces I made had the ugly white form after a few weeks. Made me mad so–being a chemist, my first thought was to neutralize that acid with the common baking soda on my baking shelf. Amazing! never had a problem since! I just make a paste with the soda and water, rub it on the piece and let it set for a few minutes, then rinse. Then continue cleaning and polishing. Its as cheap as it gets, and effective!!
So glad to hear I’m on the side of chemistry Cheryl. It’s a miracle substance 😉
Thanks for taking the time to share your experience.
I’ve heard of fixing glass phone fronts with a liquid from a dropper then remove excess with a razor blade. Have you heard of anything like this? I’m hoping to visibly removing a crack in a finished piece. 🥴
If you search ‘glass glue capilliary action’ you’ll come up with some glues that go into really small cracks Barbara. It’s the same technology they use for repairing car windscreens.
Can you help with this? I have been teaching grandchildren to make sun catchers. After soldering the foiled pieces, the silver is getting a frosty appearance? What is this and how can I get rid of it? Is this oxidation?
Yes it is Margy. This page on finishing will show you how to combat it with polish, patina and wax. I hope that helps. Good luck.
What wax do you use on copper foil?
Mothers Pure Carnauba Wax Sue 🙂
Cael garraffo
What is the best way to remove white oxidation from stained glass lamps
that were made years ago?
You can try mixing whiting with water and giving it a good scrub (being careful of the lovely lamp though!) Then polish and patina as normal.
We use this “trick” in my chemistry class all the time to “magically” polish pennies.
The science behind this is that the salt, NaCl, dissociates, and is then free to react with the weak acetic acid. This forms chloro-acetic acid which is stronger (but still weak) acid. Strong enough to reduce the copper and brighten it right up!
Good to have the science Doug, thanks 🙂
Hi, I am from Cape Town in South Africa. My word I can’t find a store that sell the foil strips and the liquid leading.
I am a beginner and want to do my kitchen cupboard with a few lines no major patterns.
I’ve found a supplier in SA Christina, they’re called ‘Falling Moon’. They’re not in Cape Town but I’m sure they’ll deliver or know someone in CT who can help you.
Christina, I live in Cape Town, Southern Suburbs and I go to Lead and Solder
6a Saxon Park
Glucose Way
Bellville South
Cape Town.
Hope you get what you need.
Adi
I have a project that has been in the making for 20 years. Most pieces have been foiled for a couple of years,. I’m now finishing it and almost ready to solder. My area is dusty. Do I need to wash each piece with your vinegar solution so the flux and solder stick? Im foiling the last few pieces with old foil. Its a big window so couldn’t do it all at once. Then we moved, …and more excuses. Will it all fall apart if I solder it now?
Life happens Nancy! Things can be retrieved. Try wiping it off with a damp cloth to start with to remove the dust, then do a test to see if it will take the solder. If it does, you’re away.
If not you need to do a bit more work to retrieve it, using the vinegar solution to freshen it up. Good luck. 2020 WILL be the year you get this done!
Thanks for this! Somehow I’ve never known you are supposed to solder soon after foiling. I also leave my foil out constantly. I guess Ive just gotten lucky, since nothing has oxidized. Regardless, I think I’ll bag it up now.
It’s definitely worth keeping in mind Mandy. Glad you’ve been lucky to date!
Hi, I was planning to re-purpose and old stained-glass lamp that had broken but have been my family for a very long time. I was planning to take the beautifully ornate molded leaves leaves and make them into individual Christmas ornaments for the family. The pieces heavily soldered and foiled. Is there an easy way to free the leave pieces?
That sounds a lovely lamp Letizia. If the leaves are at the edge you’re in for an easier time. If not, start at the edge and work your way towards them. I’m assuming it’s made of copper foil.
Before you start, cut an aluminium can into little strips with tin snips.
You need to clean the solder seams so that you can melt them easier. Using gravity by tipping the lamp, run along bits of the seam, scraping the solder off as you go.
When gaps appear in the seams, insert the strips of aluminium into them. Solder doesn’t stick to them so it helps with separating the pieces out. Keep going until you get to your leaf and remove it.
Re-solder around the edge – I have a video on how to solder beaded edges here.
I’d be very careful if it’s a precious family heirloom. I would start at an edge and if it was ruining everything I’d take it to someone who repairs stained glass rather than spoil it. Good luck!
Hi…I repaired a window…which is now with solder and lead….In front of the panel it soldered nicely…in the back of the panel…….the foil will not take the solder…….please help
Have you made sure that the foil is scrupulously clean? Have you tried the tips above that are about cleaning the foil? As always, test a small area first to check it works. Good luck Alexandra.
Hi there! I applied a copper patina to my stained glass, but it turned copper-y, but with a lot of black. Any way for me to make it actually look like copper.
Chelsey this is a can of worms LOL. As there are a lot of different variables – solder, flux, polish, patina, even water quality! etc, results are also variable. I have a page on patina here which might help you.
Not my top tip but Sharon’s – she emailed it to me so I thought I’d share it, Milly 🙂 I love the stock rotation idea!
A tip for storing foil that I have done for years.
Buy a 1 gallon paint can and lid at the hardware or home improvement store and put the unopened foil in the can and seal with the lid just as you would do with paint.
I bought cans for each type and size of foil and labeled the cans. The cans store easily and the foil is protected from the element.
If I add more foil to the cans I rotate the newest to the bottom and I always write the date I received the foil on the plastic wrapping.
Most of my work is done with 7/32 copper backed EDCO foil. I like the look of copper patina on my finished pieces.
Hi Milly,
I was told to use Odorless Mineral Sprits to bring the foiled glass pieces back to life. Just a little on a soft white cloth, rub softly as if I were polishing the piece, then with a clean dry soft cloth wipe clean.
It works!
What are your thoughts on using this product?
That’s an interesting comment Judith, thanks. I got into a mess once with mineral spirit, trying to clean a piece, and have avoided ever since. Perhaps I put too much on… if it works for you, then it works! I’ll give it another try – perhaps with less mineral spirit than last time.
Anyone else tried this? What did you find?
Thx from Canada!
You’re welcome, from the UK 😉
In your Blogs the words “polish” and “wax” are used. Polish you solder, patina and wax. Isn’t car polish and car wax the same?
Can you give me some suggestions of what you use, as polish and wax.
Thanks
Polish contains an abrasive element that is meant to clean metal. Hence using it before the patina; to get the solder scrupulously clean. Some people don’t do this, they wash, then patina, then wax. Wax is for buffing up at the end. If you put an abrasive polish on after patina it will remove the patina.
It is confusing Donna, for sure! I hope my explanation helps.
But is it the same product? Or is there one for polish and another for wax?
They’re different Debi. Polish for cleaning and taking the solder back so it’s ready for patina to colour it and wax to protect it.
I have seen you recommend this, and I want to try it… but then I read the polish has some wax in it too! I got Simichrome, which I saw you recommended. Would the wax that’s in the polish cause the patina not to work?? Thank you! 😊
The patina question is a complex one in truth Alison, as there are so many variables. If the Simichrome doesn’t work for you, then you can experiment with other polishes or try without polish. Some people recommend waxing before patina, then clean and a final wax after.
One day I’m going to gather up all the patina ‘recipes’ and compile them for people to try!
Thanks for the tip!
To save money I mix a cup of dish soap and 2 tablespoons of baking soda into a large jug then fill up with water then splash some into a dishpan filled with hot water scrub with brush and the pieces come out shinny bright every time. Rinse well and you’re ready to polish or patina.
Thanks for the tip Lynne, it’s a great idea, much appreciated by all. I love how everyone has their own methods, tried and tested in all these different studios across the world. It makes for a lovely thought 🙂
I have some copper foil that is about two years old and been In it’s package but I am wonder how to glue will work, haven’t tried it and I guess that would be my first step. Thanks for all your useful advice. I am away from my studio and can’t cut glass and am going thru withdrawals
You’re right Joan, the glue is the important thing. Test it and see. It should be fine if it has been stored in an airtight package but you never can be sure unless you test.
Get back to your studio at once! You obviously need stained glass 😉
I have an unused roll of copper foil that oxidized. Should I go ahead and use it then do the vinegar/salt dip?
Yes, try it! As long as the back is still sticky it should be okay. You might want to test on a small piece first – I’m a great believer in testing.
After foiling a large panel if I’m not going to solder for a bit I cover it with a saran-type wrap until I get back to the piece. The wrap keeps the foil from oxidizing and the back of the piece is already protected as it lays on the workbench.
Oh thanks for writing that tip Brandy. Funnily enough I’ve just answered an email asking that same question about a large panel… and I answered the same as you 🙂 Saves me adding it to the page, thanks.
I was searching for this solution. I’m working on a large piece and there’s no way I can get everything foiled and soldered in a short amount of time. Do you think the back of the panel is protected enough if I’m working on plywood?
You can use saran wrap (cling film) if you’re having to leave a large panel for a long time Debbie. Glad you found the copper foiling answers helpful.
I had a problem with the last piece I did with copper foil. I was very careful to make sure the edges of my glass were clean and dry before applying the foil and made sure to use my fids on all edges. But when I tinned the edges the foil peeled off the glass. What did I do wrong? How could I fix it?
How annoying! Were you taking a while over the tinning? The foil will peel off if you stay too long in one area. The other thing you can do is to do beaded edges instead. They’re stronger as the solder ‘clings’ to the edge of the glass and helps hold it on. You can see my soldering beaded edges video here.
What’s the difference between wax and polish?
I answer this exact question under the sub-heading “Exposing The Polish and Wax Myth” on my patina and polishing page Ken.
Very good question, thanks!