How to Solder Stained Glass Beaded Edges
Learning how to do stained glass means getting to grips with learning how to solder stained glass beaded edges. You don’t want to let untidy finishing spoil your beautiful glasswork.
Before you start with the beaded edges, not many people know that keeping your iron in peak condition actually makes soldering edges easier – and better 🙂
My Soldering Iron Maintenance Blueprint mini $14 course covers everything to keep your iron tip performing well AND gives you some extra crucial soldering tips that aren’t often addressed.
This stained glass video and tutorial shows you how to solder a lovely rounded edge for your sun catcher.
Soldering stained glass beaded edges is a little bit more difficult than the interior seams as there are three surfaces to deal with instead of just the one, and one of them is vertical!
Stained Glass Soldering Secret
The secret is simple and it concerns speed and heat.
It’s a question of using the heat of the soldering iron in conjunction with the speed that you move the iron tip.
Too hot with the iron or too slow with the tip and the solder will drip. Too low with the iron and too fast with the tip and you won’t melt anything!
Practise using the iron tip in different ways to master the speed/heat equation. Try using just the corner of the tip for the least amount of heat, try using it flat for the hottest option and using it vertically for the middle ground. You’ll soon get the hang of it.
What You Need To Solder Stained Glass
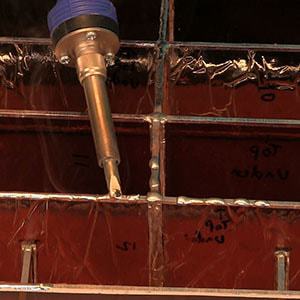
- Flux *
- 60/40 Solder *
- Soldering Iron * and Soldering Iron Stand *
- Wet sponge for cleaning tip, Q-tips or cheap brush to apply the flux and heat resistant gloves.
- Bricks or similar to hold your glass vertical (Optional)
*Just so’s you know, if you click and buy through the link within 24 hrs I get a small % from Amazon, (not you!). Thanks in advance but no worries if you have a local store – I’d always support them first 🙂
Solder Stained Glass Beaded Edges
1. Tinning the Front and Back Edges
“Tinning” means merely covering the copper foil with a thin coating of solder. Can you see from the diagram at the top of the page that a tinned edge is flatter, less pleasing and weaker than a beaded edge?
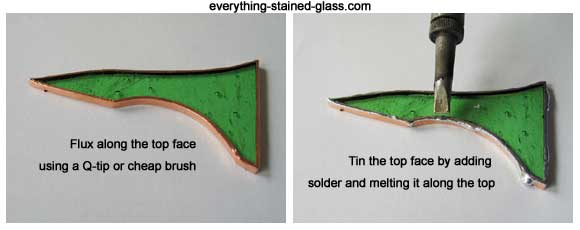
- Paint the liquid flux over the edge with the Q-tip. Be fairly generous with it; too little flux will stop the solder sticking
- Tin the top face of your edge
- To do this simply add a few blobs of solder to the foil and melt it along the top edge with the soldering iron
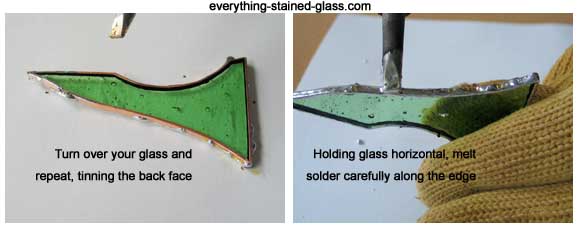
- Turn your piece over and do the same to the back face.
- Don’t worry about the solder spilling over the sides, you’ll use that in a minute.
Why Tin the Edges First?
Are you wondering why you are tinning the edge first if you are going to do a beaded edge? It’s a good question.
It’s a bit like preparing the soil with nutrients before planting a shrub. The tinned top and back face of your piece provide the perfect ‘ground’ for a beaded edge. The stained glass solder finds its way over the tinned foil and rounds off a treat.
If you don’t tin the edge first you get a lumpy and irregular edge. And we don’t want that!
2. What is a Beaded Edge and Why is it Better?
Beading means creating a lovely smooth, rounded edge with the solder. If it’s internal solder seams you’re looking for you can read how to create smooth solder seams here.
A solder stained glass beaded edge is much stronger than a tinned edge because the solder ‘clings’ to the sides of the glass rather than just being held by the copper foil glue.
Sticky Glue Problems
This glue is only there to hold the foil in place before and during soldering. The heat of the soldering iron melts this glue during the soldering process and the solder replaces it as the ‘glue’ that keeps your stained glass piece together.
There’s a short video on using the heat of the iron to get good results here.
Have you noticed that sticky residue when you’re soldering? It doesn’t happen all the time but when it does it’s a result of the glue melting and coming away from the foil during soldering. It normally happens if you have been reworking the same area repeatedly. Try to avoid this if you can. It helps to let an area cool before reworking.
3. Solder Stained Glass – Beading the Edge
The secret with edges is to keep moving your stained glass so that the area you’re working on stays as flat as possible. This stops the solder running off or flattening out.
- Put your heat resistant glove on, or prop your stained glass up between two bricks
- Join the blobs that are already on the edge by heating them with the iron
- Move slowly along, holding and lifting, making sure that the solder is rounded as you go
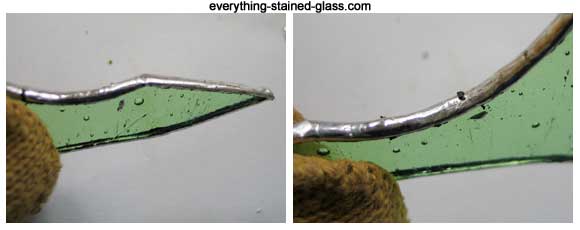
- Adjust the sun catcher as you go so that the piece you’re working on stays horizontal
- If you need to add more solder, put it on the tip of the iron and add it to the edge
- You can get rid of excess solder by ‘flicking’ it off sharply. Be careful though, it will burn where it lands!
You can always practice on small scrap pieces of foiled stained glass before you start ‘for real’. By the end you will have a neat rounded edge and sides.
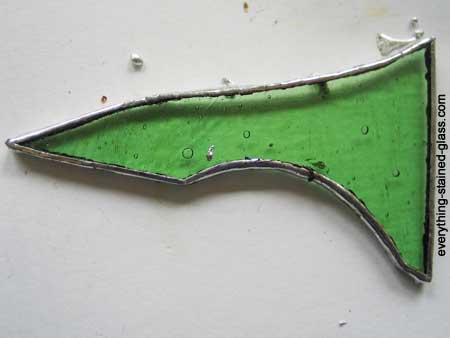
Finishing Off
Wipe the flux off with a damp towel. Don’t worry too much about making it perfectly clean if you’re going to add jump rings. If you’re leaving your solder for more than a few days clean it thoroughly and put it in an airtight bag as it helps prevent oxidation.
Solder Stained Glass – Helpful Resources
This guy Karal is a genius. The whole how to do stained glass video is 13 minutes and I’d highly recommend watching it all. If you haven’t got time, go straight to 7mins 25 secs and the soldering edges sequence lasts one minute.
Great idea to bend the solder up like that and take a little bit from the top. Inspirational all round!
How to solder stained glass beaded edges, very skilfully!
Now you know how to solder stained glass beaded edges you’re ready for the next step, Attaching A Jump Ring.
Return to the Everything Stained Glass Home Page.

Once I start the soldering process on my window, must I complete all of the soldering the same day? If so, why?
Do I solder one side, then flip the window and solder the opposite side? Or alternate back and forth?
Thanks.
No you don’t have to complete it on the same day. It’s best to clean the flux off if you’re leaving it overnight. If you’re leaving it longer I’d recommend covering too – a bag if small or cling film/saran wrap if large.
All of this cleaning and covering is an attempt to slow oxidation. If it oxidises, you then have more work to do to get rid of it before recommencing soldering.
I hope that answers your good questions John.
I am 82 and have “professionally” done stained glass (mostly foil windows) and some u some suncatchers. I work part time now, never got rich, but enough to pay the bills. I love, love, love stained glass and still get mail orders. I found your site, and loved the video’s. i use thin examination gloves like doctors have, they do keep the flux from damaging my hands, now I will try and get some garden gloves to keep the heat away and bits of solder. Thank you for the informative and patient way you talk to us in solving a problem. Never to old to learn, or remember if fuzzy.
Thank you too Connie, for sharing your experience with us. We’re all learning from each other all the time – the best way 🙂
Does beading a seam make it stronger or will a flat solder line be enough to hold it together?
Good question Cynia. Yes, beaded seams keep the foil on more securely because the solder ‘hugs’ the edge of the glass. Tinned edges sometimes peel off when the foil glue melts.
Hi Milly,
Cheers for the soldering tutorial. Have just received the glass today. Very excited to get to it. I have a few questions. what is the work block you solder on. What temp do you set the solder iron. What are the brand of gloves you are using?
Thanks again, your knowledge is priceless.
I’m soldering on a scrap of granite kitchen top. There are more board ideas here: https://everythingstainedglass.com/stained-glass-soldering-boards . Temperature; 360-410 or higher, depending on project and mood! See temperature discussion here: https://everythingstainedglass.com/hakko-fx-601temperature-question. The gloves are gardening gloves. Not heatproof but fine for solder drips.
Good luck with your project Greg.
And when soldering an edge (what I do differently) is when I tin each side, I load up the solder (keep the solder on the iron as I tin, just like running a bead on a joint) and the solder drops down the sides (edge) so I actually skip the dropping of solder balls when beading the edge as I have plenty of solder on the edge from tinning. Then I just flux the edge and I just tap as I go down the edge and the solder runs smoothly. Of course keep your edges horizontal. On curves, I just pause a couple seconds before moving to the next section so it sets up enough not to run. Occasionally I need to add a little solder but rarely.
It goes much faster as I skip the entire step of dropping solder balls on the edge after tinning.
Like Milly, I wear a heavy glove on my left hand to protect it from hot solder dropping (I use rubberized gardening gloves)
Thanks for your suggestions Pamela, I appreciate you taking the time to share them with others 🙂
Very nice informative, so nicely shown.
Thank you.
You’re most welcome Juzar 🙂
Again thanks for the solder class. I don’t remember being told to tin the whole piece first. I think that is what you are saying. I will try that next.
My problem seems to be when I foil. I have to look up your class on foiling as I think that is my week point,
Thanks again,
Lynn Bertaut
I’ve found that when you’re doing a beaded edge, if you tin the edges first it allows the solder to find it’s path over the edge more easily. You might not need to do that but try both and see which you prefer.
what kind of heat resistant gloves do you recommend
These are gardeners’ gloves Martha. They’re not heat resistant but they do prevent those solder drips… ouch!
I undertake very large lamp projects. I finished the Odyssey 18″ Wisteria…..but it took me almost 2 years. Something like 1900+ pieces. By the time I finished the outside, then inside…..when I went back to bead the outside….the solder had started to oxidize/tarnish. I had to back over all of the rough solder joints with a dremel/wire brush to remove the surface oxidation so that the solder for bead would flow nicely. Should I stick with that technique or maybe use a product like Kwik-Clean with a regular bristle brush to prepare the surface? Any other suggestions? Thanks
Oh how frustrating Dave! Either technique will work. Kwik Clean is very good but you still need to get the oxidisation off first. Good luck, it’ll look amazing once it’s done.
Good morning. I am new to stained glass and have made two(pretty shabby) sun catchers. My question is on soldering tip width. I got a Weller crafting soldering iron and the tip seems really wide. And I feel like my soldering beads are wide because of it. Does the width matter? Thanks!
The smaller tip is a better bet for a beginner as there is less heat allows you to go slower – often giving a beginner much needed time.
It’s good to match your project with the size of tip. A delicate fiddly one calls for a smaller tip.
Just remember that the larger the tip the more heat so the faster you need to go. It’s more difficult for a beginner to manipulate a larger tip as it melts the solder more quickly.
I hope that helps Chris.
All your tips are great you have helped me a lot thanks very much.
Great Colin 🙂 Thanks.
So appreciative of your amazing newsletters and tutorials! You are so generous with your time! Thank you!
You’re most welcome Andrea, I’m glad you find them helpful.
Anyone else, if you’d like to receive my stained glass newsletter can sign up on this page here.
Fill out the form and click the confirm button in the email that follows.
Hello Milly,
George here, I am slowly coming together with this learning process, unfortunately it is not the only project going on. I have most of the tools, and everything is cluttered into my workspace.
Concerning soldering, I have a question. I havent been able to see much hand made stained glass to understand this and not seen discussed.
On say some thing you are going to put into a window, whether as you call it, tinned or bead, is there generally only one side that is paid attention to? Perhaps in a window piece and I choose to bead solder, does one only care about the side that will be facing the interior, or do you finish one side of a flat plane, then turn it over and attempt another decorative bead on the outside face.
I did not see the old art piece photo you talked about here and probably wouldnt see both sides anyway. But is there a pre determined good side you focus on, or would you work just as hard on both sides of a pane then decide which side will get the interior view and the other out.
Hope that makes sense, gp
You know which side is which from the beginning George. Treat both sides the same. If you only did a flat bead on the outside/back the stained glass panel wouldn’t be so secure. Someone will see it from the back, too! You want it to look nice from every angle.
Also, the texture of the glass is normally on the front as it adds a lot to the window. So you need to know before you start cutting glass which is the front and which is the back.
Great question George, thanks.
I was delighted to read your comment about foil sticking to smooth glass better than it does to glass that has been ground. This is exactly the results I have experienced. I get so excited when a piece of glass is cut and breaks so perfectly that I don’t need to grind it!!!! I’m constantly reading posts on different stained glass blogs that grinding makes the foil stick better. I simply don’t believe it.
Thanks for sharing your wealth of knowledge with us.
To grind or not to grind glass is something that divides stained glassers. Obviously you have to make the edges safe but that can be done quickly with a scythe stone rather than taking ages on a grinder. It’s nice when my experience resonates with others 🙂
Thank you! I was really struggling with my edges coming loose. I can see now that I was getting too much heat on the pieces. I’m looking forward to trying this method. I really enjoy getting your emails!
Thanks Deedee; I hope it has worked on your stained glass piece.
I was wondering if it is wrong to solder together sections of a large piece before the entire piece is cut out and laid in place?
No, lots of people I know work this way, effectively using the multi-soldered piece as one piece of glass when they finally solder it together.
I usually cut all, grind all (if necessary), foil all and solder all but if I have a fiendishly complex panel I might solder the complex bit together first to stop it shifting and moving about. Whichever suits you or a particular project.
Good question Carol, thanks.
This was very useful, thank you. I have a question though how do you strengthen a lager stained glass peice around the edges, can you use something, more than just beading the edge?
Yes, you can solder copper wire around the perimeter of your piece. It helps gives a bit more strength. Thanks for your question Stewannie.
I found this video really helpful for the small boxes I am making. My edge beads have improved a lot since watching it. I am still seeing a problem with the beaded foil lifting away from the glass in places. It doesn’t happen with seams, just edges. I am using 7/32″ foil. Maybe it needs to be wider? Is there a trick to making the foil stick better? I do burnish well. I only seem to notice the problem after adding patina.
Any advice?
Try adding patina with a Q-tip and using Kwik Clean on it rather than washing. And be careful how you dry and buff it up. The wider the foil the more it will ‘grip’ the edge so 1/4″ will help too.
Glad the video helped.
I made a bow to attach to the tail of a stained glass kite I made. I framed the kite to give it strength and used a wire for the tail and created a bow out of three pieces and then attached that to the wire. The problem I have making small, free standing glass pieces is that they break easily. One side of the bow came off, foil, solder and all, from the other pieces. I think it had been bent when moving. I had similar issuings when making a multi-demention star. How do I add stability to pieces like this so that they are so fragile and come apart?
The design is crucial for stained glass Rachel. If you have ‘hinge points’ – solder lines that go straight from one edge to the other with no supporting pieces – then it is inevitably weak and will likely break eventually.
You can solder wire all around the perimeter to help – although that might be difficult with the shape I’m imagining your kite is – but your best bet is to think ahead and avoid hinge points.
Thank you for the advice. The kite turned out really cute, the bow is a trouble maker though. I’ll have to do some redesign, thanks for the tips:)
You’re welcome Rachel. This is how we progress 🙂
It’s been a long time since high school art class, I’d forgotten all about hinge points!
Thanks for sharing, always pick up new stuff for each person has their own technique that can be improved
That’s very nice to hear Joan, thanks. I found the same thing; it’s a case of mix and matching everyone’s ideas with your own and coming up with a solution that works for your stained glass.
Your video is very helpful, but I do have a couple of questions.
1- what kind of glove do you have on and where did you get it?
2- I have the same type iron that you were using, what temperature was your iron set on?
Thank you for your time
The glove was an ordinary gardening glove. Gives a bit of protection but not heat-proof.
The temperature was set at 410, although you can do this at 360 if you go slower. Soldering is a balance between time and heat, so adjust heat according to the time you take to do a particular task
Thanks for your good questions Mike, I hope my answers helped.
This is by far one of the most helpful instructional videos out there. It took a little practice, but this method really works and makes for more attractive suncatchers! Thanks for sharing your knowledge and tips with us!
That’s really great to know Steve. Thanks for taking the time to comment and I’m glad it has improved your stained glass edges 🙂
Your video is simple, instructional, pleasing and awesome. Most videos, while aimed at the same end result, are annoying, slow or too fast, noisy, endless chatter……thank you for a calm. Quiet, very pleasant video to watch.
Thanks for the pointers. Im working on soldering a better bead.
That’s such a lovely comment Teri, thanks so much. You have picked up on all the things I aim for when making stained glass videos, so that’s great to know. Good luck with your beading 🙂
Thank you Millie for the “How To Solder Stained Glass Beaded Edges” I have been working on a panel that I have incorporated a glass plate in the center. I’m getting closer to start soldering and this little course you just posted was a great brush-up for me. Thanks for all the tips and videos! I’ll post pics when I get done with the panel ~Pam Jette
Very happy that you found the information useful Pam. I’d love to see your finished piece and I’m sure others would too. Thanks!