Stained glass soldering temperature is something I get asked about a LOT. Here are answers to common questions.
Stained Glass Soldering Temperature Questions
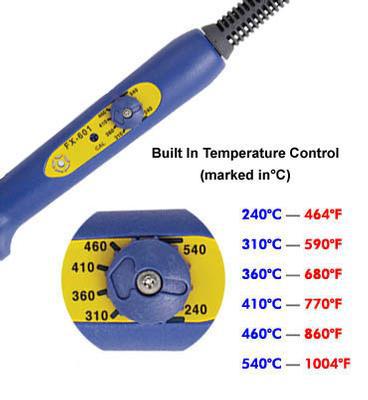
Temperatures For The Hakko FX-601
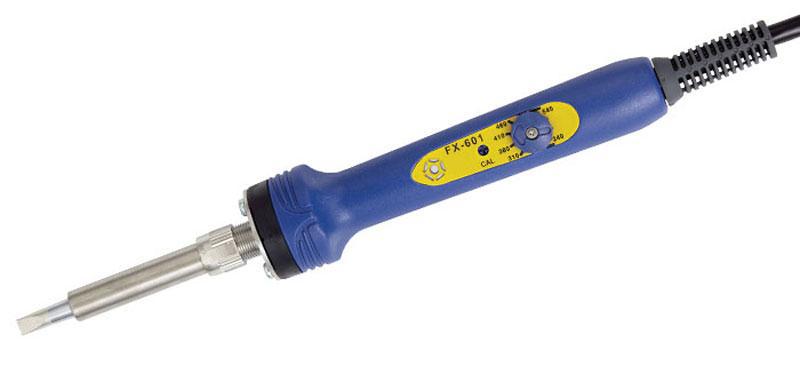
The temperature you need for soldering a bead with the Hakko FX-601 is normally between 360C and 410C (680-770F).
I say ‘normally‘ as it depends on a couple of factors including tip size, solder type and how quickly you move the iron along the seam. Those who are quicker have their stained glass soldering temperature set at 410C but if you solder more slowly you need to reduce the temperature to 360C.
360C is a good temperature for starters as it gives you more time.
The iron’s ability to maintain a constant temperature is crucial to good soldering.
The easiest thing you can do to improve your soldering is to keep your iron in peak condition.
My Soldering Iron Maintenance Blueprint mini-class outlines all the things you need to do to boost your iron’s performance – and your soldering! It costs just $14 – has to be worth it 🙂
How Tip Size Affects Stained Glass Soldering Temperature
Some say the size of the iron tip is more important than either the wattage or the temperature. My feeling is that they work in tandem and all feed into the optimum soldering experience. The most important thing is consistent temperatures and no cold spots.
The Hakko FX-601 comes with a small tip – 3/16″ – which is good for decorative soldering and delicate operations but not so good for running a bead. I’d suggest buying 1/4″ and 3/8″ for more control over your beaded seams.
Hakko Soldering iron Tips Amazon (paid link)
You don’t have to worry that the larger tip will cause your solder to spill over. It sounds obvious but the width of the bead depends on the outer edges of the foil joint. The solder is not going spread out onto the glass if you use a wider tip.
How To Use The Iron Tip To Control The Temperature
The front edge of the tip is the coolest area, next is the side edge, the hottest area is the flat sides. You can control the melting solder by how high off the work you keep the iron.
If you want more heat change the angle of the iron tip – hold it flatter so that more of the iron tip is exposed to the solder. Do the reverse for a cooler iron, hold the tip more vertical (giving less of the iron tip to heat the solder) and the process will slow down. When you get super quick and confident you can turn the temperature up. You just have to move faster!
You’ll find the optimum temperature for YOU by experimenting. It will depend on your soldering speed and what you’re actually doing with the solder.
What Stained Glass Soldering Temperature To Use For Different Tasks
Don’t expect to set the heat dial and forget about it. Your soldering iron temperature needs to be tweaked in response to the job in hand. You’ll learn by experience what works for you but here are a few pointers:
Set the temperature hotter (410C or even above) for these type of stained glass tasks:
Embedding wire, soldering brass rods into a lampshade, removing excess solder off a vase cap. Just remember to turn it down again afterwards otherwise melting of lead came could happen!
If the solder isn’t flowing and you’re not achieving a nice bead then try turning the iron up. I’d practice on some foiled pieces of scrap first if you’re inexperienced.
Set the iron temperature lower (360-310C) for the following:
Decorative soldering and soldering lead came, free-form solder art.
Temperatures To Use For Different Solder Types
50/50 can be heated to a higher temperature than 60/40 solder.
Lead-free solder doesn’t flow as nicely as 60/40 or 50/50. It reacts more like 50/50 and takes a lot of heat to make it flow nicely. When running a bead it’s better to work slowly, allowing the solder to heat up a little more. With practice and patience you can run a very nice solder bead with lead-free solder.
Heat And Soldering Irons
You can see from the above pointers that there are various factors feeding into the stained glass soldering temperature question! Soldering irons are the final factor.
The good thing about the Hakko FX-601 is that the wide range of temperatures it offers means that it can be used for all sorts, from electronics to stained glass repairs.
Weller irons achieve temperature control via a magnet in the (replaceable) tip which switches the iron on and off at the preset temperature. Two preset temperatures are available but you need to swap out the tip to change the temperature. These pertain to the number at the end of the tip – 7 = 700F, 8 = 800F.
Hakko uses modern electronics to provide an adjustable temperature. This is very useful as it can be easily adjusted it to suit the type of work you’re doing (copper-foil or lead) and the particular application.
The important thing to remember is that one temperature doesn’t work for all scenarios. I frequently adjust the stained glass soldering temperature as I work. The way it “feels” is more important than the actual temperature.

More information and a review on the Hakko soldering iron
Just got a Hakko 601 iron. What holder fits this best to hold it securely without tipping over?
Love all your tips!
I’ve got a Weller iron stand Maggie – and love it. Very sturdy. I hope that helps.
Great insights on soldering temperatures! I’ve often struggled with finding the right balance, so your tips on how different temperatures affect the flow and adhesion of the solder were really helpful. Thanks for clarifying the common misconceptions!
That’s great to know, glad it was of help.
Aloha Milly.
Thanks so much. I had a couple of aha moments reading this today. Absolutely invaluable. Im sure my soldering will improve because of it.
Music to my deaf ears Meg, thanks 🙂
Milly,
I did stained glass for 30+ years and then gave it up. But I recently started again. I have and old Inland soldering iron with built in temp control much like the Hakko FX-601 Soldering Iron, however I see it is no longer available but wondering if you know what replacement tips would fit it.
Thanks for any help!
BTW, so glad I found your site as it is helping me get back into creating stained glass pieces.
Franklin Art Glass sells Inland tips, hopefully they’ll be able to tell you if they’re right for your iron. You can find them here: https://www.franklinartglass.com/product/316-tip-for-inland-100-watt-standard-deluxe-irons/
Great that you’re back Maggie, and glad to be of help 🙂
I have lots of 50/50 solder I need to use up. Someone said I should use an 800 degree tip on my Weller iron. Is this correct?
A #8 tip (800F) will melt the solder – and the lead came – more quickly than a #7 (700F). If you’re a more experienced stained glasser you’ll be able to solder more quickly and will therefore be fine with a 800 tip.
It’s fine to use an 800 or 700 tip with either 60/40 or 50/50 solder.
I hope this helps 🙂
Milly, each Christmas I make an ornament from the nativity for the children in church. I have been wrapping with hobby came. This year will be an angel. I wish to wrap her in wire. My previous wire wrapping projects have turned out ugly and horrible. Where is the wire placed … middle? edge of foil?? Am I using too large of wire? Why is mine so awful? I have no problem soldering, just make a messy mess when I try to wire wrap. I am doing something horribly wrong. Help, please! Didn’t see a tutorial, unless I missed it, somehow.
I’m not such a fan of wrapping in wire as the benefits are minimal in terms of strengthening. I would prefer hobby came but that’s a personal thing.
The gauge – 16 or 18 – in the middle of the foil and if you tack solder in strategic places and then move around using this beaded edge seam video instructions it should work: https://everythingstainedglass.com/how-to-do-stained-glass
Good luck Laura 🙂
Good morning Milly ..I live in NY and my soldering iron has numbers on it 1 -9 . I usually keep my on 7 would you know what F temperature that could be ..Love your hints and instructions ..thanks so much Margaret
Without seeing your iron I would guess 700F – a good steady temperature for careful (as opposed to speedy!) soldering speed.
Glad you find my tips helpful, thanks.
I renewed my hobby after several years and found that I have lost much of my skills. My old Mika Studio Line 100w iron is part of the problem. So, I just received my new Hakka FX 601 -02 and am excited to use. It seems to be quite popular.
The directions say to flood the tip with solder when you first start it. Exactly, what does that mean?
The Hakko will help I’m sure John.
Flooding the tip means heating the iron – I’d suggest 360 or less – and melting solder over the whole tip before using. It protects the metal coating. I have a mini-course on soldering iron maintenance here if you’d like to have a look. It’ll help you keep your iron in peak condition from the start: https://www.everything-stained-glass-school.com/p/iron-maintenance
I hope you love the iron.
Milly, When you say heat to 360 or less above, do you mean Celsius? I had the same question as John and found this Q/A helpful! Thanks!
Yes, Celsius. I should qualify in the article, thanks for pointing that out.
Not sure of the dates of the earlier posts, but the Hakko 601 is readily available in the uk – I got mine from Pearsons Glass and it came (not a pun) with 1/4″ tip, not a 3/16″ one as described by Milly. Just got it today (November 2022), so maybe I need to do a bit of experimenting with the temperature control.
Thanks for this Gordon. Good to know the about the tip sizes; it varies depending on who you’re buying it from. Have fun with the different temperatures, you can really adapt it to your needs for each project.
Hi Milly, love your tips page! I used Weller100 for decades before finding the Hakko. I still use both but my Hakko is my go to. My suggestion is this: everyone does, or should, wet their sponge prior to soldering. I always use distilled water for this as all the impurities are filtered out. Makes for a much longer tip life!
Yes, distilled water is a great idea Mark, thank you for suggesting it for everyone 🙂
Why do certain parts of my solder look dusty and not shiny?
It all comes out in the clean up and polish at the end, Lisa. You can see the process here: https://everythingstainedglass.com/stained-glass-tutorial
I have recently been making stained glass Ukranian flags for friends and family using my new Hakko 601 set a higher temperature then you suggested. Several of them have developed cracks. I intend to lower the temp as you suggest. Not sure that was the cause, but it did happen with two different types of glass. I appreciate your advise!
Those Hakkos do get up a head of steam John! If you up the temperature you have to increase the speed of soldering otherwise you do risk cracking the glass. Thanks for the warning – very helpful for everyone to read.
Milly. My copper foiling sometimes it leaves a white powder on the edges. How can I get rid of it
This is a finishing question Robert. A couple of coats of wax at the end helps with this – you can read about polish and patina here: https://everythingstainedglass.com/stained-glass-tutorial
Can’t seem to find that soldering iron in the uk
You have to import it from the US at the moment Jane, and use a step-down transformer to cope with the different voltage. I am waiting on a guy who is working with Hakko to modify an iron specifically for the UK market (June 21 he estimated) so keep your eyes peeled.
Will you be able to let us know when the Hakko soldering iron will be available here in UK. Also where we can purchase it.
Many thanks
Sandra van Wijk
Yes Sandra, I keep checking but nothing so far despite being told June 2021. I think Covid has lengthened lead times for pretty much everything 🙁
Hello Milly,
While enjoying my Chinese take-out lunch, I looked at the wooden chop sticks and thought….these would work great for cleanup/picking. after puttying my stained glass piece!
Bamboo skewers/Kababs (bamboo stick to slide meat & veggies on to cook) are my favorite tool for cleanup and picking putty. They have a pointed end and a round end! The work great!!
Enjoy your newsletter!
Thank you for sharing you knowledge!
JP
Hahaha, we stained glassers can’t do anything without thinking of stained glass, can we? Thanks for the tip Judith.
Putty? Not familiar with the use of putty with stained glass. Please explain. Thank you!
Milly stepping in here as not sure if Judith will see your comment… the putty is for leaded stained glass, not foiled. You use it to fill the gaps under the lead came to weatherproof the panels. I have a page on it here if that helps: https://everythingstainedglass.com/how-to-stain-glass
Milly!! Right in line with concerns on my second window. During the last portions of the first window my Weller was melting the lead came with about 1/2 second (or less) of contact. Since then I got a HAKKO FX-8801 and it too came with a pretty small tip. I assume it will be great for the detail work but I also wanted to get the 1/4 and 3/8 tips but have not got to that yet. Thought I’d see if I could get used to the small tip but really, you confirmed my thoughts. Is it possible to purchase those for the FX-8801 through a link from you?
I don’t have a link for these tips, they all seem to sell them as a set which would mean you’re spending on something you don’t need. It’s kind of you to try and buy through one of my links though, thanks Rick.
That was so informative, I never knew that it depended on the angle of the tip for heat control. Thanks so much.
The tip needs to be used in lots of different ways to control the amount of heat. Try it on a scrap piece to get the feel of how the different areas of your tip behave. You’ll get used to it in no time.
Thank you. I think this will help me a lot.
You’re welcome Lisa.
Hi Milly!
Thank you so much for this information! I kind of figured that if I had the iron set too high I would melt my came but didn’t realize that 50/50 needed a higher temp than 60/40. I often use the 50/50 as my first run and then go over it with the 60/40 for a nice finish mostly if there are large spaces (the oopsies) since 50/50 is cheaper and it seems to hold better and not melt through when I put the 60/40 over it…now I know why! It’s always nice to know the “WHY” we do something instead of just doing it by accident and having it work. I think your information makes us all much better artists and not just someone who flies by the seat of our pants hoping we end up with a good piece in the end.
You rock!!!!
Pati…from across the Pond
It’s really good to know that the information I’m putting out is of help. It’s all those little bits of knowledge that build up, I find. Good luck with your next project.
Milly, as always such wonderful tips you offer!!! I have to say I love my Hakko 601 much more than the Weller 100. Thanks for keeping us on the right track and explaining things so clearly.
You’re more than welcome Gail 🙂