Soldering Problems – Quick Tips
Nothing is more annoying than spending hours designing, cutting and assembling a piece, only to feel disappointed at the end because stained glass soldering problems have spoilt the final finish.
Here are some suggestions for the most common problems and questions I get asked which will hopefully give you some quick answers to your soldering problems. This page will continue to grow as I add more.
But first… I can’t talk about ‘avoiding common mistakes’ without mentioning Iron Maintenance.
So many people think that their precious iron looks after itself, week in, week out.
Not so.
The amazing thing is, by following this simple regime, you’ll see your soldering improve along with your iron’s performance – you might not even HAVE any soldering problems 🙂
Click the links below to go to the section:
Solder Leaking Through
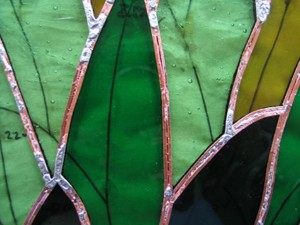
Thick Solder Lines
Corroded Copper Foil
Soldering Zinc Came
Left Over Solder
Solder Leaking Through To Other Side
1. Your cutting could be the culprit with this soldering problem. Inaccurate cutting leaves wider gaps for the solder to flow through to the back side.
2. Your iron might be too hot, causing the solder to melt too quickly. Turn the rheostat down to somewhere between 700 – 750F (360 on a Hakko FX-701) or check you’ve got the correct temperature tip in if it’s a thermostatically controlled one (#7 for Weller 100W). If all this is ok, get the iron checked out by an expert.
3. Liquid flux is more likely than gel flux to cause this particular of the soldering problems. Try a different type of flux and check the difference.
4. You might simply be soldering too slowly causing the solder to melt too quickly in one place. See #5 if you think this is causing you difficulties.
5. It might be your solder type. 60/40 flows more easily than 50/50 and can cause soldering problems if you go too slowly. You could try soldering the backside first with 50/50 then turning over and doing the front with 60/40.
60/40 solder on Amazon (*paid link)
50/50 solder on Amazon (*paid link)
Solution
- Tack solder your piece securely together
- Lift it carefully using a board if necessary
- Place a slightly damp towel or flannel under the piece while you’re soldering. It will cool the solder when it touches it and stop it pooling through to the other side.

Thick Solder Lines – A Common Soldering Problem
Question from a reader:
I was hoping to get some advice from you. I made a piece and it’s got quite thick solder lines on it, but it turns out my soldering iron isn’t actually hot enough to be able to properly smooth out the thick lines. Have you got any advice on how to improve this situation? Would something like sandpaper even be able to smooth down the lumpy solder? Any and all advice is greatly appreciated!
I’ve attached a picture of the unfortunate piece that went wrong… I would normally never do solder so thick but for this piece it was specifically to try and make it look more like the Pokéball it’s supposed to be!
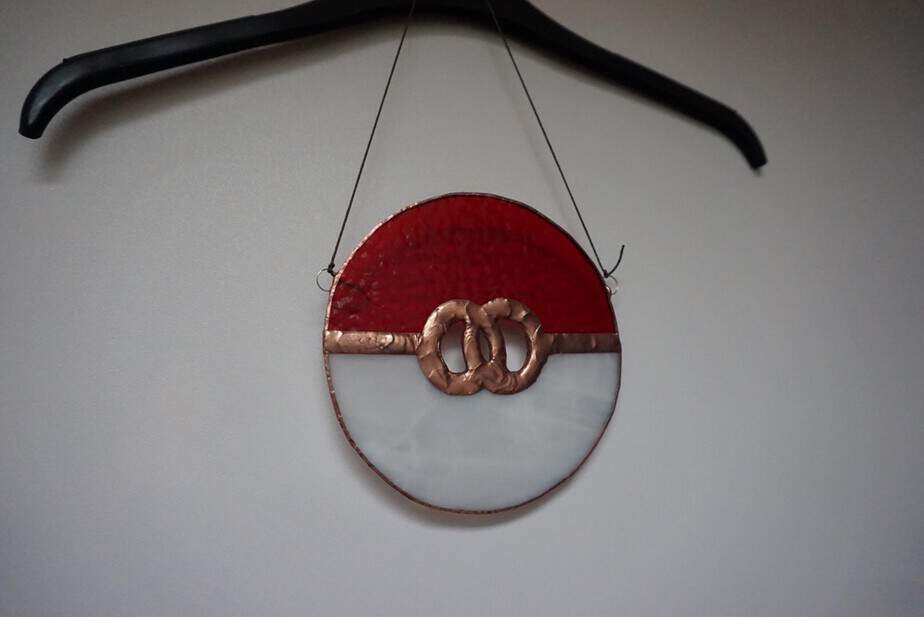
Milly’s suggestions:
- Sandpaper won’t work as it isn’t robust enough to rub solder smooth
- Try slowing down when you’re soldering to allow the solder to melt
- If your iron won’t get hot enough even if you slow right down, try a larger tip. They impart more heat.
- Make sure your tip is clean. I use the MG Tip Tinner below. It’s pretty miraculous how it shines the iron tip 🙂
Tip Tinner from Amazon (*paid link)
Corroded Copper Foil
Question from a reader:
Recently I was doing a lamp shade. After initial soldering, I had to stop working on it for several days. When I returned, the copper seams were corroded and could not be soldered. It took a long time to clean the seams and re-solder the pieces.
Milly’s suggestion:
-
- Ouch. Lesson learned: do not stop soldering half way if at all possible.
- Wipe the flux off the foil if you are stopping. If you have to stop before you have finished wash the work to clean the seams from flux so that it doesn’t corrode the copper foil. Kwik-Clean Flux/Patina remover (*paid link) is great for this task if you don’t want to bother with soap and water.
Problems Soldering U Profile Zinc Came
U profile zinc came is for the edge frame of your piece. It should take solder. However, It takes longer to heat up so try this:
- When soldering zinc, hold your iron on the zinc a little longer than you would on lead.
- When soldering zinc to lead, touch the zinc came first to heat it a bit before touching the lead too. The zinc might turn dark and almost look scorched, but this will clean up.
- Zinc takes longer to heat up so on the corner, zinc to zinc, hold your iron on the zinc to warm the zinc and activate the flux. Then put the solder on the zinc, iron on top and melt the solder.
- Practice with some scrap zinc and lead.
- Zinc doesn’t melt like lead so perhaps if you are having problems you’re doing it too quickly?
What To Do With Left Over Solder?
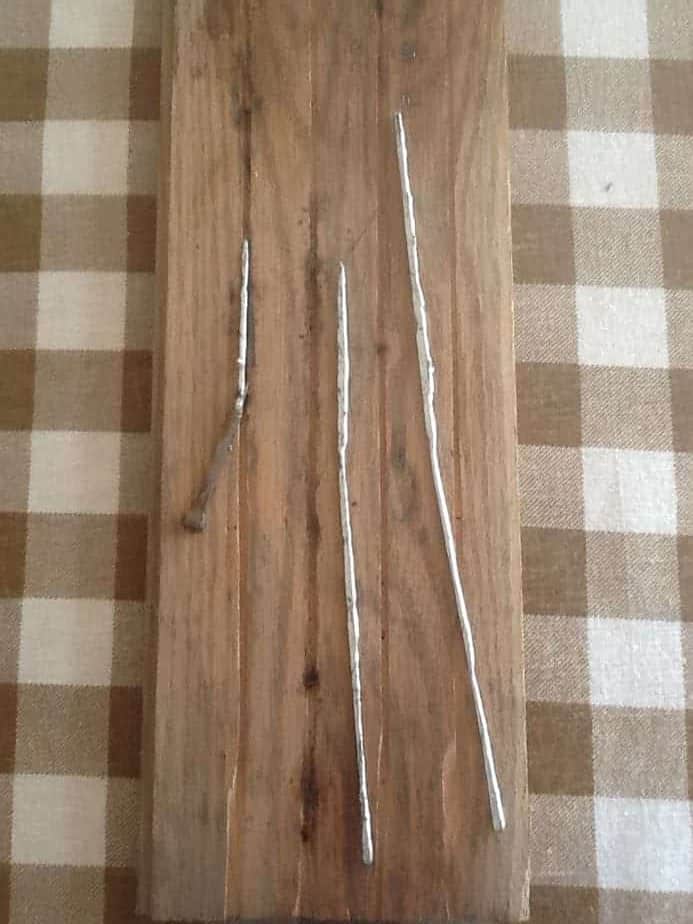
Here’s a great tip sent to me by reader Vicki Farrell
-
-
- Cut shallow grooves into a length of board
- Gather your left over bits of solder and spread them near the grooves
- With a hot iron pull the bits into the grooves creating nice long solder sticks. You don’t need flux
- When cool, just pry them out with a horse shoe nail
- You can also solder the sticks to the end of the solder on a spool so you don’t have to hold on to a hot end.
- These sticks are so much easier to use than trying to pick up bits and blobs of solder left overs!
-
Thanks Vicki.
Feel free to add any comments about how you tackle soldering problems below. Thanks in advance 🙂

More Soldering Articles
Stained Glass Soldering Techniques – The Key to Smooth Soldering
Best Stained Glass Soldering Iron
Solder Stained Glass Beaded Edges
I hope that helps!

abouy Vicki Farrell
melt some vintage bat of lead
is it 50/50 or 40/60 comprared or pure lead
interrogation
is this stouft workk very well or maybe not the best ?
difficult to said
what is your opinion ?
I have used combinations of left over 60/40 and 50/50 (as well as combinations of different brand names) and I have not found a noticeable difference in the application or overall results. One option is to collect your solder blobs into labeled jars and make sticks from just 60/40 or just 50/50. Or, you could try a combination stick on scrap pieces of foiled glass to see how it works for you.
Hope this helps!
Thank you Vicki, very interesting observations and suggestions. We appreciate you 🙂
can you make me in contact whit Tammy Wiley
she make some byke wheel stain glass apparently
i plan to do so also
maybe
i can help
Hi Jacques, I’m sorry I can’t give out any information on people who comment on my site. I’m sure you could have a good discussion though!
Hi Milly, this is all so helpful!
I keep having disasters with my soldering iron tips. They erode away to nothing or get big holes in them/misshapen after just one side of a project.
Is my iron too hot? Is it just a rubbish quality iron? I have been using very cheep B&Q irons. What’s happening here??
I use a powered tinner as well.
It’s very frustrating
Hope you can help x
Hi Ginny, this shouldn’t be happening. I don’t know the tips from the B&Q irons but I would guess that they are likely the problem. It’s worth forking out for a decent soldering iron.
what power is you B&Q
hope it is about 100w but this look like less
and
what tip do you have you need a big 1/2 inch large one
this B&Q have sometime little pin point needle that no good for stain glass
Hi. I’m wondering if you can help. I made a square box lamp (like a 5 sided cube) but realised (after finishing and adding patina) that I had constructed it inside out! The textures are all on the inside. Is there a way can I open it up/deconstruct it to fix it?
Eek. Yes, you can get any stained glass apart, with gravity and patience, but I’m wondering whether it may be best in this instance to leave it for a bit and see if you like it as it is.
Sometimes the texture on the back registers more strongly because the coloured glass in front of it deepens the illusion of texture, if you see what I mean.
It might be better to learn the lesson for your next lamp, rather than undoing. Too soul-destroying!
in electronic store you can find what we call in electronic a soquer pomp
it is made for remove the solder hre
https://www.amazon.ca/Plunger-Desoldering-Solder-Locking-Removal/dp/B07J3ZDVBC/ref=asc_df_B07J3ZDVBC/?tag=googleshopc0c-20&linkCode=df0&hvadid=335174690133&hvpos=&hvnetw=g&hvrand=5479040364309649075&hvpone=&hvptwo=&hvqmt=&hvdev=c&hvdvcmdl=&hvlocint=&hvlocphy=1002606&hvtargid=pla-714155067077&psc=1
or this one better mine
https://www.amazon.ca/Wemake-Solder-Sucker-Desoldering-Vacuum/dp/B0002KRAAG/ref=asc_df_B0002KRAAG/?tag=googleshopc0c-20&linkCode=df0&hvadid=292947999281&hvpos=&hvnetw=g&hvrand=5479040364309649075&hvpone=&hvptwo=&hvqmt=&hvdev=c&hvdvcmdl=&hvlocint=&hvlocphy=1002606&hvtargid=pla-491294181333&psc=1
some time it jam but you cam open it and clean
jack 47 71
Thanks for taking the time to share these Jacques. I haven’t used them so can’t comment in terms of whether they’re good or not but I trust you!
I have soldering my panel and cleaned it and will patina it shortly. My problem is the bottom piece of glass on my panel the piece I stand it on is a bit wobbly. It is a straight across piece of glass just short of A4 size, what can I do to make it so its not wobbly or firm it up?
Do you mean that the piece wasn’t cut straight Jan? Is there something you can insert into the stand to make it stable? A slither of wood or matchstick for example.
I hope I haven’t got the wrong end of the stick.
Another lead soldering question:
When the solder slips down on to the glass and under the lead!!, how do I get it up again. I tried resoldering and flicking it out but still some stuck under there. I’ve a feeling I shouldn’t be leaving it there but don’t want to cracking the glass either.
Any suggestions of a technique? Or could I just ignore it and cement up anyway?
Thanks for your time
Fiona
Just do what you’re doing Fiona; get as much as you can out from under the flange and then cement over it. It’s easy to melt the lead trying to get underneath and not worth it – it won’t cause you any problems.
HI Milly
I’ve got a question about soldering on lead.
Could I be having issues because the lead is old? Do you have any tips on how to manage this situation? I’m familiar with soldering lead but it’s many years ago and I was probably using new (or newish lead) at the time. Would a wire brush come in handy for this?
I hope I haven’t missed this question above.
Thanks for you time. Fiona
You’ve answered your own question Fiona 🙂 Yes, a wire brush to clean the joints usually does the trick. If the lead is really grimy you might even need to scrape at the joints with a scapel, making the area lovely and silver. Flux and solder soon after to prevent oxidation.
I hope that helps, thanks for asking.
Thank you Milly. It’s pretty grimy, I’ll try scraping it back with scalpel.
Can you advise me why my solder (60/40) “spits” as I am applying it. I have used a generous amount of flux, perhaps too much?
You’ve hit the nail on the head Perri, too much flux. It gets into the channel and has nowhere to go so ‘spits’ up at you! Try using less, I’m sure it’ll fix this.
Hi Milly,
I’m an absolute beginner at copper foiling and hoping you could help me with a problem please?
I haven’t currently got a grinder so I have been using a carborundum stick to smooth my edges before foiling however, I’m finding that this sometimes causes accidental scratches on the front of the glass that will be seen. This is extremely frustrating and I am wondering if there is a way to remove these scratches?
Thank you in advance. Jayne.
I’m guessing that the angle you’re holding the carborundum stone must be too low to the glass for it to scratch the glass. This shouldn’t be happening. It’s very difficult to get rid of scratches so your best bet is to rectify the problem going forward. Sorry I can’t be of more help here 🙁
Clear nail polish
Hi Milly
I am so lucky to find your website. Thank you so much for your time.
I am brand new to stained glass so kind of confused.
Can you tell me how many ways to make stained glass? So far I find out
1. Since came
2. Lead came
3. Copper foil
4. Soldering
Is that all (4 methods)
And how is each the technic of each method and the use of each one
Thank you so much
Welcome to stained glass Tam 🙂 There are two methods of stained glass construction; one with copper foil and one with lead came. I have tutorials on copper foil here
https://everythingstainedglass.com/how-to-make-stained-glass
and tutorials on lead came here
https://everythingstainedglass.com/making-stained-glass.
I also have online classes on each of the techniques here
https://everythingstainedglass.com/stained-glass-classes.
I hope that helps.
Hi there 🙂 I’m a stained glass newbie and have found your website really helpful so far! I’ve only done two very small pieces on clear glass, using the copper foil technique, just so I can practice cutting and soldering etc. One things I’ve noticed is that on both pieces, the solder has almost black specs in it and sharp bits. Any idea why this would be? They’re almost like black crumbs of solder. I make sure my foil is stuck down, use a small brush of liquid flux then start soldering and there they are!
Any clues would be greatly appreciated! Thanks, Abbie
Hello Abbie and welcome to stained glass. Yes, the sharp bits are a result of a too-cold iron, you need to turn the heat up or slow your soldering down to give the solder a chance to melt smoothly.
The black spots are flux residue. You can wipe the solder lines intermittently as you go (watching out for heat of course) to prevent this.
And finishing off with polish and patina properly helps too.
I hope that helps.
My lead lines look straight when I soder but when I’m done things are all crooked! What is wrong??
With lead came the came can be nudged in the soldering process if your jig isn’t holding everything securely in place William. It’s good practice to line it all up and put a couple of tack solder blobs in places that seem as if they might shift.
If you’re talking about foiled seams my question would again be about what’s holding them in place. It’s easy for things to move everso slightly. You can pin or tape pieces together accurately before tack soldering the joints.
I hope that helps.
I am making small Christmas tree sun catchers and the base piece moved on on one as I was soldering. What is the best way to remove that small piece of glass and re-foil and re-solder? Thanks
Heat it with the soldering iron to melt the solder and prise it off by using gravity and gently pulling it apart. Tidy up the solder and re-attach.
I hope that helps Gisele.
I keep having problems with my outside edge. I burnish very good on the edge, but often have issues that it peels back or away very easily. I personally don’t like using came, so that isn’t an option. Can you please help with this!! Thank you!
There are a lots of reasons that your foil might not stick. I’ve collated them all together on this page: https://everythingstainedglass.com/copperfoil-not-sticking
I hope that helps KC 🙂
Hi Millie: Thanks for the quick tip about joining odd scraps of solder together using a grooved piece of wood. I always have a bunch of blobs and short pieces of solder wire laying around my work table. This is. very handy and useful information. I appreciate all of your tips and have incorporated many into my workshop. You rock!
Thank you Bob! ‘You rock’ is something that isn’t often said about me LOL.
I have read many articles and comments about soldering. Im thinking of tacking the front of my project with 60/40, then flip the project over and soldering the entire back with 50/50, flip the project over again and solder and bead the front before beading the back. Is this the correct process?
Hi Bob, you can do this, or you can flat solder with 50/50 on the front, turn over and solder a bead with 50/50 then turn over and finish off front with at 60/40 bead. Lots of people do this as it fills in the gap and leaves you more chance of getting a smooth bead and 50/50 is cheaper.
I’ve recently run into an issue I haven’t had before. My solder won’t stick to the foil or the came. Once it cools, it just peels off. I use the same canfield 60/40 solder I’ve always used, as well as the same brand of copper foil and flux,but am just recently having this issue. The solder is sticking to the came better than the foil, but once I go to clean it, it keeps just peeling and falling off.
That is just the strangest thing Kate. I’ve never had that experience so not sure what it can be to be honest. It sounds like the solder isn’t making the necessary union with the foil or came, which is often a lack of heat problem. I’d check that your iron is reaching the requisite temperature and/or get it checked to be sure.
Sorry I can’t be more definite. Has anyone else had this problem and know the solution? Thanks in advance if so.
I have a leaded window I made some time ago. Now I want to install it into my building project, and we live in a very windy area. I need to have 3/8 inch horizontal saddle bars fitted into the window frame for safety reasons. The plan is to fasten the window to the bars with copper wire soldered on to the window lead in 4 places.
I am having a lot of trouble joining the copper wire to the lead. Each spot was already soldered once. when I made the window. I have been scraping back the oxidation and trying to join the copper wire with new 40/60 solder on top of the previous joint. I’m not sure if I need to use tallow for this or not. I’ve had about 10 attempts but it has only worked twice. I’m using a Weller 101 iron.
Experimenting with scraps of lead and solder, I can do it all right. Is there something about the old solder joint that causes problems?
How frustrating Lorna. The most common reason for solder not sticking is oxidation. You’ll need to thoroughly clean each joint with a wire brush and tallow straight away before soldering. The joint needs to be clean silver. You need to make sure the iron is hot enough so that it partially melts the existing solder join so that they can join together strongly.
I hope that helps.
What is the best technique for removing oxidation build-up on solder joints?
Dampen a bit of fine steel wool and scrub. Use gloves and a mask. I hope that helps. You can also use those green scrubbies.
I took a class and made a 3 piece 3D heart with copper foil. One of the joints is loose so I tried to put some solder on it to strengthen it, but after I put flux on it, the solder wouldn’t stick to the joint. It just rolled down the glass. Then I copper foiled a piece of mirror and soldered all of it without a problem, until the last little bit that was slightly overlapped. The solder wouldn’t stick there either. I’ve never had that happen to me. What causes solder not to stick to copper or other solder, even with flux?
It’s nearly always a cleaning problem if solder isn’t sticking. Especially if it’s sticking everywhere else. You might need to wet a bit of steel wool – fine – and scrub and clean the area thoroughly before having another try. Good luck.
So I just soldered both sides today but I want to fix up my lines. Can I do that the next day with more flux and iron?
Yes. It’s best to wash off the flux and start afresh Emily.
How do I solder different glass thicknesses together which have foiled edges?
If you want the front to be flat, you’ll have to turn your pattern over and solder side2 (back) first. Then side1 will be flat. However, I love the unevenness that comes with thicker and thin glass; it causes the light to refract in an interesting way. Great question Judy.
My friend soldered front side just fine but when she soldered the back the solder won’t stick to the fluxed foil. Any idea why. She’s getting very frustrated. Thanks
That’s quite unusual Nancy. She could try cleaning the flux off with Kwik Clean and starting over afresh? That might help.
And making sure that she’s giving the solder time to warm up sufficiently so that it melts. Sounds obvious but it’s sometimes overlooked.
I’m working on the piece using bike wheel, soldering the glass in-between the spokes. I’m having trouble with the copper foil staying on the spokes when I solder, the foil seems to be peeling open where it meets on the spoke. I’m using liquid flux, and plan to use gel on next one..and maybe I’m not cleaning the spokes well enough. Do you have other suggestions?
It’ll be the spokes, not the type of flux I would think. Somehow you have to get the foil to stick to the spokes so cleaning them within an inch is the way forward. Try a wire brush. Don’t linger too long on the foil or retouch with out cooling first as the heat will melt the foil glue before the solder has a chance to settle. Good luck!
Some spokes are stainless steel and some are chrome plated. Stainless is difficult to solder and – as far as I know – chrome plate can’t be soldered. Check the material of the spokes if you’ve not done so.
best way is pas a sanding paper on and plated whit copper
easy to do whit vinaiger and salt and 6v batt here
https://www.instructables.com/High-Quality-Copper-Plating/
try it on front gear also give beatifull look
A brilliant idea by Vicki in your last news letter for using up left over solder using a piece of wood with shallow grooves cut out. I thought i would try it on apiece of narrow grooved decking.
Ingenious Valerie – that way the grooves are already made. Let us know how you get on.
Thanks Valerie,
Just in case some folks aren’t aware, some decking is made of composite plastics and not wood. I suggest wood only for this tool.
And, use a hardwood if you can. It will hold up much longer than a softwood like pine.
I am hoping someone can help me solve the oxidation problem. I thoroughly clean copper foil projects with dawn soap (using toothbrush) and water, dry well and apply black patina, then I again clean well with cold water and dawn soap, within 2 weeks the white “gunk” appears. I switched to copper sulfate rinse and still this happens. So frustrating because I think I am doing a solid cleaning. I am beginning to wonder if it is our water? Should I try distilled water? Any suggestions would be appreciated! Thanks for this great resource!
Mary, try applying wax over the patina as a final step. That protects the solder from oxidation. It will need freshening up every year or so but it shouldn’t have white gunk within 2 weeks.
Here’s a tip for you fellow glass saw users . Keeping the water flow from wiping out your pattern is problematic!
Here’s a solution. Paste you paper pattern using that purple school glue to your piece of glass . Then coat the pattern with a thin layer of “KIWI MINK OIL” No amount of water will spoil your pattern ! KIWI MINK OIL is available wherever shoe polish is sold or at any sporting goods store. It’s far far superior to “Mark Stay” or “Chap Stick” and a tin of it will last a lifetime! Try it !
Bill Tait
Bill, I have bought some of this on your previous recommendation and WILL get around to trying it out some time! If it’s as good as you say – and I believe you 🙂 – it will be on my ‘recommend’ list. Thanks for sharing.
I have used a dish drainer to store 12 x 12 glass with news paper in between and it works great. If you have lots of smaller pieces the padded envelopes that Amazon uses for shipping works great to separate colors.
The padded envelope idea is ingenious Carol, thanks for that!
Milly, you always have the greatest tips and tricks!!!!
I almost always solder the back side of my pieces first, and save the front side for last. That way if I have any repair soldering to do because of bleed thru it’s on the back where it might not have to be as perfect as I want the front side to be.
Plus, since the channel between foiled pieces need to be filled with solder, this gives me a chance to move my iron a little slower so I can watch as the solder flows down and fills the gap between the pieces.
I generally do a first pass all over my piece to fill that gap, and then do another pass to form the bead.
Now when I flip the piece over to solder the front side I don’t have to worry about filling in the channel. This makes it so I can shoot for running a nice bead on the front with one pass. Needless to say the bead doesn’t always come out perfect on the first run, but I don’t have to worry about filling the channel. And once in a while I might have a spot or two that bleeds thru, but not always.
This method works whether I use 60/40 or 50/50 on the back. Regardless, I always use 60/40 on the front.
What a lovely clear explanation Gail, thanks 🙂 As someone who used to solder for a job you have very good advice for us all. Take note everyone!
Thank you for all these great tips Milly. I love it when other people share their tips and suggestions as well. Keep up the good work.
Thanks Diane, I’m glad you find all the tips helpful. People are very willing to share, it’s great 🙂
Hi Milly, I have a similar question about copper patina. I made a peace and did not properly set the hook to hang it. now I need to fix the hook up but I’m afraid of what it’s going to do to the copper patina.
How can I fix it and then re patina and have it come out okay?
Thank you 🙂
Try removing the patina in that area with fine steel wool (wear a mask). Do your repair and clean, polish and patina as normal. Should be fine.
Hi Milly:
As an instructor, when it comes to soldering, I have two rules I give my students. First, “Don’t confuse the solder”. This is meant to remember that solder is not to be “painted”; when soldering a seam, move in one direction, not back and forth. Second, ” Solder will only do what you ask it to do.” Meaning, solder responds to heat application, and developing a “pace” of moving the tip, and hence the important “bubble or puddle” is the important factor to watch. Hope this helps.
John J. Yurosko
I totally agree John. The temperature/speed equation is crucial for telling the solder what to do! Use the flatter part of the tip for more heat (go faster) and the edge for less heat (when you want to go slower).
Thanks for your very helpful pointers.
Hi Milly
I, I am Jacline from Québec city in Canada and my question is: I would like to have a solution for patina on zinc, the result is never very beautiful. Thanks in advance, I read all your stuff and ideas and I practice them.
Try cleaning the zinc using steel wool before applying the zinc patina. Apply the patina with a toothbrush and let it sit until it dries without washing it off. Then apply a 2nd coat of zinc patina to the zinc, letting it dry. Mothers’ car wax is good for polishing the zinc. Novacan Black Patina for Zinc works well.
To your reader who struggled to solder because of corrosion on the metal . . . . . . I find that a gentle rub along the seams with wire wool removes any oxidation and leaves a nice shiny surface that takes the solder well. I also clean the soldered piece with wire wool again before applying patina. Don’t forget to brush away any traces of the wire wool.
And don’t forget to wear a mask as the wire wool gets everywhere! Thanks for taking the time to add this helpful tip Linda 🙂
Hi please guide me .after soldering , copper foil unstick.why this happen?
This can happen if you over-work an area with the heat of the stained glass soldering iron. If you revisit an area, makes sure that you let the solder cool first. It also helps to have a beaded edge on the glass, rather than a tinned edge, as the solder ‘grips’ the edge of the glass. See this video for soldering stained glass beaded edges.
I hope this helps Soheila.
Help I soldered a lead came panel by mistake! Instead of foiled panel How can I remove the solder?
That is a bit of a stained glass soldering problem! If I’m understanding you correctly, you soldered along the lead came as you would copper foil? If that’s the case you can’t remove it I’m afraid. The best you can do is to finish as you started until you reach a join and then stop. Then, when you’ve done the puttying of the panel and clean up, patina the solder black and it should blend in with the rest of the stained glass panel.
I hope that helps a bit.
Thin copper wire can be used to fill in small gaps before fluxing and soldering.
Thanks for the tip Walter, much appreciated!
I love your tips! Please don’t ever forget me!
Don’t you go worrying Billye Sue, you’re unforgettable 🙂 Glad you like the tips.
I use wider lead for the surrounds of my panels. Numerous times the solder has run through the corners and made the corners into near solid lumps, this is a problem particularly if ‘I want to fold the outer edge of the lead. The solution is this; I bought a hard 5mm thick silicone skillet for use under hot pans to protect the surface below from heat. I cut the silicone into strips and ‘L’ shapes and use these to push into the lead around the corners or at joints along the length of the surround and then solder in the usual way. The silicone is unaffected by the heat but stops any leakage and build-up of solder on the inside of the corner or joint. When complete the neoprene is removed ready for use the next time.
That’s an ingenious solution Steve, thanks for taking the time to share it. I’ll have to give it a try.
Nice idea! Will try this for sure.
Report back if you have any revelations, Berna 🙂
How do you get a damp cloth under a loose piece without it coming apart and taking off the guides holding the frame for the first side??
You can tack solder a panel together and then carefully lift and slide it. I wouldn’t advise this for a larger panel – in this case the damp cloth solution would only be good to ensure that you don’t melt Side 1 when you’re soldering Side 2.
It’s a really good question Mike, thanks for bringing it up.
I will definitely try the damp towel; I’d never heard that before. Millie, you have the best ideas, and I love your site!
Thanks Lori – I hope you find it helpful when you try it.
Nice to hear from you 🙂
Now I know I was too hot..How do I fix the solder that went though my project? Thank You Mary
Good question Mary, thanks.
If you haven’t soldered the side that it bled on to, just use the excess solder to create beaded seams on the ‘back’ side of your piece.
If you were soldering the second side, and it bled through to the first (already soldered) side and ruined it (grr!) then you have to remove the excess solder.
Lift your panel and tilt it forward towards the workbench so that the excess lump of solder is facing the bench. Introduce a hot iron tip to it and heat the area, before moving the iron fairly quickly across the seam, taking the excess solder with it. Then – carefully!- flick your iron so that the excess solder comes off the tip onto a heat resistant surface. Then put the panel flat and repair the area as normal.
Hope that helps!
I created my own problem…Forgot to leave room for the frame and soldered to the edge of the glass. How do I remove enough to get the came frame on my copper foil project??
oh, how frustrating Gail. You’ll have to remove the solder using gravity – hold the panel up as vertically as possible, use a hot iron and stroke downwards. Good luck