How to Solder Stained Glass
Stained glass soldering joins all your foil-wrapped pieces of glass together by running a bead of solder along each seam. It isn’t the easiest technique to learn but it’s one of the most exciting, as it allows you pick up and see your project for the very first time.
What You Need
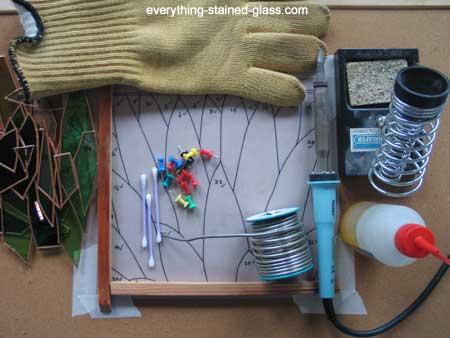
- 60/40 Solder (*paid link)
- Flux
- Soldering Iron (*paid link) and Soldering Iron Stand (*paid link)
- Wet sponge
- Q-tips or a cheap brush to apply the flux
- Your pattern
- Homasote board (*paid link) or ceiling tile to pin your work on
- Push pins (if your project isn’t square)
- Masking tape
*Just so’s you know, if you click and buy through the link within 24 hrs I get a small % from Amazon, (not you!). Thanks in advance but no worries if you have a local store – I’d always support them first 🙂
Use a fume extractor or solder in a well-ventilated space.
Stained Glass Soldering
It’s best to start by holding all your pieces together with small blobs of solder to hold them in position and stop them from moving about. This is called ‘tack soldering’.
If you’re having trouble with getting your soldering smooth there are a couple of techniques you can learn to improve it.
If you don’t have a local class my Stained Glass Made Perfect course has helped many people achieve neater solder lines in their work. And we know how important they are! The course is self-paced and online so you can learn these soldering techniques even if you are unable to get to a class. You can find out more about it here Stained Glass Made Perfect.
1. Positioning the glass
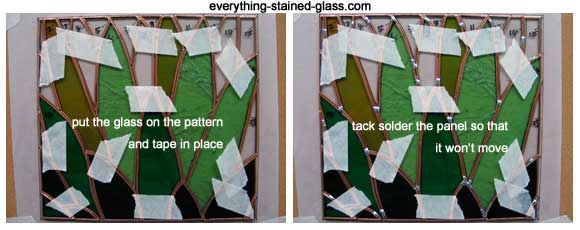
- Stick your tracing paper pattern on to the board and place all your foiled pieces carefully in position
- If you don’t have batons, tape them together in a few key places so that they can’t move
- If you have a homasote board and pins, you can pin them securely in place
2. Tack soldering
Use a stained glass soldering iron that is at LEAST 80 Watts (I use a Hakko FX-601 (*paid link)) and tack your panel together with soldering to hold it in place.
- To do this, brush a little liquid flux on the crucial joins and melt one blob of solder on each of these joins
- You’re then save to remove the masking tape
3. Soldering the seams
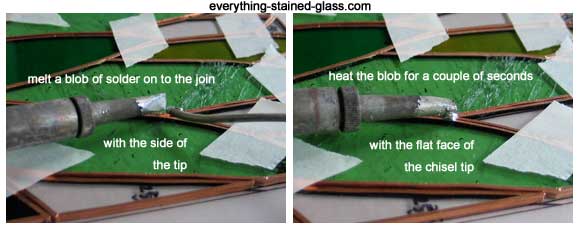
This is not as easy as it looks in some videos! Don’t worry if you’re not making a perfect line straight away, it takes lots of practice to know how much solder to put on and how fast to move along the seam.
The 3 most important things to remember are:
- good soldering is a balancing act between heat and time. If your iron is hotter you need to move faster. Conversely, if you prefer working more slowly then turn the heat down if you have a rheostat or change tips if you have a tip controlled iron.
- to keep the tip of the iron silver and clean by wiping it on a wet sponge every now and again
- to make sure you have enough flux to melt the solder. Keep adding more when necessary
What shall I do when I get to an edge?
If you want to put a zinc or lead came frame around the project, stop soldering 1/4″ short of the edge
If you’re making a free-hanging sun catcher, keep soldering right up to the edge
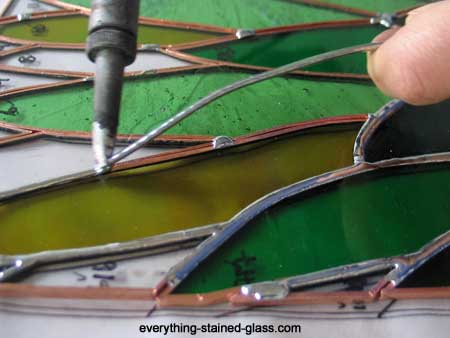
- Brush flux along one or two seams to start with so that it doesn’t evaporate. Don’t put too much flux on as it can can get trapped when you solder the other side and bubble up, causing craters
- With the hot soldering iron in one hand and the solder in the other, move them both slowly along the seam together
- Position the solder a little way up from the end of the tip so that you don’t accidentally stick it to the foil
- The solder will melt and run down on to the foil
- Make sure the iron tip touches and heats the foil too so that the union between solder and foil is as strong as possible
- There should be enough solder to cover the foil and fill any gaps between the pieces. Filling these gaps with solder strengthens the piece.
- Stop soldering by either moving the iron tip sideways on to the glass quickly (don’t stay on the glass with the tip) or lift vertically off the seam
- When you reach a join, don’t stop! Follow the solder through in all directions about 1/2″, keeping each ‘tail’ hot. Return to each ‘tail’ and pick up the seam from there. It’s neater if you pick up on a single seam than on a join
- The solder should be beaded (slightly rounded) rather than flat
4. Making stained glass soldering neat
Sometimes the solder just looks a mess. Luckily, there’s a technique that works like magic – the ‘hold and lift’ method.
Instead of moving the iron along with the solder, you keep it in the same place and allow the heat to work.
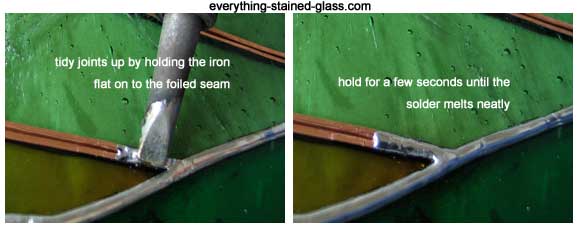
- Flux the area and clean your tip to make sure of the best results
- Hold the tip flat over the problem area for 2-3 seconds, and then remove it upwards
- Magic! a neat join is achieved
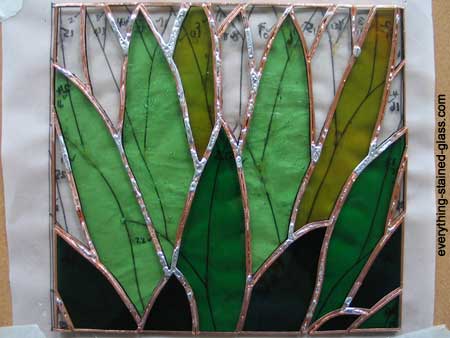
5. Soldering the reverse side
- Carefully turn the panel over. Some of the solder might have leaked through. That’s okay, just make sure you use less solder in these areas
- Repeat the process as above
- If you need to rework any areas make sure you let it cool down first, clean and reflux. Otherwise it may leak through to the first side.
Stained Glass Soldering – Troubleshooting
My solder disappears between the gaps!
If your cutting isn’t 100% accurate (like the rest of us!) and there’s a bit of a gap between the pieces, solder will drain through to the other side. This isn’t a problem, as you’ll deal with it when you turn the project over.
Just keep adding small amounts of solder until it eventually beads up.
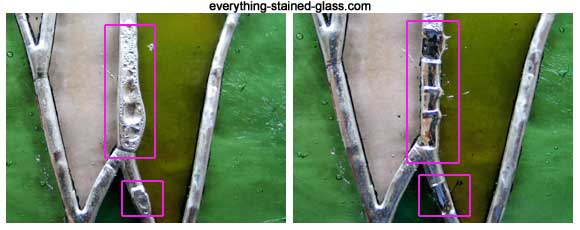
I’ve soldered the second side neatly, only to find that it has leaked through to mess up my first side. There’s too much solder, how do I get it off?
Luckily, just as you can add solder to the seam, you can take it off too.
- Move the tip of the iron quickly across the seam where there’s too much solder, and flick it off onto a heat-resistant surface. You can always pick it up again and reuse it where needed.
- Use the hold and lift method described in 4. above to neaten the area afterwards.
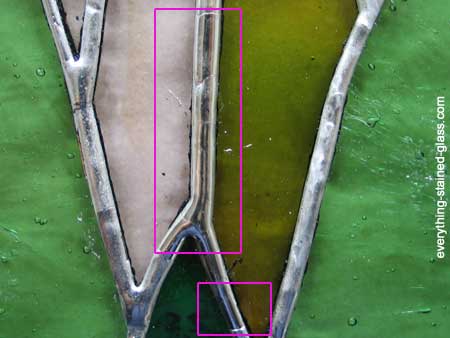
My flux doesn’t work and the solder doesn’t melt.
This could be one of 3 things:
- the flux has dried up or drained away and you need to reapply it
- your soldering iron is not maintaining temperature and you are experiencing a ‘cold spot’. Be patient and it will get back up to top temperature. If you have a dial controller with or on your iron, turn it up a fraction and test it out.
- the tip of the iron is dirty from the flux and solder, and needs wiping clean on a damp sponge to allow it to work properly. Sometimes the tips get a black residue on them which is difficult to remove. I use a tip cleaner to restore the tip to its shiny glory (*paid link)
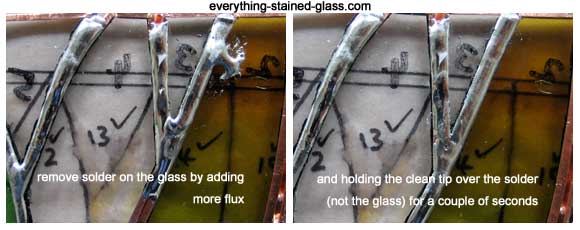
The solder has stuck to the glass and I’m frightened it will crack it.
Don’t panic! Brush flux over the solder and seam, and ‘gather’ it up with the hot iron by holding the iron on the seam. You’re right, you will have to be quick so that the glass doesn’t break, but it’s unusual for that to happen.
*Just so’s you know, if you click and buy through the * link within 24 hrs I get a small % from Amazon, (not you!). Thanks in advance but no worries if you have a local store – I’d always support them first 🙂
Helpful Resources
I’ve found this really great 3.45 minute video from Delphi Glass that shows stained glass soldering. Wow, this woman is good! Don’t worry if you can’t do it this quickly, that will take a lot of practice.
Stained glass soldering for copper foil
Once you’ve soldered both sides and you’re happy with it, you’re ready for either Zinc Framing or, if you’re not framing your piece, Soldering Edges.
There’s another page here that addresses some more Common Soldering Problems
PIN IT FOR LATER!


Bill, which Tuff Stuff?
Milly, what type of wax do you use?
Thank you both.
I use Renaissance Wax now Floyd, you can see why on this page: https://everythingstainedglass.com/recommended-tools
When you are working with beveled glass, is it better to lead or solder your panel?
You can do either Frank. I prefer to lead bevels but many people foil them with great results.
I hope that helps.
dear milly what’s the difference between polishing & waxing?Can you give me the steps again as to the finishing process?My grandson was cleaning up my ipad & l cant find it anymore 😢😢😢
It’s here Gertrude: https://everythingstainedglass.com/stained-glass-tutorial
Good luck.
Hi, can anyone advise me where (or if) I can buy Gel flux in UK? I was given some supplies by a kind individual who no longer needed them, and one was gel flux, I found I much prefer this to liquid. But I can only find it sold in the US with it costing up to 4 times as much for delivery. Is there a reason I can’t seem to find it over here?
Have you tried Etsy? There’s one here for under £10: https://www.etsy.com/uk/listing/639819722/classic-100-gel-flux-for-stained-glass
Hi Milly!
Love your stuff, thanks for sharing.
When copper foiling, is there any advantage to tinning the edges of each individual glass piece before joining them together in the final piece?
Thanks!
I tin the edge pieces if I’m going to do a beaded edge as it seems to help the solder cover on the vertical.
I also think when you’re first starting out you can do this to help your soldering skills but apart from these two scenarios, no advantage I can ascertain Denise.
I’m happy to be challenged if anyone is adamant to the contrary!
Where can I buy the copper foil tape?
Any stained glass supplier sells copper foil Ness. Venture and Edco are good but they’ll all work 🙂
Micheals sells it
Thanks for this Anne.
Hi Millie,
What is your procedure for cleaning up after a long soldering session? What precautions do you follow to avoid fumes and contact with lead? I’ve gotten to be so paranoid about these things. Wearing a respirator, not knowing how to position the fan and scrubbing my workshop every time is taking the fun and joy out of working with stained glass. I’ve found myself avoiding projects.
I use a fume extractor and latex gloves and wash my hands thoroughly after a soldering session. Try putting the fan over the shoulder you use for soldering – it will direct the fumes away from you.
I hope that helps Angela.
Hey,
I have recently started working with stained glass and my last project ended up having burnt looking bits around where I soldered, I don’t know why this is happening how can I clean it off.
Try wiping the flux off as you go. You should be able to clean this up with the final clean and polish. There’s more about this process here: https://everythingstainedglass.com/stained-glass-tutorial
Good luck Molly.
Hi, thank you for great advice. How long can you leave old flux on your glass work? I won’t be able to finish in one day and don’t want to keep on flipping the art work. Thank you!
It’s best not to leave it Alex. To be safe, only flux what you know you’re going to solder and then wipe any flux off before you finish the session. You don’t have to go mad with the clean up if you’re going back to it, just enough to neutralise it.
Hi-what’s the best way to add glass beads that may be in a group and have other glass pieces below the beads? Foil only the backs or sides? Thanks
Sandra
Sorry I’m not understanding the question Sandra 🙁 Can anyone else help?
I think she means glass cabs. I lightly grind a flat ring around the cab, wash and foil the edge and wrap to the back. I flux and tin the cabs next. Then line them up the way you like. I want space between mine so I solder the very least I can at a few places where the tinned foil on the cab is touching the tinned edge foil on the glass, just so it holds. Then when you flip it over you can add a lot more solder at that same point and it will not come through much. Continue to fill that space with cabs and add the next piece of glass and solder from the bac and touch up front.
Thanks for helping me out Linda! Much appreciated. And good advice, too 🙂
Hi!
I find that cleaning with a Mr Clean sponge, vinegar water and dawn dish soap get my pieces really clean, and the patina stays away for a very long time.
Brilliant tip thank you for sharing Sharen 🙂
Do you “bead” the perimeter of your project if you’re not framing it? Do you have to bead the back or is tinning enough?
Yes to the beaded edge and a qualified ‘no’ to having to bead the back.
1. Beaded edge: this gives a nice rounded edge and is less likely to come away from the edge than just tinning because the solder ‘grips’ the edge of the glass and holds itself on.
2. Beading the back: You don’t HAVE to but in practise it looks nicer and is stronger as the solder melts down the gap when you bead both front and back and creates a sort of web of solder. You can get away on a small piece with just tinning one side but it never feels quite finished and isn’t good practice. Thanks for your questions Kathy, I hope this helps.
Also “Beading the back” increases the stability of the panel, or other copper foiled pieces.
So true Tom, thanks for adding.
Hi,
I repare an old Stained glass. What do you suggest to make the old seams and the new one look identical?
Thanatos you
Martine
You can try removing the patina from the existing glass panel and getting it back to the solder, then patina the whole panel as one. I don’t recommend this for any valuable old glass; I’m not an expert in that field and wouldn’t want to ruin an antique!
The other thing I’d advise is that you test small areas – on the back – first, to make sure it works. Good luck.
If I am doing a foiled piece that is going to be framed in zinc came, should I completely foil the entire outer glass edges that are going to be inside the zinc and tin them or just put a short partial return on the outer glass edge? Since the foiled glass pieces are soldered to the zinc at joints, is there any reason to completely foil and possibly tin the glass edge that is inside the zinc
Good spot George. No, you don’t need to foil the edges because, as you so rightly pointed out, the zinc will cover the edges.
Hello!
I’ve just got to the soldering stage of my first copper foil project and have a plan to tack, then tin the front, turn & bead the back for practice, then turn and bead the front.
I started by making a frame of lead came on three sides and think it better to remove the lead border after the tacking stage as I can quite easily see myself getting solder on these accidentally. I plan to tin to the edges but bead to within a quarter of an inch as I would like to get the piece framed with wood.
My main problem is time and a paranoia about oxidisation. I have just bought some Kwik-Clean and have read around about it but am not sure if I can use it after I have finished for the day, then flux over it about a week later to continue the project. I don’t have my own tools and use workshop space that is only available weekly. The piece is too big to clean with water and detergent and I know that I can’t leave flux on for a week at a time.
Any comments and help would really be appreciated as I keep going over everything in my head and am getting more and more scared about actually starting the project!
Many thanks!!
Yes you can use Kwik-Clean and then re-flux, absolutely no problem. If you’re leaving the piece for a while half done you can wrap in saran wrap or put in a ziploc or plastic bag if small enough. I hope that helps. Thanks for your question Carol.
HI Millie. I love your advice! I’m new to stained glass and am wondering if I build the project with the paper pattern underneath the glass, Do I need to remove the pattern before soldering? It looks like you solder with the pattern in place underneath, but won’t this start a fire when the hot solder leaks through the seam and hits it underneath the glass. Clear as mud? Hope I explained my question thoroughly enough! Thanks for any help you can give me with this. Rebecca
You can either build the stained glass with the pattern under the glass or you can cut templates of the shapes, stick them on the glass and cut around them. This method means you have to print another pattern so that you can place all the cut pieces on the pattern to check the fit. There’s a whole page on the different methods here.
No fires occur as the solder loses heat quickly and not a lot gets through to the other side anyways.
I hope that helps Rebecca.
Hi Milly love ur tips. How do I get smooth solder lines it drives me crazy
and I’m still New been doing it a year and when I try to fix and make it one straight lines sometimes I make it worse will that lift method help with this. I know I have to stop being a perfectionist and it’s hopefully practice will help to get it smooth
The hold and lift is a good place to start as you’re more in control of the solder. You can start speeding up once you get the hang of it. It does take time to get those lovely smooth lines so don’t lose patience. Good luck.
Every time i use foil on a project and solder…the foil ends up lifting off the glass. What could be making this happen.
This could be one of many things Daria.
The stained glass copper foil might be lifting because you are going over and over the same area too many times and not letting it cool in between.
It could be that you didn’t stick it on properly.
Your iron could be too hot.
I have a page that goes into lots of solutions for copper foil not sticking here.
I hope that helps.
Old copper foil loses its stickiness. Can also contribute to this as I discovered when I found a coil in the bottom of my cabinet!
Ah, yes, good point Jeffrey, thanks for adding it. If it hasn’t been kept in a sealed container is does lose stickiness. And sometimes even if it has been sealed; it’s just plain past it!
I also found if the glass wasn’t clean enough before sticking on the foil it will lift off.
Thanks Emma, a useful point to add.
I found that I was sticking and resticking the foil to get it centered and it was losing its adhesive.
You can use lined paper to help you centre the foil Nancy; use the line as a guide on either side of the foil as you turn your shape. There are a lot of ‘foil not sticking’ suggestions on this page too.
I want to solder glass to some rusted outdoor art and also to bicycle spokes of a wheel. Can that be done with copper foil?
Hi Debra, if you can get the copper foil to stick to the metal then you can solder it. You can also solder directly to some metals so you might try cleaning the metal up within an inch and seeing if it takes the stained glass solder. Worth a try. Good luck!
I’m making a couple of panels for my buffet and I’m finding that, after soldering, when I go to clean the panel with Dawn, baking soda and toothbrush, the flux is leaving a messy brown crust around all the seams. I have to scrape it off with a sharp edge and I’m afraid I’ll scratch the glass. What am I doing wrong?
Hi Jessica, the trouble with patina is that there’s lots of variables and lots of solutions. Some of the variables are: impurities in the water, types of solder, flux and patina, types of polish and wax! You see the problem? Have you tried Kwik Clean spray for cleaning? That helps with the unsightly residue.
Oxidation is unavoidable and will return eventually so you will always have to do a quick ‘once over’ every so often to spruce up your panels.
I use a product “Tuff Stuff” it’s a spray bottle available on line .. that along with a tooth brush will clean your piece better than any product I’ve ever used.. try it and your problem will be over !
I’ve looked Tuff Stuff up and you can get it in Walmart. Didn’t find it yet in the UK but will keep searching. So, US-of-A-ers – give this a try and report back. Top tip Bill, thanks!
Hi, When I make ornaments I thoroughly clean with soapy water to get all flux off. I then I polish with semichrome. But inevitably within a short time I still get oxidation. Very frustrating to after all the work I put into it.
Please HELP what can I do?
Hi Cindy, have you read my page on patina here: https://everythingstainedglass.com/stained-glass-tutorial – there may be some new tips for you to try.
Hi there. I found using a car polish to polish up the glass and the solder helped to keep the shine. This is on copper foiled pieces.
Thanks for your tip Linda. I use car polish too – then a wax after patina to protect it.
Soapy water is not enough – use “Tuff Stuff” and a tooth brush .. you’ll love it !
I use CJs Flux remover. Its a liquid. And a natural brush to soap up the pieces then rinse with warm water and polish.
Thanks Glenda, that’s helpful 🙂
The tuff stuff when are you were talking about is the foam cleaner I’m seeing on Amazon?