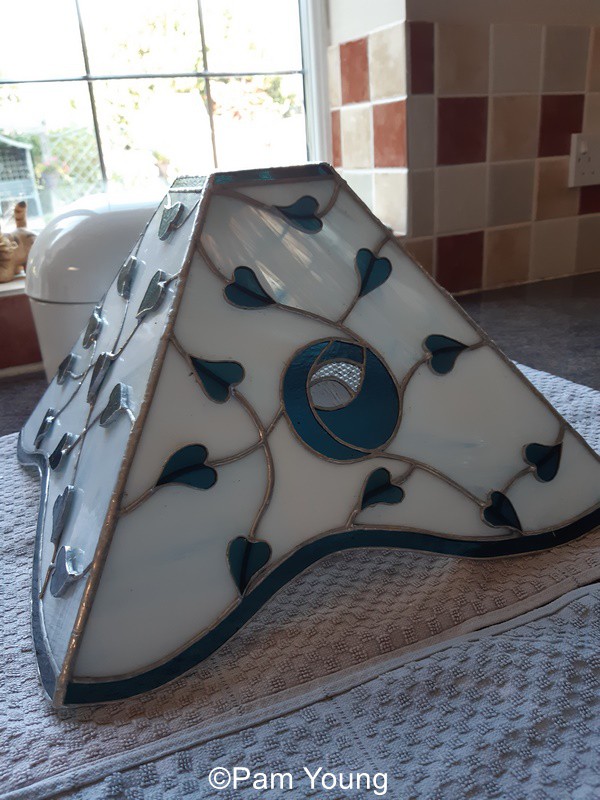
What REALLY makes a smooth solder seam?
You all know that lumpy solder seam feeling. You try and TRY to improve your stained glass soldering techniques but STILL you can’t get a nice smooth finish.
Well I have a secret for you.
It’s a tiny but crucial tip – taken from my Stained Glass Made Perfect Course – that will improve your stained glass soldering techniques and help you get over the hump and start producing smooth, even seams to be proud of.
You’ll see that it isn’t a question of speed, or the right flux or the correct solder – although these things help.
It’s all about controlling the heat of the solder with the angle of the soldering iron tip.
Click here for Answers to 7 Common Soldering Problems
Stained Glass Soldering Techniques
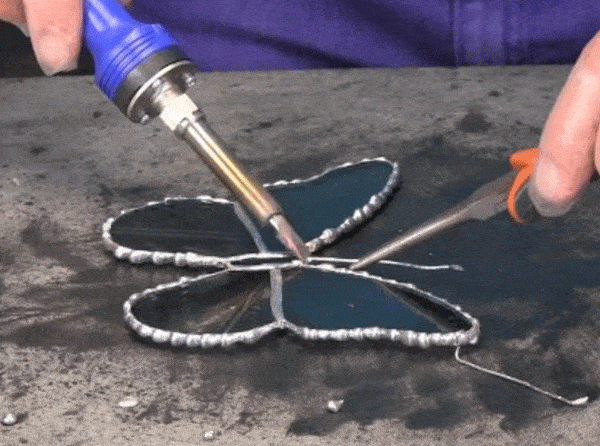
Have a look at the Video Tip below and give it a go yourself. Play around with the angle of the tip. Try it flat, try the corner, try the side. This will help you:
- see how the solder behaves differently.
- learn how much heat is transferred to the solder with the different angles.
- start to control of your soldering iron.
And with that control comes smooth, even solder seams.
You might not have instant success but if you keep at it I can guarantee that your stained glass soldering techniques will improve.
P.S. If you got value from this free sample class, please Pin on Pinterest or Share on Facebook with your friends and fellow glassers who want to make stained glass to be proud of. Thanks.
More Stained Glass Soldering Techniques
- Try looking just ahead of the iron’s tip, not directly at the tip, as you move the iron along the seam.
It’s like driving. The more road you can see ahead, the more anticipating you can do and the better you drive. It’s the same with feeding solder to the tip. - Don’t be afraid to move your panel so that you get the best angle for running the bead. If you’re in the wrong position it will make soldering smoothly more difficult.
- This might challenge you but try holding the iron like a pencil and drawing it towards yourself. Rest your soldering hand on the bench to stop it wobbling as you go. You might find that this gives you better control. As always; find what suits YOU, not anyone else.
- Try dropping a series of blobs along the seam and joining them up to make the smooth seam.
That way you don’t have to worry about feeding the solder. This is the technique students find most helpful in the Stained Glass Made Perfect course. - Try flat soldering the front side first, making sure that the gaps are filled. Wipe of flux, turn over and bead Side 2. This is now easier as there’s no gaps for the solder to get sucked into. See image below.
Go back to Side 1 and run the bead. This is now easier as there’s a solid base that makes running a smooth seam easier.
By beading Side 2 first you get a soldering warm up and can identify problem areas to pay attention to when you go back to Side 1.
If you get the hang of this you may find in time that you don’t need to tin first.
Soldering Tips For Smooth Seams
- Experiment with temperature to suit YOU. Find the temperature that works for you. This will change depending on what you’re doing too. Edges, internal seams, decorative soldering. They all need slight adjustments in temperature and speed.
- Too much flux can cause problems. Flux will splutter and can get trapped in the gap between glass and spit when you solder side 2.
- Make sure you keep the iron tip clean by wiping it frequently on a damp sponge to remove the build up of residue.
- Check that your iron is maintaining a constant temperature. Weller soldering irons have the reputation of cool spots and it’s another thing to factor in. The Hakko FX 601 maintains a very even temperature which helps.
Learning To Relax
- Don’t worry about doing the seam in one pass. It creates too much pressure. Try making a run of solder over the seam without worrying about smoothness. Then go back and make the bead on the second run. As long as you let the solder cool down in between you can go over it a few times.
Let go of expectations, it’s liberating! - Learn to slow down, you’ll make smoother lines if you do. Because glass expands at the edges when heated it’s very VERY unlikely that you’ll crack the glass. Soldering overlay in the middle of a shape is much more likely to crack the glass so you have to speed up a bit with that.
Answers to 7 Common Soldering Problems
Question 1: My solder won’t stick to foil
Milly’s Answer:
Never fear, there are various things you can try, some more elaborate than others. Make sure you’ve eliminated these 3 general pointers first:
- Check that your iron temperature isn’t too low or hitting a ‘cold spot’
- Soldering in a very cold room can affect it too
- Check that your iron tip is clean
This ‘solder not sticking’ problem is nearly always caused by the glue from the foil. It can leak outwards and upwards. This can get on fingers and spread further, preventing solder from sticking.
To remove this glue before soldering you can try a variety of approaches:
1.
- Use a magic eraser or alcohol to clean the foil before fluxing and soldering.
- Then apply flux. This also helps clean the foil. Gel or paste fluxes are best if you have this problem.
- Leave it on for a minute or so before reapplying and soldering.
2.
- Wipe the foil with a lacquer thinner or acetone. Acetone is very aggressive so be sure to vent the area well.
- Apply gel/paste flux and solder.
3.
- Fine steel wool can work. It makes a mess so try the other options first.
- Dampen it down, use a mask and make sure you clean up all the bits afterwards before flux and solder.
Try them and see which one works best for your particular situation.
Question 2: My solder won’t stick to zinc
Milly’s Answer:
First eliminate the 3 general soldering pointers above.
Then try the following:
-
- Immediately after cutting, briskly wash the zinc with alcohol, to remove the oil present after manufacture.
- Scrub lightly with a brash brush at each joint and use paste flux. Try Nokorode paste flux.
Question 3: Is it okay to use 50\50 solder for tinning and go over it with 60\40 solder?
Milly’s Answer:
Yes, that’s absolutely fine. You can also do the back side first in 50/50 and then the front with 60/40.
That way you fill any gaps with the cheaper solder and finish off with the better finishing solder.
Question 4: How do you remove solder to take something apart?
Milly’s Answer:
-
-
- Use gravity to melt the bulk of it off.
- Hold one end up and heat and ‘scrape’ the solder down off the seams.
- Safely flick the excess off. Repeat for all seams.
- Then use the soldering iron tip perpendicular to the seam to ease it apart.
- You can insert aluminium strips (cut up a drinks can) in between the seams as you go. This ensures that the pieces don’t stick back together as you go.
- Wear gloves and ventilate the space when soldering.
-
Question 5: How do you achieve smooth solder joint at the junction of multiple pieces of glass?
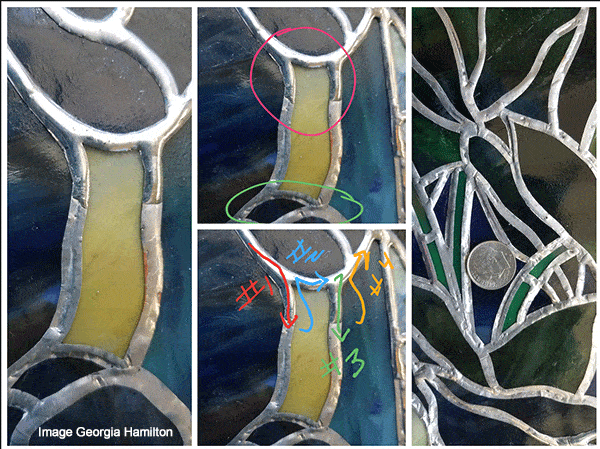
Milly’s Answer:
Continue a little way past the junction, leaving a little ‘tail’ of solder, then return and do the same from the other solder lines to the junction, leaving a little ‘tail’ in all directions (see image, above*)
When you’ve finished the main line you can go back to each ‘tail’ and easily pick up where you left off.
This will avoid solder collecting at and forming lumpy intersections.
It’s far easier to pick up a single line than going back to the join to neaten it.
*thanks to online student Georgia Hamilton for providing the illustration
Question 6: How can I prevent a cloudy film forming beside my solder lines? And what exactly is it?
Milly’s Answer:
-
-
- Wipe the solder clean with alcohol before you solder
- Keep wiping the flux and gunk off while you’re soldering
-
What is it?
My online student Gail Koebke* found out the ‘official’ answer to this by writing to a solder manufacturer:
That ugly grey gunk is called dross. Dross is a byproduct of flux residue and oxidation.
If the blob builds up so much that the solder starts to run over the sides of the foil use a little alcohol on a small piece of kitchen paper and clean off the seam.
Now go back and add a “little” fresh flux to the seam, and run over the seam again. This usually will result in a clean solder seam, but if the dross worked its way into the solder as you worked the first time it might come back to the surface and continue to give you grief.
In that case just clean it again, re-flux a little bit, and run the seam again.
*Thanks Gail, very top notch information sleuthing 🙂
Question 7: How do you tack leaves (or other shapes) on top of beaded seams?
Milly’s Answer:
- Flux the top and tail of the leaf
- Melt a small blob of solder at either end and tack solder by holding the iron perpendicular to the stained glass.
This reduces heat transmission and gives you more control.
- To neaten the seam let the tack solder cool
- Reapply flux
- Bring the iron tip flatter towards the seam to increase heat transmission and melt the blob into the seam
- Temperature Tip. If you’re a quick worker, 420, if slower, 360
If you have any other tips, feel free to add them in the comments below. You may help others achieve smooth solder seams and eliminate common problems. My students often find good ways of explaining things to help the penny drop!
Have unsightly gaps? Go here to see a video on how to fill and solder them
Let’s not forget about safety when using solder.i have had a tiny bit of solder land on my hand and a big ouch! That stuff is really hot! So protect your eyes and wear long sleeved shirts and pants, gloves and shoes with socks. Ventilate the room and have a fire extinguisher around you just never know. Safety first
Very good points indeed Larry, thanks for reminding us all.
And while we’re on the subject, I have a safety page here with other pointers to take into account everybody 🙂
I removed the bevels from a discarded cut glass door. The adhesive was very difficult to remove until I discovered that WD-40 is terrific for removing adhesives. I was able to reuse all the glass and much of the brass. Now I also use WD-40 to clean up my scissors after cutting foil.
Fabulous tips Jo Marie, thanks so much 🙂
Hi Millie and everyone in your stained glass circle. I have been around for more than 40 years doing this stained glass business and like someone just said ‘ your never too old to learn’. I really appreciate seeing all the comments that people have about their successes and failures,because that’s how we learn from one another. I came across your site many years ago and have followed along since. Just wanted to say thanks to all that participate because it makes all of us better and we feel like it’s worthwhile to carry on even if we do have some failures. Much fun!!Thanks for all the time you spend with everyone helping us get better.
best regards
Em Warner ,Nanaimo,British Columbia Canada. Vancouver Island.
Aw, lovely to hear from you again, Em. You were with me right at the beginning of my online teaching journey. Your experience is very valued and can be added to all the others – and mine – to make a wonderful resource.
Thanks for taking the time to comment 🙂
Thanks Milly and all the participants for your tips and comments.
I was looking with envy at the bird
https://pl.pinterest.com/pin/1337074886635591/
and wondering if it is possible to achieve such a smooth seam manually? I’ve been practicing stained glass as a hobby for over ten years and had never been even close to that perfection.
Normally I use a “watery” flux (I know this is acid) for soldering, but I also have a “paste” flux, which I use for cleaning my iron tip. Recently I gave a try with the “paste” for soldering my piece and surprisingly the seam appeared much smoother than the one with the “watery” flux, however still not satisfactory.
I’m going to experiment with the “paste” flux to improve my soldering.
Aw, it’s tricky comparing oneself to others Janusz. That certainly is some smooth soldering. As you’re experienced, you could try upping the temperature and going faster. Don’t let ‘perfection’ be you ruling star though; keep the joy 🙂
Thanks Milly for your comment.
Back to the “paste” flux, further experiments did not proof their superiority. I rather take your advice and play with the temperature.
Thanks for reporting back Janusz 🙂 Let us know how you get on with increasing the temperature (and solder speed)
Milly:
Your tips for soldering are great for beginners and always helpful for those of us that
need a refresher once in a while.
But … I was quite disappointed at all the temu ads that jumped into your presentation over and over again. If you are getting paid from temu, shame on you. If this is another google intrusion into our lives without your knowledge, I sincerely apologize.
I don’t feel ‘shame’ Paul – that’s a strong word.
I do feel concerned that my readers’ experience is being curtailed and will look into that.
Background: We (there are just 2 of us) had an Ad Free site for 10 years, picking up the rising tab for all the hosting and associated behind-the-scenes costs. With the latest recession we have had to reconsider:
Ads or retire the site.
We know we offer a huge amount of free value to those who can’t afford my classes and didn’t want to cut that off.
We don’t choose individual ads, they’re different for each user (although we did forbid certain types of ads that didn’t fit our world view). The experienced company we use has said the ad density is correct for the amount of articles we offer.
We will certainly look into the density and look at reducing it a bit.
By the same token I hope that you’ll think hard before you shout ‘shame’ without knowing the background to carefully agonised over decisions.
Those like you that do a service by sharing are the stars in our skies. Thank you.
Hi Milly
I love these tips on soldering. If I am working on a large piece I like to divide it into sections to solder instead of looking at the whole piece. Keeps me focused and less frustrated with the long seams.
Your site is wonderful! Cheers
Ruth
Great tip Ruth, thanks. Bit by bit can really help with soldering, both with finish and overwhelm.
So far no one here mentioned foil as a possible issue. I learned from Milly that sprinkling my piece with salt and then spraying with white vinegar removes oxidation on even the oldest foil in my collection of cast off rolls.
I now do this with every piece before I solder and it has helped tremendously. Milly also taught me that this treatment won’t affect the foil glue.
Just rinse with water and dry well before soldering.
Thought this bears repeating and I hope it helps someone else.
Thanks Milly!
I’ve got foil that’s over 20 years old, still in the original packaging! Thanks for this tip!
Toss out your sponge, start with a new, clean,(no soap), sponge. Always use distilled water for wetting the sponge. It will last longer and more importantly, the irons tip will last longer also.
Ps, love your site, Milly!
Thanks for your additional tips Mark. And for loving my site 🙂
Hi Milly and thanks for soldering tips!
I want to add 2 tips that have been game changing for me.
1. As you come to the end of a solder bead go back over about halfway down the bead and the remove your iron straight off. No more lumps or pools of solder at your joins!
2. I use blue painters tape on one side of my piece before soldering especially if I have gaps. That way the solder doesn’t leak out the other side.
Have a wonderful day and thanks so very much!
Another two great tips Jennifer, thanks so much. I’ll definitely have a wonderful day now 🙂
Thank you so much
2. I disagree. The glue from the painters tape could leave residue that may impact soldering the other side. If solder leaks it will only stick to the foil on the other side so why worry about it?
What helped me the MOST was finally getting a quality soldering iron
I agree Elizabeth; cutters and soldering irons are the two pieces of your stained glass kit you shouldn’t skimp on. I wonder which one you chose?
Totally agree. New glassers (is that a word?) think about the initial startup cost but spending more money buying quality tools will save you a lot in the long run.
When going over a bead again to re-work it, do you also need to flux the solder that we laid down first? I hope that makes sense!
Yes, if the flux has evaporated. You might want to wipe it of gunk too – to give yourself the best chance of a smooth bead.
Thanks Millie,
I find that using Canfield 50/50 solder gives a smooth bead pretty much effortlessly. Its the only solder that I use.
I love that solder too, thanks for the recommend 🙂
How do you keep foil tape from wrinkling when tinning.
It sounds as if either your iron is too hot or you’re taking too long in the same place. Tinning a very quick swipe over and doesn’t give the foil a chance to wrinkle. Try turning your iron down or going faster and see if that helps.
Another option is to use only quality foil tape. I will not post brands here but you can easily search and fine the best brands. The glue they use is much more resilient to heat which may be your issue. But no matter what tape you use Milly’s recommendation stands.
When I made stained glass pieces I found the best way to get the solder smooth was to take deep breaths and gently run it over the lead.
Keeping calm and steady is the way to go Katharine 🙂 I’m assuming that’s what you meant; I haven’t heard of breathing on solder to get it smooth but I’m always willing to learn if you swear by it!
I also clean the soldering iron wiping sponge before each use. It seems to collect gunk and will show up in your solder.
Important addition Kimberly, thanks 🙂
As a long-time electrical engineer this is all solid advice. Clean the iron on a sponge or wire wrap after each pass and work in a smooth motion. Everyone is different so find your mojo and roll with it.
I know you meant deep breaths to mean calm yourself. But never blow on solder to cool it quicker, it forms a much stronger bond when cooling by itself.
After spending four years away from my glass studio, I had many things to relearn. The major challenge was soldering and it was like everything in life…I had to slow down, I was frustrated that the macular degeneration changed my depth perception, but I began adapting, one solder line at a time.
My biggest discovery and “ah ha” moment came to me when I was working on joining panels of outdoor spinners. I just couldn’t seem to get my iron too in the 3d seam line but discovered a technique quite by accident. I found if I melted off a strip of solder the same length of the corner from top to bottom, and lay the cool solder piece into the fold, I could take my iron and melt the solder piece slowly from top to bottom and it worked marvellously! I proved to myself that being legally blind in one eye would NOT stop me from learning tricks to do what I once did so easily before my eye disease.
Thanks for taking the time to add that trick Diane. I can see it would work if you had the right width foil and solder. I say that because we in Europe are sold thick solder sticks and it would be far too much solder for a seam. By the same token, if you had narrow foil it might be too much solder. But a great idea if it ticks the points I’ve made 🙂
I’m glad you’re back in the stained glass fold.
Some of my soldering lines are clumpy and too thick. It may be because it’s a combo of old solder and new solder of different kinds. But I’d like to just remove it and try again. Can it be removed? Is the soldering iron supposed to lose its temperature while you are using it?
You can flux and melt off excess solder using gravity and scraping and ‘flicking’ the solder off the seams – carefully and wear safety gloves and goggles. Alternatively you could reheat them and try again, making sure you don’t overdo one area.
Honestly? I’d move on to a new piece and be philosophical about your learning process; it takes time to improve, bit by bit. It’s discouraging to keep going over the same thing and I’d hate you to lose your sense of excitement.
This is the first time I have ever disagreed with your advice . I have learned more from re-doing a project than I have from giving up. While re-doing I discover mistakes that I didn’t recognize in the excitement of production.
Yay, Karen, I love different takes on things, thank you for disagreeing 🙂 I think there’s a balance to be had; I’ve seen students re-do and re-do again and again, teeth gritted to get ‘perfection’ – that approach was what I was trying to discourage. Totally agree that learning by re-doing is valid – so long as enthusiasm isn’t killed off (as in my example).
Thanks for your thoughtful comment.
Heating and flicking 700 degree anywhere solder is never a safe idea. Search for “solder wick” anywhere you shop and buy the widest they have available. It is braided copper wire strips coated with flux created to remove solder. Place it on top of the solder and heat with an iron and it will wick up the solder like a sponge. Just be mindful of the width of the wick and solder you will be absorbing as it can run up the wick and burn you quickly. Once used cut off the piece filled with solder and move onto the next area.
Hello Millie,
I have found a way to cut down on all those strips and drips of solder that are left after cutting pieces.
Rather than “cut” the solder piece by piece and sometimes hold it too long because it’s too short and too hot, I unroll the solder from the spool but don’t actually melt through it to give me a length. By unrolling the spool the solder is never too short in mid seam. When the project is done I just roll the slack back onto the spool. Voila…no leftovers, other than the usual drips. I collect those, put them in a cup and use them for spot soldering. It has reduced my solder budget immensely. A spool lasts much longer now.
That’s a great tips Debi, thanks for sharing. Just goes to show that doing small things can add up 🙂
That’s exactly what I have been doing for years and it works great and is perfect especially with the price of solder.
Solder can be bent over and over before breaking. Go crazy and unspool a few feet to make it easier to solder in any direction and then just reroll it when you are done. If you bend it into a vertical arc it weighs almost nothing and can easily be rerolled when done. Just make sure to wash your hands after rerolling.
Thank you so much for this Millie! Soldering has always been my weak point. Your tips and tricks have helped me so much.
That’s great to know Pat, thanks for commenting.
Hello! My lines are okay but from time to time I need to fill a larger area with solder. I am working on a piece with a car and tried doing some of the grill in solder but it cools so quickly that I can’t get a nice finish. Any suggestions? It may be that the area is just too large to heat at once.
Hello 🙂 You can use either scrunched up bits of copper foil – make sure they’re flush or lower than the glass, you don’t want them to stick up. Or braided wire. I’ve got a video on filling gaps in stained glass with solder here. Hope that helps!
Another option is copper stripping (won’t post product names here). It’s much thicker than copper foil but thin enough to bend it in any shape. It can be used to fill gaps and to strengthen ling lines. Since it’s copper it will readily react to flux and adhere to solder.
Hi Milly,
Thanks for sharing this. One thing I do when soldering is keep a wet cloth near by and clean the iron tip often. Getting a good iron is also important. Some fluxes break down sooner than others. Getting a good flux is equally important.
Great tips thanks Frank. What would you recommend for a flux, out of interest?
Does anyone have a suggestion to clean off solder that appears cloudy? I always clean the soldering and have tried to use steel wool to get it shiny , but not luck.
Have you tried Simichrome Polish after washing the flux off Nancy? Solder comes up a treat with that. Harley Davidson ‘people’ use it for the chrome on the bikes – and we know how they love their bikes!
The best way to clean solder before using the Simichrome is the Mr. Clean Magic Eraser! No water on it just the way it is. It’s awesome.
Thank you for sharing your tip Jennifer! It’ll be much appreciated by everyone reading this I’m sure 🙂
Thanks Millie .
There can never be enough tips on getting that perfect solder line .
Some tips just ‘click’ and work for you, others don’t so much. It’s the nature of the beast! Good luck.