When soldering stained glass copper foil you’re aiming for a slightly rounded, smooth seam. There are lots of factors feeding in to your success with this!
The main ones are:
- how hot your iron is
- your soldering speed
- sufficient flux and the cleanliness of the tip
If you’re having trouble getting your solder seams smooth there are a couple of techniques you can learn to improve it.
If you don’t have a local class my Stained Glass Made Perfect course has helped many people achieve neater solder lines in their work. And we know how important they are! The course is self-paced and online so you can learn these soldering techniques even if you are unable to get to a class. You can find out more about it here Stained Glass Made Perfect.
Click the link below to jump to the section:
Soldering Stained Glass Mitred Corners
Soldering Stained Glass Copper Foil Seams

One of the things I get asked about most is how to make a smooth solder seam. Here are some suggestions:
Question: I was wondering if there is a better way to make my solder seams look better. I always have a chopped up look to my seams.
Milly’s Answer: “Chopped up seams” (nicely put!) could be a couple of things:
- you’re soldering too fast so the solder doesn’t have time to melt
- your soldering iron isn’t hot enough and again isn’t melting the solder sufficiently (I like the Hakko Iron – paid link)
- or you are using the ‘hold and lift’ method but going too slowly, so the solder in one area hardens and leaves a visible line where the newly molten solder joins.

60/40 solder (paid link) is better for soldering copper foil as it runs well, so it could be that you’re using 50/50 which makes a smooth line a little more tricky – although certainly not impossible.
Fixing Soldering Mistakes – Solder wick
If you make a mistake with solder and want to remove it, there are ways!
- First try gravity, holding the panel vertically and heating up and ‘flicking’ the solder off safely.
- If this doesn’t work you can use solder wick. It’s a braided copper ribbon that you lay on top of the solder and heat with your iron. It wicks away the solder down to the foil/lead, after which you just cut off the used wick. It’s very helpful when gravity isn’t the way to go.
Soldering Stained Glass Mitred Corners
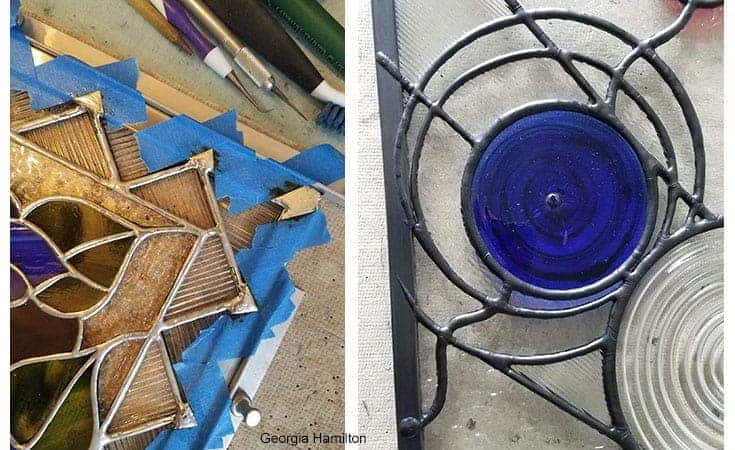
Masking or decorator’s tape will help if you want neat soldered corners for your frames. This technique works both with zinc or lead frames and finishes your panel off a treat.
All you need to do is:
- carefully stick tape either side of the lead or zinc mitred corners. This can be at right angles or 45 degrees, depending on which you like best
- flux and solder the gap in between
- remove tape once solder has cooled
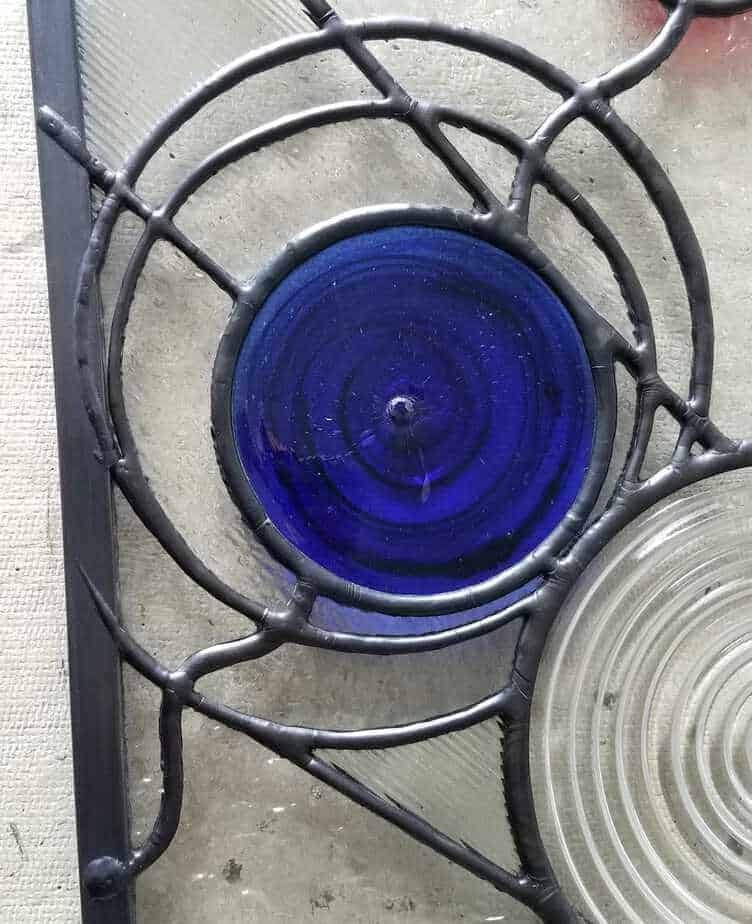
To add a bit of fun and pazazz to your edges you can take this one step further to create decorative elements:

Can you see how Georgia Hamilton has used the tape to create the soldered triangles (L) and swirly soldered lines (R) on her edges? It adds a lovely finishing touch to her work. Thanks Georgia!
You can create dotty soldered edges, too!

Helpful Soldering Resources
I’ve got a couple of pages on my site with more information about soldering stained glass copper foil:
And more answers to common soldering problems here
And then there’s this YouTube video – not mine this time! – that’s very helpful here for running a bead. She does seem to put quite a lot of flux on, so be careful you don’t put too much on as it can splatter and pop.
It’s 18 minutes long but the nitty gritty starts at 5 minutes if you get impatient easily!
Running a bead looks easier than it is and can be disheartening for beginners or refreshers if you haven’t given yourself enough time to practise with the feel of how the solder behaves. So don’t give up!
I hope these resources help.


if I want to make a coffe cup or a ‘cocontir’ , is there a kind of material that is not toxic like lead?
with 100% lead free
jacques savard 47 71
You can get lead free solder for items that are to be touched Jacques.
I’ve found, that when finishing a project, it is a good practice to do a last “bead check). Your bead’s can be smoothed/corrected by just running the iron over a mounded seam and “herd/move-off” any excess solder to improve the look of the bead!!
Great tip Richard, thanks. There’s a fine balance between messing it all up again or getting it as you want it. You seem to have found a way, that’s brilliant.
Thanks that was a great video. I was wondering about the gaps on the edges of the leaves for example. I noticed you did not fill them with solder. If I don’t want to use a frame is that a concern?
Eagle eyes! Yes, it would be a concern. If you were not framing this piece you’d have to go to the edge of the leaves and then finish the panel off with a beaded seam. I show how to do a beaded seam in this video here. Great question, thanks April.
Just so’s you know, the soldering video above isn’t me. I’ve changed the wording to make it clearer. I’m glad you found it helpful though, that was the idea 🙂
Hi Milly, Thank u for this video I really learned a few things from it I found out some of the mistakes I have made in the past when dealing with foil. This video was very helpful. Many thanks, Michelle Dehart
That’s really great to know Michelle, thanks for taking the time to comment 🙂 May your soldering get better and better!
Very interesting information…thank you Milly. I have found over the years that the key thing for me to get nice straight solder lines is how I hold my iron. I always thought that by holding the tip to the work it would flow thinner and more even..but it turns out that for me holding the flat side of the iron helps me to make a more unified smooth solder line…learn something new every day…have a great day Milly!!
That’s a great observation Cindy, thanks. You’re so right, the angle of your iron effects the amount of heat transmitted to the solder. If you’re doing something delicate you might want to make the tip more vertical so that it doesn’t melt too quickly and too much all at once. A good discussion, thanks!