Adding wire working to stained glass gives your project a whole new look. It adds detail that you can’t get with just stained glass and copper foil alone.
Click the links below to go to the different sections:
Wireworking Eyes
Adding Wire Flower Stamen
Decorative Wire Working Spiral Tutorial
Using Washers For Eyes
Using Wire and Solder Together For Detail
Using ReStrip for a Beak
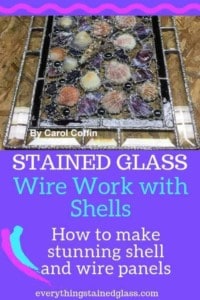
Wire Working With Shells
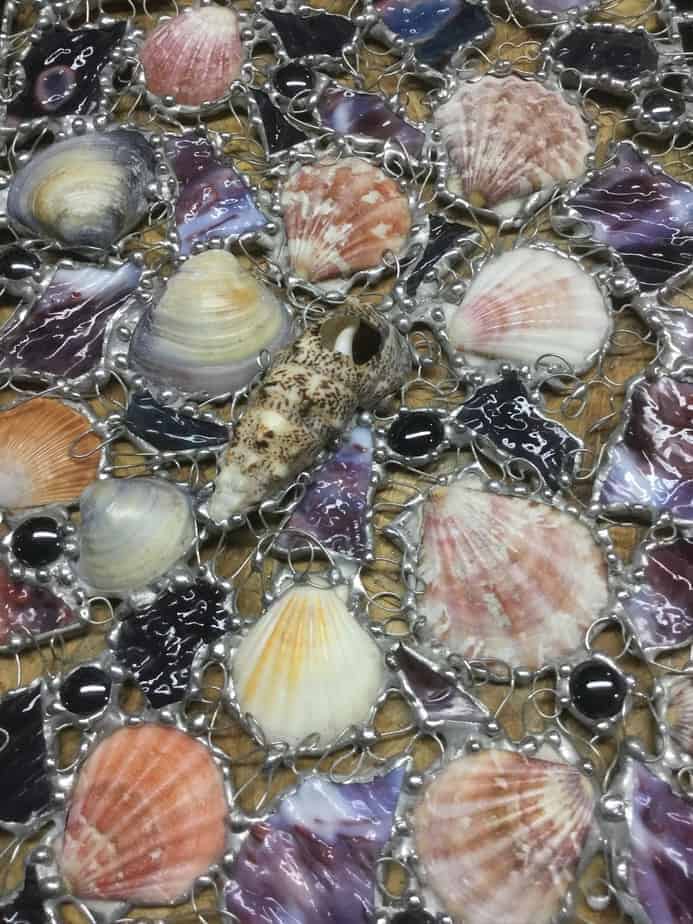
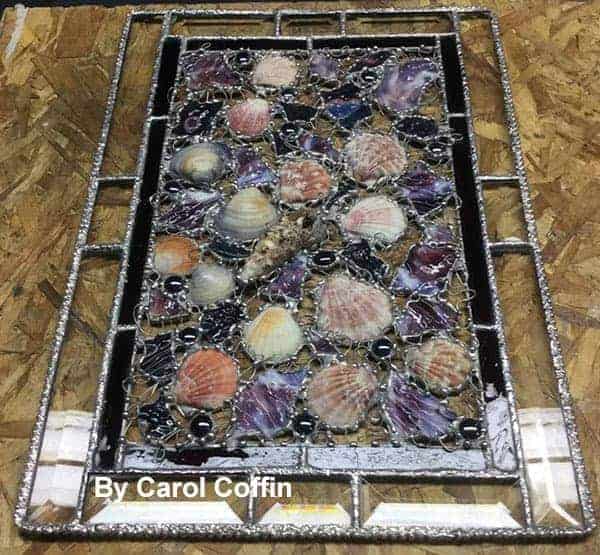
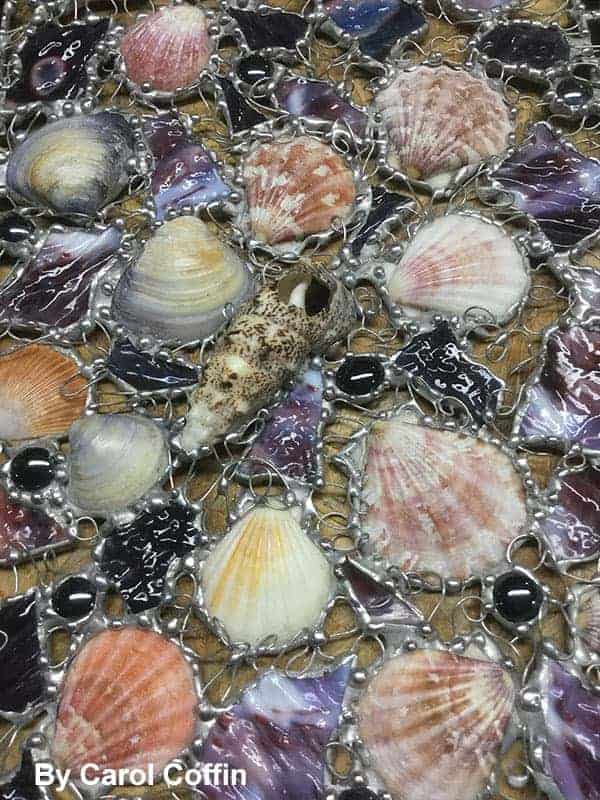
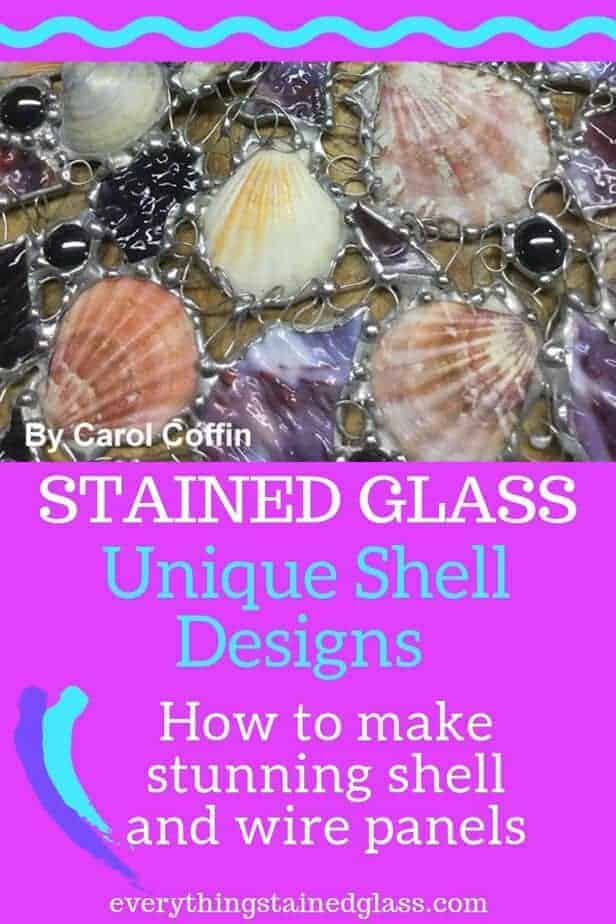
These stained glass, shell and wire panels are COMPLETELY unique. They’re lovingly – and patiently! – made by Carol Coffin.
Carol combs the beaches of Maine to find her shell treasures particularly after stormy weather.
If you don’t live by the ocean you can buy bags of shells at local hobby stores. Try to make sure that they’re sold responsibly and aren’t denuding our beaches 🙂
As you can see from the photo above, Carol obviously is very creative and has found this outlet. If you’d like to start creating totally unique stained glass you might want to look at my Plating Magic course. It shows you how to layer glass to achieve ALL sorts of stunning effects.
You need: drapery glass (you can use any stained glass but this glass goes particularly well with the shells), shells, thin wire, gridded paper, mosaic glass cutter or glass saw (if using drapery stained glass), needle nose pliers, KwikClean, wax
Instructions
Designing
- Decide on the size of your panel and draw it out on gridded paper
- Double borders are recommended to add strength
- Start placing your shells and stained glass to your liking
- Make sure that the corners have shells or glass for added strength
Foiling
- Clean the shells thoroughly. This helps the foil to stick. Wash the shells and wipe the edges with denatured alcohol as you foil
- Foil all the pieces, making sure you burnish securely in and out of the grooves
Wire Working and Soldering
- Start connecting the shells and glass with the wire using the jeweller’s needle nose pliers
- Twist and turn the wire, soldering to the foil as you go
- When you’ve finished make sure that the connections are strong enough to support the stained glass and shells. If not, add more.
- Solder with little balls of decorative balls of solder
- For the border solder just use the side tip of your iron tip to rough up the solder lines. Check with your fingers that you don’t have sharp points. If you do just touch those points with the soldering iron to melt down the sharpness
Finishing
- Use KwikClean flux cleaner and lightly scrub with a soft brush. Your wire and solder will naturally darken in time
- Polish the glass with wax
And finally a helpful tip from reader Karen Forde about burnishing copper foil on shells:
I wanted to pass on a little trick I learned when burnishing copper foil on the glass beads or shells…after wrapping them in foil, put them in a glass or jar and spin it around in a circular motion. They come out perfectly burnished.
And there you have it; THE most amazing panel to wow both you and everyone who sees it! Thanks for sharing your secrets, Carol. She recommends this method only for those people with lots of patience. I can see why 🙂 You can see more of Carol’s work here.
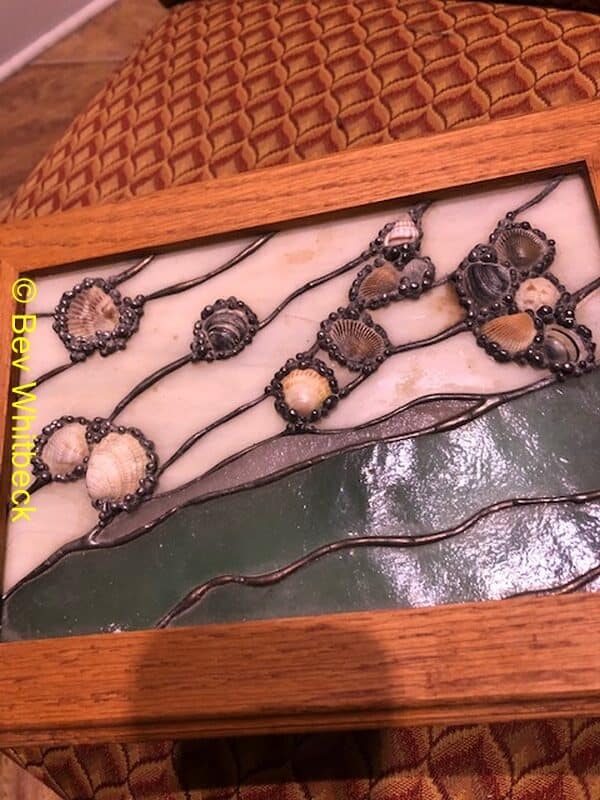
Plus here is another lovely example of shells in stained glass kindly shared by Bev Whitbeck
Adding Eyes With Wire Working
Eyes, eyes, eyes…how to add them without paint or glue?!? Sticking copper foil directly on to the glass and soldering over it is an option but can be quite fiddly.
You can also use a single drop of solder if you have a solder line close by. This too can be tricky as the blob can melt into the solder line or end up too big and too flat.
Wire working offers another option. You’ll need a length of thin copper wire. Recycling old electrical cord is a good source of copper wire. Just strip the coating off and use a thin strand.
- Wind the thin copper wire around a small paint brush handle 3 or 4 times
- Leave an inch 0r so to give yourself a handle to work with
- Slide the ‘mini spring’ off and press it flat – see photo below
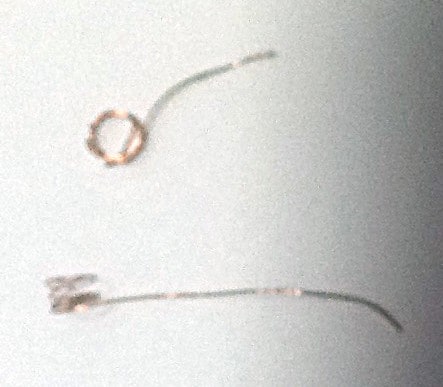
- Add a small blob of solder to the circle and wait for it to cool
- Position the eye where you want it and add another blob of solder to secure it
- Cut off the handle and wash, patina and wax as normal
Try using this technique in different ways and see what stained glass decorative delights you come up with!
Thanks to Vicki Farrell for this simple and effective solution.
Other Methods For Adding Eyes
- If you want to use glue to stick the solder eyes you can use E6000. If this doesn’t work for you, try KOA 300. It’s a UV glue so has to be kept in the dark when not in use. When you’re ready to use it, the piece of stain glass has to be put in the sun for the glue to adhere for 3 to 4 hours.
- You can also drill a small hole and melt a tiny blob of solder into the hole for an eye.
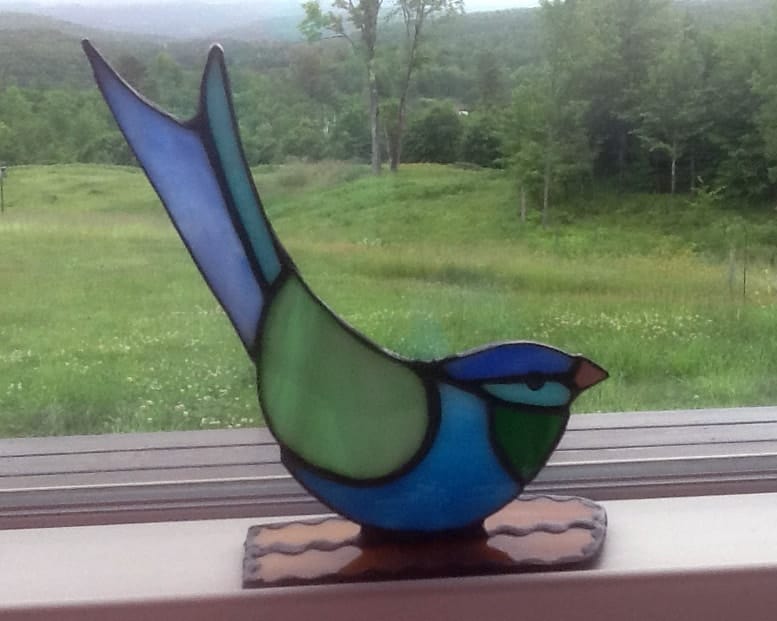
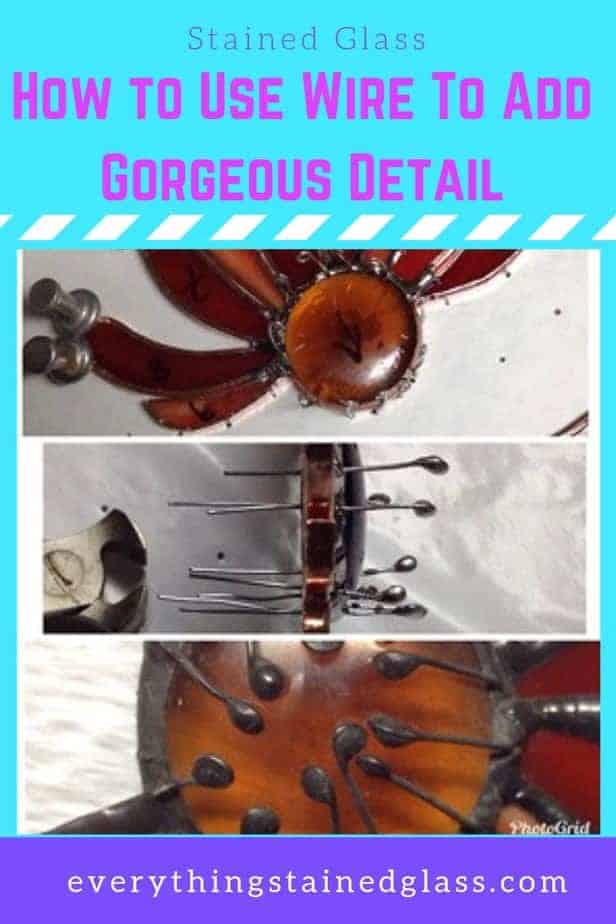
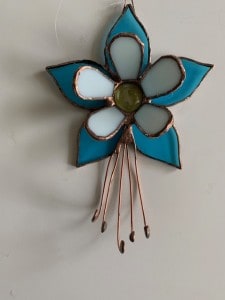
Adding Wire Flower Stamen
Can you see the gorgeous detail Denise Whittle achieved by adding wire working stamens at the centre of the stained glass flower above? It gives a real 3-D effect to the project.
You can tin your own copper wire by holding one end with pliers and quickly running an iron tip along the length of it.
If you’re feeling lazy you can buy wire already tinned. I dare you to go look at Artistic Wire’s range and not come away with a whole selection!
Wire at Amazon* (affiliate link)
How to Use Wire Working To Add Detail
This is an ingenious way of adding decorative wire to your stained glass projects:
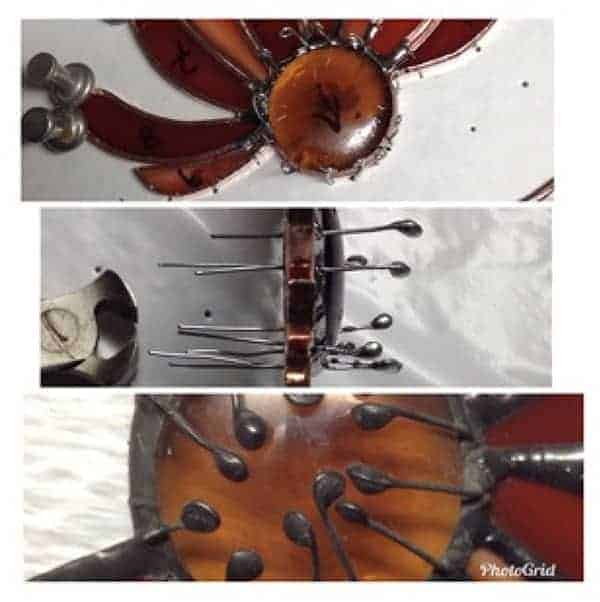
- Snip little pieces of 22G wire and make loops at the ends to drop a solder ball onto
- Poke the wires in all around the nugget at different levels
- Solder the flower and clear glass at the top of the nugget. The wires should stay put
- Lift it up and snip the wires off very close at the back
- To solder the back, place the nugget over the edge of the styrofoam board
- The solder bead on the back side will cover the little end nubs
- Leave the wires sticking up until you finish the panel
- Fold them over after the patina stage
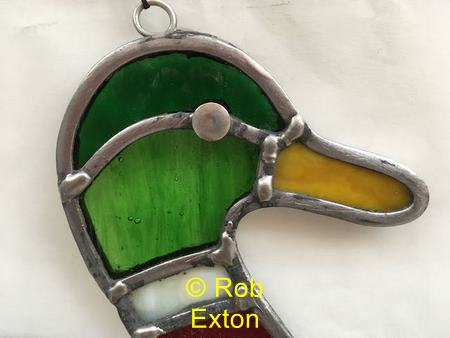
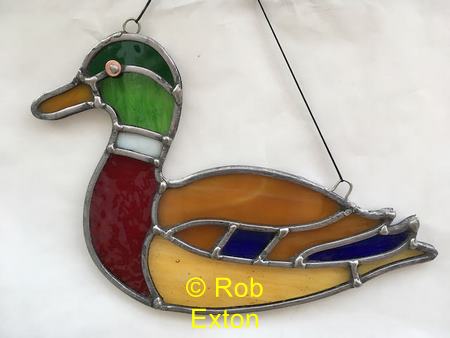
Using Washers For Eyes
Reader Rob Exton has a very clever technique for making eyes. He simply uses a washer and solder.
- Start with a little blob or peak and slip on a copper washer
- Melt the peak to trap the washer.
- You can leave the washer with a copper rim for a 2-tone effect or cover the whole washer for a perfect circle. Both methods are illustrated here.
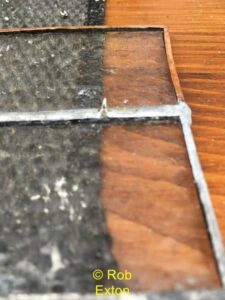
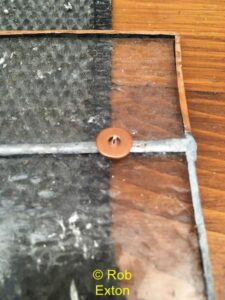
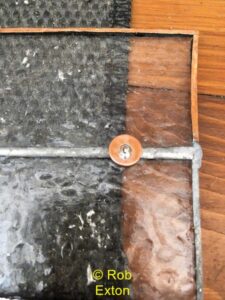
I think you’ll agree that the result is much neater than wire.

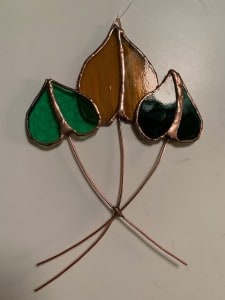
Lovely Examples of Wire Working
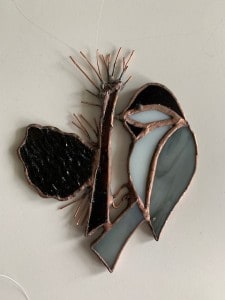
Reader Gail Shears has very kindly shared these ideas and images with me. They show that wire adds those lovely details that elevate your work. Gail has added wire aspen leaf stems, columbine back petals, pine needles and foil covered hummingbird beaks. She’s also used them for ski poles, fishing poles, lines on a sailboat and whiskers.
You can also use copper wire bent in small inverted V shaped hooks to solder on smaller items to use as hangers. They blend in perfectly, especially if you use copper sulphate to bring a copper finish like Gail does.

Decorative Wire Working Spiral Tutorial
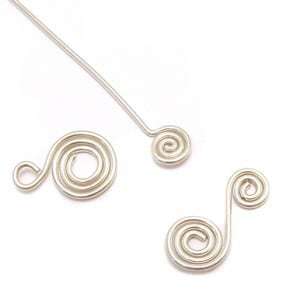
You know those decorative wire overlays that add lovely accents to your stained glass work? Fancy having a go?
I’ve found a brilliant video tutorial for beginners by Beaducation.
This particular one shows you how to make two types of lovely spirals. If spirals aren’t your thing the techniques with the pliers could be used for other wire working shapes.
There’s lots of other videos on the Beaducation site. Have a snoop around with your ‘how can I use this in stained glass’ head on, and see how you get on.
Using Wire and Solder Together for Detail
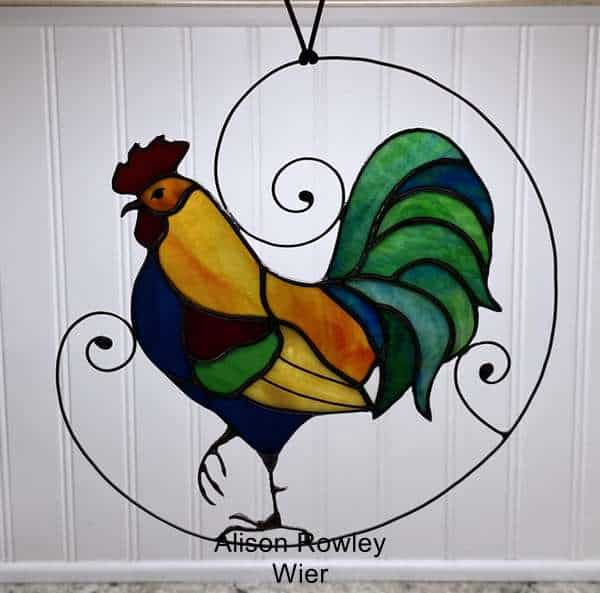
This is a lovely idea. Alison Rowley Weir spotted a similar technique on Pinterest and replicated it to make the feet on this fabulous rooster. She says she used wire and soldered over it. She had to do it over 4 or 5 times to get the effect she was looking for.
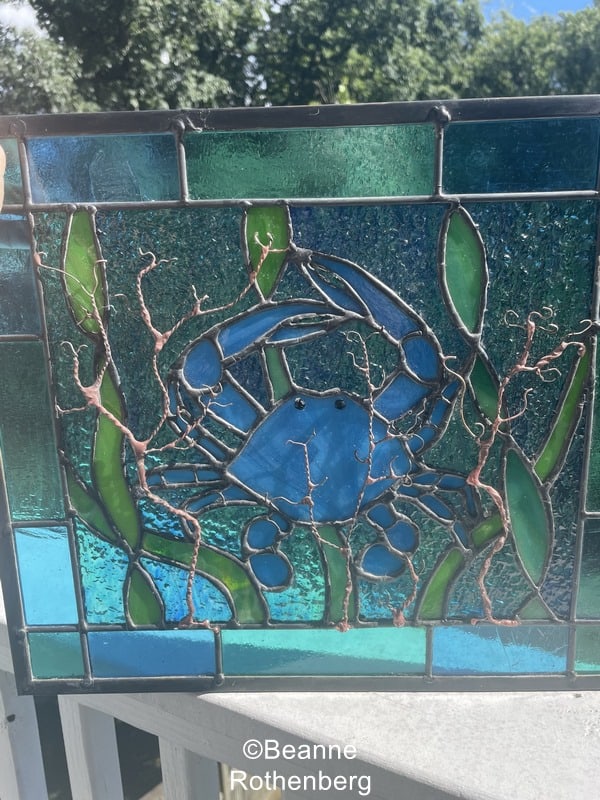
Take a look at this clever use of wire and solder in Beanne Rothenberg’s watery crab panel. Zoom in to see the wire detail. Very nice.
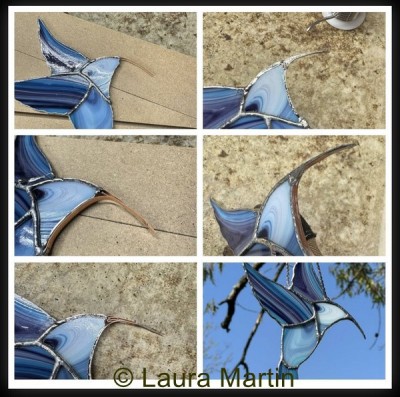
Using Restrip for a Hummingbird Beak
Laura Martin sent me a clever idea* for using ReStrip to create a lovely – and best of all, stable – hummingbird beak.
It’s a bit tricky as the solder wants to roll off the beak. Laura says she turned down the heat on the soldering iron while working with it.
Keep at it and you’ll get there 🙂 Laura did just that, as you can see below.
She very helpfully took process photos along the way for us. Wonderful, thanks Laura.
*Idea originally from AA Glass Studio:

Have a look at another decorative soldering idea here
For more detailed homemade jump ring instructions go here
Return to Home Page
Using Mirrors in Copper Foiled Stained Glass
Want to see more decorative techniques? See this page on stained glass overlay.

Love your newsletters and all the great ideas!
Here’s another way I work with wires, whether small like old telephone wire, or heavy, like electrical wire:
Put the end of a couple strands in a drill, attach the other end to something solid and slowly twist the wires together. After tinning, you can use the wires for decorative work or even hangers. (Hint: solder the ends together first!)
Twisted electrical wire makes a great stem for flowers and adds another attractive dimension to the work!
Thanks so much for this explanation Paul, it’s so useful for readers. I appreciate you taking the time to share it 🙂
DO I POLISH PROJECT BEFORE SOLDERING WIRE TO A SEAM?
No you do all the soldering at the same time and then do the clean up at the end Shirley.
OMG. I tried finding books on Amazon and EBay yesterday on wire working without a bit of success. Today I received this email and I am SO crazy happy to now know what to do with wire. Christmas gifts will be even double the fun to make. Huge thank you for these techniques.
LOL this made me smile Gloria. Thank you for your enthusiasm, you brightened my day 🙂
Love the idea for using shells and wire! I am assuming you need to tin all of the shells and glass before you start adding wire? Thank you, really appreciate the weekly tips!
Yes, it always helps to tin more awkward projects first Nancy, as it either covers the foil or helps the solder cover the foil more easily and evenly if you’re beading a seam.
You’re welcome re-the tips, glad you’re enjoying them.
Wonderful tips Milly!
I’ve been tinkering with using wire accents and just kinda stumbling about but now that I’ve read your tips I’m excited to get going again!
Oh that’s great to hear Jody, come back and let us know if you have any of your own tips afterwards. Good luck.
Just starting out in stained glass. Love the tips everyone is sharing. What would you use for the stems on flowers that need to stand independently in a base of some form?
Thank you
Jacquie
Welcome to stained glass Jacquie 🙂 You can use brazing rods. They come in all sorts of different diameters.
I hope that helps.
Thank you so much Milly. All these tips you give us I enjoy going and trying them. I want work with the wire more. I do have problems with the wire taking solder
You might find it easier if you start off with pre-tinned Kathy. Then once you’ve got your eye in you can recycle copper wire and tin it yourself.
You might also try rubbing the wire with 000 steel wool first to remove oxidation. Also make sure the wire isn’t coated with clear plastic!
Love the decorative wire touches!!!
Thanks Milly for the use of wire as to add to the center of a flower as well as eyes.
Enjoy your tips.
Lynn
You’re most welcome Lynn 🙂
I love your work so much ❤
I’m doing a piece with big sassy hibiscuses and am going to try the stamen technique shown here.. since they will be a bit longer and fatter at the ends than the echinacea, I’m going to try and get then stabilized at the end by barely touching a solder line. Any great suggestions? Love your website and you and yours are always so helpful.
A not so hot iron and a steady hand Georgia!
Does one mold coils and such before or after tinning the wire? Does tinned wire mold as easily as untuned. Thinking it would be ideal to form first then tin the shapes.
You can do either Andrea. If the wire gauge is lower (thicker) it’s more tricky than higher (thinner); the tinning doesn’t make that much difference. Good question, thanks.
comment souder deux épaisseurs de verre différentes.
If you want a flat front on your stained glass panel when soldering together glass of different heights (thicknesses) turn over your pattern and solder Side 2 first. Turn back over and solder Side 1.
I hope that helps Lina.
Si vous voulez une façade plate sur votre panneau de vitrail lorsque vous soudez ensemble des verres de différentes hauteurs (épaisseurs), retournez votre motif et soudez d’abord le côté 2. Retourner et souder le côté 1.
J’espère que cela aide Lina.
Milly, Thanks for posting all these wonderful pieces that have been made with scrap pieces of glass. And a big thanks to your students that made these items and were willing to share them with everyone. Such great inspiration!!!
I have a fairly large supply of scrap glass, and really want to start using it. I’m truly inspired.
Great to hear you’re inspired Gail. Everyone is so kind to share their endless creativity with us, I totally agree 🙂
DITTO X 100
When I need to add an eye to a project, I use a hole punch to cut out a foil circle. I have several different sizes of punches for different sized eyes. Peeling the backing off the foil is a bit of a challenge sometimes, but it’s worth it. Stick the foil, burnish, and solder.
What an ingenious and neat idea Michalene. Do they not come off in time if they’re not soldered to a seam? Or do you glue them on too?
I will create foil details on scrap glass and solder them–and then peel them off, remove the adhesive with acetone, and glue the soldered foil detail in place with epoxy.
Ooh, that’s an interesting approach for overlay that doesn’t have a solder joint to secure it Virginia, thank you for sharing it.
I also use a punch hole and when I stick the copper punch on to the glass, I usually put it on a copper seam so when I solder it is one seam. No glueing needed.
Great and simple idea Ginger. I really like this one, thanks for adding it 🙂
Great idea. Thank you
Thanks for featuring some of my work and ideas! I’ve been doing stained glass for over 40 years and still learn as I go. Such a rewarding artistic endeavor.
Thank YOU Gail, for sharing it with us all 🙂
I like working with wire and now I can do it easy and right. thanks. I love the way she did the stamens on the flower. I’ll be doing that sometime in the future. Thanks for the video. Cheers
You’re always welcome Nancy. I look forward to seeing what you come up with, wire-wise 🙂
Wow! Thanks for all the great tips and inspiration,Milly! Definitely plan on giving a shell and glass panel a go. And when I clicked the link for Carol Coffin’s work I found her studio is only about 20 minutes away from my home. Amazing. Happy Sunday from Maine, USA
How amazing is that Brenda?! Hopefully you’ll be able to see her work for real – that’s more than I’ve been able to, sadly.
I look forward to these ideas all week! So many great ideas and tips. Thank You.
Aw that’s so sweet Joe, thanks so much. Anyone else wanting to receive my newsletters can sign up here.
I have collected hundreds of seashells over the years, and I am excited to have found a project for them.
Thank you for sharing Milly.
Oh great, you’re well ahead already Lilo. Let us know how you get on with them 🙂
I love all this valuable information. Thanks so much for sharing this. Especially love the wire work with the shells, it helps to eliminate the need to cut pieces of glass to match the shape of the shells. Brilliant, just brilliant!!!
Exactly so Gail, spot on. It effectively removes all the lead lines too, leaving the panel lighter and more fluid. I’m glad you enjoyed it.
Milly, do you have a good source for the drapery glass? Thanks.
Good question Mike, thanks. Uroboros have been taken over by Oceanside and they make drapery glass, you can see their catalogues here.
Hi Milly. I do wire work on my stained glass and am wondering if I am required to use the tinned wire. I watch videos about decorative wires on solder but they never indicate that it is necessary to use tinned wire. Thank you. Tamara
You don’t need to use tinned wire Tamara, no. But there is the advantage you can patina the wire the same colour as your piece. If you want the wire to stay copper then no tinning is necessary.
I am Ilie Cristiana and I live in Romania. I am 62 years old and I am in love with stained glass. I do not speak or write in English. That’s why I never answered you. Thank you for the emails received from you. The explanations support me and help me work from home. I am very happy when I receive news from you. Be full of life!
Thank you Ilie, that’s kind of you to write. I’m happy you’re in love with stained glass 🙂 Good luck with your next projects.
If others reading this want to receive my emails, they can sign up to my newsletter here.
That idea for the stamens is so much better than what I have been doing! I see this saving me lots of time…time to spend making more stained glass! Thanks for sharing!
That Denise is a ninja! I’m happy to hear that the idea has helped you Linda 🙂
I love this. Wonderful technique for adding that extra umph to butterflies, dragonflies and other insects! The detail is only limited by your imagination. Thank you so much for sharing.
Absolutely Pati, I can see you’re off on flights of imaginative fancy, hooray!
It appears in the photo that she drilled holes in the nugget? Is this correct?
Would placing a small piece of copper foil on the glass work as a mounting point, rather than drilling?
The wire was poked in between the nugget and the petals, not through the nugget. I hope that makes sense Patrica and thanks for your question.
Love Denise’s technique for making stamens. This looks so cool
Yay to Denise! It rightfully takes it’s place on the page 🙂
This is a super idea, and thanks for sharing!
You’re welcome Liz, I hope it adds some gorgeous detail to your stained glass.
great tutorial on wire spirals. my question is, for soldering decorative spirals to a stained glass seam, what kind of wire can/should be used? will any kind along with flux work, or does it have to be special pre-tinned copper wire for stained glass? thanks for any insight!
Hi Sheila, you can solder any wire – tinned or not – that ‘takes’ to solder. In short, these metals you can solder: tin, copper, brass, zinc, steel and bronze. I hope that helps
thanks for this. it was really helpful and instructive. i am going to definitely try this with my copper wire!
Hey Gina, welcome to the ESG Blog, and thanks for your comment! Really glad you found the tutorial helpful.
I expect a flurry of spirals from your neck of the woods in future!