Stained Glass Overlay Using Copper Foil
Have you ever wanted more detail or depth in your stained glass? A simple way to make an impact is by using stained glass overlay with copper foil. This technique allows you to be creative and add delicate details.
There’s a level of confusion about the term ‘stained glass overlay‘ and ‘shadow soldering‘. I’ve outlined 4 different methods so that you can see for yourself some of the different ways you can use foil overlays:
Method 1. Cut or buy a foil shape and either a) solder directly on the glass or b) solder first and stick on to the glass with glue. These are often referred to as shadow soldering.
Method 2. Cut a foil shape and add it to the front of the piece to create detail.
Method 3. Use foil overlays on the backside of the glass to create contours or shadows. This is also referred to as shadow soldering or ‘shadowing’!
Method 4. Create 3D effects by hammering texture into a copper foil sheet before tinning. This is less used but very effective.
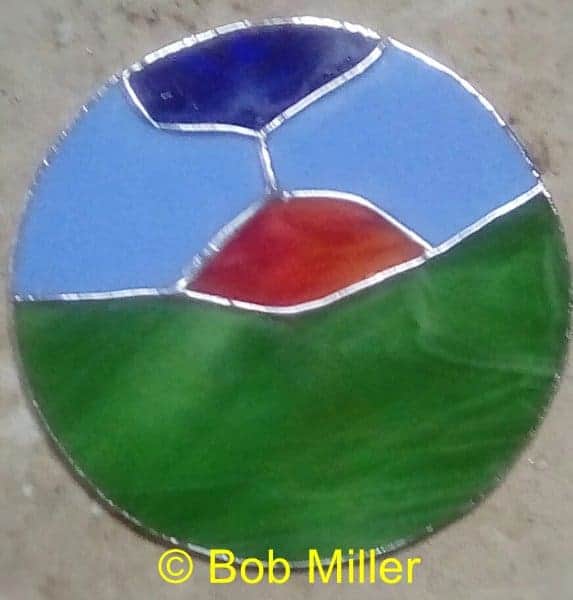
Method 1a – Copper Foil Overlay With Soldered Texture
This technique uses foil to create shape and solder to create texture. Reader Bob Miller has kindly shared his progress images of this technique used to make a textured tree.
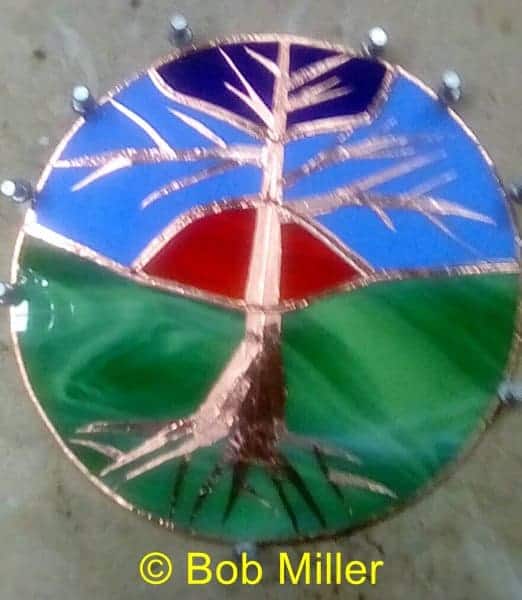
- Design your piece with the overlay in mind before you start
- Notice how Bob has used the foiled seams as part of his tree. This is good practice as it gives the foil overlay far more stability. It also gives you the opportunity to use different colour glasses in your panel, rather than just one colour.
- Construct the basic panel. Clean thoroughly.
- Cut and add the stained glass foil overlay.
- Use paste flux. It is less likely to lift the foil.
- Solder the overlay quickly and don’t hang about on any one area too long.
- Clean carefully, patina and wax.
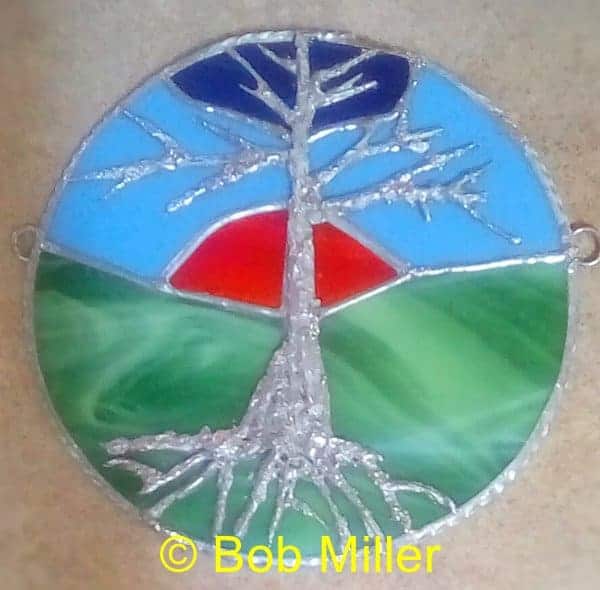
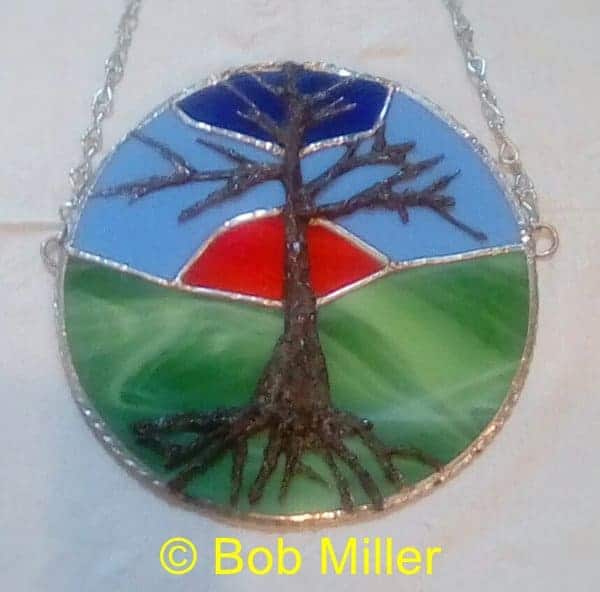
When viewed from the front the tree has texture but when viewed with a backlight it creates a silhouette or shadow.
Method 1b – Sticking Foil Overlay to Glass With Glue
The difference between this one and the one above is that the shape is normally a ‘stand alone’ shape, rather than an integral part of the panel. It is soldered prior to being stuck on to the glass with glue.
- Draw or mark a shape on a copper foil sheet – you can indent the foil in a shape if that’s easier.
- Carefully cut the shape out using a craft knife.
- Stick the shape to a heat proof plate like a microwave plate, burnish
- Use paste flux then tin and/or texture it. You can build the solder up in layers to create the texture you are interested in achieving.
- Wait for it to cool before peeling off the plate
- Stick the shape to your glass panel with glue.
- Clean and patina with your chosen colour.
This video below shows this technique very nicely. The interesting thing is that Risa Dera doesn’t use a heatproof plate but she’s only tinning the foil, not texturing it.
If you don’t want to make your own foil shapes, you can buy them pre-cut. Risa has an Etsy store called Foil Revolution where she sells them.
Method 2 – Using Copper foil Overlay For Tiny Details
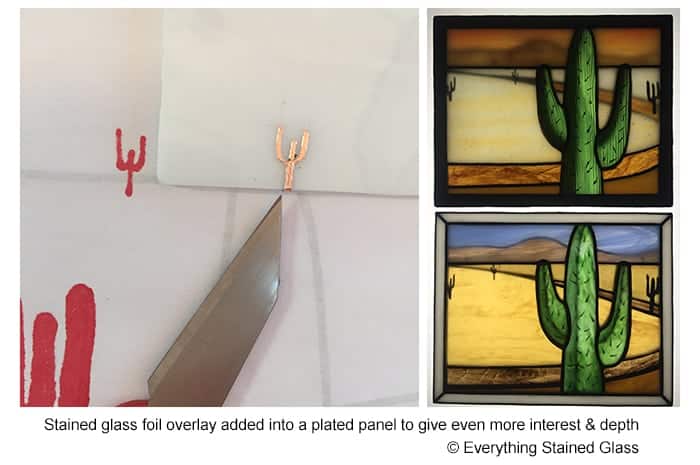
I hope you’re beginning to see that stained glass foil overlay adds a lot to your work. You can be as creative as you like without the usual constraints that come with lead lines and glass.
And if you add in another element – layering or plating glass – your options suddenly widen to become infinite. You suddenly have colours, textures and detail at your fingertips. The cacti in the panels below are foiled overlays. Can you see how they add dimension to the landscape along with the plated glass?
My Stained Glass Plating Magic course includes videos on cutting and soldering overlays and on painting (see those cacti spines?!). If you like creating brand new textures and colours and learning new techniques I know you’ll love this class.
Method 3 – Creating Shadows With Stained Glass Overlay
This is sometimes called ‘shadowing’. The foil can be used on the back of the glass to create subtlety and interest in your work. These images below are examples from Robert Oddy. Have a look at the one on the left. Can you see how the contours make the stems seem really rounded and real? They’ve been created using black-backed foil in strips on the back of semi-opaque glass. Ingenious.
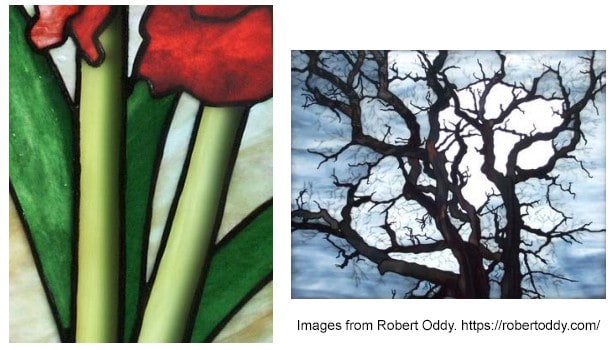
And those gorgeous twigs half disappearing into the sky on the right? You’ve guessed it – foil on the back. Absolutely stunning.
You can find these images and Robert’s explanation in his extremely useful overlay PDF. He really is a true stained glass artist.
Method 4 – Stained Glass Overlay With Hammered Texture
This is a bit of an unusual technique in that it concentrates on texturing the foil sheet, rather than using solder.
In ‘The Kemp’s Tree‘ below by glass artist Howard Mendelson, you can see how this method really mimics the gnarly, knotted, knobbly bark of a tree.
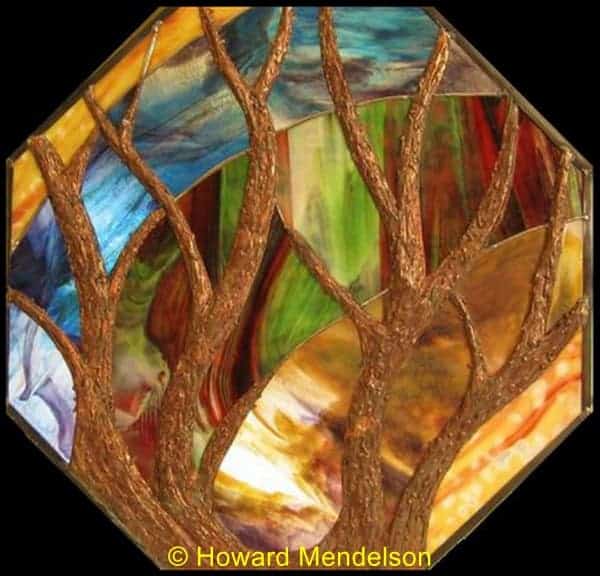
Howard kindly advised me how to go about making something like this:
You need is a stained glass design that includes a tree, a square of copper sheeting and an assortment of tools for making the marks. Some for scratching, some for banging and possibly some for smoothing areas of the foil.
Try:
- knitting needles
- clay tools
- a small hammer
- anything that makes the kind of marks that you’re looking for.
The copper overlay sheet is sold either in squares or on a roll by stained glass suppliers. 36 gauge is fine and can be cut with scissors.
How To Make This 3D Overlay Tree
- Once you’ve made up your stained glass panel you have to decide what shape you want your tree to be, so remember you will be soldering the foil ‘tree’ to the panel so the tree design has to echo the existing solder lines.
- Now transfer this tree design onto the copper sheet and cut the tree shape out.
- This is the time for experimenting! You’re looking to create a shallow relief of the tree so that it has a 3-D feel about it. Work on a bench with newspaper padding with a scrap of suede or mousepad on top. This protects the foil sheet from unwanted marks.
- Try and replicate the main aspects of the tree branch texture with your handiwork. Pockmarks, ridges and dips – think about your favourite gnarly tree and be inspired!
- When you’re happy with your tree, tin the top face with 60/40 solder to give it more strength and then solder it along the foiled seams on your panel.
- To give your tree an even more detailed texture, use 63/37 solder – the quick setting one used for decorative solder – and add solder to your trunk and branches until your tree is more like a tree than… a tree.
- To finish off your stained glass overlay you can use different colour patinas to colour your tree – don’t be afraid to have some parts a different colour than others – or you can leave it copper. Experiment first before you leap in.
The ‘official’ name for this copper sheet technique is Repoussé, but it’s otherwise known as metal art.
General Copper Foil Overlay Tips
To conclude then – the world is your oyster when it comes to adding detail! I’ve listed the most important points here so that you can get started at once 🙂
- if you’re tinning or soldering texture directly on to glass, have your iron on a lower heat and be as quick as you can. Don’t go over the same area repeatedly as the glass may crack
- your iron tip is best held perpendicular to the glass as it transfers less heat in this position
- use paste flux – it’s less likely to lift the foil overlay
- use black-backed foil if you’re creating contours as it’s more realistic
- it’s best to have foil overlay connected to a foil seam if possible. This makes it more secure.
- you can stick overlays on both the front AND back of the same piece
Once you’ve got the bug you’ll be wanting to add Plating (Layering) into the mix… have a look at these two videos to see how it’s done:
Stained Glass Layering: How Plating Works To Create Depth And Shadowing
Stained Glass Plating And The Effects You Can Achieve With It
If you have trouble with parts of shapes being chopped off by lead (or solder) seams when you start assembling, this page will help you.
Designing Stained Glass Letters and Circles
I’m sucking up all this information in expectation of my renewed desire to create!
Thans Milly!!
Annie Bacon
I hope it comes to fruition Annie 🙂 You certainly have the enthusiasm… now to channel it.
Hi Milly
Love your Sunday reports I’m always picking up great information so thanks so much.
I am working on a piece with lettering in it so very timely tips. I am inserting the entire piece into a mirrored picture frame and wondering if I should glue it in and if so what glue for outside (it’s a home address) Or should I caulk it ?
Thanks for your help.
If I’m getting the right end of the stick, I’d use silicone for outside. I’m not sure if the mirrored picture frame is wood or just stained glass though…
Regarding building up an overlay. When i want to create the bark of a tree, for example, I lift the iron tip from the built-up solder and roll it slightly to prevent the solder from setting up sharp points as it cools. Just my approach. I know others also can speak to that.
Thanks for the additional tip Bob, along with your examples above 🙂
I haven’t done stained glass in years. I only used lead cane and wanted to learn about copper foil. I haven’t had a chance to start the classes yet. But am looking forward to them. I have learned so much about both already from just the emails. I’m really glad I found your website. Thank you.
Oh thank you Vicki, that’s kind of you to say 🙂 I hope you find the online courses useful when you get started.
What glue is recommended for adhering the overlay piece using the second method?
The second method doesn’t use glue Meredith. You stick the foil sheet down and trim the foil to shape afterwards. There is always a bit of the shape connected to a seam, which keeps it robust and prevents the need for additional glue.
Thanks for asking, good question 🙂
If my detail is *very* small, as in the nearly-infinitesimal leaves on the stem of a daisy, I will let the self-adhesive backing on the foil do the gluing…which is rare in my work, because I *have* had an overlay peel up. Then I have to clean off the adhesive that isn’t working–with one end of the overlay already soldered to the seam, and then clean off the GooGone or acetone that removed the worthless adhesive, and *finally* glue the overlay back down with epoxy.
I’d rather do all that *before* soldering the connection to the other solder work [the glass seam]. Especially if there’s any *size* to the overlay, or if it extends several inches beyond the lead line–whether the seam is foiled or came, I *always* clean the [relatively weak] adhesive off the back of the overlay, and glue it to the art glass with epoxy. I’ve never been sad about the results when I do it that way.
Thank you for your time Virginia, that’s a very useful and clear explanation for all those wanting to give your ideas a try. They sound tip top 🙂
As always, thank you for your informative newsletter!
Although I have done overlays before, I love the idea of the black backed foil and overlays behind the glass – this is new to me! Always something new to learn! I don’t know if it would be considered an overlay, but I do a lot of 3-D work, and often use copper sheet cut, tooled and ‘bent’ to make flower caylex’s, then a blob of solder to finish it off (i.e. the rose ‘hip’ – hoping my long ago biology is correct!)
So glad to hear that you’re excited by these new techniques Beth. It sounds as if you’re already well on the way to experimenting and trying new things out. Just the right type of student for my Plating Magic course. That’ll really push you forward 🙂
I just love these tips! Thank you so much!
You’re welcome Janine, glad you’re finding them useful.
Thank you for your great emails full of good information, and helpful ideas and how to do them!
Thank you Mary, I’m happy that you enjoy and get something from them. Anyone wanting to sign up for my newsletters can do so here: https://everythingstainedglass.com/dazzle
Thanks sooo much Milly!!
Happy to add to the possibilities available to us Brenda 🙂
Thank you so much for your time to write out this article on how to use foil overlay. So much information that will be very useful.
You’re most welcome Sandi 🙂
Looks like fun I will have to check out your videos
Yes, do Joan. You might find a whole new world of possibilities 🙂