Mixing Lead Came and Copper Foil Techniques Adds Magic to Your Stained Glass
I have been asked more than once if it’s possible to mix copper foil and lead in one project. The answer is yes, you can absolutely use both techniques in the same project. The great master Tiffany himself did!
There are 2 reasons why you might want to do this:
1. Practical Reasons For Using Both Techniques in a Piece
- I find it very helpful to use both techniques if you have large areas alongside smaller more detailed areas. This is because leading lots of small shapes can be difficult.
- You can foil up the detailed area separately and use it as if it were a single glass shape which gets leaded into your panel (see foiled ‘glass shapes’ below)
©Milly Frances, Everything Stained Glass
Tips for Mixing Lead Came and Copper Foil
- You don’t need to foil the outside edges of the foiled ‘glass shape’. The lead came will cover the edges.
- If you leave the foil on the edge it can sometimes peek out from under the came, which you don’t want.
- Well spotted! I have foiled the outside edges in the photo above. Sometimes I find it quicker to foil all round as it saves you thinking about where the outside edge is.
- Don’t put solder on the outside edges of the foiled ‘glass shape’ as it will waste solder. The outside edges will be hidden once you’ve inserted it under the flanges of the lead came.
- When you solder the seams on the foiled ‘glass shape’, stop a tiny bit short of the outside edges. This will make it easy to slip the foiled ‘glass shape’ into the channels of the lead came.
- If you solder right to the outside edge the thickness of the solder seam (top and bottom) will make it harder to fit into the height of the lead came channel.
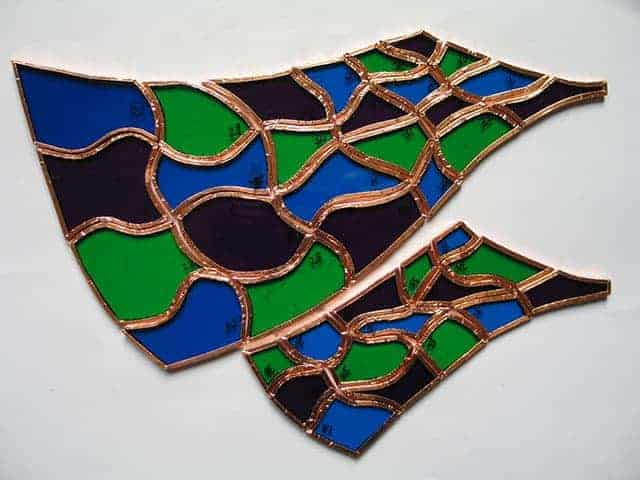
In my abstract door panel below you can clearly see the mixture of lead came with copper foil sections:

If you’re new to using lead came as a technique I would highly recommend you give it a try. It will add a great deal to your skill set and give you the best of both stained glass worlds – foil and lead.
If you don’t have a local class my Leaded Stained Glass Artistry course has taught many people – even those who have never used lead before – how to make a stained glass panel using lead came. The course is self-paced and online so you can learn this lovely technique even if you are unable to get to a class. You can find out more about it here Leaded Stained Glass Artistry.
2. Design and Aesthetic Reasons For Mixing Techniques Together in Your Work
Mixing lead and copper foil gives you a wonderful opportunity to use the qualities of each material to enhance the artistic quality of the panel.
Copper foil gives both movement and a lovely delicate organic feel and this can be contrasted with the straightness and visual strength of the lead came. Imagine a panel containing a house and a tree for example. You could use lead for the graphic house and copper foil for the organic tree.
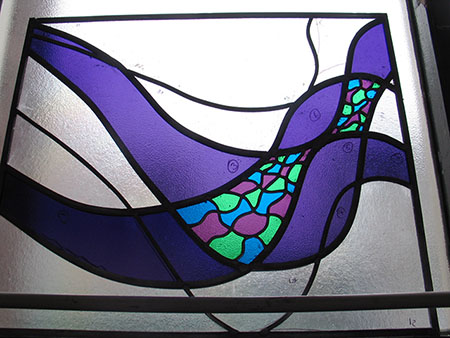
My simple Freesia panel pictured below shows what I mean. I used copper foil on the flowers and contrasted it with the straightness of the lead for the stems and leaves.

Lots of people are happy to use copper foil in external windows but I’ve never done this as I consider the putty (or ‘cement’) under the flanges crucial for weather-proofing. This consideration aside, I absolutely love the combination and have never had any problems mixing the two techniques.
3. More Lead Came and Copper Foil Examples
Follower Joyce Paul highlights 2 possible difficulties in mixing lead came and copper foil:
1) in the construction process if the lead in the central design is rounded, it can sometimes be tricky to keep the foiled pieces level with it. You can use a penny underneath to hold them up. And, the round lead came will likely be higher than the beaded solder line on the foiled pieces.
2) in the patina process. Lead lines using the same patina as the foiled lines tend to take on a slightly different shade. This can used as an advantage but something to consider when designing a piece.


June constructed the left half in lead, constructed the center and carefully slid it into place then continued to finish the project. Fabulous examples aren’t they?
Has anyone else got any other thoughts on mixing lead came and copper foil together? If so, feel free to add them below, thanks 🙂
If you’re unsure which technique is best for which type of project I have a page on that here.

Design Original Stained Glass From Scratch
Stained Glass Lead Soldering The Easy Way
Hello Milly!
Could you tell me how to finish a piece that has both the lead and copper foil? Should I wash and polish the soldered foil pieces before attaching them to the lead? Also, how does the grout work?
Thank you so much for your website – looking forward to taking another class!
I solder the foil and lead, then putty the lead, then clean up all at the same time.
Great question. I hope that makes sense.
Hi Milly,
When I was first learning about stained glass many years ago, I was taught that Tiffany invented copper foil because lead came tended to stretch over many years, if not supported all around by a frame. Thus, glass pieces in hanging lamps made with lead came would eventually loosen and pop out. I was also taught, though, that lead came was best for windows in doors, as the lead absorbs shock better. Do you think it is true that lead came can eventually stretch, and therefore that should be taken into account, depending what your planned use is?
Good question Carlie, thanks. If you straighten it first (and stretch it a little in the process) it won’t be problematic in the future. The lead light cement keeps it in shape for hundreds of years – think Medieval glass 🙂
Have a look at this for more comments on straightening lead came: https://everythingstainedglass.com/stained-glass-lead#stretch-lead
A hanging *mobil* at my church includes a came-wrapped dove whose outline has separated from a deep curve. Not only now looks strange, but may soon drop the hapless white dove. Not sure best solution to repair, do that continues match the other free-hanging pieces over the Baptistry. It seems to have stretched when too warm, then shrunk when chilled again, so . . .
I am learning new things from you, even after 60 years of working with stained glass. Thank you.
When you mix copper foil and lead, do you put patina on the lead also? Do you wax both?
That’s amazing Bonnie; I’m sure I’d learn a lot from you too, if we had a coffee together 🙂
You can patina lead, yes. Just make sure you clean it well after the puttying stage. I don’t wax lead, no.
Hope that helps.
Hi Milly
I used both styles of working on this piece for a light box . I feel the same as you about not using Tiffany style for an external window
https://crackingglass.co.uk/black-miner-window/
Thanks for your top tips , like your style and we seem to have ended up with some similar ideas. Do you always wear plastic gloves for lead work ? I don’t think I could beat to do that although I’m careful to wash hands – the lead does let you know that it’s transferring onto you!
You’re welcome Stella. I do now with the gloves, I hate them though 🙁
Good luck with your future projects.
Hi Milly
I have seen sheets of copper foil and have wondered IF and WHEN plus HOW those would/could be used. Please do you have anything to share. Thanks
Yes I have a page on overlay Nancy, it’s here: https://everythingstainedglass.com/stained-glass-overlay.
I also cover using foil sheets in my Stained Glass Plating Magic class here.
Have fun!
I love the more-organic design-feel in both the thick-and-thinness of the foiled lines and the texture of the solder.
In fact, where I use both in a stained glass piece, what ties the foiled part to the leaded part is that I *tin* all my lead lines. [I always have. That way, the solder joints don’t age at a different rate and a different color than the lead lines.]
Also, where I have foiled a section and inserted it into a leaded panel, I’ve made sure to solder the back side, too–so that it won’t sink lower. If the lead is heavy and rounded [like 1/4-inch lead], I’ll prop up the foiled piece with folded paper to make sure it’s level. Thinner glass needs that, too, sometimes, even if the panel is only just foiled.
If I’m working a panel with *really* thicker glass [as in two layers laminated together], I’ll work face-down and solder the back first. Then I’ll make a template out of cardboard to fit the single-layer part, to support it when I turn it over to solder the front.
I have pictures of each of those projects. Wishing there were an easy way to post them…
I love your processes and the way you’re so careful to make sure you get the effects you want. I like the uneven front as it catches the light in different ways but like the fact that we’re all different and make creative choices as we go 🙂
Tinning the lead was initially a German technique I think? Congrats on being able to do it neatly without melting the lead!
Thank you for your brilliant tips Virginia, much appreciated.
You can email me through the contact form and I’ll get back to you for the images, thanks.
I’d love to see those pictures
Hi Milly, I love your work and the came/foil combo. When you combine them, how do you cut the pattern pieces? Would you use came pattern shears overall, and for the sections that you’ll foil, and then foil pattern shears for the inner parts of those sections?
Thank you so much,
Teresa
Yes, spot on Teresa. Work it all out beforehand and cut accordingly. And while I’m here I’ll just add that if you’re thinking of adding ReStrip to reinforce, this is the time to work this out too and cut accordingly. I’m sure you do that already 🙂
Milly, what great tips you’ve given. I especially like the note and detailed explanation regarding the overlay. I’m working on a project that has a bunch of little teeny pieces that the overlay will be perfect. The lines are the clear background and I was worried that the pieces were so small that there would be no differentiation after I soldered. Thanks for the heads up. And all of your other great ideas and tips.
Aw that’s good to know that my tips help out Ajia, thanks 🙂
Hi Milly, l’m wondering if you have ever brought part of a window up to make it look three dimensional? Thanks for your time and thoughts. Dan
I’m thinking you must mean plating stained glass? When you layer glass on glass and choose the glass very carefully so that you get a sense of perspective? Then yes, I have. It’s a great way to develop detail and depth in your work.
Good question Dan, thanks.
Hi! Thank you for this article and all of your resources! When making a medium sized foiled suncatcher with came framing (only around the edges) is it necessary to cement the edges?
No it isn’t Renee. Sun catchers normally have hobby came rather than standard structural came around them (when it’s used at all) and that doesn’t need puttying.
I’m working on a panel now which includes glass nuggets. I had decided to use foil for this part of the design and I’m really pleased that you’ve confirmed that this should work.
Yes, absolutely it will work Lyn. I’d love to see the finished piece when you’re done 🙂
You’re welcome to sign up to my newsletter here for more tips if you fancy.
I have mixed foil and came in the past, but struggle with the different thicknesses of the two. I have used thin cardboard under the foiled pieces to bring them up to the same level. Do you have any other hints on how to compensate for this?
Try a coin Loren, I use them sometimes when soldering pieces that are different levels.
The thln cardboard technigue works great for me. I have often combined both techniques. Important to use the right sized foil to match width of lead came when finished.
Good point about matching foil width Jay, although you can also deliberately vary the widths to add areas of interest. It’s a very pleasing effect if done well.
I did a couple windows and I think window putty is too cumbersome and hard to work with plus hard to hide so I sealed mine with clear silicone seal. comes in a tube and you can cut the tip small enough to fit your came.
and, if you don’t foil the outside edge, a couple of times (back in the days when I didn’t work 7 days a week ), I used wider came and cut designs along the edge with an X-acto knife. handy for adding leaves and vines.
Some great suggestions here Bill, thanks. Silicone is good for installing windows for sure.
A few months ago I made a 20″ x 30″ panel of an angel. Her face, hands and candle were just toooo teeny to use lead! So I copper foiled all the small pieces and, like Milly says in this post, treat it like a single glass panel. I was nervous how it would come out but was thrilled with the results!
Great to know that you worked this out for yourself Laurel – and that it worked a treat!It really does help to use foil for the fiddly bits, and it looks nice to have the contrast, too. Can’t go wrong 🙂
Dear Milly,
Dear Me you are a clever one!
I wish thatI had thought of combining in my last panel with 3 roses!
I had nightmares converting the rose petals to shape with lead cames!
I will now have another go as my first copper foiling Project!
Regards
Ted Australia
LOL! A panel with three roses sounds the perfect candidate for using foil and then incorporating with lead… next time you’ll be ready 🙂
Hello Milly,
Great ideas, as usual! It might be helpful to see the abstract piece completed. The Freesia is striking.
Come to think of it, seeing several hybrid works might get me working with lead!
Good idea Vicki, I’ll post the finished piece. Glad you like the freesia; it was designed to maximise light so had to be simple. Sometimes it’s hard to be simple – I have to force myself to remove things to keep it ‘clean’ and clear.
Dear Ms. Frances,
I just wanted to tell you how much I enjoy receiving your newsletter. There is always
something new to learn. Thank you.
Sincerely,
N.D. Kagan
That’s kind of you David, thanks for taking the time to comment 🙂
If anyone wants to receive my free newsletter you can sign up on this page.
Thank you very much for the article. It was very informative. Your work is beautiful.
You’re welcome Nancy. I’m glad you like my work – I know abstract isn’t everyone’s cup of tea but I’ve always gravitated towards it 🙂
Hi Milly, I am just wondering which flux you would use at the join between lead came and copper foil ?
Thanks for all the great tips.
You can use any flux. I tend to use tallow with lead came but you could use paste or liquid.
Good question Jacqueline, thanks for asking.