Stained Glass Lead Came Made Easy
Stained glass lead came comes in 6ft lengths sold in single lengths or boxes or in spools which have to be unwound and stretched before use.
There are many different widths and depths and a bewildering array of profiles or ‘sections’ – for example, the most commonly used round, flat, H and C to the specialist Colonial.
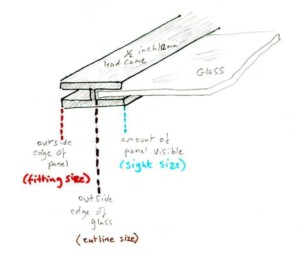
Traditionally, 1/2″ (12mm) flat lead is used for the edges of leaded stained glass windows, as it gives you 3/16 ” (5mm) leeway on each side for any errors in the measuring/fitting process.
Click the links to jump to the other sections on the page.
Lead – To Stretch or Not Stretch?
Jump to Storage Ideas
Getting to Grips with Stained Glass Lead Came Sizes
It’s very easy to get confused with all the different measurements – the width, the channel, the heart – they are all equally important but mean distinctly different things. This diagram is of an Flat ‘H’ profile on its side, as this is how we use it in stained glass. It will help you understand which bit is which and will give you the confidence to be able to order lead for your project.
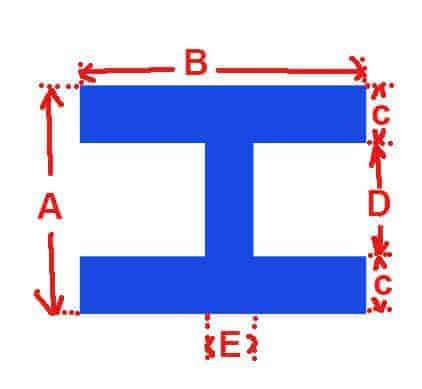
- A = The Height. This is the total thickness of the section from top to bottom
- B = The Leaf, the Flange or the Face. This is what you see as the ‘lead lines’ when you look at a stained glass panel
- C = Leaf, Flange or Face thickness. This is can be rounded or shaped, depending on the profile.
- D = The Heart or the Channel. This is where the glass slots in. If you have very thick or fused glass you might need a high heart lead.
- E = The Heart Thickness. This goes in between the glass pieces and determines how strong the lead is. If you want to strengthen your panel you might want the heart to contain a steel core.
Stained Glass Lead Came Tips
The main reason for choosing a particular lead is the best one – how it will look in your stained glass window design.
Different Lead Came Profiles – What To Use Them For
- Stained glass lead came with a round profile is better for leading curved shapes, as it doesn’t pucker up like the flat lead does.
- Wide heart lead is higher than standard came, and useful for plated glass (two pieces leaded together on top of each other) and for antique sheet glass that is irregular in thickness.
It’s also useful if you’ve slumped your piece and it’s a bit uneven. - Steel cored lead is used for strengthening stained glass panels, and can accommodate slight curves.
- Alternatively, if your design has deeper curves that you want to strengthen, you can buy separate hardened steel wire that is placed next to the heart of the lead when you’re leading your stained glass panel. You can buy it singly or by the kilo (approximately 12 lengths).
If you’re new to using lead came as a technique I would highly recommend you give it a try. It will add a great deal to your skill set and give you the best of both stained glass worlds – foil and lead.
If you don’t have a local class my Leaded Stained Glass Artistry course has taught many people – even those who have never used lead before – how to make a stained glass panel using lead came. The course is self-paced and online so you can learn this lovely technique even if you are unable to get to a class. You can find out more about it here Leaded Stained Glass Artistry.
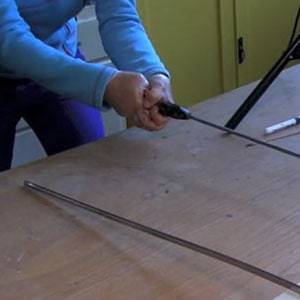
To Stretch or Not to Stretch Lead Came?
I always stretch came but the lead I buy is very pliable and would be impossible to work with if I didn’t. If you buy hard lead you won’t be able to stretch it much and if you buy pre-stretched lead you won’t need to stretch it. So it’s not simple!
Technically, you’re not actually stretching the lead, as stretching can actually weaken the lead came. Stretching (or straightening) the came gives it rigidity and therefore makes it easier to work with. This increases the stability of the came during the leading process.
It won’t, however, give it any more strength so it’s not essential in a structural sense.
Stretching helps untangle all the kinks that invariably happen how ever hard you try to stop them. This results in more pleasing lines in your leaded panel. But more importantly, if you don’t stretch it before you use it, it will stretch in your project, and you don’t want that.
I use one of these lead stretchers (paid link)
I’ve never seen the need for the more complex and expensive ones but am happy to be persuaded, should you disagree strongly 🙂 Let me know your thoughts about lead stretchers and any other tips you have on stretching lead in the comments below.
Storing Stained Glass Lead Came
Lead Came is heavy and a bit awkward to store and still be able to access easily. Ideally it needs to be kept horizontal and straight.
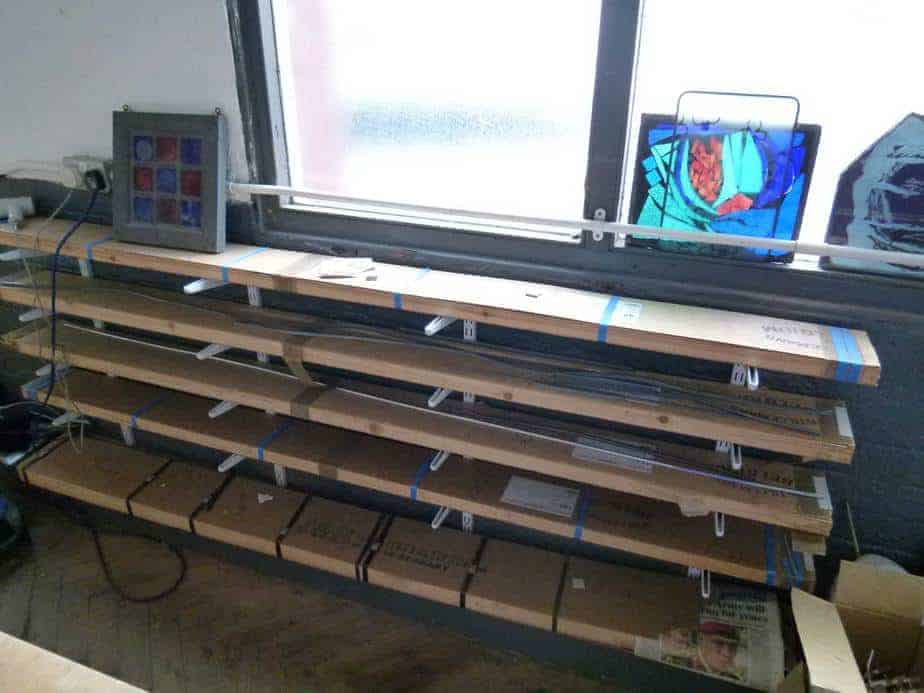
Stained Glass Storage 1
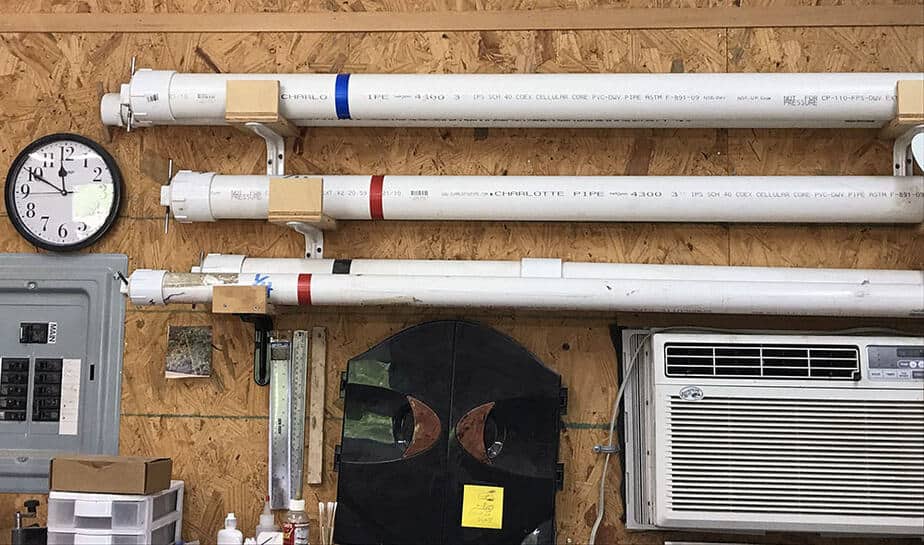
I use a lot of lead came so I buy it in boxes. I store mine by resting the boxes on brackets firmly secured to the wall. See the image from my studio below.
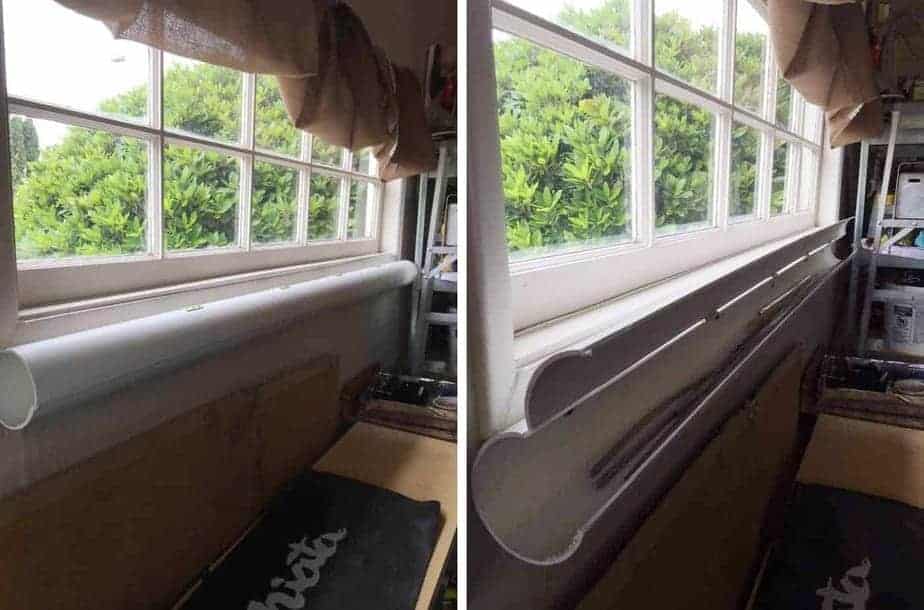
Storage Idea 2
This ingenious lead storage solution was sent to me by reader Jeff. Great idea- thanks!
Jeff buys pre-stretched 6′ lengths from a local supplier. To keep it horizontal, clean and out of the way do the following:
- purchase an appropriate length of PVC pipe and cut it lengthwise
- add hinges along the cut
- make a second lengthwise cut 90 degrees off of the first one
- mount it along a wall
Storing Lead Came 3
Reader Stephen Hazard adds some tweaks to the PVC pipe idea. He suggests the following:
- Use pipes 3″ or 4″ longer than the lead came
- Choose the diameter to reflect the amount of lead came you have
- To stop air getting in cap one end and on the other use a screw cap and receiver with inside threads for the cap
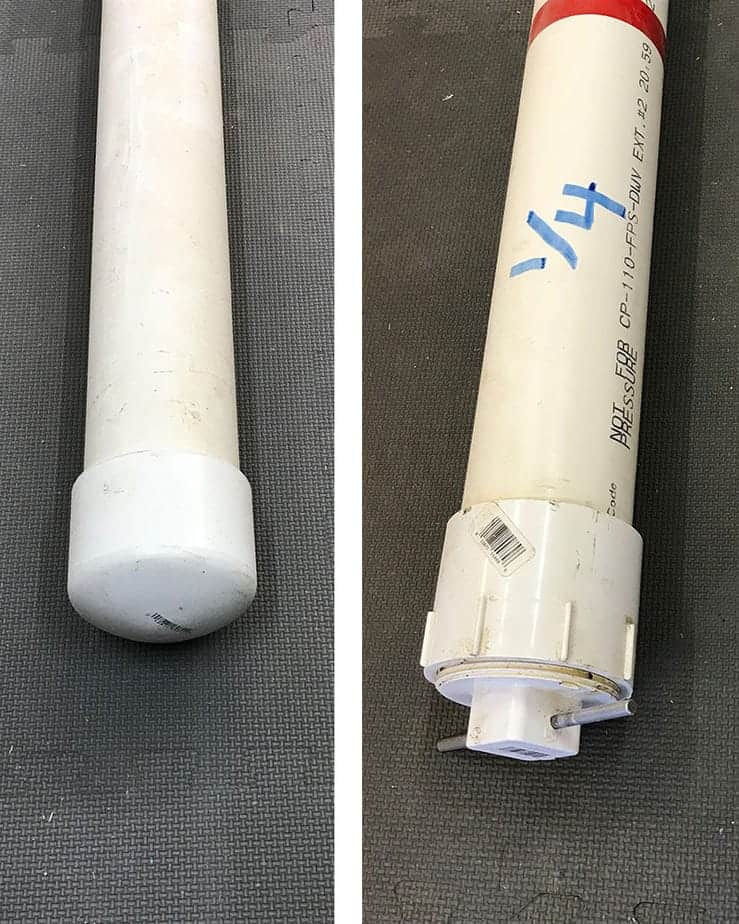
- Drill through the plastic square end and insert a rod to help to unscrew it
- Attach brackets to a wall to store the PVC pipes
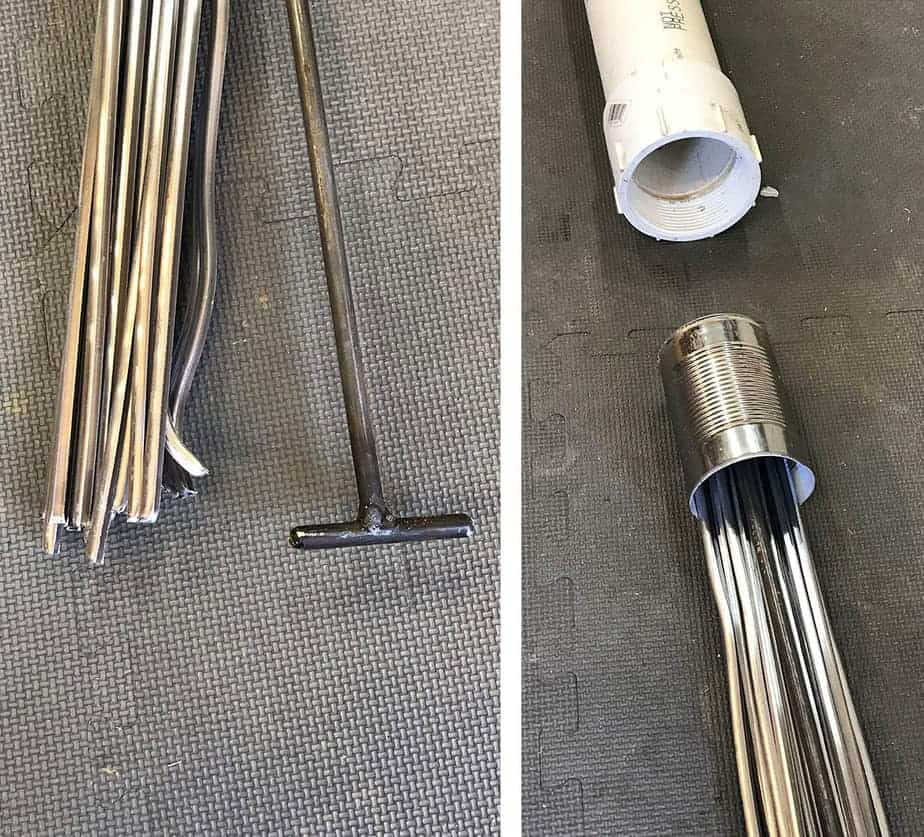
- To get the lead out, insert a tin can that fits inside the tube. Connect the can with a steel rod all the way to the opening
- Pull the rod and out comes the lead
Ta Dah, thanks so much Stephen 🙂
Additional Tip from Ron:
I put packets of baking soda at each end and in the middle. The soda absorbs the moisture and prevents the “scale” that forms on the lead and interferes with the flux and solder.

Safety Issues
I often get asked about lead poisoning and can honestly say that none of my blood tests have ever shown any dodgy levels in my system. But having said that, I always wear gloves and handle the lead with great care.
I never eat or drink in the studio and always make sure I wash my hands thoroughly after working. It is recommended that you wear latex gloves when leading, and that you seek medical advice if you are pregnant.
Read this page on Workspace Safety Tips before starting any stained glass project.
Always read the manufacturers advice before using lead.
Learn to Make Stained Glass using Lead with my online course Leaded Stained Glass Artistry
To see how to cut and shape lead came when making a stained glass window, go to Making Stained Glass – Leaded Panels.
There are some more lead tutorials here:

If you have old lead came that you don’t know if it has been stretched before, is there a problem if it was previously stretched and you stretch it again? Is there a way to tell? Does it matter how long again it was stretched if it previously was?
You won’t be able to stretch it again Sue, it’ll be pretty much stretched already. You can tell because you’ll be able to pick it up without it lolling all over the place 🙂 It’s worth putting it in the vice and giving it a quick tug just to make sure.
Good question, thanks for asking.
and new use of tube
I use plastic tubes like those for central brooms, about 2 inches size
I have to transport my lead rods to school and back home
so with a 3 ft tube and 2 x90 degree elbows not glued at each end
I add a beautiful decorative white cord passed through the tube and tied to make a triangle above the tube
this allows me to transport all my lead rods to school and back without breaking anything
(( bicarbonate )) ??
as for keeping the tube dry; for my hearing aids the manufacturer provides me with a container with pink salt; probably guarante or Himalayan salt but regular coarse salt would certainly do the trick in a dustbin riddled with holes.
Those sachets of sodium might help Jacques, good idea, thanks.
Dear Milly,
Thanks for your very useful information – it’s been a big help for a tenderfoot like me. One point on stretching came. You mentioned that one actually isn’t stretching came because stretching came would make it weaker.
As an engineer, I’d have to hazard that you are, in fact, not simply straightening out kinks but also stretching the lead came. The lead becomes more rigid after stretching because lead, like copper, aluminum and other soft metals, go through “strain-hardening”. What this means is that straining the metal (i.e. stretching it) hardens the metal and makes it somewhat stronger. You’re right in thinking that you don’t want to overdo this because at some point you will weaken the metal by overstretching.
One point I have heard in several places (one was a video on stretching came on the Delphi Glass Supplies website) is that if you don’t stretch (and harden) your lead came to some extent, the came will keep stretching from the weight of the glass and use with the result that your glass will become loose and can fall out – I’m thinking here of leaded glass windows which is what I’m working on. The woman in the video (which was very helpful) gives some idea of how much to stretch came as well.
Thanks again for your info – it’s been very helpful./
I love engineers 🙂 Thanks so much for your detailed explanation. I always knew it stiffened the lead and made it easier to work with. Very interesting, thanks.
I use aluminum gutters from your local home building supplier. They attach easy to studs with the gutter nails and you can see easily inside the gutter.
Great tip Daniel, thanks for sharing it with us 🙂
I want to thank you for the storage ideas. I recently moved cross country (California to Pennsylvania), and I used the pvc pipe to pack my came. Also great for storage. I like the hinged lid idea. I’ll probably set mine up that way. Thanks again.
You’re welcome Cheryl, I’m glad to hear the ideas were helpful.
also again
when I travel to scool I put my stock in vacuum ventilation 2 inch
I put x2 90 ‘ coudé at each end and a rope inside the tube
like this it is like tranvel handpurce
Hello, please could you give me advice about how to dispose of a small quantity of old lead came from a restoration project? Everything I can find online is outside the U.K.
thanks 😊
You should be able to take it to your local recycling centre Chris. That’s what I do with lead scraps.
also
you can just make some little bar of lead by heat it and drop in amold in wood
that ia call recycle
I leran from t ime
now I use banbout stick split in 2 part exactly the sizze I neer for my lead bar
also x2 haft inch round bar keep togetthe by big rubber and put some ‘platicine at end to stop the lear it give you a triangular stick beautifull
Hi Chris, in the Netherlands we typically bring this lead to a scrap metal processing company, typically they’re very happy, as the lead is reused as such and saves energy and mining efforts. I process quite a bit of early 1900 stained glass windows (reusing the glass) and the lead I bring there delivers several euros per kilogram too 😉
I learned that fishermen often make their own weights. I have the good fortune of living on the seashore in Mississippi and found that the shrimpers and cast net makers do make their own weights and accept my lead scraps.
That’s a great idea Leslie – I too live near the sea and will search for similar people to take my scrap lead.
Hi Milly. I use a bench vice to hold the lead and have marked the bench at 1 inch intervals between 6 ft and 6 ft 6 inches. I usually stretch it 3-4 inches until it “feels right” but of course that might be totally wrong. Is there a specific length to which one should stretch the different types and shapes of lead? Love your newsletter!
Best. Ron
Marking the bench! That’s a good idea to give you a ball park measurement Ron, thanks. I don’t have a set distance for stretching as it depends on the thickness and manufacturer of the lead. I stretch by feel – a bit like when I do yoga LOL 🙂
Hi Milly. Stained glass is becoming a very popular in the UK as glass wall art. I think I am going to have to bite the (lead) bullet and give this a try! Thank you!
I would Anna but watch out you might get addicted 🙂
Milly- I want to add a name to my stained glass graduation gift. I read you recommended Dremel 4000 with flexible shaft and I want to reread the article and order the Dremel. I think you said I need to buy a diamond drill for the shaft? Could you tell me where to find the correct drill to print the name of the school and script the name of the person graduating The total size of the glass piece is 4 x 8 so rather small. I am new to stained glass making. Thanks
The signing your name page (with video) is here Joanna:
https://everythingstainedglass.com/signing-stained-glass
I hope that helps.
I went through your site and was not able to find an accurate answer of how much do you stretch the lead. Obviously it depends on the type and thickness of the lead. I read the notion of the “feel”. Could you elaborate on that?
Good point Charles, there’s no secret formula for all lead. You have to give short tugs repeatedly until the lead starts to resist and it’s harder to pull. If you keep tugging regardless, it can snap. The lead has to be firm and straight. So hard to describe but I hope that helps 🙂
Whenever working with lead, or products containing lead (came, solder or lead-based accessories), I would recommend washing your hands thoroughly with cold water and soap. After nearly 30 years of law enforcement experience, it was recommended we “decontaminate” using that procedure after and range training using live ammunition containing lead.
Using warm, or hot, water opens the pores in the skin and allows the lead contaminates to enter the blood stream.
Thank you for this always-timely reminder Dale. You can’t be too careful with health and safety when working with stained glass.
I haven’t worked with my leaded glass projects for several years. Now I am ready to do it again, and the solder will not stick to either the lead caming or the zinc! I have tried cleaning the lead and zinc by steel wool and with naval jelly. Nothing is working. Since I had a lot of transoms to make, I have a lot of solder, lead caming and zinc. Now I don’t know what to do. Do these products expire? I would hate to have to replace them.
Do you have any ideas or solutions for me?
Thank you in advance
Try scraping the lead with a scalpel until it goes silver where you need to solder Anita, that’ll do it.
It sounds like you’re not using any flux. I prefer the paste kind.
Hey Jeff,
Great idea of using the adjustable shelf brackets – will work in my studio and much appreciate so I can get my came off the floor from under my work stations. Thank you!
Just a quick tip you may have heard of, but if not here goes:-
When youve soldered a large panel and you need to turn it over to solder the other side you might find it wobbly and precarious, potentially liable to cause damage to your panel through flexing. I always slide a long rigid metal ruler(1m) into the groove of the top came and use this to raise the panel to a vertical position against my batten. By the same method I then slide the piece forward, supporting it with the rular, until it is flat on the work top.
Although the panel is much more rigid, once soldered on both sides, it will not be at it’s firmest until cemented.
Thanks for this suggestion Pete, very helpful. I’d love a video of this method as my mind isn’t quite getting there with the visuals 🙁 I’m sure others will have no trouble understanding though 🙂
Reference flipping large panels to solder the other side: I assemble/solder the project on a creosote board placed on the work table. The creosote board is cut just slightly larger than the panel, by about 2 inches. When it comes time to solder the backside, I slide the glass panel to the edge of the creosote board, then raise one side of the creosote board & panel (left to right, or right to left) to vertical . . . Swap the creosote to the other side, then lower both flat with the side to soldered facing up. Creosote board is slightly flexible, but can be made very rigid by glueing lengths of 1”x2” pine boards on the bottom side; the 1” side of the pine board is the side to glue. Hope this description makes sense.
Thank you Alan, that’s very helpful! It does make sense and is a very good description of how to turn panels over.
Milly, I love all the tips and tricks you share with us! So far I’ve only made projects using the foil method, but I have used hobby came around the edges of several small round 6″ pieces that I’ve made. I don’t have any plans to start making things using the lead method, but it’s great to know that if I ever decide to go that route, I can take your class to learn it. Thanks for sharing your knowledge with us.
Thanks Gail, you might love it if you give it a try 🙂
Cheapo’ came stretcher: A U-Bolt fixed to a work table or long piece of wood, and two pliers. Put the “biting” part of one of the pliers in the u-bolt arch and squeeze down onto the came; then gently pulling the lead (keeping the tension so that the now fixed plier continues to bite down on the came), use the other pair of pliers on the other end of the came and pull to stretch.
Oh great idea George! Really simple and I can see how effective it would be. Thanks so much for adding.
Hi Milly. Your comment on biased came seems counter-intuitive. Surely having the wider came at the top, rather than the bottom, would improve weather resistance. Do you know of a supplier please? I can’t find any on the internet.
Well you’ve set me off on a trail Roger, thanks for that! It seems that the piece I have from many years ago is very unusual and it certainly isn’t easy to acquire, if impossible. So I’ll remove it from my site, thanks for the heads up on the mistake, too. Sigh! Not a good time to be biased lead 🙂
Thank you Milly, I found this discussion of lead came very informative and helpful. I so appreciate your generous sharing, leadership and mentoring about everything stained glass.
I may have clicked a second time just now to be added to your list. My apologies. I will see what I can purchase on Amazon.
Thank you again.
Cheers,
Phyllis
Canada
Thank you so much Phyllis from Canada, that’s very kind of you to say 🙂
Hi Millie,
LOVE your site and emails with advice! I am working on a spinning sun catcher and am debating using all copper foil or adding hobby came to the edges. Because it will be a hanging piece I was unsure if the hobby came was the right choice or if it would stretch over time. Or do you have any other suggestions for edging? Thanks!
You can gently stretch the hobby came before using Lori. Also, if there are long stretches without solder joins at the edge you can slip a bit of E6000 glue under to hold it in place.
I hope that helps.
I made a round stained glass piece and added a came border. The boarder “puckered up” like you mention, where you advise to use a “round profile” type of came to avoid the puckering. I looked on line for came with that name but wasn’t able to find it. What should I be looking for? Thanks for all your help. Your tips are great!
Hi Katherine, if you go here you’ll see an image of round face lead. I hope that helps, glad you find my tips helpful 🙂
Hello! I am still very new to stained glass. So far I have only worked with the copper foil method. I am self taught so I’m very interested in your online course as I’m sure I have a lot to unlearn! I’m currently most interested in learning how to frame my finished pieces with came. I’m wondering which class option would be best? I’d eventually love to learn the lead came method but don’t want to get in over my head too soon! Thanks in advance!!
Thanks for your interest in my classes Jessica. If you can already do copper foil, I’d suggest my Leaded Stained Glass Artistry class as it will take you step by step through the framing process so you can neatly frame your foiled pieces. AND you’ll then know how to make leaded panels which will open up different skills and options for you. Let me know if you have any more questions if the link page doesn’t answer them.
Thank you Milly for all your helpful tips and advice. I’m fairly new to stained glass and just finished your online course, “Stained Glass Made Perfect.” I strongly recommend this course for all beginners. It’s already improved my cutting/grozing skills. Question- do you have any suggestions for cutting and copper foiling very small pieces of glass? I have several patterns I’d like to make but some of the pieces are so small it seems impossible to cut and foil. I’ve enlarged the pattern but then the design seems too big. Any suggestions? Thank you!!
That’s so kind of you to say Amy, thank you. Some patterns aren’t actually ‘do-able’ it seems to me!
I have a page here that might help: https://everythingstainedglass.com/grinding-stained-glass.
Alternatively you could take a different tack and use foil overlay if the glass is the same all the way through. Just stick it on and tin it – making sure it has a seam to connect to. You can see the principles of this in the video on this page: https://everythingstainedglass.com/how-to-make-stained-glass-2
I hope that helps.
Just a quick question. I will be making stained glass butterflies to hang on an outdoor fence. Can I use copper foil, or would lead came be better. Thanks for your advice.
You can use either Stephen. They will be fine in all but the most extreme weather (in which case bring them inside temporarily)
I would use a slightly wider foil for the edges to give the solder more of a base to ‘grip’ the glass edge.
Be prepared to give them an annual brush up and re-patina if necessary.
Hi Milly,
Thanks so much for all your brilliant tips. I just wanted to ask about cames for borders. I’ve done lots of small windows using U section cames and adding steel inserts but I’m releading a larger window (6’ x 2’) and wanted to check U cameS with steel inserts are still suitable? – I can’t find anything on supplier sites either way. My window originally had a 1/2” border with another 1/2” piece soldered to it, so quite chunky. That said, the wooden frame has rotted and a new frame is being made to fit the glass, so I wanted to check is the only advantage of the 1/2” the ability to trim to fit your window or is it stronger than a u section came with steel inserted?
If you’re having a wooden frame made I wouldn’t bother with the steel. The frame provides the strength. I’d just use 1/2″ H flat, trimmed to fit and held in place all round with putty and appropriately sized beading (you may call them quarter rounds?).
Make sure the panel itself has reinforcing if needed. I have a page on reinforcing here to help you decide.
Good luck with it.
1/4 round we know it as quadrant but any profile is acceptable .We also have available here ,UK, 5/8 or 15 mm or even “h” section ,useful if glazing into a window frame with limited rebate ,used as an odd leg section ,I also developed a Y section ,really a U on top of a single section this we used in IGU,s insulating glass units , using 2 spacers one each side of the upright leg I called this an encaspulated stained glass double glazed unit so as to retain their stained glass when people were going from single glazed to PVCu double glazing Albeit our work was restoration,renovation and new commisions both domestic and commercial Working nationwide in many Cathedrals chuches historic buildings civic halls domestic situations and listed buildings for the rich and famous Of the many of note we have completed was for the James Town Trust installed in Willoughby overseen by HRH Prince Phillip all the trust members came over for the window revaling and then don to the Thames to see the send off of a duplicate ship to James Town Virginia depicting Captain John Smith he of Pochahontas and Godspeed fame in 07 ,some 13 years before the Mayflower founding fathers ,never understood that ,Pochahontas actually buried in South London I have some photos but do not know how to post. We had a company here Hartley Wood who made mouth blown antique unargually the best in the world U.S.A took as much as they could .Now ceased trading but do try English Crown Glass only for the very best commissions though being price restrictive Yes we did purchase Spectrum Kokomo etc for resturant and pub work
We found that Polish Tatra blown glass ,I helped to introduce into the UK , is value for money and so easy to work into 400 year old window restorations or indeed copies of or even Victorian drawn sheet replacements as have plenty of movementI also operated a wholesale company that supplied smaller concerns with materials and ran classes in my “spare time ” One thing I noticed is that we all use an open flame directed to a copper bit whilst diyers would use electric 100w upwards as they seem to do in the USA ,sorry run out of space
Wow Anthony you have a LOT of experience. I was sorry when Hartley Wood ceased trading, I’ve tried English Antique Glass but find it quite hard to work with. I bet you have some fascinating tales and some great tips to share. Thanks for the glimpse here 🙂
Hi Milly love all your tips I’m a novice to stain glass having before worked on making pieces using glass on glass. I’m using the copper foil method and doing okey.The last piece is 16 inch by 12 inch does this size require came to frame it for strength. I have beaded the edges already .
Something that size could sometimes do with strengthening – either a frame or internal reinforcing. It’s all about the design. I have a page on reinforcing here which will help you: https://everythingstainedglass.com/reinforcing-glass-panels
Hi Milly, Thank you for all your help. I also use PVC pipe to transport my supplies of zinc from MD to CT in the car each fall. Keeps it straight and safe. Also have a PVC pipe for each size standing in my work area.
Great idea to use pipe in the car for transport Gypsy. Thanks for taking the time to post it.
Hi hope you can advise me. I’ve stained a small glass panel, it’s about 6” square, and someone suggested framing it with “suncatchers lead” which would look delicate. Can’t find anything to match that description from any supplier here in the UK. My piece looks nice but unfinished but traditional lead will just be too thick I think. Would you have any suggestions please?
You’re looking for Hobby Came Rochelle. Tempsford Glass sell it here: https://tempsfordstainedglass.co.uk/stillemans-suncatcher-lead-came-1
I hope that helps.
If you’re interested in learning how to make stronger leaded panels for windows, I have an online course here that will show you how.
Help, I have recently started on my projects. My question is if the came was stretched 20-30 yrs ago, can it be re stretched at this time? Or will it snap?
Wow, that’s a long time ago! You should be able to gently straighten it out. Don’t go mad as there won’t be much give left in it. And make sure that the lead came is free from oxidation by cleaning it back to shiny with a wire brush or scraping it at the joints with a sharp craft knife. Good luck.
I’m looking to improving my pattern-drawing method in order to cut the glass to size correctly for a leaded window and am needing to clarify what is the exact pen width allowance used (representing the heart of the lead)for a pattern drawing? Is it 1.5mm or greater for leaded designs. Have read to use a fine point Sharpie pen width – which is blunted down… but would prefer to know what the exact size is so the glass is cut not too tight or loose!
thank you!
Standard lead came hearts require a 2mm line width on the cutline/pattern. This changes if you use either very narrow, very wide, high heart or strengthened lead came so be aware of that and adjust your cutline width accordingly.
Do the 6′ pieces of lead came need stretching also? I imagined that stretching was only necessary for lead came that comes in spool form.
Yes, they do Pat. It makes them easier to deal with and helps prevent kinking in the leading up process.
I’m wondering which measurement the companies use when advertising their came – the height, the face or the heart?
It’s normally the face as the other two measurements change less often than the face. Suppliers often give a helpful schematic but if you’re unsure, email them first. It’s better than receiving unwieldy lead to send back 🙂
Good question Lynn, thanks.
Excellent information. Thank you very much for posting. I have only done foil, but this might get me interested in using lead came. There is a bunch of stuff you have to mix up and work into the seams that keeps me from even being interested in using lead though. It looks like a big mess that would be hard to pull off in my very small glass hobby work area.
The cementing bit is all part of the fun Don, I’d highly recommend it 🙂 You can read about it here.
If your stained glass panel isn’t going to face the outside you can get away without cementing, although I always do it to stop any movement and to finish the piece off properly.
Another great offering, Milly! How about a newsletter devoted to photos of your studio?! I would love to see how you store large and small glass, tools, your cutting, soldering and chemical work space, etc.
Good idea Vicki, thanks. I’ll get on to it 🙂
This great additional tip for keeping the lead more air tight is from Ron Walenta:
I have always stored mine in a tube with caps on both ends. Have to have some clearance to pull the piece out. One thing I did with my method, is put packets of baking soda at each end and in the middle. The soda absorbs the moisture and prevents the “scale” that forms on the lead and interferes with the flux and solder. That’s why I had to burnish the joints before soldering.
I have to keep my zinc came and lead came enclosed in a box because of the salt air down here will cause a lot of problems but a PVC pipe sounds like a winner to me
It’s a great idea isn’t it Joan – not mine I hasten to add but Jeff’s. I keep mine in the wooden boxes they come in but if you don’t buy the whole box, there’s nowhere obvious to put them… Good luck with your pipes 😉
Do you have a online course in how to assemble a stained glass panel with 2 outside tempered glass panels for a stained glass door? I’m making the stained glass for the door right now and need to assemble it soon. I also need a stained glass supplier. I recently moved to Arkansas so the local supplier I used when I lived in Arkansas isn’t available. I need glass and rigid lead right now.
Thanks
Good question Diane. Sorry but I don’t have a class covering sealed units. I don’t do these myself, I get a local glazier to do them for me. Anyone know of any Arkansas glaziers who do this work?
Does Lead have a shelf life? Should lead be kept in an air tight container if your going to keep it for any length of time? I have mine stored in a PVC pipe with caps on the ends I never thought about cutting the pipe w/brackets to open it that is pretty neat. But after cutting the PVC this would not be air tight anymore. Thanks for all yours suggestions and helpful hints I have learned a lot from you and my Hubbits.
It should be kept as airtight as possible Maureen, yes. I’ve opened boxes of lead which then have the wooden lid which fits as well as this pipe would. Without any problem over the years. So it should be fine. Glad you’re liking the tips, good to know. The Hubbits are the best!!! (For anyone who doesn’t know what we’re talking about, they’re students of my online stained glass courses who gather in a closed FB Group called the Stained Glass Hub 🙂 )
I just ordered and received a box of 6 foot sections of lead came. It is presently standing vertical in a corner because of space issues. This is not a good wrote store it? And thanks for the measurements tip in the email. My problem is I have three times ordered what I thought was the round U came and have received the same stuff every time and it’s not what I’m wanting! Whatsoever you order when you want the height (A) rounded? Thank you!
I wouldn’t store lead came upright Stephanie, no. It sort of slides down in the box and gets into a bit of a mess. Lay it flat if you possibly can. Sorry you’ve ended up with too much lead of the wrong profile! Perhaps you can ask them to send you a sketch of the profile, with measurements, before buying next time?
I solved my issue of storage by putting two L shelf brackets over my window and added a board to make the perfect place to put my came in the shipping box, out of the way and ready to retrieve when needed.
Great tip Karen, thanks so much for sharing it with us 🙂
I buy my led on the spool.. It’s on spindle above my stretcher. I roll out what I need and stretch. Saves on waste..
Great idea, thanks Meg, that does sound like a neat way to reduce waste.
Looking for information on how and what to use Y channel zinc came. Can you help?
The Y channel is used to secure a panel into a sealed double glazed unit. You use it around the edge of a stained glass panel and the tail of the Y is held into place by spacers either side within the perimeter of the sealed unit.
Good question Vee, thanks.
I have always wondered how far to stretch lead came. I normally have my wife hold one end and I pull on the other end. I try to sense when the lead becomes rigid and stop pulling. What method do use?
You just need to get the kinks out and make it rigid so that you can work it more easily. You can trap one end in a door jamb if you don’t have a stained glass lead vise. You can pick vises up cheaply like this one here on Amazon. I hope that helps and saves your wife from harm Robert!
I have the woodworker’s vice that belonged to my father, mounted to our workbench. I put one end into the vice, and pull from the other end. Never fails.
Ooh yes, sounds perfect, thanks for reminding us that we don’t need a dedicated vice. I find the serrated edges ‘grip’ the lead came and help hold it in the jaws when you tug. No falling backwards 🙂
How nice to have a vice with a personal history, they’re surprisingly nice things aren’t they?!
Interesting instructional guidance. A pleasure to read
Thanks Jenny. I hope it helps with your leaded stained glass.