Making Jump Rings And Adding Hooks to Stained Glass
These stained glass instructions show you how to make and solder hooks on to a zinc frame. It uses a simple, nearly invisible method of adding hooks to stained glass to allow hanging that shows off your beautiful stained glass in the best possible light.
The rings in this stained glass tutorial are made from recycled copper wire stripped from electrical wiring. Alternatively – and this is my favourite option – you can use spools of pre-tinned copper wire (try gauge 14 or 16 if you have a smaller item to hang) which is easier than stripping and tinning your own, cheaper than buying ready-made rings AND more flexible with regards to size!) or you can buy ready made pre-tinned rings -the easiest but most expensive option. (paid link).
What You Need
(Some paid links below)
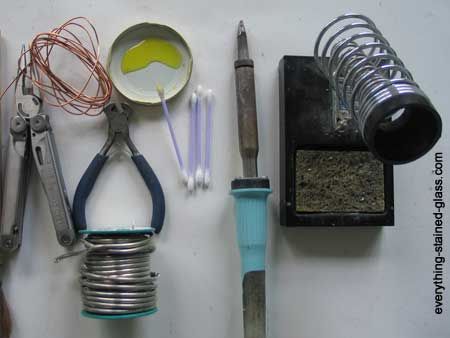
- 60/40 Solder
- Flux
- Soldering Iron and Soldering Iron Stand
- Wet sponge for cleaning tip
- Q-tips or cheap brush to apply the flux
- Copper wire (either bought or recycled)
- Needle nose pliers
- Wire cutters
Adding Hooks To Stained Glass
1. Making the Hooks
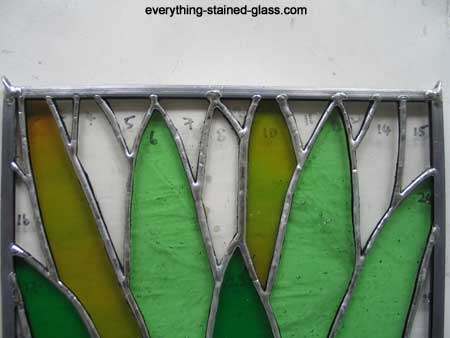
These discreet hooks are going to follow the 45 degree angle at the corner of your panel instead of the more usual circular hoops.
Use of round nosed pliers (small ones available at craft shops and larger ones, size of the typical needle nose pliers, available at some tool stores) can ensure crinkle-free and nick-free bends in homemade hanging loops.
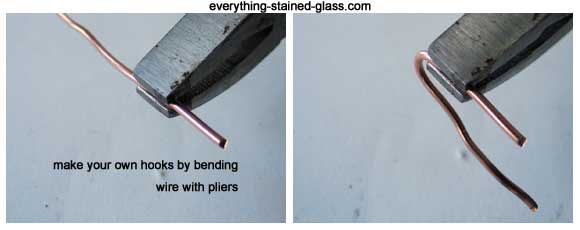
- Cut off a length of copper wire with wire cutters
- Using the pliers, bend it into a U-shape
- Measure the length needed by putting it over the top corner of your panel
- Cut off the excess
2. Instruction for Tinning Hooks
This both strengthens the wire and stops the copper from corroding. You don’t need to do this if you’ve bought pre-tinned rings or wire.
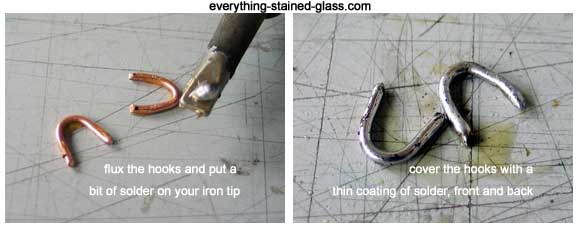
- Flux each hook
- Add stained glass solder to your iron tip
- Holding the hook with the pliers, cover it on both sides with a thin coating of solder
3. Attaching the Rings
- Balance or hold the hook over the top corner at a 45 degree angle
- Melt a bit of solder on top
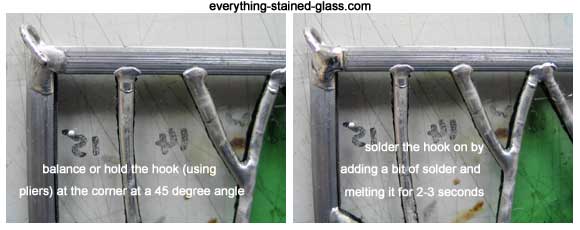
- Hold the iron over it for a couple of seconds to smooth it out
- Turn over and do the same to the other side
- Hold the panel vertically and neaten up the area carefully with a corner of the iron tip
- Repeat the steps above for the opposite corner
It would be negligent of me to not to mention Soldering Iron Maintenance when talking about soldering zinc. Following a simple maintenance regime is probably the easiest way to improve your soldering, full stop.
To help you gain the most out of your precious soldering iron I’ve crafted a mini $14 course called Soldering Iron Maintenance Blueprint. It helps you:
- prolong the life of your iron
- save money on replacement tips
- improve safety
Check out the Iron Maintenance Blueprint mini-course here
Be excited; there’s a MUCH bigger hidden benefit waiting for you… a happy iron = better soldering 🙂
That’s it! I’d recommend attaching 2 separate pieces of wire to hang your precious panel so that if one should break (yikes!) the other one will prevent it from falling (phew!)
Handy Hangers with a Zinc Frame
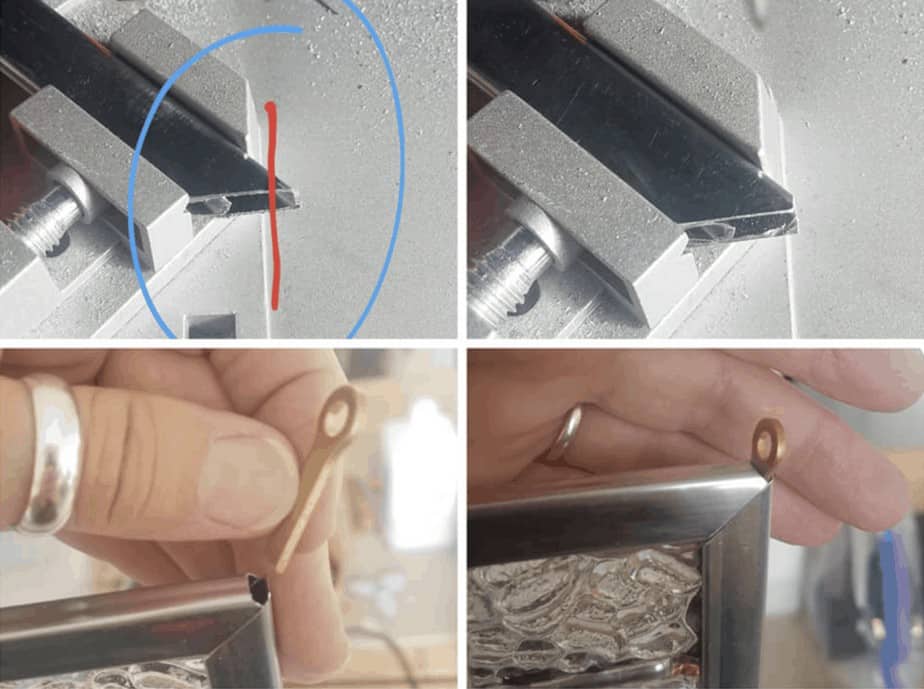
One of my online students Georgia Hamilton has very kindly sent me these images showing how she cleverly makes a handy hanger tuck nice and securely into the corner of the zinc frame.
Here are the instructions for adding hooks to stained glass (images below):
- cut all the framing pieces with mitered corners with a mini cut-off saw, a 2inch Mini Bench Top Cut-Off Saw by Drillmaster
- flip the piece that will be the top rail and nip the corner off each end. This creates a small pocket for the Handy Hanger to drop into
- steel wool the Handy Hangers before you tin them. This helps it take the solder much better
- use liquid (not gel) flux for tinning as it tins more evenly
- solder the Handy Hangers to the inside of each side rail
This may not be as pleasing to the eye as some other types of hangers but it creates a really secure fixing.
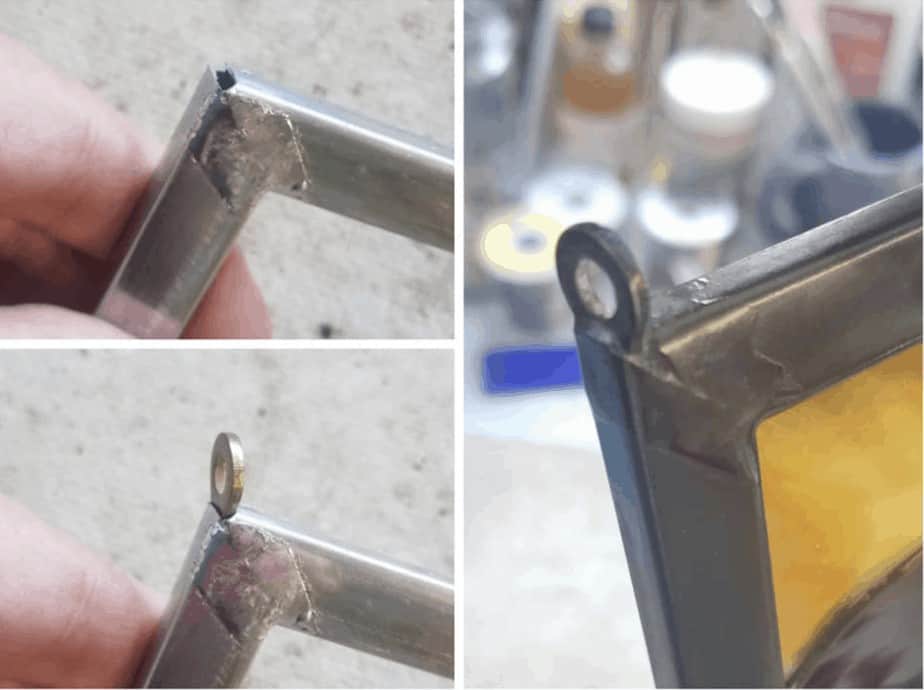
For added security you can clean the inside of the zinc where the hanger is going to go, put some solder inside the zinc and then reflow it when you insert the hanger. This gives you peace of mind knowing that it is soldered inside the channel.
Tips from Readers:
Abby suggests something like these ring crimp terminals (paid link) . She says just crimp the bottom so it fits in between the framing. They’re made from tin plated copper that can be crimped or soldered.
Sherren Says:

Now you’re ready for the final step – making your panel gleam and shine. Go to the patina and polishing instruction to finish off your panel.
How To Frame With Stained Glass Zinc Came
I have an unusual question for you. I took black patina to an abstract circle panel. It didn’t come out black at all. Some places are darker than others. Can I go over the patina solder lines with a black magic marker to darker them? Or should I use black stained glass paint?
I have a page on patina here Renee:
https://everythingstainedglass.com/stained-glass-tutorial
I hope it helps
a good way to do ies to use metal houck or wire
and a flat magnet to position ot exactly where is your project
I find my flat magnet from vintage 5 inch floppy disk ;sidmetntel it the disk is about 3,5 inch wid perfect for positionning a houck
A magnet! That’s an idea I hadn’t thought of Jacques, I’ll have a try with this. Thanks so much.
Hi Milly,,
Thanks for the great tutorials. Thisau seem like a silly question but do you need a specific type of vacuum cleaner when working with glass? Would a normal Dustbuster work?
Thanks 🙂
No stupid questions here Max; yes, any vacuum cleaner will do. Wear a mask and dampen dust down whenever you can to prevent airborne particles.
Thank you, Milly. That’s really helpful. 🙂
The most often repair I am asked to do is to replace a failed hanger on pieces crafted by others. So, I’ve come up with a couple of methods that work well for me.
A good way to add a hang wire on a heavier sun catcher is to wrap the wire around a pencil to create the loop but leave two tails about an inch long. Solder one tail to the horizontal edge of the frame and solder the other tail at a right angle to the vertical leg of the frame. Doesn’t look quite as finished as a jump ring soldered to the corner, but it’s a lot stronger since the weight is distributed on two legs of the frame.
On round projects, if the design of the project allows, I always make a u with long ends from a piece of pre-tinned copper wire. I solder the one leg of the u into a seam on the front of the project then go over the framed or soldered edge and solder the other leg of the u into the same seam on the back side of the project. No one can tell this is what was done and again it is a much stronger method than using jump rings just on the edge of the frame or onto the foiled edge.
This is REALLY great advice Vicki, thanks so much for taking the time to explain each method so well. Both are excellent ideas, and as you say, add strength.
Great site!! Any thoughts about drilling a tiny hole for rings very near the edge of the glass for hanging glass that doesn’t need framing?
You can do this for smaller pieces. Just make sure you place the hole about 15mm in from the edge and use a see-through plastic gromit in the hole to prevent the edge of the hole rubbing the hanging material.
I have completed a leaded glass zinc framed piece that measures 46″x12″. It’s very heavy and I’m concerned about securing hooks/rings properly to make hanging worry free. I will hang it vertically, so the weight distribution is only over 12″. Soldering the 45 degree hooks on the corners – is that best?
The safest thing to do would be to frame it in wood now that you’ve finished the panel Karen.
If not, you’ll have to fix the hooks to the outside of the frame, yes.
Next time you do a large panel it’s best to think about hanging before you assemble. That way you can do a miter cut on your zinc frame on top left and right, leaving a a small notch just big enough for heavy duty picture wire to go into.
Cut the frame to size and, starting top right, run the wire down the side, along the bottom and up the left side.
Leave your wire long enough at top left and right to make a sturdy loop and solder the void to make it enclosed and secure.
Good luck, I hope this helps.
Thanks Milly, planning ahead is always good. Are you saying above that the picture wire would go around the entire circumference of the window inside the zinc came?
Correct Karen. In doing so, it helps hold the weight of the panel.
Hi
I love your idea of running a wire around the panel. I’m just confused about how to secure the wire in a loop at the corners.
I am making a stained glass mirror and have been looking for tutorials on how to make it strong enough to hang and what to put on the back to hang it from. My mirror will be 24 by 20.
I would appreciate your helpful knowledge!
If you make the side channels the longest pieces and the top and bottom channels enclosed between these sides, you will not need to notch at the top.
Make sure to leave your wire long enough to make a sturdy loop and solder where the wire exits the void to enclose it.
Good question Susan, thanks.
Great advice thank you so much.
Hi milly
Can I use handy hangers by soldering onto a copperfoiled seam to wall mount my work in the garden please?
You’d be better off using wire jump rings for sun catchers Linda. You can keep the ‘tails’ and solder them down along and into the seam for added strength on larger sun catchers.
What type of solder do you use? Is there a special solder out there for attaching a hanger?
No special type Janice, whatever you were using for your project will work fine.
If you use round nosed pliers (admittedly often hard to find) instead of needle nose pliers when forming loops, you eliminate the chance of nicking the wire. Hunt for round nosed pliers under jewelry making supplies or electrician’s supplies.
A great tip Graeme, thanks so much for adding it.
I have a question about using jump rings or Handy Hangers. At what point (weight of project) should I NOT use jump rings, and instead use the Handy Hangers? I have made a few projects and framed them with zinc came, using jump rings. But, I am wondering how secure jump rings are for hanging. I have not hung any yet, as I just am not sure about the jump ring strength. I want to make sure whatever hangers I use are secure when hanging.
It depends on what gauge wire the jump rings are made from and whether they have ‘tails’ – this makes them far far stronger for larger projects. If in doubt go for the Handy Hangers Nancy.
How much weight can a Handy Hanger hold? I am wondering when should I use a Handy Hanger or a wood frame. Also, if I am using a 12 or 14 gauge jump ring with tails/ends embedded into the solder lines, how much weight can it hold? Is there a chart anywhere that tells stained glassers to determine the best hanging practice?
Good idea re-chart Laurel but it would be tricky as each hanging dilemma is unique. Handy Hanger themselves state 45-50lbs, which is a weighty panel.
It’s all about the attaching as the fixings are very strong in themselves. Make sure you secure them robustly; use a hot iron and fill the cavity with solder. And test them!
Good luck.
Great tips as always, thank you.
I was wondering. As someone JUST starting out, can this be done with a lead frame as well or is does this only work with zinc. Sorry if that’s a dumb question lol
Absolutely it can. Not dumb at all Turkish, it’s very good to ask questions! Some people – professionals – never use zinc, always lead. I hope that reassures you.
It does indeed. Thank you very much 🙂
Thank you for all of these tips and tuition emails. I’m a beginner (yet to begin properly), so I feel like I’m getting a good grounding for when I begin 🙂
Great Jackie, you’re in the right place here 🙂 I hope you enjoy your stained glass every step of the way.
Jackie, you are my twin! I’ve taken one class, am going to pick up my starter kit today and I also feel I’m getting a good grounding. Let’s have fun!
Thank you again for all the great tips. Since I will most likely be in the beginner category for the rest of my life,
the tips you unselfishly give us are super handy.
Ken
Ha ha this made me laugh Ken 🙂 I’m sure you’re doing yourself a disservice and that you are improving all the time and gaining experience. Sometimes we can’t see it ourselves!
I am also a beginner having only attended one summer school college course. I have had six years of experience in silversmithing and still feel like a beginner.
Ken, this is what ‘imposter syndrome’ feels like!
Thanks Milly for the great idea on how to hang ur stain glass. I never have seen the way you had said using wire n making a U shape n putting it in the corners. I always used a ring n had a hard time keeping it on top to solder it, it always slipped off. Love this idea n the other way u men too. Michelle Dehart
That’s great to know Michelle, thanks for commenting 🙂
I’m always learning shortcuts but my dilemma is not addressed here on this forum. How do I put 2 rings on a circular zinc frame where there will be only one soldered connection? Or is the answer to make 2 solder points; one on each side? thank you
I have been using paper clips (uncoated). Can cut to size and bend end to form an l shape. This works well up to about 30 pounds. Can adjust so tension hold them in place during soldering
Great tip Elwood, thank you 🙂
I just recently put hangers on some large panels that were installed on our old windows. I used galvanized steel to make a “U” shaped hanger that I soldered to the backside of the frame. It worked well.
That sounds really robust George. If you have an image you could email me and I’ll put it on the site for others to see as an option for larger work. Thanks for adding.
Dear Milly, regarding the use of the Handy Hangers – Believe it or not I’ve always found that viewers of a piece are drawn to the piece itself NOT the framing. Additionally, most pieces are hung at eye level or higher. Therefore the mitered edge on a zinc framed piece is additional work. What I have always done is make sure that the top piece of zinc (and sometimes the bottom) continue to the end of the piece. The vertical pieces sit “inside” of the horizontal ones. I pre-tin the inside of the horizontal pieces and slide the pre-tinned hangers in horizontally. I apply heat until the solder flows. As the Zinc channel is just slightly larger than the diameter of the hanger EVEN if the solder fails the hanger still prevents the zinc from from becoming dislodged. I’ve had 10 pound windows done this way with no failures whatsoever.
Nat
Thank you Nat, that’s another way to use the hangers and equally effective. You make a good point about the mitred corners taking longer. I was taught that the longer edge of metal with a mitred corner was a stronger one but I’m sure if I sat down with a scientist that it would be marginal 🙂
That is the way I’ve been doing it, too. But it’s always great to see new ways to do things. I love these tips and tricks. Glass people are so generous and kind. ❤️
I read that using handy hangers in a mitered zinc frame weakens the piece. The article also mentioned that when using handy hangers you should use it with squared off pieces of zinc. Have you found any problem with the strength of a piece that has been done with handy hangers in a mitered frame?
You can do this with squared off zinc came, thanks for adding that. Interesting that you read that mitred joints are less secure Suzie, do you remember where? I’ve never had any problem and would like to check it out, thanks.
I also read that you should use the Handy Hangers with a butt joint. This was off the Handy Hangers own webpage! I discovered this after I cut the came for my most recent piece on the miter. Luckily it’s a lightweight piece.
Another important note I found: Due to the a change in the manufacturing of the U Channels. The 1/4″ and 3/8″ Channels will not accept the tab of the Handy Hanger. Therefore it may be necessary to slightly widen the channel with a flathead screwdriver, or to reduce the tab of the Hanger with a File, for the hanger to fit into the came. Mitered corners weakens the framed work of a glass panel piece, therefore Handy Hanger is NOT recommended to be used in a mitered corner piece.
Okay, great updates and important to know about the adjustments needed. Thanks so much for taking the time to let us know Kiki.
I haven’t heard that about mitred corners. I’ve always used them and never had any trouble.
I have just started using the paste flux instead of the liquid. Its taking me a little while to get used to the paste, never sure how much to brush on. Am I imagining it but I don’t seem to have as much black residue come off when I add polish to the soldered foil. Also I am so glad you recommended using the polish before patina, it works a treat. Thanks Marg.
Testing things out for yourself is the best way to find what works for your situation Marg. I’m delighted that you find the polishing tip of help.
Glass polish before patina works best? Curious, why is that. I will try this on my piece I’m making now. I LOVE all the tips I find here…
Love your personality Millie!! Always uplifting, helpful and POSITIVE….
Ha! Ask my loved ones if they would say the same about me Jaye!!! I have a very easy job as stained glass itself is uplifting 🙂
Polish has an abrasive element that cleans the solder before patina.
The wax is the final process after patina, it has no abrasive qualities, it provides a layer of protection from oxidation.
I hope that helps explain.
Can we get these in the UK? I haven’t found anywhere that sells them. I have tried Pearsons Glass (liverpool), Tempsford stained glass supplies and Creative glass guild.
You could try adapting non-insulated ring terminals online. You’d have to squash the end and use them for zinc came so that the squashed end can be soldered into and hidden by the gap in the centre of the channel.
Thanks to Abby Mitchell who emailed me this idea and this link for US visitors: These would work, too, I think. You get 100 for $10. Just crimp the bottom so it fits in between the framing. They’re made from tin plated copper that can be crimped or soldered.
https://www.wiringproducts.com/6-stud-12-10-awg-non-insulated-ring-terminal-100-pieces.html
Theses tips are perfect for zinc or lead frames but what I would like to know is if there’s a company anywhere that sells round wood frames to display copper foil stained glass? ….or infact any nice wooden displays for glass, standing or hanging?
There’s a link to an online wood frame maker on this page, under the heading ‘Framing and Hanging’. Good question Kizzy, thanks.
Great idea if you are using zinc came, but How do you attach hooks using lead came especially like me you don’t have a controlled temp. soldering iron. Any ideas would be gratefully appreciated.
The handy hangers are good for zinc as they slot in the gap. The instructions above using tinned copper wire on the corners are perfect for lead came too Marg. Thanks for your question.
I fold a piece of pre-tinned wire over a screw driver and then grab both ends with pliers and twist it into an eyelet. Snip off the ends so it is neat and then insert the end into a hole in the zinc at the corner seam. Melt some solder into the hole and you have a secure and neat hanger. Easier to handle than a U of wire, and neater at the corner.
Great tip Donna, thanks so much for sharing with everyone 🙂
I used to make ‘U’s, and I found them hard to keep straight when soldering trying to hold them with pliers. So now, I take a 1.5″ piece of wire and flatten both ends. I solder one side on (the flattened end lays lower in the seam). When cooled, I flip the panel, bend the wire over a pencil (or exacto knife) to make the ‘U’, I use my pliers to put a slight bend in it so the other side will sit flush. Then I solder the other side. The flattened edges, I find, blend in nicely in the seam.
That’s a really good tip Pamela, thanks for sharing it with everyone. Very useful.
I always make my hooks or rings by wrapping the copper around the end of one of my brushes. This gives me a really even circular appearance without messy links in the wire. My brushes are tapered so I can make them in almost any size I want.
Thanks Amanda, that’s kind of you to share your ideas – I like the tapering brush=different size rings. If anyone would like a tutorial of making jump rings there’s one here.
Your Good!
Thanks for the great tips.
It’s nice to see someone share there expertise and not wanting to sell something all the time.
Keep up the good work of sharing your craftsmanship.
I’m glad you’re enjoying all the free tutorials Kenneth. I do have a course for sale coming up though, so watch out for that!