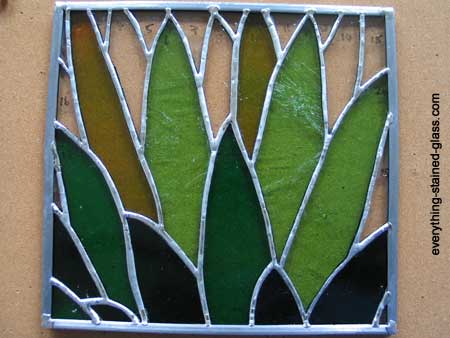
Stained Glass Zinc Frame
A stained glass zinc came frame is a good option for the edges of your panel. This is for a couple of reasons. If you have a heavier panel that needs a bit of strength or want a definite border for artistic reasons then a stained glass zinc frame is your answer.
This stained glass tutorial shows you how to measure, cut and solder a mitred zinc came frame together for a professional look. Your glasswork is worth it!
There are some extra zinc tips in these sections:
Soldering Neat Zinc Corners
Tips for Soldering Zinc
Tips for Hanging Zinc
What You Need
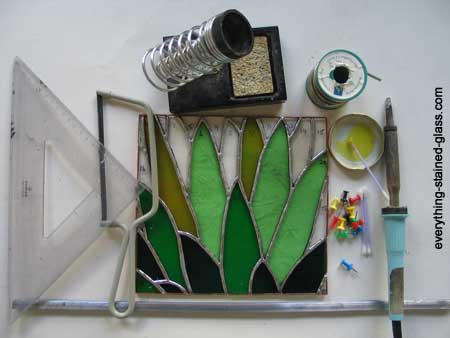
Essential: 60/40 solder, flux, soldering iron and stand, wet sponge, Q-tips or cheap brush to apply the flux, your panel, cork or soft wood board, fine felt tip pen, push pins to hold the zinc came in place, zinc came, set square, metal file and a came saw or fine-toothed hack saw. There are special saws for this, including electric ones. You don’t need to buy anything expensive at this stage. Just move the blade of your hack saw down a bit and it will work fine.
Optional: mitre box.
A Word About Stained Glass Zinc
Zinc came comes in several different widths. The wider it is, the stronger it is. You can buy it with H or U profiles. The U shape looks nicer for framing but you can use H zinc for framing.
If your panel is being placed in a wooden frame there is no advantage to using zinc over lead. The wooden frame gives the strength. I use lead for the edges when I’m framing in wood as it’s cheaper and easier to use.
How To Make A Stained Glass Zinc Frame
First of all you need to cut the zinc came to fit the panel. Mitred edges (those cut on a 45 degree angle) look most pleasing but you can abut the zinc if you want to solder the handy hangers into the frame rather than around the top corners.
1. Measuring The Zinc Came
- Saw off a 2″ piece of zinc to use as a marker
- Place this marker over the vertical edge of your panel so that the edge glass butts up to the heart of the zinc
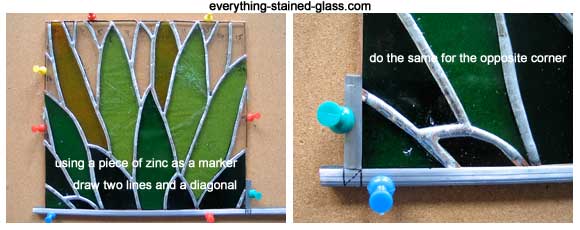
- Giving yourself a bit of extra length on the left hand side, draw two lines down from the marker on to the horizonal came
- Draw another line diagonally across. This gives you the 45 degree angle
- Mark the other corner in the same fashion
2. Cutting The Zinc Came
Try to do this as accurately as you can. Some people use a mitre box to cut the angles. By all means purchase one of these if you think it will help.
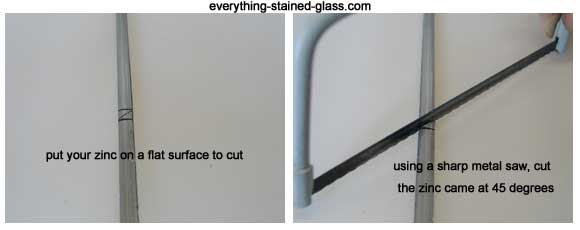
- Place the blade over the cut line and saw straight down. It takes a bit of time and effort!
- Don’t push too hard, as you might squash the zinc
- File the ends to tidy them up
- Repeat 1. and 2. above for three sides
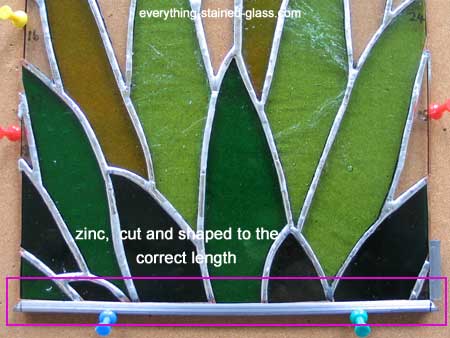
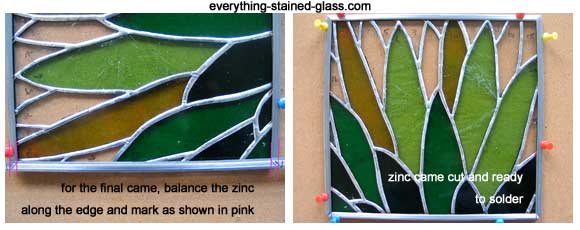
3. Measuring The Final Edge
- Pin your three edges in with the push pins, checking that they’re at right angles
- Place your final length of zinc over the top and mark the 45 degree angle as in 1. above. The marks in the photo looks ‘off’ because of camera distortion, so look at the pink lines below
- Cut the remaining two angles
- Pin the final zinc came in place, checking that the stain glass panel is square
Hanging Larger Zinc Framed Panels
You’ll Need
- Zinc came
- 2 X brass screw eyes – choose the appropriate size for your panel and pre-tin them
Method
- Use 45 degree angle cuts on the bottom corners only
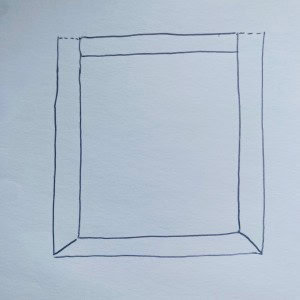
- Measure from the mitred bottom to the top of the horizontal frame at the top of your panel
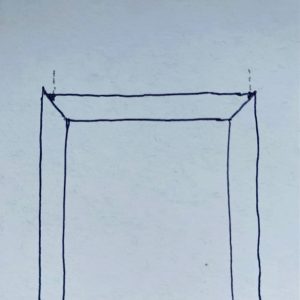
- Cut the 2 verticals straight across at the top of the frame (see diagram, above)
- This leaves a hole at the top of the side pieces (see photo, below)

- Drop the long end of the screw eyes into this hole and fill the hole with solder
- (if you want to hang the panel against a window, turn them flush)
- Test that the 2 screw eyes are securely fastened before hanging
This zinc hanging method was sent by Bonnie Lord. It’s been well tried and tested; she’s been doing it for 40 years!! Thanks so much for sharing it with us.
Milly’s Variation
I’ve used a similar method. I’ve mitred the top corners and nipped a tiny bit off the tip of the HORIZONTAL top piece of zinc – just enough to make a hole big enough for the screw eyes (see diagram, below). This leaves less of a hole to fill with solder.
You can also use Handy Hangers instead of brass screws. They’re a bit more expensive but very strong.
It’s a bit tricky to get the mitre length spot on though, so Bonnie’s idea could be a neater solution. Try both and see which you prefer 🙂
4. How To Solder The Zinc Came Frame
- Zinc came needs a bit more solder than lead came so make sure you’re a bit more generous with it.
- Stained glass zinc also prefers fresh flux. Apply flux one joint at a time rather than all at once.
- Now each edge join needs to be soldered neatly to the zinc.
- Work your way around the edges, soldering each join to the zinc came. This ensures that everything stays in place.
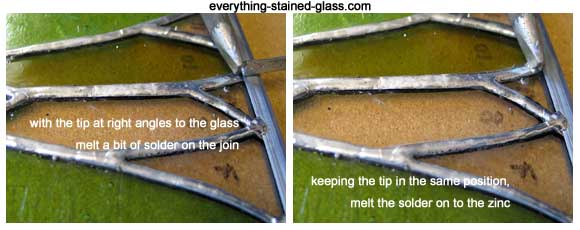
- With the chisel tip of your iron at right angles to the stain glass, melt off a small bit of solder on to the seam
- Keeping your tip at the same angle, slowly melt the solder until it merges with the seam and sticks to the zinc frame
- Be aware that zinc needs a bit more heat applied than copper foil or lead
- Work your way around the panel until each join is soldered to the frame
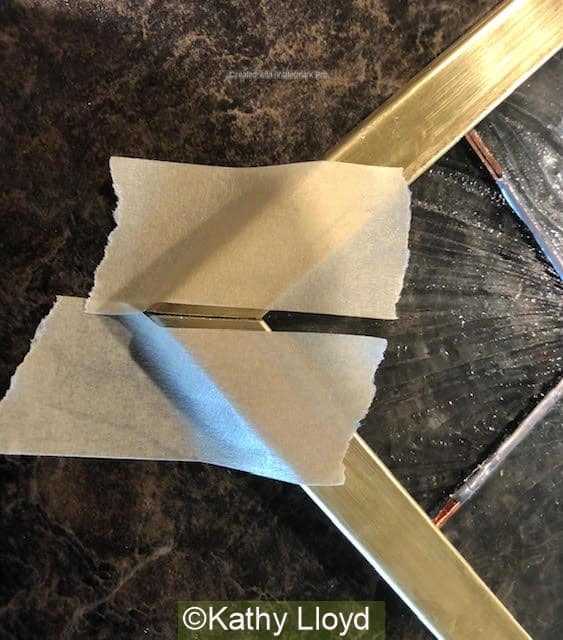
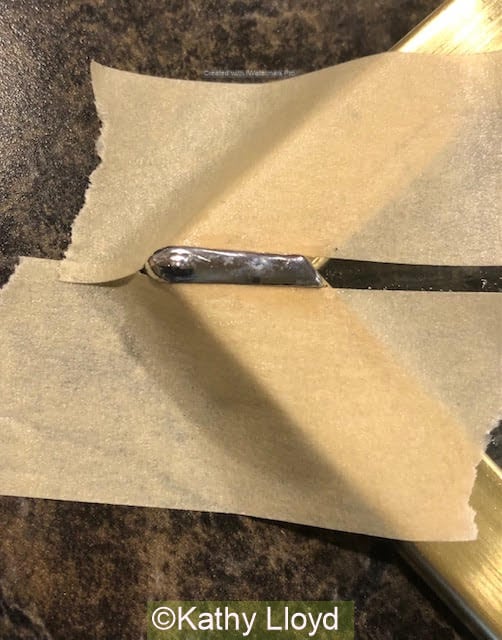
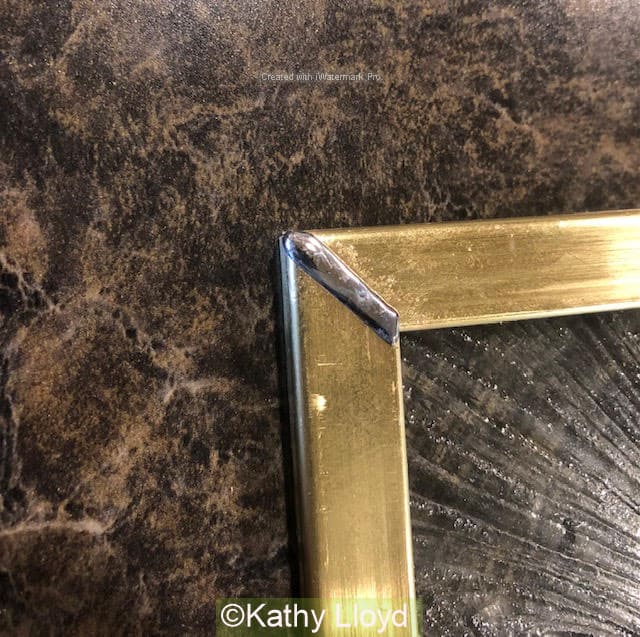
- Next solder each corner. You can use tape to help you make a neater join (see below)
- To do this melt a blob of solder over the join and melt the stain glass solder with the flat face of your iron tip on the solder. See the video below if you’re unsure about this.
- Turn over and repeat the soldering on the other side.
Soldering Zinc TOP TIPS
Soldering a Neat Zinc Join
To create a neat solder join you can stick masking tape on each side of the join before fluxing and soldering. Make sure it’s stuck down firmly first. This contains the solder for a professional finish and prevents a blobby mess 🙂
The images below were kindly sent to me by reader Kathy Lloyd and show this technique nicely.
Additional Soldering Tips for Zinc
U profile zinc came is for the edge frame of your piece. It should, if it is zinc, take solder. It takes longer to heat up so try this:
- When soldering zinc, hold your iron on the zinc a little longer than you would on lead.
- When soldering zinc to lead, touch the zinc came first to heat it a bit before touching the lead too.
- The zinc might turn dark and almost look scorched, but this will clean up.
- Zinc takes longer to heat up so on the corner, zinc to zinc, hold your iron on the zinc to warm the zinc and activate the flux. Then put the solder on the zinc, iron on top and melt the solder.
- Practice with some scrap zinc first.
If you find this information helpful for improving your soldering of zinc, you’ll find my Soldering Iron Maintenance Blueprint equally so.
Many people don’t realise that a well-maintained iron is one of the most effective things they can do to improve their soldering.
Have a look at my mini Iron Maintenance course here
I’m betting it’ll be the quickest path you’ve taken towards better soldering – zinc or not 🙂
Helpful Resources For Stained Glass Zinc
This is a useful 3 minute video showing exactly what I’ve been describing, including soldering a corner join. Start watching at 1min 20 seconds if you’re in a rush, as it repeats the same steps for each corner.
She’s using a luxury electric saw, lucky thing!
Stain glass – how to make a zinc frame and solder a corner join
Perfect, all done! Now you’re ready to attach some hooks for hanging.
If you don’t want to hang it, go straight to the final step to patina and polish your stain glass.
Return to Everything Stained Glass Home Page

I’m confused on the post about adding screw eyes at the top of the vertical side pieces. Using U-shaped cane the glass fills the entire interior of the cane, regardless of whether it is a mitered joint or a butt joint, there is no hole for the screw. The photo is confusing me as well, the side of the came appears to be folded under. What am I missing?
Yes, these instructions are for the H Zinc profile. You’ll have to solder to the zinc itself with the U Zinc. Do it diagonally over the corner, use painter’s tape or similar to mark where you want the solder to go to make it neat.
What width zinc came would you recommend for a free hanging piece that will be 51”h x 32”w.
I plan to use Re-Strip in the vertical border seams as well.
Thank you
That’s a very large panel to be free standing Elle. I’d go for at least 1/2″ or even 3/4″. If it were me I would frame it in wood for more stability. And I’d put ReStrip or Strongline in several places from one side to the other to reinforce. See my page here for more help on this:
https://everythingstainedglass.com/reinforcing-glass-panels
Good luck 🙂
What size zinc came did you use for this piece?
It’s 7/32 wide Brenna. I chose the narrowest as it’s a small panel.
I use a dremel saw to cut my corners, using a vice grip to keep it tightly secure when using the saw. Wear your goggles and nose mask. Then I go back to my project and see where I need to finesse a little and burn off any jagged edges. Sometimes I lean the piece over a table ledge and whizz off the uneven edges with the side of the blade. Hold tight. I love my dremel saw for this. If you focus on accuracy and keep a steady hand, you will have perfect ‘looking’ edges, we hope!. Lawd knows stained glass work is a process of creating beauty out of inaccuracy’s. Aslo, I foil the edges before soldering, sticking foil ends into edge conjoins. I think this really helps with strengthening the join.
That’s brilliant advice, thanks so much for helping others Lee, we appreciate it 🙂
Thanks for this website, Milly. Such a wealth of useful info. I’m coming back to stained glass after a long absence. I was wondering about fitting the lead or zinc frame on the edges. In the past, I cut the edges of the interior joining lead a few millimetres short of the outside edge of the whole piece, so that the glass at the edges could fit into the framing came. Is that necessary, or do you just push the framing came over the top of the joining lead around the edges before you solder it? Would this leave a big gap between glass and frame where the interior lead goes into the framing came?
I hope you understand what I’m getting at.
Thanks again for your help.
Hello James, I have a page on measuring for stained glass that explains it here: https://everythingstainedglass.com/how-to-make-stained-glass-1
I hope that helps
Hi Millie,
Thanks so much for your response. The page you gave the link to us very useful, but unfortunately doesn’t answer my question.
I was asking whether the came between the pieces of glass in your design should go all the way to the edge of the glass on the perimeter of the design. Or should you cut the came several millimetres short of the perimeter so that the glass can easy slide into the framing came?
I found that if the came goes all the way to the perimeter of the design then it’s hard to squeeze it and the glass into the framing came. The glass slides in, but the bump created by the came stretches the framing came open when you push it into the framing came.
Sorry, it’s a bit hard to explain. I hope you get what I mean.
Thanks again!
James
The page does answer your question James; the Fitting Size is a bit smaller (2mm off each 4 sides) than the Tight Size (the exact size of the opening.
Hope that helps.
Hi Milly. I “inherited” a bunch of stained glass and supplies, including some zinc came. Despite scrubbing it down with steel wool it is very difficult to get solder to hold it together. Is it possible that the came it too old? This stuff is probably at minimum 8 years old.
It won’t be too old, it’ll be hidden dirt/oxidation. You can try alcohol rub. And/or scraping with a craft knife. Or white vinegar! Lots of possibles, hopefully one might help. Good luck Nancy.
Agreed! Thank you for sharing your expertise with us! From your video it seems ideal to have the zinc edging be in a single piece along one side. I am working on a piece that is 6.5 feet tall. The zinc available to me at the local supplier is only 6 feet tall. Will it work to piece it together? Or should I seek a different option (longer zinc channels and/or using lead?
You can only get lead in 6ft lengths too so that won’t help Jolysa. Use two pieces of zinc by cutting your edge zinc at a point where a seam joins it. That way it disguises the cut and is stronger.
Good morning Milly,
I am making a free hanging copper foil picture frame that will be 11″ x 14″ clear glass centre with a 60 mm stained glass border in an abstract design and am considering how best to finish the edges. Do you think that 6 mm U lead came cemented would be sufficient or it would need the added strength of zinc. I appreciate your help and advice. Thank you
Yes the 6mm lead came will be fine for this size Justine. Good luck!
Milly- Do you know how to clean a very oxidized zinc frame? I’ve been checking on the web to find a solution to my problem, but haven’t found one yet. It’ very oxidized.
Baking soda and vinegar will remove most of the oxidation. If that doesn’t do the job thoroughly enough for you you can use metal polish cream.
Blue Magic do a good one.
Thanks for the question Sharon, I hope this helps.
Milly, Thank you for all your detailed explanations . I am loving the courses also, but do have a question . I have made a leaded panel to hang across the top of a bay window. It is 5 1/2” w by 37 “ long, framed in zinc came. I had left the came open ended on the bottom to place a rod through to support the panel , attaching to the wood window frame on both sides, along with using to hooks on the top. My husband wants to hang it with rod on top only. I’m wondering if it will be too heavy with just the supports on the sides and start to bend. I hope I explained this well enough. Thanks.
That’s a very unusual shape Judy, not so much long but very narrow 🙂 As it’s so narrow you could add 2 horizontal reinforcing lines in the panel itself which should stop any torsion.
A panel this size should be okay hung just from the top. Make sure the hooks are securely soldered and have a wire or chain up from each side, rather than just the one, so that you have a fall back if one should snap. I hope that helps.
I add some iron steell bar inside the U shape sink
like this it is very rstrong and sometime also pass it a light touch to wellding iron bar to the U shape sink
Do you need to stretch zinc came like you do lead? Thanks for all of your articles and videos.
No zinc doesn’t stretch Laura, it’s rigid. You can get a came bender if you want to frame circles and semi-circles.
Glad you like the info 🙂
Should a 20×20″ hanging panel wobble when stood upright (wiggly-ish frame), or rattle when it’s moved? (It’s supposedly copper framed / zinc came.) I can actually move a few of the beveled pieces around oh so slightly, and several seem loose, and this doesn’t seem right to me. You seem like the person to ask! I have purchased stained glass panels before but never encountered one that wasn’t strong/stiff and solid. Is this at all normal / acceptable? If it’s normal I will keep and gift it. If it’s NOT normal and the piece will not last long, I would rather return it. Thank you for you expert opinion!
I would expect a panel that size to have some level of reinforcement (design dependent) to strengthen it and keep it from wobbling. Sometimes panels aren’t puttied if they’re free-hanging and for inside but I personally would putty (we call it ‘cementing’ a panel) a piece this size.
I hope that helps.
Very much, thank you. I had a feeling it was an inside-v-outside thing. I’m learning a lot and anxious to get to making my own—loving your emailed tips!
You’re most welcome Greta. I’m glad you’re finding my email tips useful. Anyone else wanting to sign up to my newsletters you can do so here https://everythingstainedglass.com/dazzle
I have made a 14 ” round stained glass piece for our daughters birthday and had planned to frame it in a quilting hoop which I have done with other pieces. This project is not perfectly round so the wooden hoop wont work. Can i use zinc came to frame the piece?. I was away from the art for a while and would appreciate any advice!
You can Stephanie but you’ll need a zinc bender to bend the zinc. I hope that helps. Good luck!
My zinc u channel is old and dirty. It will not take solder. I have scratched and scrubbed and it won’t take it. Bubbles up and rolls off. Suggestions?
It’s also not jumping the the lead came on the interior connecting points.
Have you tried scraping it with a craft knife? That might do the trick.
I’ve just finished an 8×11 copper foiled panel and cut a zinc frame to match. Should I solder before putting the frame on the glass? That way the panel will be flat, since the frame elevates the edge pieces a bit. But I worry that the glass will not fit inside the zinc cane once it’s soldered, and also that the pre-cut zinc cane won’t fit since things move a bit as I solder.
Should I leave about a quarter-inch unsoldered all around the edges? Or is it better to solder with the zinc frame already on the glass and allow a little bend in the middle of the piece?
Yes, solder the foiled seams first, leaving a small gap for the zinc – the width depends on the width of your zinc came.
When soldering zinc, hold your iron on the zinc a little longer than you would on lead. When soldering zinc to lead, touch the zinc came first to heat it a bit before touching the lead too. The zinc might turn dark and almost look scorched, but this will clean up.
I framed my stained glass project with zinc came. I used a black rust-oleum paint on the zinc came, but the paint is flaking off. I will need to sand off the black paint, but what do you suggest I use if I’d like the zinc to be blackish in color?
There’s a black patina for zinc available Mary Beth. Another alternative is Gun-Bluing.
I hope that helps.
It’s hard to get zinc to turn black like the lead, I have gotten so I use the black patina leave for about an hour rinse dry then take steel wool #000 and rub the zinc down and it comes out like petter or I’ve heard it called gun powder color then polish. I find the zinc patina doesn’t work any better than the lead patina
Thanks for your thoughts on patina Joan, very helpful and interesting. I love everyone’s methods and ingenuity when it comes to patina 🙂
Have a wood frame made 🙂
I just completed my window using zinc came for the frame. The rest of the window is copper foiled. Do I need to putty the frame like I would if it were lead came? The window will be hanging in front of an inside window, as opposed to being installed into a window frame or door.
No, you don’t have to cement the zinc in this instance. It’s an interior panel with no weatherproofing requirements. You might want to though, for a more finished look but it’s optional.
As an aside, you don’t HAVE to putty an all-lead came piece if it were similarly free hanging for the same weatherproofing reason. I like to putty an all-lead came window as the glass can rattle and it doesn’t seem ‘finished’ – more so than the foil/zinc combination you’re talking about.
I hope that answers your good question Catherine.
Thanks for your answer. My understanding that putty-ing lead came windows was for weatherproofing but also because the lead eventually stretches out and the putty will delay the eventual loosening of the glass. Zinc doesn’t seem to have that same stretching feature but it does have channels and I wonder if the putty slows the oxidation process inside the zinc.
No the putty doesn’t stop the oxidation of zinc sadly Catherine. You can patina it to match the black patina on the foil.
I have an arched transom over my front door that I want to put stained glass in. It does not open and will not get any movement. I have worked primarily with lead came but I do not know how to bend zinc to that angle. Is it absolutely necessary in this application? I can send you a picture of it if that will help. It has been a few years since I have done a big project. Thank you for the wonderful website. I save them in a special folder so I will have them for reference. It lights a fire that is flickering.
Stained glass panels don’t need zinc edging if you’re installing them in a fixed position. Just make sure you choose quarter rounds (beading in the UK) that are wide enough to hold the window securely around the perimeter.
I’m not sure why you would need to bend the zinc for a transom, by the way. You normally mitre the corners, cutting it with a hack saw or small electric chop saw. You need to bend zinc for circular windows. I hope that helps.
‘Lights a fire that’s flickering‘, what a lovely thing to say Nancy, thank you 🙂
This is the best explanation of how to measure/cut corners that I’ve seen. Even taking classes, the process was more “guesstimate” than exact as you were explaining. I’ve been working in stained glass for nearly 20 years, so thanks for the updated process for me to use! An older dog can learn better tricks! The framing process won’t seem so daunting now.
Oh that’s so nice to read, thanks so much Barb, you made my day 🙂 I absolutely agree that we can all learn new things… that’s why I love stained glass, keeps us on our toes! Feel free to add any tips on any of the pages; I’m sure you’ll have a lot that me and others can learn from.
At what size do you determine that zinc came frame is better? I am specifically making a 20″x13″ stained glass piece.
It depends how you’re displaying the stained glass panel – whether it’s free-hanging or in a frame Kathleen. If it’s free hanging go for zinc. If it’s going to be displayed in a wooden frame, go for lead came. I hope that answers your question.
I had not done a project for several months and needed a refresher course. I checked on line for information to help me get through this project. Your site is the very best I have come across and thank you sincerely for all the great information. You have covered every detail in a great way to understand. I am ready to frame and needed to know how to cut my corners for the came. You detailed it perfectly. Could not tell you how much I appreciate the efforts you took in sharing your knowledge.
I’m so happy to hear that you found my site useful Ajia. As a teacher is great to know that my stained glass tutorials help people make better stained glass. Thanks so much for your kind words.
Thank you for sharing your expertise in such easy and detailed way for beginners like me and hopefully you could answer my question, I rescued from the trash a panel framed with lead came H shaped and would like to frame it with zinc came to hang it on my wall but I don’t know if lead came has to be removed and replaced or if zinc came can be added to existing lead frame and what shape would be more appropriate to do it.
Thank you.
You’ll have to remove the zinc came frame first (use gravity to help by tipping the panel when you unsolder the joints) and either re-frame with U shaped zinc or lead came. If the panel is large you might want to keep the H lead came and frame it in wood. Hope that helps Yasmin.