The BEST thing about stained glass cost-saving tips is that they leave you more $$ for glass, beautiful stained glass. Below you’ll find a series of cost saving tips. I hope you find them useful. Feel free to share your #1 tip at the bottom of the page 🙂
Click the links below to go to the section:
Saving Oil
Careful Template Use
Save Solder
Make Jump Rings
Cheaper Cutting Rulers
Holding Things With Cheap Household Items
Saving On Stained Glass Cutting Oil
The first stained glass cost saving tip is really simple. Try using kerosene or sewing machine oil instead of the relatively expensive cutting oil sold in stained glass stores.

Sometimes the barrels of the cutters leak. Rather than waste oil try using a little jar with a bit of sponge soaked in oil. You can put the lid on and use it as and when needed.
Cost Saving Tips for Stained Glass
The biggest savings to be made when cutting glass are by placing your templates in the right position so that you waste less glass.
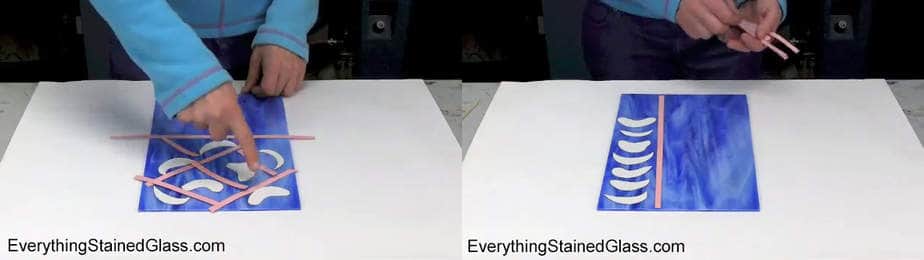
Can you see the difference between placing the glass randomly (left in the photo above) and neatly in a line (right, above)?
There’s a lot of wasted glass all around the edges of the random shapes. If you have a lot of similar size shapes, you can put them all in a row. Choose the strip of glass that you like, thinking about the grain direction and colour.
Make one cut along the length of the glass and then across for each of the pieces.
A huge 2/3rds of that hobby cut have already been saved! And you’re left with that little nice bit at the bottom that can be used too.
When you cut the shapes, do the inside curve first, making it one of your cuts. Then do the top side. Remember that you have to go from one edge of the glass to the other to make a successful cut. By doing it this way you only use about 1/3 of the sheet rather than about 1/2.
If you’re new to stained glass or coming back to it after a break there are many tips and tricks you can learn to make it easier – and cheaper! – for yourself.
If you don’t have a local class my Stained Glass Made Perfect course has helped many beginners and refreshers nail the essential techniques and and go on to find success with more ambitious projects. The course is self-paced and online so you can learn these techniques even if you can’t easily get to a class. You can find out more about it here Stained Glass Made Perfect.
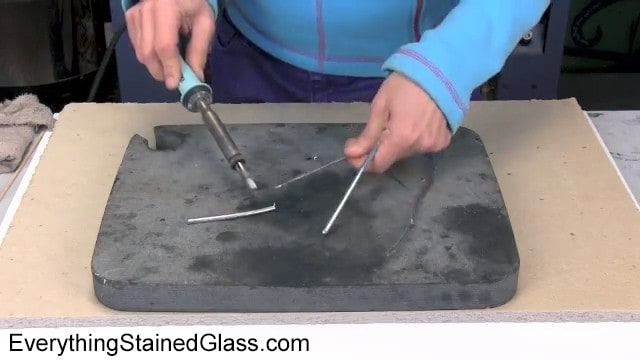
Save Stained Glass Solder
Don’t throw away those annoying little bits of stained glass solder that get left at the end. Simply join it together with your longer solder stick.
To do this, join them together by holding your iron tip flat over over the two ends until they melt. Leave it for a few seconds to let it cool and harden. And then you’ve got an elongated mega stick with no wastage!
Make Your Own Jump Rings
Jump rings are quite expensive to buy but this stained glass cost saving tip will shows you how to make your own.
- Get some tinned wire – I’m using 14 gauge but you can adjust this depending on the size of your project. Don’t make it too low though, otherwise you won’t be able to wrap it easily.
You can see a range of tinned wire on Amazon here (paid link)
- Think about the diameter of the ring you need and find a dowel or pencil that corresponds to this.
- Wrap the wire around your chosen object repeatedly. I make 3 rings in the video but you can keep going and make up to 10 by keep wrapping it round and round.You’re effectively making a small spring.
- When you have enough rings, cut the wire and slide it off the dowel. Now you’ve got the little spring.
- Now cut it with wire cutters.

- The first one is usually not usable as it’s incomplete. Cut along in a straight line and the wire circles begin to appear. All you have to do then is bang them with a hammer to flatten them out.
And there you have it, a handful of cheap jump rings at sizes to suit your projects 🙂
Save Money on Cutting Rulers
Do you find the cork backed steel rulers for cutting glass a little bit expensive AND too shallow? If so, here’s how to use materials to make your own cheaply and the correct height.
Can you see from the video that a regular steel rule is too slippery and not high enough off the glass surface to be any good when cutting stained glass?
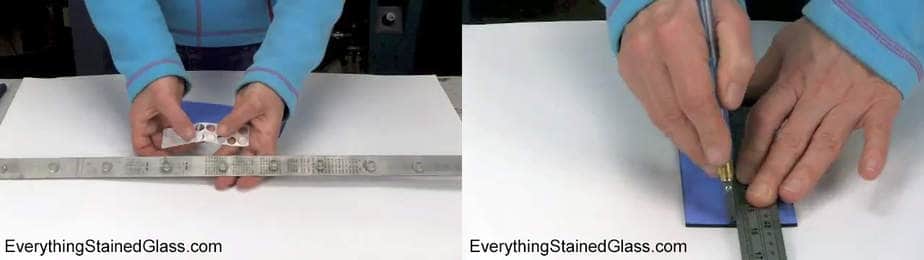
- You need a packet of those plastic sticky pads that stop doors or drawers slamming
- Then clean you ruler and stick the pads along underside of the ruler
- One of my readers suggested staggering the pads to make it more stable – top tip!
- That’s all there is to it. You have a non-slip ruler that is the correct height for cutting glass.
Cheap Tools For Holding Things
One of the constant problems when making stained glass is managing to hold everything together and in the right place. You have to keep things still, make angles and generally make sure that the piece doesn’t move in the making. Unless you’re an octopus, this is tricky!
Reader Georgia Hamilton has very kindly put together an ingenious variety of ideas to hold things in place that use inexpensive or everyday items. She has taken photos and explains how she uses them below. So useful, thank you SO much Georgia!
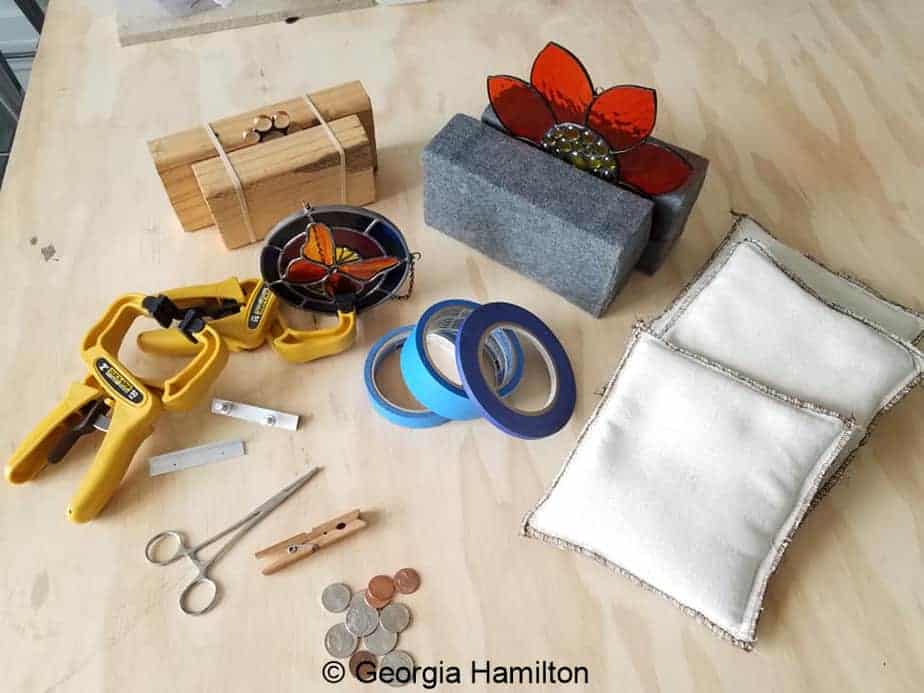
01
Above are some of the items Georgia uses for holding things in place and at angles. Coins are great for levelling pieces and the aluminium Morton strips can be used for angling things like butterfly wings when soldering.
02
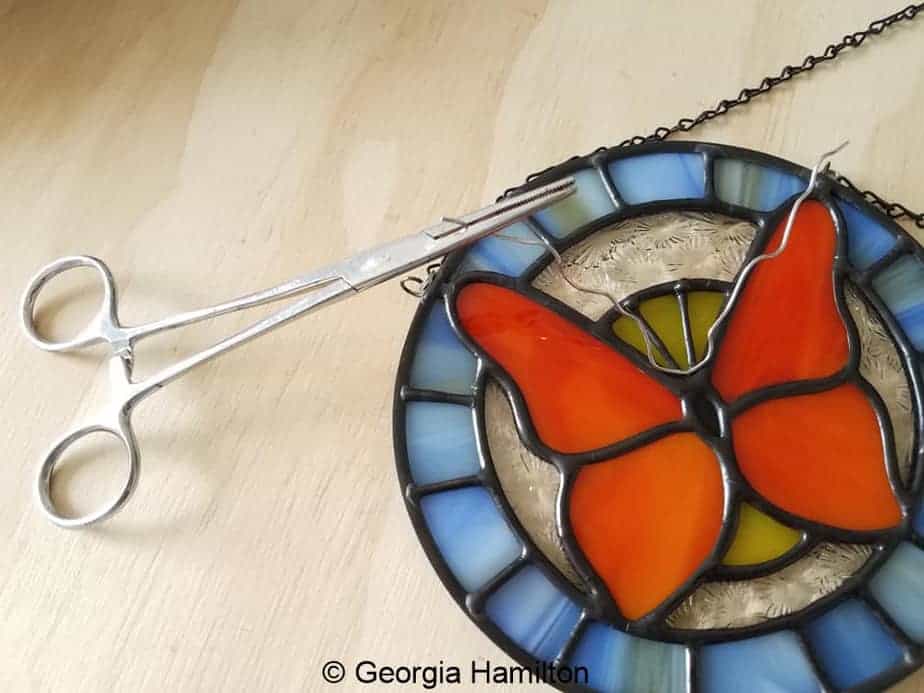
These scissor-looking things are called Hemostat clamps. You can buy them online for about $5. You can get them at fabrics stores and sometimes pet stores. What works well for stained glass is that they don’t require you to hold them closed because they latch together. Also, they’re very narrow so can be use for small delicate items.

03
Clothes pins are also handy and readily available. Plus, like the hemostat clamps, they are a reverse clamp, so you don’t have to hold them closed like you do pliers.
04
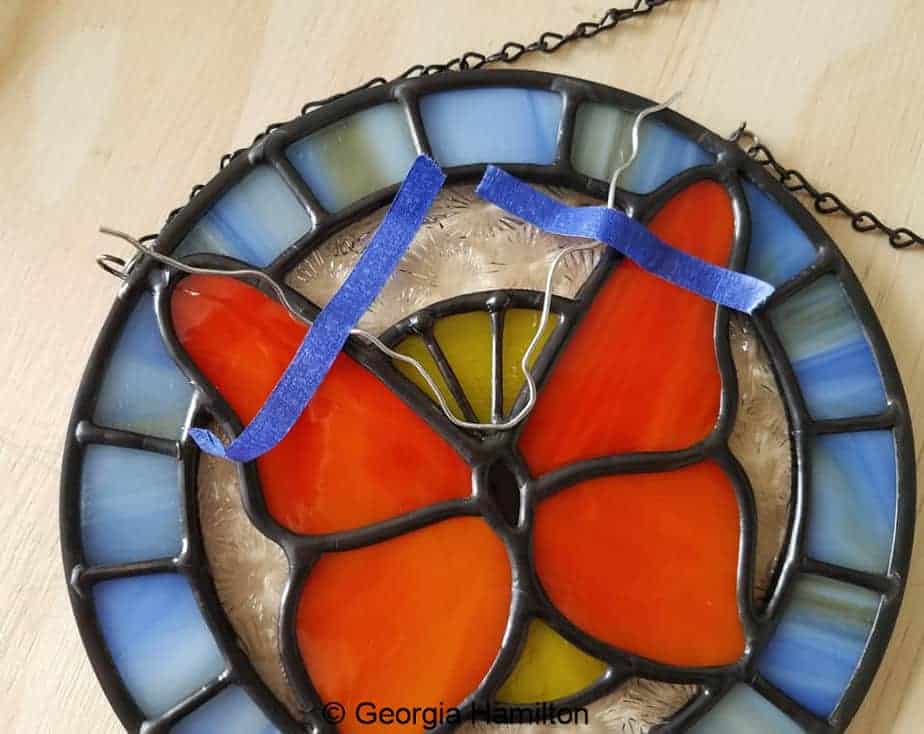
Blue painter’s tape is great for all kinds of things. You can tape down wire embellishments and solder them in place. The tape removes easily, doesn’t melt and solder doesn’t stick to it.
05
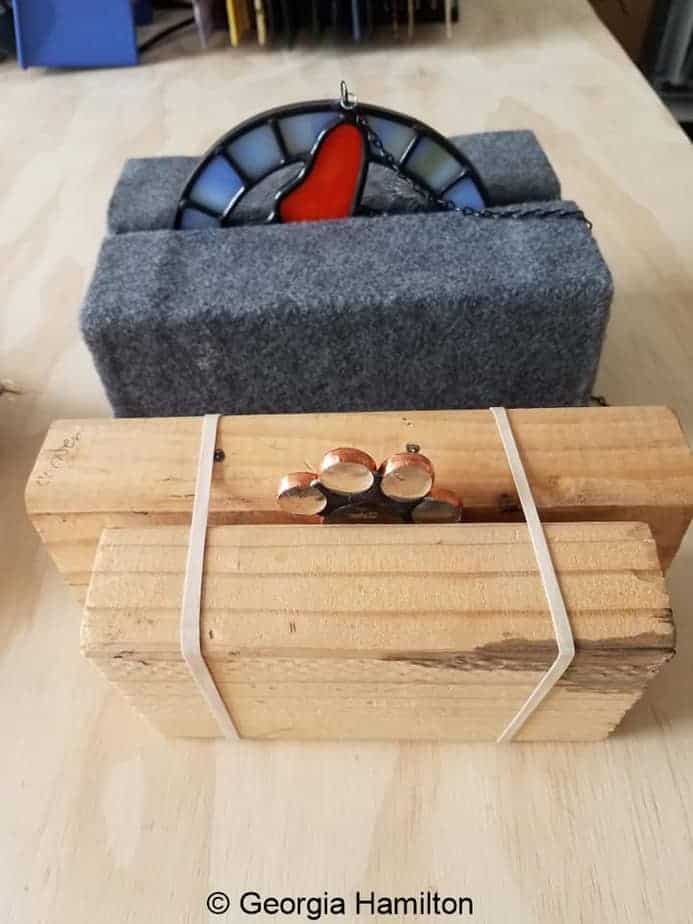
The clamp in the front is just scrap 2×4’s held together with rubber bands. The back items are 2 bricks that Georgia glued felt to. They’re heavy enough to hold larger things upright without falling over. The felt protects the glass and solder from getting scratched.
06
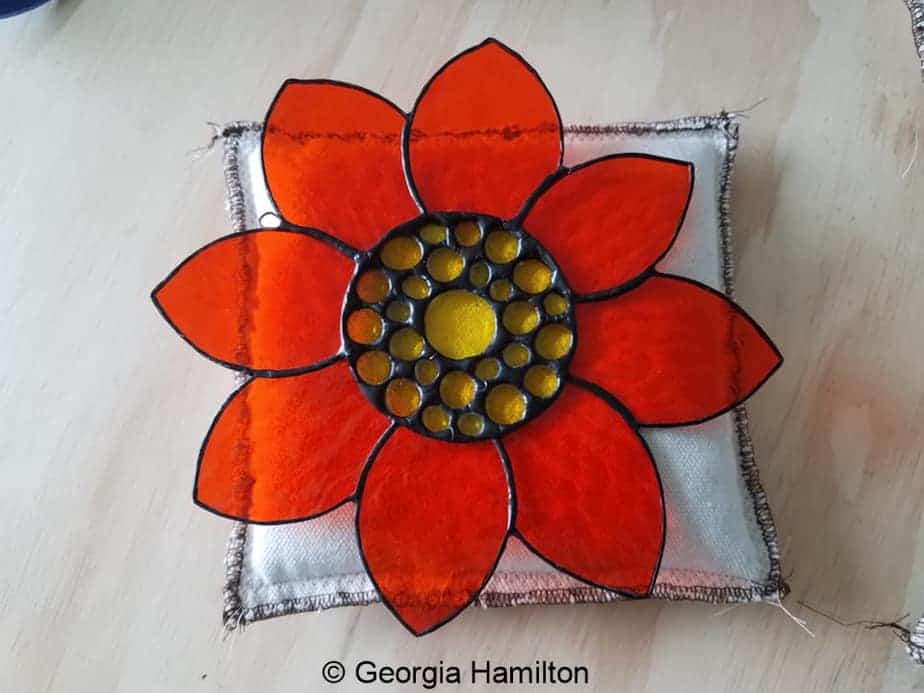
Georgia makes these mini sandbags using a cheapie canvas dropcloth to cut squares from. Cotton canvas is more flame resistant and the sand won’t melt or break down. Plus it is softer than beans. She cuts four squares for each bag to make them doubly thick. She then sews them up with double seams and fills with sand.
They’re handy for positioning items at an angle or when you have projects with nuggets, jewels or bevels that stick out on one side of the piece and you need to solder the back. These keep things level and protect the jewels.
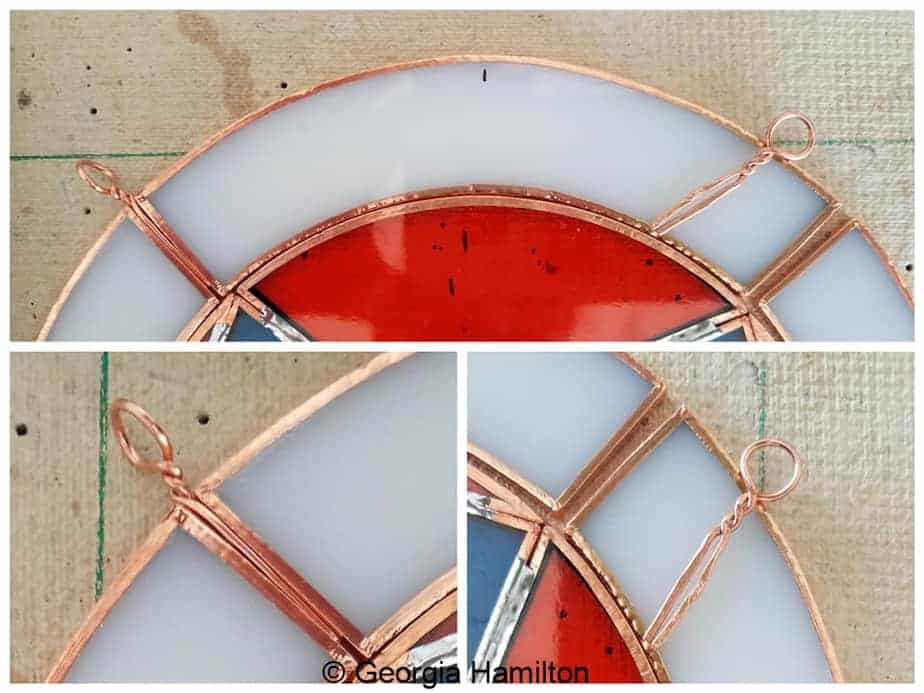
07
Georgia prefers loops with tails rather than simple rings. They’re much more secure because they’re soldered into a seam. They can be pinned into position and soldered in place without needing to grasp anything with pliers.
I’m hoping you’ll find these tips useful and that save a little bit of money when you’re making stained glass. I bet you have your own tips? If so, feel free to add them in the comment section below to help your fellow stained glassers. Thank you.

Stained glass people tend to be some of the nicest people, and are great at sharing! I am currently fascinated by the “spinners” made from squares placed so they are 3 dimensional in a cross shaped pattern. I found the directions for a jig to hold the pieces online on ETSY ( https://www.etsy.com/listing/1210839205/stained-glass-spinner-cardboard-jig ) , and while I “could” have just used the details in the posting, I paid the $1.80 since the details were EXACTLY what I needed and couldn’t come up with for myself! I have added panels to the original pattern and made the spinner look Extremely 3d like boxes stacked. The latest is to make the pattern look like spinning PEOPLE!! (Stevie Nicks! David Bowie! Elvis! Etc)
Agree about the lovely people. thanks for the link
What is the grey 2” thick platform you re using to solder on?
It’s an offcut of granite worktop Julie. Picked up from a skip 🙂
Lots of great tips that I never knew. Some I have been using for many years. Love all the new ones to me. Thank you Milly anf everone that shared..
Nancy
This is more mosaic related but thought I would share it just in case others have this issue. I have hundreds of beads and mosaic tiles and they are in storage containers that have 8-10 compartments in them. I was so tired of having to look in each one to find what I was looking for so I decided to number them. Then I took a picture of what was inside and created a separate album renaming them with the number on the container. Now I can go to the album and look at the pictures to find the item I want, get the number of the picture and just go pull that container. Easy Peasy.
Great idea Janet, thanks for sharing with others 🙂
Milly, yours are some of the few emails that I always archive after I read them. So much valuable info! Thank you. I originally started stained glass in the early 1980s and did it for about five years. And just recently I picked it back up again and made a few small Christmas gifts. But I really need to know an easy way to draw ovals. Circles, squares and rectangles are ok, but I think ovals add a certain elegance to a panel, especially an oval with one or more borders. Ideally, a series of templates in various sizes would probably be the best approach, but how to get or make them?
I’m honoured Russ, thank you 🙂 I software to draw ovals and circles. Specifically Rapid Resizer – you can then print the pattern out at the correct size ready to cut. You can read more about it here:
https://everythingstainedglass.com/stained-glass-software
I hope that helps, Milly
What do most of you do with left over glass scraps? I moved out of state last year and had two large buckets of scraps to get rid of. I tried to sell or give them away for mosaic projects with no success. Sadly ended up trashing the glass. Couldn’t take it with me.
I have a page of ideas here Brenda, for your next bucket full 😉 https://everythingstainedglass.com/scrap-glass
I hope that helps.
I usually use them for stepping stones or find someone that does resin projects and pass them on that does mosiacs. I will from all my glass make a sample box of 2 x 2 inches and write name of glass and where purchased.
Recently I received a lot of pieces of networking cables from an electrician, making networks in my school. Remove the outer layer (easy) and remove the layer around each strand (more difficult). I tried a lot of methods, but the best is: pull your coated copper over a whine cork (slice a small piece of to stabilise it), while holding an exacto knife flush to it. Now you are left with nice pieces of copper strands, to be used separately or twisted.
Thanks for this tip Berna, I haven’t tried that. Sounds a very good solution.
Here’s a useful tip when polishing a finished project. Use and old electric toothbrush head to get into the corners. Works great.
Trudy
Fantastic idea Trudy, thank you. Shame I’ve just gotten rid of my old electric toothbrush 🙂
This tip is to make an edge of a project look nice or to re-inforce an area.
1. Cut 3 strands of 18 gauge wire, 2 to 3 feet long
2. Get out your hand-mixer and put one beater in the hand mixer
3. Take the 3 strands of wire and secure it around the end of the beater (the part that would touch the bottom of the bowl if you were mixing something).
4. Plug your hand mixer in and hold it up in front of you, grab the loose ends of the 3 wires, turn the mixer on low and hold onto the 3 loose ends (tug on the loose ends a bit to keep the wire taught).
5. Watch the magic begin – you will end up with a beautiful twisted wire (all 3 wires will be perfectly twisted). Once the ‘twist’ has worked its way down to the end of the wires that you are holding on to, shut your mixer off. “Voila”, a nice decorative piece of wire to use any way you like.
I like to solder this twisted wire around the outside edges of pieces, wrap it around a pencil to make jump rings, use it for attena on an insect, use it for the tentacles on a jelly fish, etc. Let your imagination go wild.
That’s such a fabulous tip Ann, thank you SO much for taking the time to share it. I may use it on my site (credited of course) if that’s okay, so that more people can see it. Fantastic, thanks again.
I’ve done this with a drill but not thought of a mixer LOL. Will try it.
Sounds great! Let me know how it works out using a kitchen appliance to achieve your creativity 🙂
Good Luck !
My tip for saving monry on oil is: don’t use any! Not necessary for scoring glass.
hahaha, true Stephen, if you can stand the feel of it. Which I can’t; puts my teeth on edge.
Not using oil is hard on cutter heads. I’ll spend the extra money on oil in order to preserve my cutter.
I hate when the lead around a project dulls or looks old. I found that the Family Dollar store brand of Magic Erasers works great for shining it up. I use the sheets that are about 1/8th inch thick. I cut the large sheet into 4 pieces. When I sell or give away a project, I provide this small piece so they can touch it up later.
Thanks a great tip Edie, thank you SO much for adding it here 🙂
What an awesome tip ! Thank you for sharing this!
Lucia
I’m gonna try this. Thanks
I was in a second hand sore last week and they had a box of metal rulers for $1.00 each. All different sizes.
Angie Miller
Good point Angie, we can pick up things cheaply everywhere if we keep our ‘stained glass heads’ upon us!
Hi Millie!
Thank you as always for my Sunday morning email.
When making pattern pieces I now use waterproof vinyl labels (Amazon)! They go through my printer or can be hand drawn with a Sharpie. Stays on through the whole process and then peels off and can often be used again. No glue stick or chapstick or line stay for me anymore.
Tip top idea and addition to the page Jennifer, thanks so much 🙂
Glad you enjoy the Sunday emails.
What a great idea! Which one do you use? There’s a lot of them. For years I’ve been using overhead projector plastic sheets and literally tracing my pattern pieces then cutting them out. Very tedious to say the least!
Please show/tell us which labels. I looked and only found small labels like for bottles. Thank you!
Thanks for sharing these tips Milly. 😊
You’re welcome Lisa 🙂
Small jam jars are the way to go for flux and other liquids! We get a few at Christmas and I noticed some black- and some copper-topped ones, great for the different patinas. A blue one does my blue liquid flux.
Good idea Mike, thanks for adding it.
I like the little pimentos jars. They are only about 1.5″ in diameter and about 1.5″ tall.
Thanks Milly for the ruler’s tip! You have no idea how much glass I ruined cutting long pieces with a ruler that slipped and created an unwanted cutting line!
Glad it helped Sylvie. Someone else suggested a refinement; placing the sticky ‘dots’ staggered from side to side, so that it doesn’t tip. Even better 🙂
Can anyone give me a tip for getting a stuck cutting wheel moving again? Love your tips. Thank you from Canada.
Clean out the space anove the wheel
WD 40 would loosen
Yes soak it in evaporust rust remover overnight. The stuff is non toxic( you can stick your hand in it) and works like absolute magic. I used it on a cutter from the 1970’s that wouldn’t move at all. Now it’s my favourite. You can get it at princess auto.
I loved all the tips to help save money and help our hobby, To change the subject, I would like some advice as what is the best soldering iron to purchase, I am new at the hobby, My solder keeps firing though the back of my work evn if i turn my iron down, Also my ,solder is so thick, Hope you have some tips for me
I recommend the Hakko FX601 Brenda. You can see my review here: https://everythingstainedglass.com/soldering-irons
I have lots of tutorials to help with your soldering here: https://everythingstainedglass.com/tag/soldering
I hope that helps 🙂
I use the outer rings for canning jars to get the angle needed for my 3d flowers, wings etc. It gives a gentle angle and a stable surface for soldering. The ring can be held down with a bit of “glue tack” so it doesn’t move on the cutting surface. I got a whole box of rings for a quarter at a tag sale but even in the store, they are cheap and last forever.
That’s ingenious Linda! Thanks so much for taking the time to share it.
American Science and Surplus has 100 feet of 24 gauge copper wire for $4.50 and 36 yds x 3/8″ copper foil for $8.95 plus many other fascinating items.
‘many other fascinating items’… how can we resist galloping over there to look. I’m on my way!
Thanks for the heads up Bill.
Instead of baby food jars, I use my wife’s small cosmetic jars with a small scrap of material in the bottom. I take less oil and less space in the work area.
Good tip John, thanks for adding it 🙂
Hi Milly. My Dad was on a lot of medications. Instead of throwing them out,I thought the lids were a nice size for dipping. I have a large stash of them but!they can be washed if someone doesn’t have a continual supply of medicine lids.
Great idea Sandy. Very convenient for dipping, I can see that.
Milly, The best tip I ever got from you is your “tapping” advice to start a score !!
On an inside curve especially, it’s a marvelous tip !! Saved me so many curse words !
Notice you never seemed to like my carpenter square idea for containing rectangular
projects ? – Bill Tait
So sorry Bill, I went snooping for it and indeed it had slipped through the net. Here it is, thank you!:
“when I have a project that will be framed I use two small carpenters squares with a few 1/16 in holes for push pins. Keeps everything in place and square!”
It was in an email – you can guarantee future tips of yours won’t be missed if you comment yourself on the site rather than email me. My brain’s a sieve 🙂
Yes I have two sides of my assembly table in a permanent 90 degree angled stops– screwed in place… thenn a carpenter’s square and pins for the opposite 90 angle– It I have to fill in the gaps, I use pinned painter’s sticks as they can be cut to size, are cheap (free) and push pins go through them.
Thank you Margo, that’s helpful.
Am so appreciative of all that you offer!
I’ve been pouring flux into a water bottle cap and using that when I’m working. It’s usually just enough to do a small project and I rarely waste any. I also don’t pollute the original container.
Great tip, thank you S Ward (sorry, bit formal, don’t have your name 🙂 )
Re the ruler tip, if you take a strip of the material used in drawers and cabinets so that they are non slip and glue it to the back of your ruler you gain both height and stability and the cost is almost zero. Works very well.
Fred
Thanks for your tip Fred, much appreciated 🙂
Wine corks can be sliced and glued to the straight edge too. Free if anyone you know drinks wine!
That’s a really good idea Vicki, hadn’t thought of that. Steady hand needed to cut the slices of cork though 🙂
If not too late, I would add one more tip: lampshade molds are pretty expensive when bought from the professional suppliers, so why not to make one yourself using a paper mache technic: a newspaper soaked in the wallpaper glue, spread several layers over a colander, flowerpot or any other sphere you like and let it dry. Paint it white, draw your pattern and re-use with different pattern. One more advantage is that the pieces of glass may be hold in place with pins.
It’s never too late Janusz, thank you for this extra tip 🙂
Brilliant, I’m going to try this today! Thanks for the inspiration
I also love to use small glass baby food jars to put oil and patina in. They are especially good if you are taking a short break from your project and don’t want to throw it out because you can put the tops back on and seal the jars up.
Thanks so much Milly! I always look forward to reading your tips and what your other students suggest as well. What a wonderful family you have created here!!
Ooh yes, baby jars for oil and patina, good idea Pati. Saves wastage. I now need to find someone with a young one!
I use eye shadow containers or small jam containers you get in hotels
Thanks for adding this Ann, very useful. I love those mini jam jars!
I always keep the small jam jars I get when eating out. You never realise how they can come in handy.
Makes eating the contents all the more pleasurable Lesley. Thanks for the tip 🙂
Hi Milly
Just another tip to add to the one you gave about making the jump rings. If you get one of those inexpensive allen key sets you will have graduated sizes for making the jump rings. Also, an added advantage is that unlike a round surface the wire will not become tight when winding it on, as the hexagonal shape makes it a lot easier to slide off. Credit to my jeweller husband.
Also, with saving solder- i think I may have seen it on your site a while back. Use a flat piece of timber with a groove routered in it. Collect all of the little balls of solder and melt them int the groove to make a new stick. saves heaps and it it fun to do.
Thank you Milly. We love your site. I purchased some cookies last newsletter time. they save fingers big time.
Once again thanks heaps
Oh that’s ingenious, why didn’t I think of allen keys after all these years?! Thank your jeweller hubbie for me 🙂
The melting solder blobs trick is here, thanks for reminding me!
Thank you for your many tips over the past.
I use Johnson baby oil in the glass cutter. It also protects my hands .
Great tip, thanks Gregory 🙂
When trying to save glass by careful positioning of your templates, be sure to take in account any pattern in the coloring or any physical physical pattern in the glass. Some glass patterns have a “grain”, color or physical, and you may wish it to be oriented in a particular way. Doing so may increase your glass usage, but improve your project.
Yay, glad to hear that someone else is happy to use more glass to get the best end result Graeme 😉 It’s always a balancing act; it can get a bit TOO expensive…
I greatly appreciate your weekly tips and enjoy sharing them with my students. I’m a volunteer teacher at our local art center.
I’m wondering if anyone else uses mineral oil for glass cutters. I can’t stand the smell of kerosene or other oils and have always just dipped my cutters in a lid with a small rag soaked in mineral oil.
Thanks Susi, that’s helpful.
A rather “mundane” tip for “containers” in the shop for flux, copper patina, etc.: The Dollar Tree! They have “disposable” tiny little square clear plastic that work well for this. For “trash bins” used after/while cutting out your pattern, certain heavy “plastic trays” from the grocery store “meats” work very well & they are disposable. I also “bought” a package of 100 “cleaning sponges” about 1 yr ago from “Wish.com”; for some reason, never really used them until recently; what a surprise, wonderful cleaning; used to wash/clean a hand mirror I was making for a Christmas present; worked great! Best part, cheap & I never before saw a “cleaning product” that worked so well in the kitchen.
Also, for certain “stained glass supplies” in the US, go online to “McGills Warehouse”; you will find cutters, bevels, foil a lot cheaper than else where.
Sandra you’ve excelled yourself with all these tips, thanks so much 🙂 They’re very helpful for my readers.
Have you ever used their copper foil? I just went to their website and noticed the 7/32 black back is cheaper than where I buy locally.
Milly,
I just want to thank you for producing and publishing your Stained Glass Tips. I’ve been creating and selling my stained glass designs in Ligonier, PA, USA, for over twenty years but I always find something new or a gentle reminder in your newsletters. For example, this time I learned that when I’m in a pinch for cutting oil, I can use Kerosene. I truly appreciate all the time and effort you put into sharing our art form with the world.
I would also like to send our thoughts and prayers to you and all the people and animals of Australia during this most difficult and dangerous Fire season. Please stay safe.
That’s very nice to hear Mike, thank you. As a seasoned stained glasser I’m sure you’ve got lots of your own tips to share – stained glass is like that isn’t it.
The fires are horrifying. Thanks for your kind thoughts which I’m sure we all share.
I’m definitely going to use the cutting oil tip . If there’s not a lot of cutting to do on a piece , then I don’t waste
oil in my pistol grip cutter .
I haven’t used “ purchased “ oil for while because I found something in our garage ( not sure what but it smelt the same )!! It worked and was cheap , even Free ! . 🤫
Free is good if it works Barbara. You just have to make sure it’s not too viscous otherwise it clogs the cutter.
I learned this from my stained glass teacher years ago. Instead of using the substance to water proof markings on glass while grinding them, use non-flavored chap stick tubes. It is cheaper and easier to use.
Ah that’s a good tip Mary, thanks for adding it. It’s so annoying when the lines disappear when grinding!
Milly, once again you have given us such valuable tips and tricks!
I am a fan of using lamp oil for a lubricant, and I dip my cutter in it. No more leaky cutter head. I suppose lamp oil isn’t much different than kerosene. It works great.
Thanks for all the information you share with us!
You’re a ‘dipper’ too Gail 🙂 Lamp oil is good.
i also use the tiny jam jars useful when I pour out flux, not that I pour out lots, but I don’t do lots of soldering at any one time so it helps the flux go a bit further.
Thanks for the additional tip Trish. It’s a good idea to do this with flux and patina as it keeps the main bulk of it clean.
I love your tips & tricks….tnx. My question is how to keep the lid of flux in baby bottle from corriding. TIA
You can’t, short answer! Try using small plastic pots instead Joanell, that will fix it 🙂
Thank you! Love these tips!
You’re welcome Janie, you’re happy, I’m happy 😉