The Secrets Of Neat Copper Foiling
This instruction on how to make stained glass shows you how to wrap and burnish your stained glass pieces neatly with copper foil. This is so that you can solder around each piece and join them all together.
There’s also information on all the different colours, widths and weights of foil available, to help you choose the right one for your project.
Want to know how to foil very small pieces? Then click here
If you’re new to stained glass or coming back to it after some time out there are many things you can learn to make it a more rewarding experience.
If you don’t have a local class my Stained Glass Made Perfect course has helped numerous beginners and refreshers master the essential techniques and progress to making more complex work. The course is self-paced and online so you can learn these techniques even if you don’t have a physical class close by. You can find out more about it here Stained Glass Made Perfect.
Foiling Complex Shapes – Video
Starting the foil in the correct place can help prevent it from pulling away at the edges. Learn how to foil tricky shapes evenly and for maximum strength.
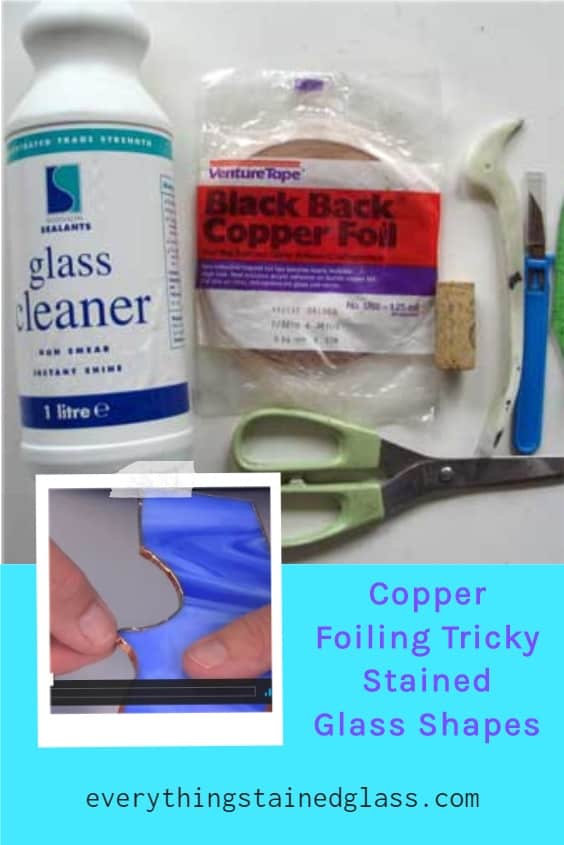
What You Need For Copper Foiling
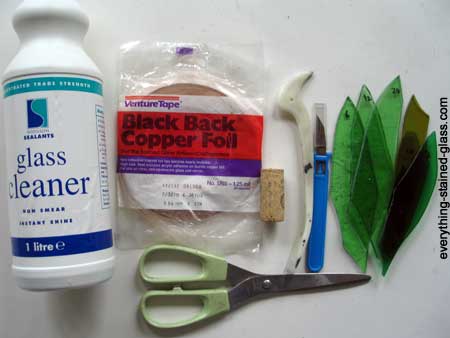
A roll of copper foil – 7/32″ wide is a good starting point, Cleaner, Scissors, Fid or spare wine cork, Craft knife, Cut and ground art glass pieces, Your pattern.
Instruction To Make Stained Glass – Foiling
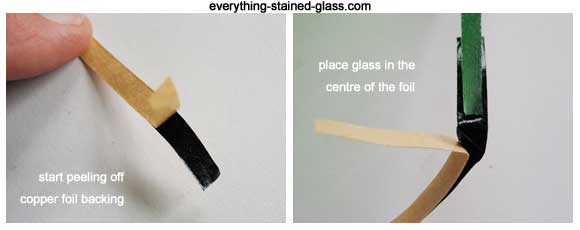
Copper foil tape comes on a roll and has a backing that you peel away to expose a sticky side.
It’s worth spending some time making the foil as neat as possible at this stage, as any gaps or uneven areas will show up during soldering. I like to use Venture Tape, like this one (Amazon Affiliate Link) or Edco.
1 Wrapping The Glass
- Clean each piece with rubbing alcohol to get rid of any grease that will stop the foil sticking
- Roughly roll out and cut enough tape for your piece of stained glass with a small overlap
- Peel a bit of the tape away from the backing and place the edge of the glass in the centre
- Start anywhere except for on an outer edge of your panel or on a corner of the piece. This will make the panel stronger
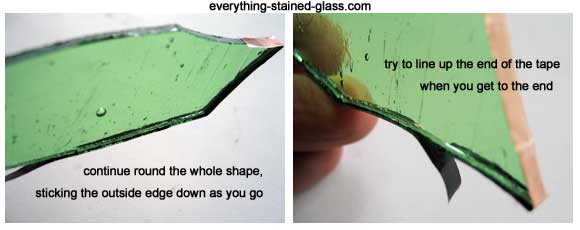
- Press down and continue around the whole piece, checking that the tape is staying centred and pressing down the outside edge as you go
- When you get back to the beginning, make sure that the overlapping bit of tape lines up exactly
Top Tip
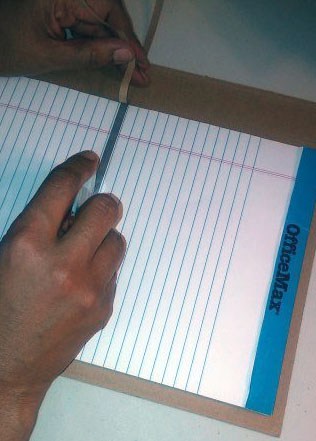
If you have trouble centring the foil you might want to use a piece of lined paper as a guide like this photo below:
2 Folding The Foil Over By Hand
- Squeeze the foil on to the back and front edges with your finger and thumb. This is called ‘crimping’.
- Make sure that the corners are neat by folding each side over first. Think of darts and dress-making!
3 Burnishing The Stained Glass Copper Foil
Now you need to burnish the edges to make them stick firmly.
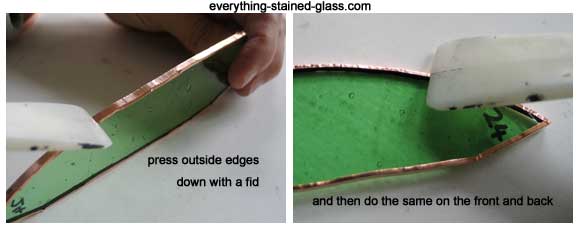
- Using a fid (you can use a wine cork or pencil for this) go over the outside edge, to make sure it is stuck properly
- Then do the same for both the back and front edges
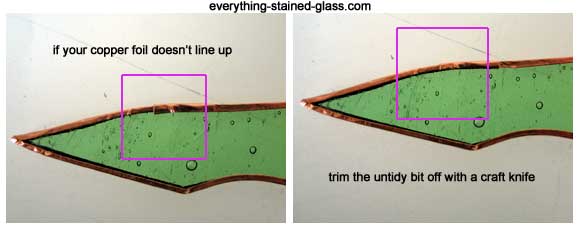
- Trim any uneven bits carefully with a craft knife
- The neater your foil, the better your solder will look
- Copper foil for stained glass is available in widths from 1/8” (3mm) to ½” (13mm).
- Beginners like working with 7/32″ and 1/4″ widths.
- It also comes in different weights, from the thinnest 1mil to the heaviest 1.5mil.
- Beginners often use I.5mil as it doesn’t tear as easily and works well on unground edges.
- You can also buy silver, brass and black-backed foil. This is especially good if you are using transparent glass as you won’t want to see copper through it.
- It’s best to think ahead and choose foil with a backing colour to match the colour of the patina you will be using, so that they blend together perfectly.
Tips for Copper Foiling Small Shapes
One of my students asked in the Stained Glass Hub* if anyone had any ideas on how to foil small shapes. I’ve compiled all their suggestions and added some of my own to share with you.
*The Stained Glass Hub Facebook Group is an (optional) private group for students of my online classes
- If the small piece is surrounded by other foiled pieces you might not need to foil them. This is because the solder from those surrounding pieces may lock them in place. If these tiny pieces go next to each other, you have another option. You can lay pieces of foil across the top edges like an overlay and run a bead of solder on the top.
- Use the narrowest foil possible. You still may have to trim some off with a craft knife to keep them from getting buried in solder.
- Practise PATIENCE 😄
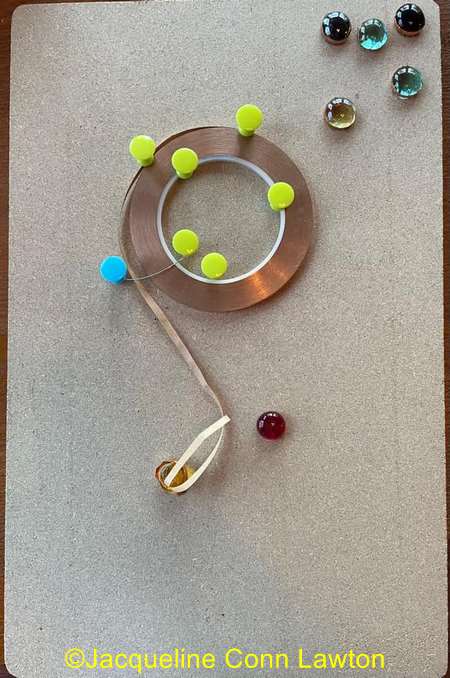
- Jacqueline Conn Lawton constructed a holder for your foil on homasote board like the one pictured below.
- Pull out a length of foil. Put the glass on its’ edge and center it as you go. You can sit or stand directly over it to check it’s centered.
- For Glass Blobs, keep them more to the flat side rather than centered. Then simply roll them on the foil. When they’re all done, put them all in a container without burnishing first and shake it. They bang against each other and burnish themselves.
- With very small pieces, take a strip of 7/32 foil and cut it in half lengthwise, then foil. It’s tight on the edge but enough to solder. This way you don’t have much foil to trim away.
If you want to make your own nugget foiler I have some ideas here
Use Overlay or Wire Rather Than Cutting
- You can leave a larger shape. Rather than struggling to cut individual little shapes – say petals – you can cut 1 larger glass shape for 2 petals Then stick thin foil overlay on the glass to make it look like 2 petals.
- Remember to go slow on the soldering of overlays. The heat from the solder has a way of cracking the glass underneath.
If you’re unsure what a foil overlay is, click here.
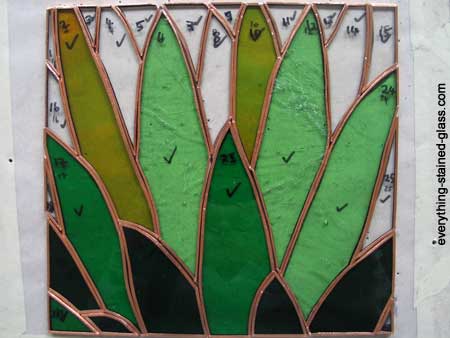
The photos below from Wes Eller show perfectly how you can use overlays to avoid cutting and foiling numerous fiddly shapes.
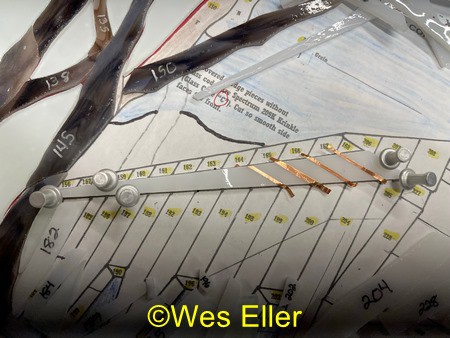
- Cut the 2 long sections with several small pieces into 2 larger, long pieces.
Lightly grind and clean the edges with alcohol.
Line them up on the pattern.
Cut several short foil strips and lay them where the cut lines would have gone.
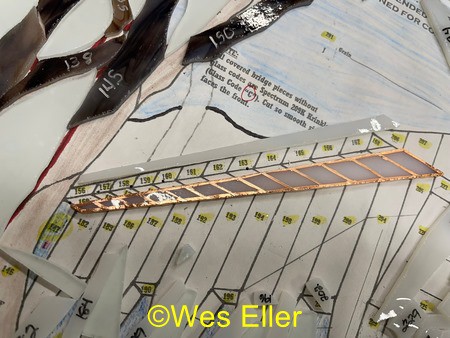
- Then burnish the foil strips to the glass, making sure the edges are secure.
Foil the 2 pieces as normal, covering the burnished strips all along the edges.
VOILÁ, the problem of foiling small pieces is solved 🙂
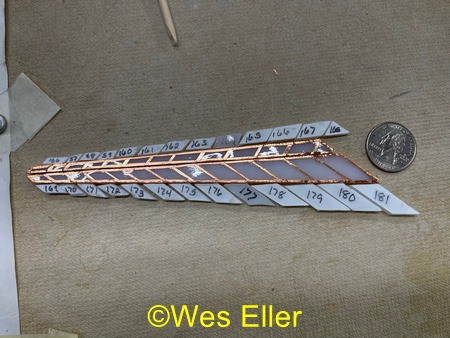
- Don’t forget the underside of the piece shows as a single piece, as it has no overlay on it. This may not matter if it’s a plated piece (as in this case) or if the backside can’t easily be seen.
If it DOES matter you could always do overlay on both sides of the panel.
Thanks to online students Gail Koebke Lynn Boucher Jacqueline Conn Lawton Scott Sucher Nancy McPherson Deb Minez Lin Krz Kathy Corbin Nelson and Wes Eller for their suggestions.
Helpful Resources
Here’s a really helpful instruction to make stained glass video, showing you the copper foil and soldering process. It lasts 2mins 30seconds.
The only thing I would be wary of is starting the foil off right at the corner of a shape, as it makes the joining of the two ends of tape together a bit more tricky.
A short video of foiling and soldering processes
Once you’re happy that you’ve foiled, crimped and burnished as neatly as you can, you’re ready for the next step, Stained Glass Soldering.
One of the benefits of using the copper foil technique is the ability to include small detail. It takes time, patience and a good grinder with a small grinding deck and bit.
Clean your pieces thoroughly! If it ain’t clean tape won’t stick!
I’ve been working on a panel with over 200 pieces. The focal point are two bees on opposing ends of the panel. I’ve come up with a life saving method for foiling these beeasts!
I make several copies of the pattern and use self sealing laminating pouches
Open the pouch, place copy of pattern on non sticky surface, fold the sticky side back over the print…sticky side OUT…remove the film exposing sticky side.
I tape the sides using painters tape. It helps to have something firm beneath it to carry it on. I’ve used cardboard, old frames, artists paint boards.
Now I can put the cluster of tiny pieces on the pattern. They stick. Not horribly sticky..just enough to hold them in place. I can take it with me and do my taping in a comfortable spot.
When complete I put the completed portion in a cabinet. Can cover with plastic wrap .
This gives me time to get the whole panel taped and avoids the complication of the tape becoming oxidized.
Happy taping!
How wonderfully organised and – well – generally marvellous your process Sue. Thanks SO much for taking the time to share it with everyone, that’s so kind.
Hi Milly,
I am just finishing a small soldered window and have run out of leading. I have put strengthening rods inside it but I have no leading to frame it. Is there something else I can use. I was reading about silicone inside the wooden frame. Do you think that would work?
Regards
Ann
I would always advise finishing off the edges with lead or zinc. It gives the whole panel strength. If you have some spare bits of zinc you could use that instead, no problem.
i’m having trouble getting my solder to adhere to the foiled pieces.
Also difficutly getting solder adhere to wire.
What are your suggestions?
Also wondering about someone who rinses foiled pieces in vinegar and salt. Could you talk more about this method and if it helps with soldering.
Dirty foil is a possible reason for not soldering, also not enough flux or too cool an iron or your tip is gunked up with residue.
Perhaps you’re using a wire that doesn’t take solder? Brass or copper wire solders fine. Tinned wire is your best bet as it already has a coat of solder on it.
The vinegar and salt trick is to clean oxidised foil. It’s really for rescuing a piece that you’ve left and are picking up after a while.
I hope that helps.
HI Milly: I have a question for you regarding cleaning you copper foil piece once complete- I am finding that when I put the liquid cleaner/polish on let it dry then try to polish it off- Im able to polish it off but often when the foil meets the glass there is still a residue and quite difficult to get it off.
Any suggestions ?
You can use a soft toothbrush or a clean soft shoe brush. I’ve even used a skewer with a rag over the end to get into the corners if I’m feeling particularly fussy.
Good luck.
Hi Alison, I have had the same problem many times. The best solution I have found is to take a Q-tip and moisten it with alcohol. Not the kind you drink…haha. I always use the 90% isopropyl alcohol. Just rub a little back and forth with the Q-tip over the sticky residue and it breaks it down. You can get in the corners with the edge of a paper towel wrapped around a toothpick with the alcohol also. I always do this after I wash the piece and dry it. Then go ahead and wax it.
Great advice, thanks Carol.
De zwarte randen worden steeds dof en grijs. Hoe kan ik die mooi houden?
Polish it to clean it, refresh with patina and wax to protect the finish. I have a page on finishing here: https://everythingstainedglass.com/stained-glass-tutorial
Mildly, I am finding your suggestions very helpful- thanks so much. However, I am having trouble putting the foil onto inside curves. When I press and burnish, the foil splits.
I have a page that might help you here Marcia: Copper Foil Not Sticking
Marcia, if I have a curve that I think might split, which you get to know after a while which ones will, I take a small piece of foil and place it in the middle of the curve, on the front and back of the glass only. Then I foil as usual, OVER that flat piece, and don’t worry if it splits. When finished burnishing the foil down I trim off the flat piece where it sticks out from under the foil. Never have had a problem since. I hope you understand my explanation. Good luck
Thanks for helping Marcia out Judy, much appreciated.
Great idea!
I call that saddeling and it’s an extra step, but well worth it! In glass work looks are everything!
Hi Marcia,
I have been doing stained glass for 40 years. I own Glass Expressions in Burien, Washington
You need to relax your foil when you are doing an inside curve. Then take your ( Hopefully it is a heavy plastic fid to work this) but move back and forth on one side slowly. This warms the foil and helps it relax and stretch. Then do the same for the other side.
Greetings,
I have a PRO soldering iron controller. I have taken my first stained glass foil class. What setting should I use with the controller for the best temperature to solder with good results. My soldering iron is a ungar. Or do I even need to use the controller?
700F is a good temperature if you’re starting out, as beginners tend to go slower with their soldering. The faster you get the higher the temperature. I have a page on soldering temperatures here: https://everythingstainedglass.com/hakko-fx-601temperature-question
I hope that helps Cathy.
Hi Milly, love your site. Please can you tell me how to blacken the silver solder as I’m trying to match the existing which is a green/black colour.
You can buy black patina for the solder seams Carol. You put it on after cleaning the solder within an inch, wash off carefully and wax to finish. I hope that answers your question.
I’m having trouble getting the foil tape to stick to the glass. Any suggestions?
Yes! Absolutely loads of suggestions on this page: https://everythingstainedglass.com/copperfoil-not-sticking. I hope that helps 🙂
How long can you keep chemicals like flex patina etc. I have tried the find the answer on the web with no luck. Enjoy your tips very much.
If you decant them when you use them so that the main bulk of them remain unsullied and securely fastened, they keep for years. If however they’re murky and messy and the lids have been left off, they don’t last so long and aren’t so effective. I hope that helps Jean, I’m glad you like my tips, thanks 🙂
Hi Milly, I love your information. Do you know if braided (twisted) wire comes in different widths? I want to solder it around a piece of glass I’ve used as a backing for a figure I made. Do you solder the wire just on the edge of the glass or does it cover the foil that overlaps on both sides of the glass?
You can either solder it at regular points around the perimeter or you can join it all the way along, depending on how you want it to look and how strong you want it. The second option is stronger. You can twist your own wire with a drill – just put 2 pieces of wire in a drill and put the other end in a vice attached to a work bench. Twist it slowly! Then you can choose the gauge yourself; 16 is good for starters.
I hope that helps Patricia.
I have copper foil which is dated 2004 it doesn’t seem very sticky Does the adhesive degrade over the years? How long should copper foil be stored? It was in original wrapping and never opened.
Yes it does Shirley. Sometimes you can be lucky, sometimes not. Try it out; if it’s not sticking, bin it – you’ll be making more work for yourself if you use it! I have a page on foil not sticking here: https://everythingstainedglass.com/copperfoil-not-sticking
How do you handle foiling very small glass pieces so that one can still see that piece after soldering?
Use narrower foil for those pieces and make sure you don’t put too much solder in those areas – a flatter solder. If you still can’t see the glass then the piece is too small.
It’s worth persisting with getting these right as the effect of tiny pieces of colour is magnificent. I hope that helps Mary.
You also foil as usual and then use a razor knife to trim the foil to an appropriate width.
Thanks for your additional thoughts Terry, very helpful.
Hi Milly
What length of time can you leave between copper foiling and soldering, time restrictions won’t allow me to complete it all in a day but could I leave it a week between the two, would I need to do anything to protect the foil?
Thanks
The time between copper foiling and soldering should be as short as possible. As it’s often not possible to do it immediately, put your foiled pieces in an airtight plastic bag or, if it’s a large panel, put saran wrap (cling film) over it to stop the air oxidising the copper foil as much as possible.
If I may, I (way too) often leave my foiled glass out too long. Sometime to the point of the copper turning green (that is WAY WAY too long). I have found brushing the foil with a very fine steel wool saves the day. Keep in mind, Milly’s suggestion will save you a lot of time and mess.
An essential reminder not to do this Floyd, thank you! And a good tip too. Dampen down the steel wool and wear a mask to reduce airborne particles.
I learned to rinse foiled pieces with vinegar and salt from you! It works for me on years old foil. Now, as part of my regular routine, I do it on every foiled piece before I solder, no matter how long it has rested between steps. My solder work is soooo much better. Thanks, Milly!
That’s great to hear Vicki, thanks for taking the time to let me know.
Thank you soooo much for your tutorials and other helpful hints!! I’m still having problems with my soldering though. I solder in my shed and it’s over 80 degrees inside. I have a fan blowing towards me (and the table). Would that have any affect on my success, or lack of in running a good bead. The last project I soldered was so bad I have to do the whole thing over. One problem is my solder bubbles up and I get holes down to the foil. The other is my solder smears on both sides onto the glass and it’s like glue trying to get it back to a bead. Help!
Yes, a fan will impact on the stained glass solder seam as it cools the solder before it has a chance to find its level naturally, making the bead uneven. Try with the fan over your soldering arm shoulder and see if that helps.
The solder bubbling up is a different issue; that can be caused by too much flux. Try not putting so much on. You can also try wiping the flux off as you go.
You should be able to heat the solder on the edge where it’s on the glass and pull it back to the bead. Flux first and don’t put the hot iron right on the glass but on the edge – less likely to crack.
I hope that helps and good luck.
Hi. I am starting with stained glass when I foiled my piece of glass I find it difficult to keep the glass in the centre of the foil.
Thanks for your help and for your website
You could try using a sheet of lined paper and lining it up with that for guidance. It’s a simple trick but one that helps a lot of students.
Thanks for your help
I will try
Good for you Feriel! I hope it saves your foil.
I too have an issue with keeping foil straight but just can’t wuite invision the advice of using lined paper. By chance do u have a video showing this & would u be willing to share? Thanks.
I’ve added a photo above that illustrates this tip Carol. I hope that explains the tip.
cw******@*tt.net. Is there a certain amount of time to solder after foiling….if working ion a very large project what would you suggest about this time and how to handle it
You can either clean it with soapy water or use Kwik Clean to remove the flux. The Kwik Clean is great if your stained glass panel is too large to wash. Then cover it with a plastic sheet and tuck it in as best you can to prevent oxidation as much as possible.
I hope that helps and thanks for your question.
I have a problem with my project coming apart once soldered. I go thru all of the steps – after burnishing it seems to be stuck, but then comes loose! I’ve tried different foil, cleaning longer, burnishing longer and harder and still every so often this happens. This is so frustrating, any advice?
The biggest culprit for stained glass foil coming loose is over-soldering. Especially when tinning the edges of a free-hanging piece. The foil glue melts and there is nothing to keep the solder on. A Beaded Edge is more secure so you might want to watch this video and give that a go.
The other vulnerable time is cleaning and polishing – again on the edges of a piece. Make sure you clean inwards and be very careful at this stage.
Thanks for your question – I hope this helps Sheri.
Do you know if there is a silver foil?
Yes, you can get silver-backed foil so that it doesn’t show when you choose to leave your stained glass solder silver and not patina it. Thanks for your question Steve, I hope that answers it.
your instruction were very helpful thank you
Thank you Carol, I’m really glad you found this stained glass tutorial helpful.