Improve Your Stained Glass Cutting Technique
There are lots of factors that result in an accurate stained glass cutting technique. The angle of the cutter head, the pressure and consistency to name a few.
You know this but continue to struggle. Your panel grows bigger and bigger. There are uneven gaps resulting in untidy soldering seams. It’s disheartening.
If you’re experiencing all these little annoyances with your stained glass making there are ways to nail these basics once and for all.
If you don’t have a class nearby my Stained Glass Made Perfect course has helped many people rectify these small – but irritating! – mistakes. The class is online and done in your own time so you can master all the techniques even if you aren’t able to get to a physical class. You can find out more about it here Stained Glass Made Perfect.
Click here to jump down to frequently asked cutting questions
Stained Glass Cutting Technique – Preventing Flares
Here are 3 quick ways to avoid those annoying flares that stop your glass pieces from fitting snugly together:
- Always break glass with thumbs when you can, it makes the cleanest break.
- For cuts going to a point try starting the run at both ends first before fully separating the glass. You’ll hear a little ‘click’ as it opens the fissure – that’s the glass telling you it’s ready to break apart.
- Whenever possible open the glass from where you ended, not began, the score.
You’ll get a little flare at the pressure points of the pliers that can’t be 100% avoided. These tricks will keep them to a minimum. Feel free to add any more tips of your own at the bottom of the page, thanks!
Stained Glass Cutting Technique – A Guiding Hand
Have you thought of using your non-cutting hand to help guide the cutter head? The weight from the cutting pressure holds the glass in place as you cut.
It really does make a difference.
I know, I know, you’re taught to hold the glass with your non-cutting hand. You’re told that the glass will move if you don’t hold it. It’s not that this is wrong, it’s just another way.
Try This
Have a look at the Tiny Video Tip – taken from the Stained Glass Made Perfect Course – and see how accurate the cutting is.
Then try the method for yourself. It might feel mighty weird to start with but promise me you’ll stick at it for a bit?
It will become easier the more you practise and it might be the accurate cutting answer you were looking for.
You just didn’t know it!
Question: Gaps In A Complex Piece
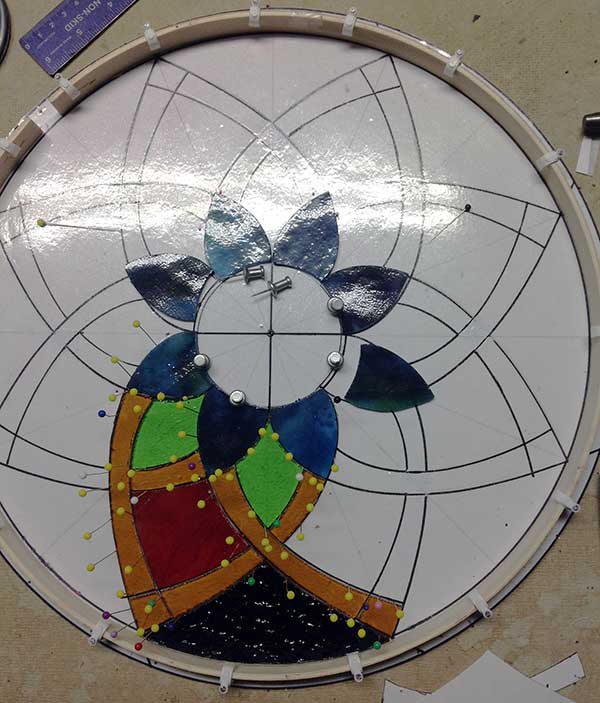
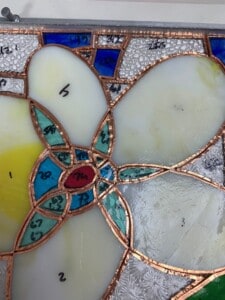
I bought 3 of your stained glass courses which are very, very helpful. Because I have made quite a few pieces already and attended class courses, I thought I would try a more intricate pattern for my copper foiled piece. Everything is cut and foiled but I am worried about two areas (photos below) where there are slightly bigger gaps than ideal.
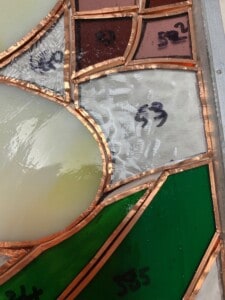
My difficulty is that I don’t have any more of the white glass the daisy petals were cut from. I would recut the offending petal if I could. I hoped there would not be such a gap.
Do you think these gaps are small enough to ignore? And if not – how on earth do I sort it? Janet Leonard
Milly’s Answer:
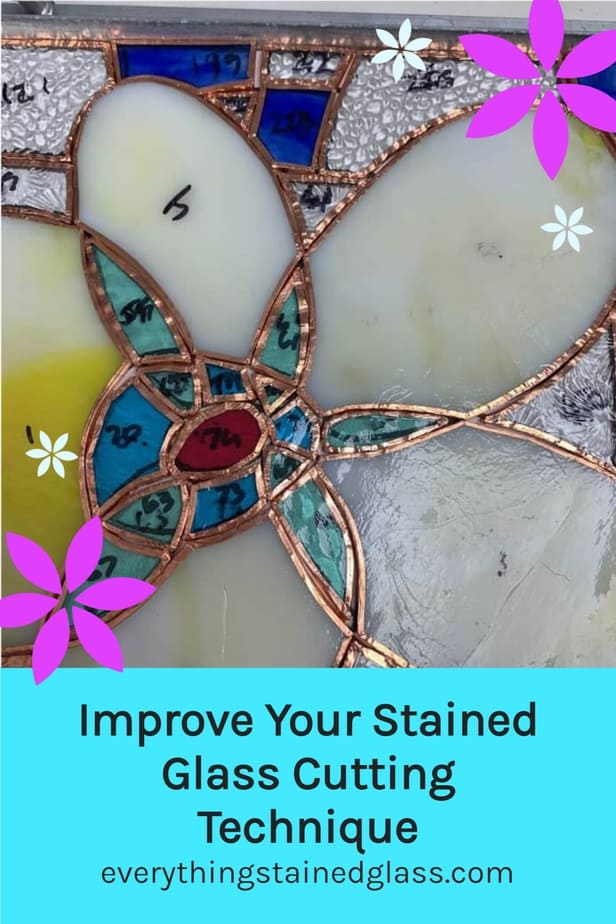
Trimming the foil around the gap to make it narrower is one way of approaching gaps. It reduces the width of the solder line, disguising the gap. It’s an alternative to recutting all the glass again.
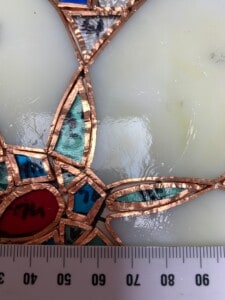
You could recut the two surrounding pieces (in pink, below) and trim the surrounding foil (in green) to reduce the gaps.
It’s good not to be too rigid about gaps… sometimes, especially with flowers and organic subjects, the varying gaps add to the life of the piece, making it seem more alive. What in nature has regular gaps?

A Happy Ending
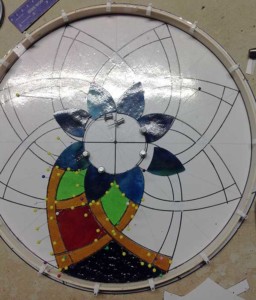
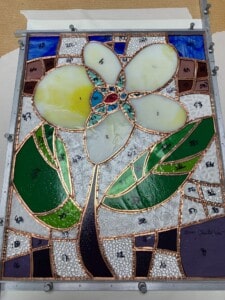
Here is a photo of the daisy panel, sorted as suggested by you. I did cut back the foil as you suggested but then decided to just recut that piece as well and I cut back the foil on the new piece.
Thank you very much indeed for your help. I am much happier now with the piece. The changes did take quite some time but definitely worth the trouble.
And here’s a picture of the finished work in all its glory – it’s stunning, isn’t it?
P.S. I love that Janet took the bit of my advice that helped her and made her own decisions about the rest. That’s what I want to see, you choosing what works for YOU 🙂
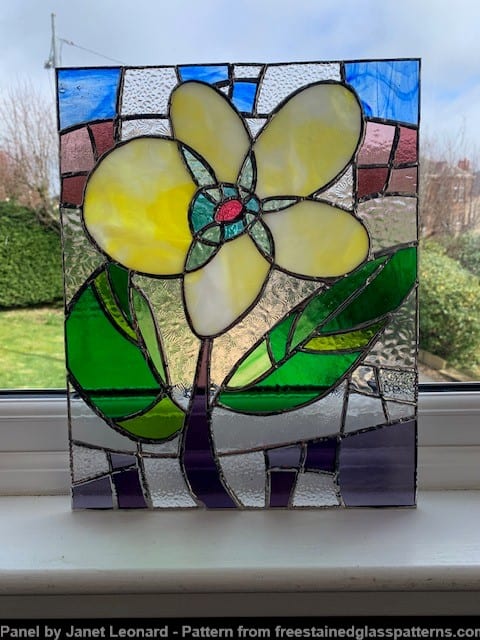
The pattern is a free pattern available from this website here:
Free Daisy Stained Glass Pattern
FAQ – Common Glass Cutting Questions Answered
Q1: Should you always cut textured glass on the ‘back’ side?
Milly’s Answer:
There are no hard and fast rules although generally we cut on the non-textured side. If the textured side is smoother and better for cutting then use that side.
If you want the texture on the front of your finished panel and have chosen to cut on the non-textured side – don’t forget to turn the pattern over before cutting.
Q2: My cut and foiled pieces never fit and have gaps, what can I do?
Milly’s Answer:
Cutting Accuracy. Some methods of cutting glass are more accurate than others if you’re a bit less experienced. For example the ‘English’ method – cutting on a light box – works better for the more experienced. Templates, on the other hand, are good for beginners. Have a look at the three different cutting methods here and try one that suits your level.
Fitting Accuracy. With regard to the fitting, you may know that you have to leave a small channel (1mm for foiled work) between each piece for both the solder (to strengthen the panel) and the width of the foil (this adds a surprising amount to the size of the panel overall). Either or both of these can make the piece ill-fitting.
You can use pins to help keep the glass in place and keep the channel nice and neat, as illustrated in the photo at the top of this page. There’s more about this pinning technique at Point 4 on this page here.
Q3: What’s best, to cut all the glass at the same time or to work in sections?
Milly’s Answer:
You can do either. You can:
- a. cut all, check all for size and fit, then foil and solder all at the same time or
- b. cut, foil and solder sections as you go along, fitting the sections together as you go
Soldering smaller sections is very helpful for those who have trouble with accuracy.
Personally I prefer a. because I get to see everything in its entirety before I start the next process which gives the opportunity for adjusting colours and fitting.
I also find it easier and quicker to stick to one process at a time, especially for a larger panel when you’d have to clean and cover the foil and/or solder each time to stop so as not to invite oxidation.
Q4: I’d really like to know what kind of oil can you use in a glass cutting tool with a little tank? Can I use an oil I use in the kitchen (maybe canola?)
Milly’s Answer:
Sewing machine, 2 in 1 oil or lamp oil work perfectly in oil-filled cutters. Cooking oils are too heavy and claggy. I wouldn’t recommend them for cutters.
If you have trouble with leakage you can bypass the barrel completely by using a small jar with an oil-soaked sponge in it. Simply dip your cutter wheel in every so often as you go.
Q5: Do you have any recommendations for pens to use for tracing patterns on dark glass. I have tried some paint pens (silver and gold) but they tend to get sucked under the stencil material and don’t give a crisp line.
Milly’s Answer:
You can use white chinagraph pencils. They’re waxy and can be sharpened to a point to make a thinner more accurate line. It’s never a crisp line though I’m afraid.
Cutting out and sticking templates on the glass is the best method for really accurate cutting of dark and opaque glass. You can see how to do the template method on this page here.
If you know anyone who would benefit from these quick tips, feel free to Pin on Pinterest or Share on Facebook with your friends. Thanks in advance.
For a whole host of Stained Glass Cutting Tutorials go here
Cutting Stained Glass
5 Ways To Cut Stained Glass
Cutting Stained Glass Circles
3 Methods For Cutting Glass Shapes

Bonjour, j’expose mes créations dans mon atelier qui est humide et, assez rapidement, une couche blanchâtre se forme sur mes soudures au cuivre. J’utilisais un polish pour voiture, mais, ça ne suffit pas. Du coup, mes œuvres sont moins attractives pour la vente et il est compliqué de refaire une soudure sur l’oxydation. Aussi, pourriez-vous me conseiller sur une cire de protection plus efficace et/ ou sur un moyen pratique pour raviver et faire briller les anciennes soudures. Surtout pour les petits sujets pas faciles à frotter.
Merci de m’apporter vos conseils car je désespère et n’ose plus produire à l’avance, mais, il faut quand même du stock. J’habite la France
I recommend Renaissance Wax – Welsh Heritage use it for their priceless artefacts. You can see it and why I recommend it on this page here:
Je recommande Renaissance Wax – Welsh Heritage l’utilise pour ses objets inestimables. Vous pouvez le voir et pourquoi je le recommande sur cette page ici :
https://everythingstainedglass.com/recommended-tools
Regarding gaps because I’ve cut a piece too small and I can’t or don’t want to recut it, I can sometimes cut the piece next to it a little larger to make up for the gap.
LOVE your tip about trimming the foil!
Thank you!
Yes, great point Cathy, thanks for adding 🙂
I use sticky back shelf paper to cut out my pieces. Trace your pattern onto the paper and cut it out. Remember to reverse the design to go on the back of the glass. You now have a pattern that doesn’t move and a nice lip for the cutter to lay against. Has worked for me for years.
This is a great tip Barbara, thanks so much for taking the time to share it 🙂
do you have any info about ( grayness:-) or ‘ grisaille ‘ in french
the vintage way to paint stain glass
how to prepared teh solution
and how to couck it at typical temperature
like about 1200 F’
curious subjet ?
Yes, I have a whole section on glass painting here Jack: https://everythingstainedglass.com/painting-on-glass
I hope you find it helpful.
I have some 15mm glas
can you speak about spaloping
like tese
https://www.homemadetools.net/forum/glass-scalloping-gif-73879?utm_source=newsletter&utm_medium=email&utm_campaign=08-23-24&utm_content=08-23-24-137334&nlsource=1&fi=137334#post137334
maybe some other are interestong about
jack 47 71
I have seen this done Jack but don’t have the necessary equipment myself. I imagine it’s pretty simple to do (with adequate safety gear and the right equipment)
Milly,
In the answer to question #3, you speak of cleaning and covering the foil to prevent oxidation. What exactly does this mean? I have been working on larger projects that take me a long time as I don’t get into my studio regularly. I have been working on a project, foil as you go, so the foiled pieces have been sitting there for months. I struggled with oxidation on my last project and would love to know how to prevent it in the future.
You can cover it with saran wrap (cling film in UK) to slow down the oxidation process Amy.
This method can help clean the foil if it is oxidised: https://everythingstainedglass.com/copperfoiling-queries
Molly, love your help and tips!!! Have you heard of glueing an iridescent piece of glass to the flat side of a beveled piece and the iridescent color shows through the beveled piece? In your project. If so, what kind of glue is used to do this? Advise appreciated! I seen this being done on a video but since then I cannot relocate the video. Please help! Thank you in advance. Diane
I haven’t done this Diane but there are glues you can use that don’t colour the glass. E6000 is a clear UV glue that’s good for glass on glass. Have a practise first though; you don’t want to mess up your bevels.
I find cutting the glass first behind the pattern. First, fook at the design closely and ask yourself where the brutal cuts then you can change your pattern slightly to make the tough cuts easier. By looking closely, I can often eliminate the challenging cuts altogether.
The second tip is to take YOUR TIME. I find with some gaps; I cut small pieces of Copper wire and put them in the holes. This can strengthen your work and avoid solder bubbles. We all get gaps.
Some glass with deep furrows needs a glass cutter. Saw. The most important thing to remember is to enjoy the Art; I have my first piece I made 40 years ago it still today gives me joy and laughter
Thanks for your tip Allen, that’s very helpful indeed.
I love that you’ve been making stained glass for 40 years and still it gives you joy. How nice. Feel free to add any more tips; I’m sure we can learn a lot from you.
I always cut my glass on a silicone baking mat, it stops the glass from moving so I can use my non-cutting hand to guide the cutter head.
Great tip Iris, thanks so much 🙂
Hi Milly,
Far, far better than Chinagraph pencils for marking glass are:
White uniPOSCA pens type PC-1MR 0.7mm manufactured by the Mitsubishi Pencil Co Ltd.
They are easily obtained in the U.K.
All the Best,
John Lamble
Thanks so much for this tip John, that’s great to know. I’ve never thought of using POSCA pens for glass.
I find that even after 10 years of glass work I still use a template glued to the back side. I first make the template by tracing through the picture I use onto a sandwich of carbon paper and thick paper. I glue the cut template on first with a glue paste and when that’s dry a rubber cement. I grind it as best as I can, let the piece soak in water and then razor blade it off.
Sadly, no matter how many steps I use I’m still grinding it a bit more. My work is never marketable and so I give the piece to friends and family.
Thanks Mike; that’s a very thorough approach and you seem to have nailed it. I’d be willing to bet that your pieces are marketable… try dipping your toe in the selling arena and see how it goes 🙂
Milly – did you miss write instructions regarding cutting on textured side of glass in the 1st cutting tip? Or did I miss read it? If cutting glass on the textured side and want the texture on front of piece, you do not need to flip the pattern.
Becky
Yes I did, oh no and whoops! Thanks so much for pointing this out Becky – I’ve changed it now.
If anyone else spots any mistakes I make, please point them out. I don’t want to be misleading you 🙂
After 35 years I know there is no perfect piece without gaps so I keep some bare copper electrical wire in the studio. I use a wire cutter to trim the appropriate size piece to place in the gap. This reduces the amount of solder I need to fill the gap. The wire should be prepared to hold the flux by sanding it with sand paper or the bronze wool you might use to clean your soldering iron.
That’s a useful comment Bill, thanks. I also like your pragmatism about gaps and ‘perfect’ pieces. We can end up agonising over gaps which no one else registers lol.
I do the same. Save the agony of always knowing the sun shine through.
Hi Milly,
This is such a basic question- when tracing your pattern should you use a sharpie that creates lines as wide as your foil shears? So that once you have cut it out you don’t see any black on your pattern pieces? I find that there is too much space between pieces when cut glass is laid on cartoon. I spend a lot of time ‘finagling’ each piece to fit better to the next piece.
No basic questions here Hilary – just good ones.
Yes, you’re spot on. Use a pen that has the correct width of line to form that necessary gap for stained glass.
PS Love ‘finagling’ and will adopt 🙂
Hi Milly,
Can you please speak to why you can’t just cut your pattern out with regular scissors leaving the black marker line untouched? It seems I’m having to cut twice. Once with foil shears and again to get black off actual pattern pieces.
Thanks
Sal
You should only have to cut once with the foil shears Sal; the blades are designed specifically to cut out the black line from your pattern. Maybe your lines are wider than needed?
I hope that solves the problem.
Hilary,
I use a calligraphy pen that is the correct size, then cut out making sure there is not black on the pattern. I use a 1.3mm pen for my foil projects.
Simple and effective solution, thanks Amy
Hi Milly,
Thanks for all your tips. I did a number of Leadlight projects. Haven’t tackled the copper foiling yet, but can imagine the cutting for foiling is more critical than for leadlight. Am keen to get into it. Weather in Oz is around 10 Celsius and my workshop needs heating before I venture outdoors. Retirement is great, no pressure. Start when the inspirations come to me.
Cheers again , Milly
Greg from Oz.
Sounds as if you’re having a fine time Greg, good to hear 🙂
Hi Milly, Brilliant idea re trimming the foil! One that I will be using a lot. Thank you. I use a cork tile to cut on. I also use coloured contact to stick down my pattern pieces, saves the sometimes messy glue step. I use CRL Aerosol Mirror Edge Sealant for mirror pieces. Not cheap, but works. I too battle with straight lines. Loved your video on soldering.
Thanks for your tips Carol, much appreciated by my readers 🙂 Glad you liked the foil one, too.
Wow, trimming the foil, to make the gap look smaller. Never occurred to me. Brilliant. I used to fill the gap with foil. I use an old plastic placemat for cutting {upside down], it has a spongy texture on the underside, the glass never moves. Milly, thank you so much for all the tips and hints, there is always something new to learn, love your site.
Thanks for your ‘placement mat’ tip, that’s helpful.
You’re welcome; I’ve had so many gems passed on to me over the years, it only seems fair to pass them along.
Hi Milly, I like to work with mirrors but sometimes, after a while, the ´soldered´ edges show stains(or peels of on the back) that turn to transparent spots. I suppose it comes from the soldering acid. normally use nail polish on the edges before I copper-tape them which helps but not always. Especially for big pieces, it´s a lot of prep-work… Maybe you had the same problem and solved this… Please advise, Many thanks in advance, Greets, Frank
You might find some answers here Frank: https://everythingstainedglass.com/mirror-discoloration
Good luck 🙂
Hello Milly,
I watch and appreciate all your tips and videos. I has heard it’s ok to fill in gaps with foil, I recently tried to do a lead panel and I couldn’t do it so I just decided to foil the panel. I ended up with many gaps and am using extra foil to fill in the gaps. Its the only way I can think, I do not have extra glass to redo the pieces. I was wondering what you think of this?
Thank you
Denise Craig
The best thing of course is not to have gaps but needs must Denise 😉 As you’ve cut the glass for lead you’ll have wider channels so will need to fill them with something in this instance. I have a video to help you here on how to fill in gaps.
Hello Milly,
Just a little note to say how much I enjoy your tips and hints. Thank you!!!
Jeannette Spencer
You’re most welcome Jeannette, thanks. Anyone not signed up to my free newsletter/email tips can do so here: https://everythingstainedglass.com/dazzle
Milly
Interesting that you mention to use both hands to guide the cutter ,,,,,I do that all the time. The glass never moves….well, hardly ever! Certainly not a problem…. I’ve always done it that way, so I guess I must have missed out on some initial instructions along the way!
I’ve passed on that ‘technique’ to my grand kids as well!!
Goodo Carolyn, another long-time convert! It is a bit surprising that the glass doesn’t shift, but it doesn’t! Must be the weight from above.
Milly, thanks a lot for all the hints and suggestions. They are valuable. Learn a lot from all ur as well as other suggestions by people. Please advise about cutting led.
You’re welcome Barb – the ‘hive mind’ is brilliant for sharing tips and tricks. I love that everyone shares freely. Cutting lead – I have a page here: https://everythingstainedglass.com/cutting-lead-came
I hope that helps.
Thanks again for the tidbits! I never thought of cutting back the foil to adjust for the gap! I will be using this, a lot!!! Never fails I always misjudge something along the way. Keep them ideas coming! Love your site and your newsletters.
Linda
Thanks for taking the time to say such nice things Linda. You can come back LOL 🙂
Hi Milly,
Thanks for the tips! Could you share what you use to keep the pattern pieces glued down in the video? I have cardboard by it doesn’t have any glue on it. I usually use a sharpie to make an outline for cutting, but cutting against the cardboard looks like it will be a lot more accurate!
Thanks!
Copydex is good Vicki or you can use a Pritt Stick. Any glue that comes off easily will be fine. This method takes a bit longer but it is consistently the most accurate in my view.
I hope that helps.
Thanks Milly, I love to read your tips, I work full time and find it difficult on weekends to find the time to practice them. Not moaning, I am blessed to be working in these times, just have the wish to spend more time with my projects and trying out all these wonderfull tips. Keep them coming Nx thanks to all that contribute. Sandy.
Thanks Sandy. I’d second that, thanking all who contribute too – it’s quite a bank of expertise we’re amassing here 🙂 I think that might be a good name for a company… Bank Of Expertise – that’s us!
Milly,
Keep the tips coming! Always can learn something new.
Cheers!
Frank
Thanks Frank 🙂
Hello Milly, once again, thanks for the tips. I do use both hands when cutting, the tip I would like to add is to have a what they call softboard , the board they use for notice boards to cut the glass on. The glass sits still when cutting with two hands.
Regards and happy creating.
Willem (South Africa )ñ
Thanks for the tip Willem, very useful for everyone 🙂
Hello, Willem!
Can you share an online link to “softboard”? Here, in the USA, we do not have anything called softboard and, when I google it, all that comes up are SURFBOARDS!
Is it a kind of styrofoam or foam sheet?
Many thanks,
Murleen Ray
California
Would this be corkboards what is used for bulletin boards?
I think what is referred to as softboard is
particle board perhaps , judging from pictures
on the internet .
Fiberboard or homosote found in home centers like Home Depot. They can cut it to the size you like. I’ve had mine over 20 years. You can put pins/nails in it; solder and cut on it.
Thank you for all your article they have helped me out a lot. I have a very hard time cutting small pieces any help with that?
You can try cutting small pieces all in one go from a bigger piece of stained glass and then breaking off around it (rather than doing one score line at a time)
Also, when breaking the score, try using two pairs of pliers – one to hold the stained glass shape, and grozer/breakers to snap the excess off.
I hope that helps.
I do so enjoy hearing a person of your knowledge remind me of different tips that might make me better. Thank you so muc
You’re most welcome, I hope this one helped. It’s always worth trying new stained glass techniques out on a scrap piece of glass to see if it’s a method that suits you.
I love the instructions, just have to practice them now. My worst cuts are straight cuts even with a ruler. Just turned hubby on to your site and he loves looking through your products.
I’ll have to dig my ‘Cutting Straight Lines’ video out for you Patt. You’ll get the hang of it soon I’m sure.
I love reading everything this There is no one near me to exchange ideas with,so this is great thank you
That’s the great thing about the Internet Audrey – it makes sharing our skills much easier. Glad you’re finding my stained glass tutorials helpful.